
Popular categories
Looking for a yarn?


Comments / Questions (67)
![]() Marilyn Morris wrote:
Marilyn Morris wrote:
Can anyone help me with making the collar on this sweater. The instructions are so confusing. Thanks in advance.
20.11.2020 - 22:22DROPS Design answered:
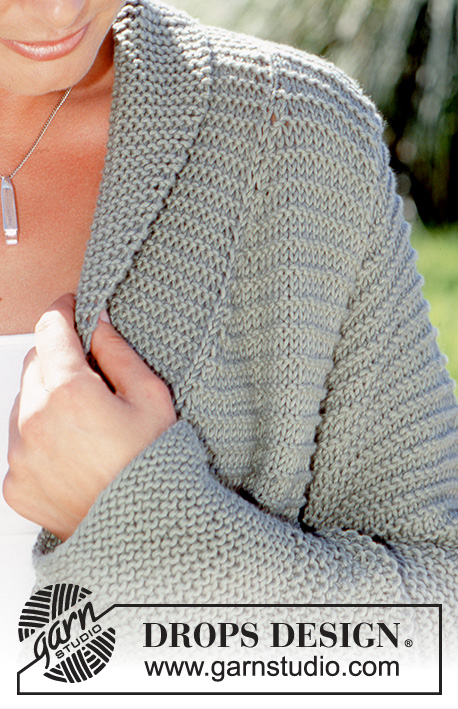
Dear Mrs Morris, collar shawl is worked over the remaining 20 stitches in garter stitch with short rows: you will work more rows towards mid front than towards seam/shoulder like this: start from WS (left front piece) and work: 2 rows over all stitches, 2 rows over the first 16 sts and repeat these 4 rows until the smaller edge (towards shoulder) measures approx. 8 cm. This video shows how to knit such a collar but you will here have to work short rows for the fold over. Happy knitting!
23.11.2020 - 08:17
![]() Barbara wrote:
Barbara wrote:
Rückfrage zu " Dann wird es innerhalb 1 Masche = vor der letzte Maschen (li. Vorderteil)/nach der 1. Masche (re. Vorderteil) für den Kragen zugenommen." Heisst: Li Vorderteil: Stricken bis noch 7 M, 6 M kraus, 1 Zunahme, Randmasche Re Vorderteil: Randmasche, 1 Zunahme, 6 M Kraus, ? (d.h. jew. Zunahme direkt vor/nach Randmasche?) LG B
15.10.2020 - 11:39DROPS Design answered:
Liebe Barbara, ja ganz genau. Viel Spaß beim weiterstricken!
15.10.2020 - 12:00
![]() Barbara wrote:
Barbara wrote:
Hallo - ebenfalls Probleme mit Kragen. Die 2 Runden nur über die 7 Maschen - nur 1x, dann wieder über alle Maschen stricken? Und die Zunahmen dann - was heisst innerhalb 1 Bordm aufnehmen? Direkt nach Randmasche oder direkt vor der gerade hinauflaufenden rechten Masche? Ist mir nicht ganz klar. Herzlichen Dank für Ihre Hilfe und liebe Grüsse aus Winterthur :-)
10.10.2020 - 17:18DROPS Design answered:
Liebe Barbara, die verkürzten Reihen werden hier nur einmal gestrickt, dh wenn die Arbeit 46-47-49-50 mist, stricken Sie 2 Reihen über die 7 ersten Maschen (mit einer Rückreihe beginnen), dann wie zuvor weiterstricken. Dann wird es innerhalb 1 Masche = vor der letzte Maschen (li. Vordertei)/nach der 1. Masche (re. Vorderteil) für den Kragen zugenommen. Die Abnahmen fûr den Hals werden innerhalb den Kraus re. Maschen + 1 M glatt rechts gestrickt (= vor diesen Maschen bei li. Vorderteil/nach diesen Maschen bei re. Vorderteil). Viel Spaß beim stricken!
12.10.2020 - 07:57
![]() Annamaria wrote:
Annamaria wrote:
Dopo aver aumentato 2 maglie per il collo, quando dite di lavorare i 2 ferri successivi a punto legaccio sulle 7m di bordo davanti soltanto, le rimanenti non vanno lavorate, a cosa vi riferite? Devo lavorare il collo solo sul davanti del lavoro? Così tirerebbe il collo
29.08.2020 - 11:32DROPS Design answered:
Buongiorno Annamaria. Lavora 2 ferri solo sulle 7 maglie del bordo, poi riprende a lavorare su tutte le maglie. Dopo aver intrecciato le maglie per le spalle, continuerà a lavorare per la parte del collo che andrà cucita al dietro. Buon lavoro!
30.08.2020 - 08:38
![]() Sarah wrote:
Sarah wrote:
Working on collar finish for the left panel (2 rows garter stitch all sts, 2 rows garter stich only 16 outermost sts, repeat) but can't determine if I've reached the correct length for the inner & outer. The inner edge is about 3" but if I measure the outer edge from the same start point as the where I measure the inner edge from, I am at 4.5". if I measure from the entire length of the outer edge I'm closer to 8". Any suggestions?
30.04.2020 - 23:11DROPS Design answered:
Dear Sarah, when working the collar, you will work twice as many rows on the outer edge than on the inner edge, when the outer edge measures 3" the inner edge should measure approx. 1,5 ". Hope this helps, happy knitting!
04.05.2020 - 09:55
![]() Lotti wrote:
Lotti wrote:
Har en undran om mönstret. Vid 2 varv slätstickning 1varv avigt upprepa menas det då alltid 1varv rät, 1varv avigt 1 varv avigt sedan upprepa igen.
22.04.2020 - 13:44DROPS Design answered:
Hej Lotti, nej för det beror på om du stickar från rätsidan eller avigsidan... du skall ha 2 varv slät, 1 varv avig, sett från rätsidan :) 0 am från avigsidan, 0 rm från rätsidan, x rm från avigsidan, 0 rm från rätsidan. 0 am från avigsidan x am från rätsidan 0 am från avigsidan 0 rm från rätsidan osv...
22.04.2020 - 15:18
![]() Veerle Van Coillie wrote:
Veerle Van Coillie wrote:
En moeten die twee steken achter elkaar gemeerderd worden ?
13.10.2019 - 10:51DROPS Design answered:
Dag Veerle,
Klopt, die moeten inderdaad achter elkaar gemeerderd worden.
15.10.2019 - 18:33
![]() Veerle Van Coillie wrote:
Veerle Van Coillie wrote:
Eerste minderingen in het linkervoorpand naast de kantsteek, hoe doe ik die ? De tussenlus verdraaid rechts breien of een steek ook langs achter nog eens breien ?
12.10.2019 - 22:29DROPS Design answered:
Dag Veerle,
Je kan inderdaad meerderen door de tussenlus gedraaid op de linker naald te zetten en deze te breien. Een andere methode is dat je een omslag maakt, welke je op de volgende naald gedraaid breit.
15.10.2019 - 18:31
![]() Lucie wrote:
Lucie wrote:
Quand vous mentionnez tricoter en rang raccourci sur les 7 mailles de bordure, devons-nous tricoter en rang raccourci jusqu'au diminutions pour l'épaule.
11.09.2019 - 15:11DROPS Design answered:
Bonjour Lucie, les rangs raccourcis du col châle se tricotent sur les 20 mailles point mousse qui restent après avoir rabattu les mailles de l'épaule; on va les tricoter ainsi en commençant sur l'envers (devant gauche) / sur l'endroit (devant droit): 2 rangs sur toutes les mailles, 2 rangs sur les 16 premières mailles seulement, répétez ces 4 rangs, le côté extérieur du col doit mesurer le double du côté épaule (= cousu le long de l'encolure dos). Bon tricot!
11.09.2019 - 15:55
![]() Jannie Lindholm wrote:
Jannie Lindholm wrote:
Hvilket uldgarn vil I foreslå til denne opskrift?
21.07.2019 - 20:29DROPS Design answered:
Hei Jannie. Vi har ulike ullkvaliteter du kan strikke med, det er et ganske personlig valg. Liker du formstabilt ullgarn, mohair garn eller kanskje et superlett blåsegarn. Om du ser under GARN og de kvalitetene som er under garngruppe C, kan du finne forskjellige ullkvaliteter du kan bytte ut Paris med. Bruk gjerne vår garnkalkulator for å regne ut garnmengden i et annet garn. Bare husk å overholde strikkefastheten. God Fornøyelse.
09.09.2019 - 14:45
|
|
DROPS 69-8 |
|
 |
 |
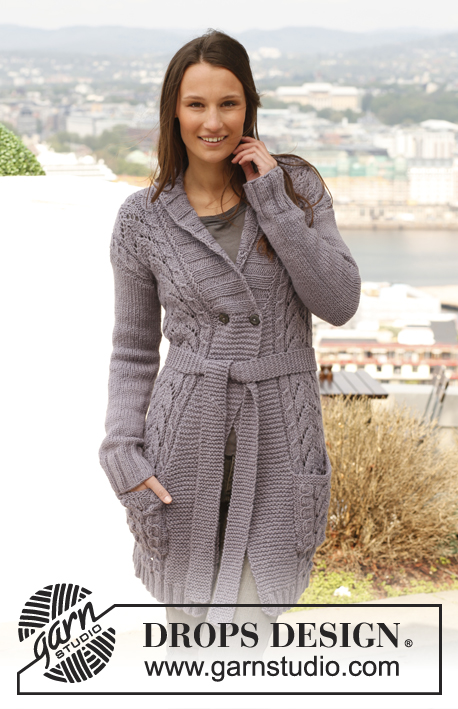
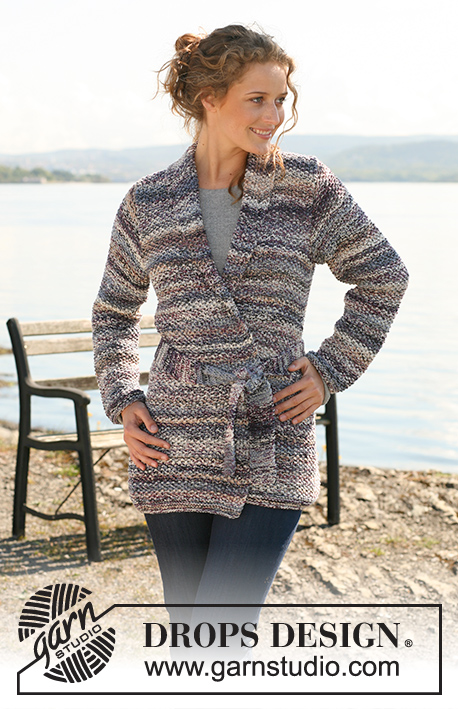
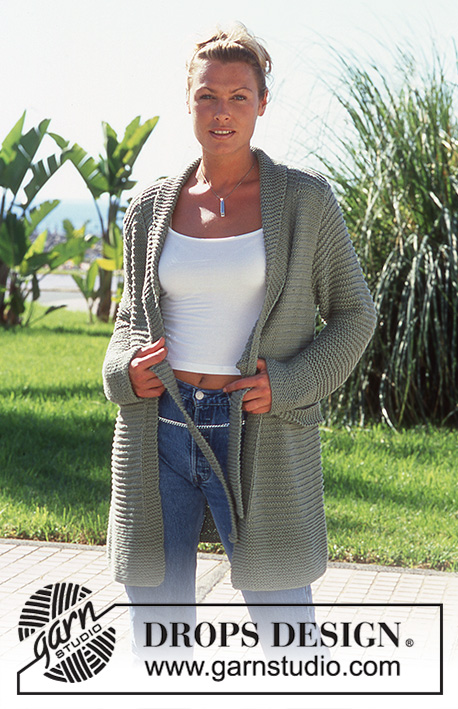
DROPS Cardigan in Paris
DROPS 69-8 |
|
|
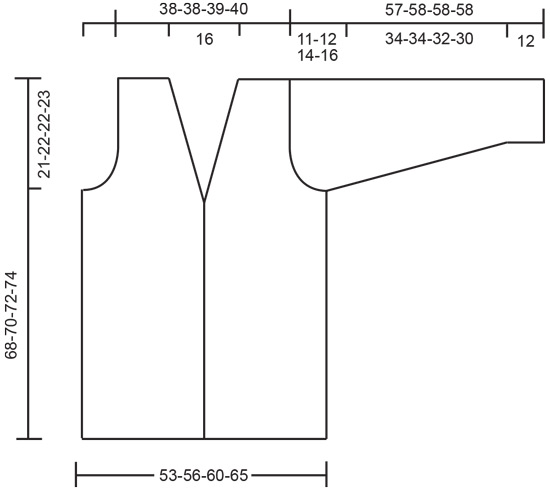
Garter st, when knitting flat: Knit all sts, all rows. Pattern: Row 1 (right side row): Knit Row 2: Purl Row 3: Purl Row 4: Purl Row 5: Knit Row 6: Knit Repeat these 6 rows. Knitting tips: Dec for the neck only on right side rows. Right front: dec 1 st as follows: sl 1, K 1, psso. Left front: dec 1 st as follows: K 2 tog. Back: Cast on 86-92-98-106 sts. Knit garter st for 12 cm, then continue with pattern- see instructions above. When the piece measures 47-48-50-51 cm cast off for armhole at each side every other row: 3 sts 1-2-2-2 times, 2 sts 2-2-3-4 times, 1 st 5-5-5-7 times = 62-62-64-64 sts. When the piece measures 66-68-70-72 cm cast off the center 24 sts for the neck. On the next row dec 1 st at each neck edge = 18-18-19-19 sts remain on each shoulder. Cast off the remaining sts when the piece measures 68-70-72-74 cm. Left front: Cast on 48-51-54-58 sts. Knit garter st for 12 cm over all sts. Continue with pattern, but knit the 6 edge sts at the center front as follows from edge (seen from the right side): 5 sts garter st, 1 st stockinette st. Read the entire next section before knitting. When the piece measures 46-47-49-50 cm inc 2 sts inside 1 edge st at the center front for collar - knit the increased sts for collar in garter st, keeping the 1 st in stockinette st between button bands and body. On the following 2 rows knit 2 rows garter st over only the 7 button band sts (short rows). Then inc 1 st inside 1 edge st 6 times every row, then 6 times every other row and then 6 times every 4th row = 20 sts increased for collar. At the same time when the piece measures 47-48-50-51 cm cast off for armhole at the side as on back. At the same time when the piece measures 50-51-53-54 cm dec for the neck shaping (while increasing for collar) as follows: make decs inside the 1 stockinette st + garter sts for collar. Dec 1 st 18 times every other row - see knitting tips. When the piece measures 68-70-72-74 cm cast off shoulder sts + 6 button band sts = 18-18-19-19 sts bound off. There are now 20 garter sts on the needles (collar). Continue in garter st as follows: * 2 rows garter st over all sts, 2 rows garter st over only the outermost 16 sts *, repeat from * - * until the inner edge of collar measures approx. 8 cm (the outer edge should measure 16 cm). Put sts on a holder. Right front: Cast on and knit the same as the left but reverse all shaping. Sleeve: Cast on 38-38-40-42 sts. Knit garter st for 12 cm, then continue with pattern. When the piece measures 13-13-14-14 cm inc 1 st at each side 13-14-13-14 times every 2.5-2-2-2 cm = 64-66-66-70 sts. When sleeve measures approx. 46-46-44-42 cm cast off for sleeve cap at each side every other row: 3 sts 1-1-1-0 time, 2 sts 3-3-2-2 times, 1 st 4-5-7-10 times, then cast off 2 sts at each side until the piece measures 56-57-57-57 cm and then cast off 3 sts each side 1 time. The piece measures approx. 57-58-58-58 cm. Cast off the remaining sts. Belt: Cast on 9 sts and knit garter st to desired length or until the belt measures approx. 120-130-140-150 cm. Cast off. Assembly: Sew shoulder seams. Join the collar at center back with Kitchener stitch. Sew the collar to back neckline with seam on right side of work. Sew in sleeves. Sew sleeve and side seams using edge sts as a seam allowance. |
|
 |
|
Have you finished this pattern?Tag your pictures with #dropspattern or submit them to the #dropsfan gallery. Do you need help with this pattern?You'll find 23 tutorial videos, a Comments/Questions area and more by visiting the pattern on garnstudio.com. © 1982-2026 DROPS Design A/S. We reserve all rights. This document, including all its sub-sections, has copyrights. Read more about what you can do with our patterns at the bottom of each pattern on our site. |
|


With over 40 years in knitting and crochet design, DROPS Design offers one of the most extensive collections of free patterns on the internet - translated to 17 languages. As of today we count 324 catalogues and 12290 patterns translated into English (UK/cm).
We work hard to bring you the best knitting and crochet have to offer, inspiration and advice as well as great quality yarns at incredible prices! Would you like to use our patterns for other than personal use? You can read what you are allowed to do in the Copyright text at the bottom of all our patterns. Happy crafting!
Post a comment to pattern DROPS 69-8
We would love to hear what you have to say about this pattern!
If you want to leave a question, please make sure you select the correct category in the form below, to speed up the answering process. Required fields are marked *.