
Popular categories
Looking for a yarn?


Comments / Questions (25)
![]() Carin Boetzkes wrote:
Carin Boetzkes wrote:
Hoi hoi, Op 20 januari jl. heb ik onderstaande vraag gesteld. Helaas heb ik hier tot op jeden geen antwoord op mogen krijgen. Ik heb het hele vest op die laatste 3 toeren na klaar…. Het zou héél fijn zijn als ik op korte termijn iets hoor op deze vraag. Alvast bedankt Carin
30.01.2026 - 13:03
![]() Carin Boetzkes wrote:
Carin Boetzkes wrote:
Hoi hoi, ik ben dit leuke vest aan jet halen en heb een vraagje over de hals bij het rugpand. Er wordt gezegd: ga hier verder in patroon over de laatste 3 toeren (LET OP: vervang elke l in het patroon door een stk). Maar als je dat doet krijg je toch 3 toeren met stokjes of hoe moet ik dat lezen?? Alvast bedankt voor jullie reactie. Met vriendelijke groet, Carin Boetzkes
20.01.2026 - 14:18DROPS Design answered:
Dag Carin,
Ik denk inderdaad dat hier een fout in geslopen is en dat er bedoeld wordt dat je de steken aan de kant van het armsgat in stokjes blijft breien. Ik zal het doorgeven aan de ontwerpafdeling om te controleren en eventueel aan te passen.
08.02.2026 - 18:32
![]() Julie wrote:
Julie wrote:
J’ai de la difficulté à débuter le col à la fin du devant droit, j’aimerais avoir plus d’explication ou une vidéo svp
19.11.2025 - 19:09DROPS Design answered:
Bonjour Julie, en commençant sur l'endroit, vous allez crocheter les 22-25 m du col ainsi: (12-13-14 brides, 2 demi-brides, 6-7-9 ms) = 20-22-25 mailles, tournez et crochetez le rang suivant sur l'envers ainsi: (6-7-9 ms, 2 demi-brides et 12-13-14 brides). Répétez ces 2 rangs ainsi jusqu'à la hauteur indiquée pour votre taille. la partie extérieure du col sera plus haute car on crochète des brides, et l'autre côté sera plus courte car on fait des ms; le côté gauche du col sera ensuite cousue le long de l'encolure dos (après avoir assemblé les mailles du col entre elles). Bon crochet!
20.11.2025 - 08:57
![]() Gea wrote:
Gea wrote:
Ik heb, denk ik, dezelfde vraag als Christine, maar mijn Duits is niet zo goed. Er zit verschil in de start van het lijf en van de mouwen. Bij het lijf haak je een rij stokjes over de eerste rij stokjes en begin je op rij 3 met het patroon aan de verkeerde kant. Bij de mouwen haak je ook een rij stokjes op de eerste rij stokjes en dan begin je op rij 3 met het patroon aan de goede kant. Dat klopt toch niet? Op het plaatje ziet de boord van het lijf en de mouwen er hetzelfde uit. Graag hulp.
13.01.2025 - 12:43DROPS Design answered:
Dag Gea,
Zoals ik het patroon lees wordt zowel bij het lijf als bij de mouwen de derde toer aan de verkeerde kant gehaakt, waarbij je ook op de derde toer met het telpatroon begint. Dus beide keren eest 2 rijen stokjes en dan telpatroon.
13.01.2025 - 20:45
![]() Christine wrote:
Christine wrote:
Danke ! Gut, dann ist das eben so : Die dritte Reihe ist beim Rumpfteil eine Rück- , bei den Ärmeln jedoch eine Hinreihe, obwohl bei den ersten beiden Reihen jeweils gleichermaßen nur Stäbchen gehäkelt werden. Warum das so sein soll, bleibt ein Rätsel. Vielleicht soll man das Muster mal von der anderen Seite anschauen ? : )
02.11.2023 - 11:18
![]() Christine wrote:
Christine wrote:
Danke für die schnelle Antwort ! Ich weiß aber immer noch nicht, ob die Ärmel ebenso beginnen. Dort ist die dritte Reihe ( laut Anleitung ) doch eine Hinreihe... Freundlichen Gruß !
30.10.2023 - 19:20DROPS Design answered:
Liebe Christine, bei den Ärmeln häkeln Sie zuerst 2 Reihen Stäbchen, dann häkeln Sie die 1. Reihe von den Diagrammen = Hin-Reihen: zuerst A.1, dann A.2 und A.3 (mit Stäbchen beidseitig). Viel Spaß beim häkeln!
31.10.2023 - 15:45
![]() Christine wrote:
Christine wrote:
Wann genau beginnt das Muster ? Ist das so gemeint : Die 1. Reihe vom Rumpfteil ist eine Rückreihe, die 2. Reihe ( Hinreihe ) sind Stäbchen, die 3. Reihe ( Rückreihe ) entspricht der 1. Reihe des Diagramms und in der 4. Reihe ( 2. Reihe der Diagramms ) beginnt das "Lochmuster" ? Verfährt man bei den Ärmeln dann auch so ? Laut Anleitung ist die 3. Reihe aber eine Hinreihe. Beginnt das "Lochmuster" in dem Fall eher ? Ich bin verwirrt... Freundliche Grüße ! Christine
29.10.2023 - 13:20DROPS Design answered:
Liebe Christine, ja genau, die 3. Reihe beim Rumpfteil ist eine Rückreihe und die 1. Reihe mit den Diagrammen. Beginnen Sie die Diagramme beim Pfeil, dh lesen Sie diese 1. Reihe / Rückreihe links nach rechts - die Hin-Reihen lesen Sie dann rechts bei links. Viel Spaß beim stricken!
30.10.2023 - 16:28
![]() Sini wrote:
Sini wrote:
Tolle Modell habt ihr wirklich ABER eure Muster sind eine Katastrophe Da vergeht einen schon die Lust beim ersten drauf Blick So wirr und konfus selbst für Häkelschrift Selbst meine Mutter die seit über 45 Jahren strickt hat aufgegeben bei Drops was nach zu arbeiten
26.09.2022 - 16:39
![]() Liliia wrote:
Liliia wrote:
Hi, I make size M with Drops Alpaca, hook 2,5 as you recommended. BUT the size of body is enormous 138 cm, I did almost 22 cm of work and seem like need to undo it...so I tried with sleeves and they have perfect feet. So, what am I doing wrong?)
26.11.2021 - 01:06DROPS Design answered:
Dear Lilia, if your tension is right, then you should get on the very first row on body a total of 293 treble crochets (UK)/double crochets (US), ie approx. 105 cm . You start with 367 chains but you will skip evenly chains on first row to get a lose edge (most of the time the foundation chain is tighter reason why you cast on here more chains than you need stitches). Happy crocheting!
26.11.2021 - 07:47
![]() Sandra wrote:
Sandra wrote:
I mönstret på bakstycket står att de 27 m i mitten virkas det inte längre över. Men två rader under står det " obs: varje lm i mönstret över halsen ersätts med 1 st. Ska det virkas något på de 27m i mitten eller inte? Vintage honeycomb tröjan...
23.12.2020 - 13:31DROPS Design answered:
Hei Sandra. Det hekles ikke noe mer over de 27 maskene på bakstykket, men kragen som er heklet på forstykkene skal sys sammen midt bak kant i kant og deretter sys kragen til halsrigningen på bakstykket. mvh DROPS design
11.01.2021 - 14:41
|
||||||||||||||||
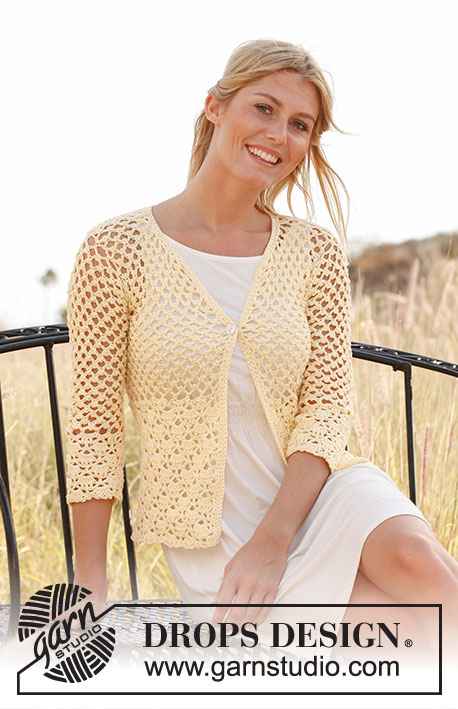
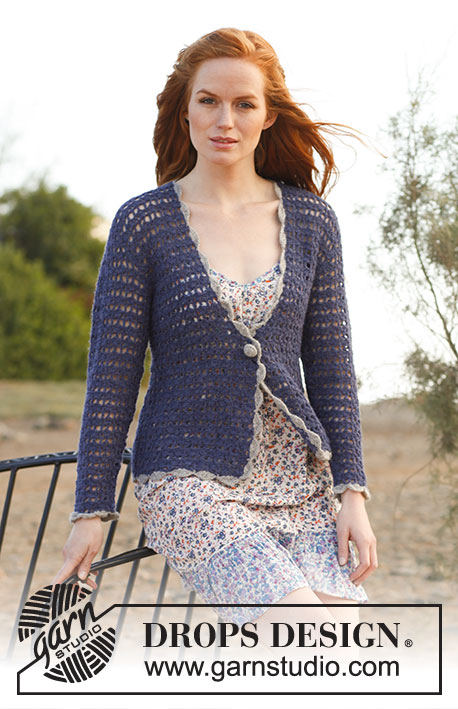
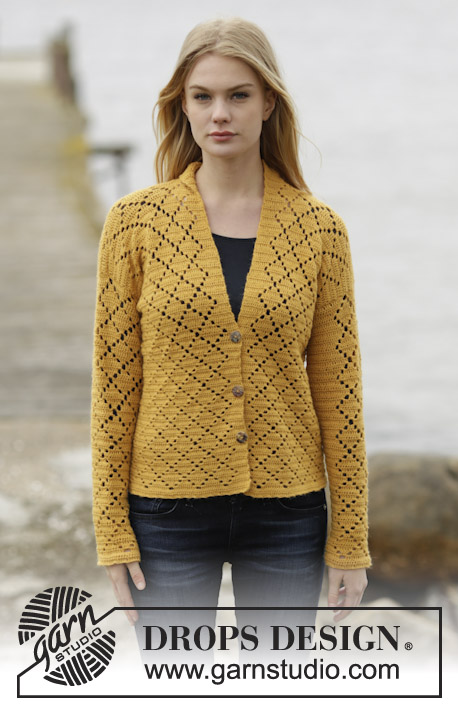
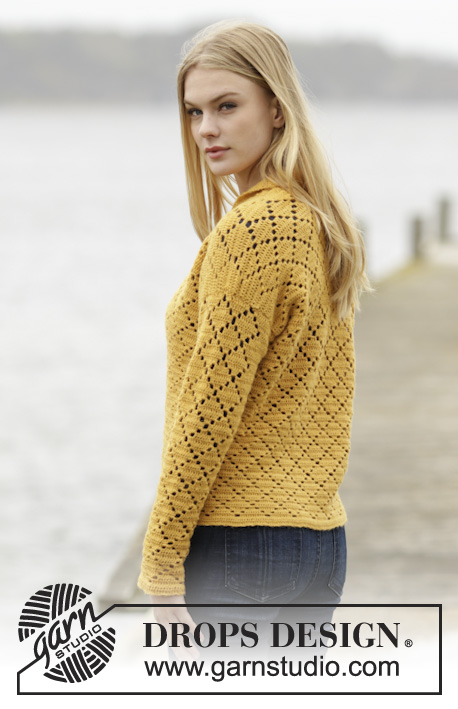
Vintage Honeycomb#vintagehoneycombcardigan |
||||||||||||||||
 |
 |
|||||||||||||||
Crochet DROPS jacket with lace pattern in squares and shawl collar in ”Alpaca”. Size: S - XXXL.
DROPS 166-17 |
||||||||||||||||
|
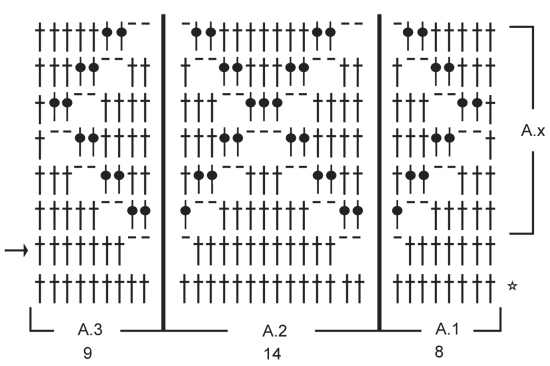
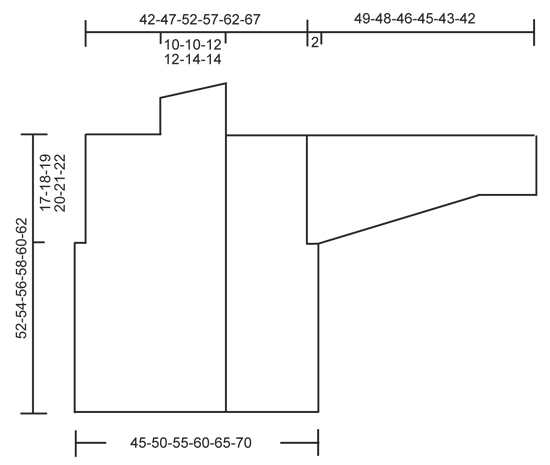
PATTERN: See diagrams A.1 to A.3. The diagrams show all rows in pattern seen from RS. CROCHET INFO: Replace first tr at beg of every tr row with 3 ch. Replace first dc at beg of every dc row with 1 ch. DECREASE TIP: Dec 1 tr by working 2 tr tog as follows: Work 1 tr in first st but wait with last pull through, work 1 tr in next st but on last pull through, pull yarn through all 3 loops on hook. BUTTONHOLES: Make buttonholes on right band. 1 buttonhole = replace fourth tr from edge with 1 ch. On next row work band st as before (work 1 tr around ch). Work for buttonholes when piece measures: SIZE S: 10, 18 and 26 cm SIZE M: 11, 19 and 27 cm SIZE L: 12, 20 and 28 cm SIZE XL: 13, 21 and 29 cm SIZE XXL: 12, 21 and 30 cm SIZE XXXL: 13, 22 and 31 cm ---------------------------------------------------------- BODY: Worked back and forth from mid front. Work 332-367-402-437-472-507 ch (incl 3 ch to turn with) on hook size 2.5 mm with Alpaca. Work first row (= from WS) as follows: 1 tr in 4th ch from hook (= 2 tr) - READ CROCHET INFO, then work 1 tr in each of the next 3 ch, * skip 1 ch, 1 tr in each of the next 4 ch *, repeat from *-* the entire row = 265-293-321-349-377-405 tr. Work 1 row with 1 tr in every tr. Now work pattern according to diagram as follows (1st row = from WS): Work 1 tr in each of the first 5 tr (= left band), A.3 (= 9 sts), repeat A.2 (= 14 sts) 17-19-21-23-25-27 times in total, A.1 (= 8 sts), finish with 1 tr in each of the next 5 tr (= right band). When A.1-A.3 have been worked 1 time vertically, repeat A.x upwards. REMEMBER THE CROCHET TENSION and remember BUTTONHOLES on right band - see explanation above. When piece measures 35-36-37-38-39-40 cm, adjust so that last row is from WS, finish each front piece and back piece separately. Insert 1 marker 69-76-83-90-97-104 sts in from each side (= 127-141-155-169-183-197 sts on back piece). RIGHT FRONT PIECE: Work pattern (from RS) as before until 5 sts remain before marker (= armhole) = 64-71-78-85-92-99 sts - NOTE: Work sts in the side that do not fit A.2 in tr. Work until piece measures 52-54-56-58-60-62 cm - adjust after 1 whole repetition of A.2 (last row = from WS). The outermost 44-51-56-63-67-74 sts towards armhole (= shoulder), are no longer worked. Then work collar over the first 20-20-22-22-25-25 sts from RS as follows: * Work 1 tr (work in tr but around ch) in each of the first 12-12-13-13-14-14 sts, 1 htr in each of the next 2 sts, 1 dc in each of the next 6-6-7-7-9-9 sts, turn and work 1 dc in each of the first 6-6-7-7-9-9 dc - see CROCHET INFO, 1 htr in each of the next 2 sts, 1 tr in each of the next 12-12-13-13-14-14 sts, turn *, repeat from *-* until collar measures approx. 5-5-6-6-7-7 cm on the most narrow part. Fasten off. LEFT FRONT PIECE: Work as right front piece but reversed. Do not work over the first 5 sts on first row from RS. Work until piece measures 52-54-56-58-60-62 cm - adjust after 1 whole repetition of A.2 (last row = from WS). Cut the yarn. The first 44-51-56-63-67-74 sts towards armhole (= shoulder), are no longer worked. Then work collar over the last 20-20-22-22-25-25 sts, beg from RS as follows: * Work 1 dc in each of the first 6-6-7-7-9-9 sts, 1 htr in each of the next 2 sts, 1 tr in each of the next 12-12-13-13-14-14 sts, turn and work 1 tr in each of the first 12-12-13-13-14-14 sts, 1 htr in each of the next 2 sts, 1 dc in each of the next 6-6-7-7-9-9 sts, turn *, repeat from *-* until collar measures approx. 5-5-6-6-7-7 cm on the most narrow part. Fasten off. BACK PIECE: Work pattern as before over the middle 117-131-145-159-173-187 sts (= 5 sts in each side for armholes) - NOTE: Work sts in the side that do not fit A.2 in tr. When piece measures approx. 50-52-54-56-58-60 cm - adjust pattern so that next row is 4th row in A.x (3 rows remain), the middle 27-27-31-31-37-37 tr (= neck) are no longer worked, finish each shoulder separately = 45-52-57-64-68-75 sts for shoulder. Continue pattern as before over the last 3 rows (NOTE: Replace every ch in pattern with 1 tr) - on first row dec 1 tr towards neck - READ DECREASE TIP = 44-51-56-63-67-74 sts. Fasten off. Piece measures approx. 52-54-56-58-60-62 cm. SLEEVE: Worked back and forth. Work 67-72-75-77-82-85 ch (incl 3 ch to turn with) on hook size 2.5 mm with Alpaca. Work first row as follows: 1 tr in 4th ch from hook (= 2 tr), then work 1 tr in each of the next 3-3-1-3-3-1 ch, * skip 1 ch, 1 tr in each of the next 4 ch *, repeat from *-* the entire row = 53-57-59-61-65-67 tr. Remember CROCHET INFO! Work 1 row with 1 tr in every tr. Work next row (= from RS) as follows: 1 tr in each of the first 4-6-7-1-3-4 tr, A.1, A.2 2-2-2-3-3-3 times in total, A.3, finish with 1 tr in each of the next 4-6-7-1-3-4 tr. When A.1-A.3 have been worked 1 time vertically, repeat A.x upwards. When piece measures 10-10-10-10-8-8 cm, inc 1 tr in each side by working 2 tr in the second and next to last tr in each side. Repeat inc in each side of piece every 3rd row 16-14-7-3-0-0 more times, then every other row 4-7-16-21-25-22 times in total and every row 0-0-0-0-0-5 times in total = 95-101-107-111-117-123 sts. When piece measures 49-48-46-45-43-42 cm (shorter measurements in the larger sizes because of wider shoulders), fasten off. Work another sleeve the same way. ASSEMBLY: Sew the shoulder seams. Sew collar tog mid back, edge to edge and then sew collar to neck line on back piece. Sew sleeves in body. Sew sleeve seams edge to edge from the bottom and up. |
||||||||||||||||
Diagram explanations |
||||||||||||||||
|
||||||||||||||||
 |
||||||||||||||||
 |
||||||||||||||||
Have you finished this pattern?Tag your pictures with #dropspattern #vintagehoneycombcardigan or submit them to the #dropsfan gallery. Do you need help with this pattern?You'll find 9 tutorial videos, a Comments/Questions area and more by visiting the pattern on garnstudio.com. © 1982-2026 DROPS Design A/S. We reserve all rights. This document, including all its sub-sections, has copyrights. Read more about what you can do with our patterns at the bottom of each pattern on our site. |
||||||||||||||||


With over 40 years in knitting and crochet design, DROPS Design offers one of the most extensive collections of free patterns on the internet - translated to 17 languages. As of today we count 324 catalogues and 12290 patterns translated into English (UK/cm).
We work hard to bring you the best knitting and crochet have to offer, inspiration and advice as well as great quality yarns at incredible prices! Would you like to use our patterns for other than personal use? You can read what you are allowed to do in the Copyright text at the bottom of all our patterns. Happy crafting!
Post a comment to pattern DROPS 166-17
We would love to hear what you have to say about this pattern!
If you want to leave a question, please make sure you select the correct category in the form below, to speed up the answering process. Required fields are marked *.