
Popular categories
Looking for a yarn?


Comments / Questions (60)
![]() Myriam Vanranst wrote:
Myriam Vanranst wrote:
Hallo, jullie spreken bij dit patroon over de ribbelsteek, maar op de foto lijkt dit toch echt een andere steek. Kunnen jullie laten weten welke steek het dan wel is, want ik zou deze vest graag maken. alvast bedankt!
06.11.2015 - 14:27DROPS Design answered:
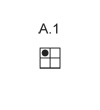
Hoi Myriam. Je breit de randen, voorbiessteken en kantsteken in ribbelsteek, de overige steken brei je volgens het patroon A.1 zoals aangegeven in het patroon.
06.11.2015 - 15:34Irina wrote:
Dear Drops Team, I've finished the jacket, however I cannot figure out the purpose of the ties and how they should work. In my understanding coronet that I should end up with 4 vertical ties: 2 x at either side of the jacket where the back and front pieces are sawn together; 2 x in the middle of the right and left front piece. So I have 4 braids with tassels hanging... How does it work next? How do I tie them? Thank you for some more explanation to this. Bests, Irina
03.11.2015 - 22:42DROPS Design answered:
Dear Irina, there are only 2 braids for the jacket: first one is sewn on the side of the jacket below the armhole (at the seam between back and front piece), and 2nd one is sewn on the edge of front piece. Each braid consists on 3 strands of yarn 70 cm each that are thread halfway on the side/an the edge of front piece and braided together (make a braid with the 6 strands of yarn). Happy knitting!
04.11.2015 - 09:17
![]() Lea wrote:
Lea wrote:
Hallo, ich verstehe das Muster nicht. Was bedeutet der Punkt für die Hinreihe? Stricke ich: je 2 M rechts in der Hinreihe und je 1 M links - 1 M rechts in der Rückreihe? Vielen Dank!
24.10.2015 - 22:06DROPS Design answered:
Der Punkt taucht ja immer nur in der 2. R, also in der Rück-R auf. Diese M stricken Sie in der Rück-R re, sodass sie auf der Vorderseite als Linksmasche erscheint. Sie haben es richtig verstanden, die Hin-R besteht nur aus rechten M und in der Rück-R stricken Sie abwechselnd 1 M re, 1 M li.
27.10.2015 - 22:48
![]() Svenja wrote:
Svenja wrote:
Hallo DROPS-Team, ich bin fertig mit meiner Jacke und verstehe leider nicht wo genau ich die Bänder hin sollen (leider hat das Modell die Arme an der Stelle). Bitte eine besser erklärung... LG Svenja
21.10.2015 - 17:44DROPS Design answered:
Das eine Zopfband befindet sich an der Seite der Jacke, das andere am vorderen Rand, beide auf gleicher Höhe, am besten probieren Sie sie an, um die besten Stelle zu finden. Die Jacke kann somit seitlich zusammengebunden werden. Wenn Sie genau hinschauen, sehen Sie auf dem Foto an der rechten Seite der Jacke eine Quaste hängen, dort befindet sich also das andere Zopfband.
30.10.2015 - 10:17
![]() Isabel wrote:
Isabel wrote:
Olá tricotei este modelo em andes e ficou muito bem. Não percebo como se passam os cordões pode explicar melhor? Ficam a meio do casaco tipo cinto? Não consigo perceber.
03.10.2015 - 12:56DROPS Design answered:
Parabéns por ter terminado um modelo tão bonito! Um dos cordões passa-se pela parte de fora do lado da frente esquerda (onde deveria ser a "costura") e o outro cordão passa-se pelo rebordo da frente direita. Quando atar os cordões fica com um casaco assertoado ou com as frentes sobrepostas, uma por cima da outra. Continuação de bom tricô!
06.10.2015 - 12:30
![]() TAFFOREAU wrote:
TAFFOREAU wrote:
Bonjour, je suis intéressée pour réaliser la veste en point texturé col châle, modèle drops 166-10, mais je vois le croquis mais pas le diagramme, à l’intérieur de celui çi qui me permettrai de faire le point texturé que vous mentionner car je ne le connait pas ce point là pourriez vous me renseigner. vous en remerciant par avance, Cordialement Mme TAFFOREAU PS: j'ai reçu ce matin mon colis je vous en remercie.
23.09.2015 - 16:15DROPS Design answered:
Bonjour Mme Tafforeau, le diagramme A.1 est un tout petit diagramme sur 2 m et 2 rangs qui se trouve entre la légende et le schéma des mesures. Pour remercier votre magasin, cliquez ici pour accéder à ses coordonnées. Bon tricot!
24.09.2015 - 09:15
![]() Marijke Wauman wrote:
Marijke Wauman wrote:
Kunt u eens verduidelijken waar die strikbanden moeten komen want ik begrijp de uitleg niet.
06.08.2015 - 12:30DROPS Design answered:
Hoi Marijke. Je hebt 2 strikbanden. De ene monteer je aan de zijkant ongeveer 15 cm onder het armsgat - op de foto zit die aan de zijkant tussen achterpand en linker voorpand. De tweede monteer je middenvoor (dus aan het rechter voorpand op de foto) ongeveer 40 cm van de bovenkant.
06.08.2015 - 14:43Hallgunnur Skaptason wrote:
Hvordan kan det være at masken pa rygst. ar 57 - 59 - 63.... men hojre och venstre forstykke har næsten det samme, det passer ikke.....rygstykket ma have flere masker eller hur?
24.07.2015 - 11:14DROPS Design answered:
Hej Hallgunnur, jo det stemmer, hvis du kigger i måleskitsen, så kan du se at forstykkerne er ret så brede. God forøjelse!
29.07.2015 - 14:33
![]() Miriam Fliegel wrote:
Miriam Fliegel wrote:
Elegant and cozy looking. Easy to put on during a cold winter day.
19.06.2015 - 17:32
|
|||||||
Morning Walk#morningwalkcardigan |
|||||||
|
|
|||||||
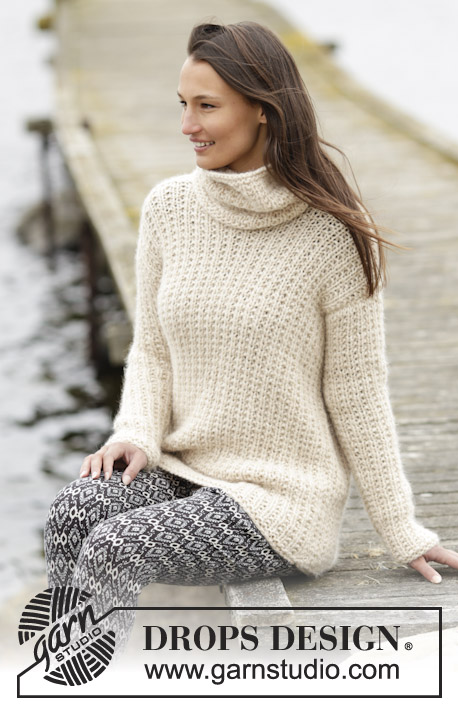
Knitted DROPS jacket with textured pattern and shawl collar in 1 thread Cloud or 2 threads Air. Size: S - XXXL.
DROPS 166-10 |
|||||||
|
GARTER ST (back and forth): K all rows. 1 ridge = 2 rows K. PATTERN: See diagram A.1. The diagram shows all rows in pattern seen from RS. MEASURING TIP: All measurements must be done when holding the piece up on needle. INCREASE TIP: Inc with 1 YO, work YO twisted on next row to avoid holes. Work the inc sts in the pattern A.1. ---------------------------------------------------------- BACK PIECE: Worked back and forth on circular needle. Cast on 57-59-63-69-75-81 sts (incl 1 edge st in each side) on circular needle size 8 mm with 1 thread Cloud or 2 threads Air. Work 2 ridges in GARTER ST - see explanation above. Switch to circular needle size 9 mm. Then work as follows from RS: 1 edge sts in garter st, A.1 (= 2 sts) until 2 sts remain, K 1, 1 edge sts in garter st. REMEMBER THE KNITTING TENSION When piece measures 51-52-53-54-55-56 cm – READ MEASURING TIP – cast off 5 sts for armholes at beg of the next 2 rows = 47-49-53-59-65-71 sts. Work A.1 as before until piece measures 66-68-70-72-74-76 cm. Now cast off for neck as follows: Work A.1 over the first 19-20-21-24-26-29 sts as before, cast off the next 9-9-11-11-13-13 sts and work A.1 over the last 19-20-21-24-26-29 sts as before. Now finish each shoulder separately. On next row from the neck, cast off 1 st = 18-19-20-23-25-28 sts remain on shoulder. When piece measures 67-69-71-73-75-77 cm, work 1 ridge over all sts. Cast off. Work the other shoulder the same way. RIGHT FRONT PIECE: Worked back and forth on circular needle. Cast on 51-53-57-63-69-75 sts (incl 1 edge st in the side and 2 band sts towards mid front) on circular needle size 8 mm with 1 thread Cloud or 2 threads Air. Work 2 ridges in GARTER ST - see explanation above. Switch to circular needle size 9 mm. Then work as follows from RS: 2 band sts in garter st, A.1 (= 2 sts) until 1 st remains, 1 st in garter st. Work band sts in garter st until finished measurements. When piece measures 51-52-53-54-55-56 cm, cast off 5 sts for armhole at beg of row from WS = 46-48-52-58-64-70 sts. When piece measures 67-69-71-73-75-77 cm, adjust so that next row is from WS, work 1 ridge in garter st over the first 18-19-20-23-25-28 sts, A.1 until 2 sts remain on needle and finish with 2 band sts in garter st. Then cast off the first 18-19-20-23-25-28 sts on next row from WS (= shoulder) = 28-29-32-35-39-42 sts remain for shawl collar. On next row from RS, cast on 6-6-7-7-8-8 sts at the end of row = 34-35-39-42-47-50 sts. Work 1 ridge over the new sts, work the remaining sts in A.1, work band in garter st. Then work 2 band sts in garter st towards mid front and the remaining sts in A.1. When piece measures 4 cm from where the new sts were cast on, adjust so that next row is from RS, * K 3 rows, AT THE SAME TIME on first row inc 3-3-3-4-4-4 sts evenly * = 37-38-42-46-51-54 sts. Work 2 band sts in garter st towards mid front and A.1 over the remaining sts, until piece measures 9 cm (from where the new sts were cast on), adjust so that next row is from RS, then repeat from *-* = 40-41-45-50-55-58 sts. Cast off. LEFT FRONT PIECE: Work as right but reversed. Cast off for armhole at beg of row from RS. Cast off sts for shoulder at beg of row from RS, and cast on new sts at the end of row from WS. SLEEVE: Worked back and forth on needle. Cast on 26-26-28-28-30-30 sts (incl 1 edge st in each side) on circular needle size 8 mm with 1 thread Cloud or 2 threads Air. Work 2 ridges. Switch to circular needle size 9 mm. Work A.1 with 1 edge st in garter st in each side of piece. Continue like this. When piece measures 8 cm, inc 1 st inside 2 sts in each side of piece - READ INCREASE TIP! Repeat inc every 9½-8-8-6-6-4½ cm 4-5-5-6-6-7 more times = 36-38-40-42-44-46 sts. Cast off when piece measures 51-51-50-48-46-44 cm (shorter measurements in the larger sizes because of longer sleeve cap and wider shoulders). Knit another sleeve the same way. ASSEMBLY: Sew the shoulder seams. Sew the collar tog mid back and sew it to the neckline. Sew in sleeves. Sew the sleeve and side seams inside 1 edge st. TIES: Cut 3 strands of Cloud or 6 strands of Air, approx. 70 cm long, thread them half way through the side of jacket and approx. 15 cm down from armhole (try the jacket on and adjust), make a braid of approx. 22 cm, tie a knot, the remaining yarn becomes a tassel. Do the same mid front approx. 40 cm down (measured from shawl collar). |
|||||||
Diagram explanations |
|||||||
|
|||||||
 |
|||||||
 |
|||||||
Have you finished this pattern?Tag your pictures with #dropspattern #morningwalkcardigan or submit them to the #dropsfan gallery. Do you need help with this pattern?You'll find 17 tutorial videos, a Comments/Questions area and more by visiting the pattern on garnstudio.com. © 1982-2026 DROPS Design A/S. We reserve all rights. This document, including all its sub-sections, has copyrights. Read more about what you can do with our patterns at the bottom of each pattern on our site. |
|||||||


With over 40 years in knitting and crochet design, DROPS Design offers one of the most extensive collections of free patterns on the internet - translated to 17 languages. As of today we count 324 catalogues and 12290 patterns translated into English (UK/cm).
We work hard to bring you the best knitting and crochet have to offer, inspiration and advice as well as great quality yarns at incredible prices! Would you like to use our patterns for other than personal use? You can read what you are allowed to do in the Copyright text at the bottom of all our patterns. Happy crafting!
Post a comment to pattern DROPS 166-10
We would love to hear what you have to say about this pattern!
If you want to leave a question, please make sure you select the correct category in the form below, to speed up the answering process. Required fields are marked *.