
Popular categories
Looking for a yarn?


Comments / Questions (60)
![]() Sabine wrote:
Sabine wrote:
Hallo liebes DROPS-Team, ich möchte die schöne Jacke "Morning Walk" in M etwas länger bis ca. Mitte Oberschenkel stricken, also etwa 30 cm länger als auf dem Foto. Wieviel Garn würde ich denn dafür mehr brauchen bzw. wieviel insgesamt? Viele Grüße
09.10.2017 - 23:35DROPS Design answered:
Liebe Sabine, leider können wir nicht jede Anleitung nach jeder Geschmack und jeder Anfrage anpassen. Gerne bekommen Sie Hilfe von Ihrem DROPS Laden. Viel Spaß beim stricken!
10.10.2017 - 09:36
![]() Virginie wrote:
Virginie wrote:
Bonjour. Je viens de finir le dos et il me paraît étrange de monter quasiment le même nombre de mailles pour le devant droit et gauche que pour le dos. Dans le croquis il n'y a pas les dimensions des 2 pieces de devant. Pouvez vous m'éclairer ?
26.04.2017 - 22:36DROPS Design answered:
Bonjour Virginie, les devants sont effectivement très large, comme vous pouvez le voir sur le schéma des mesures: dos = 55-79 cm et devant = 50-74 cm. Bon tricot!
27.04.2017 - 09:31
![]() Christiane Lavigne wrote:
Christiane Lavigne wrote:
Pour le devant gauche, après 2 essaies, je n'arrive pas à avoir le même design que le devant droit à partir du moment où j'ai rabattu pour l'épaule. Où est-ce que je me trompe ? Merci de me répondre le plus vite possible
30.01.2017 - 16:33DROPS Design answered:
Bonjour Mme Lavigne, pour le devant gauche, rabattez les premières mailles sur l'endroit, montez les mailles du col à la fin du rang suivant sur l'envers. Après 1 côte mousse sur toutes les mailles, tricotez A.1 avec 2 m de bordure devant au point mousse, et continuez avec les augmentations comme pour le devant droit. Le schéma pourra peut être vous aider. Bon tricot!
30.01.2017 - 17:50
![]() Nan Andersen wrote:
Nan Andersen wrote:
Jeg skal til at strikke denne Jakke, men jeg forstår ikke diagrammet - det et ikke glatstrikning vel? Håber meget i kan hjælpe med at skrive hvordan diagrammet skal forståes - evt ved at beskrive 2 pinde. På forhånd tusind tak for hjælpen.
10.11.2016 - 18:58DROPS Design answered:
Hej Nan. Nej, det er det ikke. Du strikker som fölger: förste raekke er retten, strikkes fra höjre mod venstre, alle m ret. Anden raekke er vrangen og strikkes fra venstre mod höjre, 1 r, 1 vr, 1 r, 1 vr osv.
11.11.2016 - 15:18
![]() Amelina Cristina Di Pinti wrote:
Amelina Cristina Di Pinti wrote:
Mi scuso per il disturbo ma non riesco a capire il diagramma. Potreste gentilmente chiarirmi i ferri a rovescio come devono essere fatti? Grazie
07.11.2016 - 13:38DROPS Design answered:
Buongiorno Amelina Cristina. Sul rovescio del lavoro (seconda riga del diagramma dal basso, leggendo da sinistra verso destra), lavora: 1 m dir (quella con il punto nero), 1 m rov, 1 m dir, 1 m rov e così via. Buon lavoro!
07.11.2016 - 14:09
![]() Smykowska Irena wrote:
Smykowska Irena wrote:
Co znaczy : przerabiac trzy rzedy na prawo ? Po dodaniu 3 oczek wzor nie wyglada juz tak ladnie .Pozdrawiam
21.09.2016 - 21:32DROPS Design answered:
Witaj Ireno. Tak musi być. Jest to ten fragment na górze ramienia. Zobacz proszę zdjęcie w powiększeniu. Pozdrawiam i powodzenia!
23.09.2016 - 10:14
![]() Smykowska Irena wrote:
Smykowska Irena wrote:
Wzor A1 wychodzi mi Jak zwykly sciagacz .Jaki robie blad ?
02.09.2016 - 21:39DROPS Design answered:
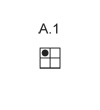
Droga Ireno, w schemacie A.1 na prawej stronie robótki przerabiamy tylko o. prawe (a nie jak w ściągaczu raz prawe, a raz lewe o.), a na lewej stronie robótki (kolejny rząd) na przemian 1 o.p., 1 o.l. Zobacz zdjęcie próbki ściegu na górze wzoru. Powodzenia!
03.09.2016 - 19:39
![]() A De Groot-Posset wrote:
A De Groot-Posset wrote:
Hallo. Ik heb dit vest gemaakt. Nu vind ik de twee voorpanden veel te groot. Is het mogelijk om dit garen uit tehalen zodat je er wat anders van kan maken. Ik vind dit garen vreselijk pluizen. Ben dan ook niet tevreden.
23.06.2016 - 12:47Kristina wrote:
Hi, When the pattern says, 'Cast on 57-59-63-69-75-81 sts (incl 1 edge st in each side) ' does this mean add an extra 2 stitches. So if I made the largest size I would cast on 81+2=83? And I don't understand the chart. = K from RS, P from WS = K from WS Can someone explain or is there a video or a photo of what this looks like? I knit continental style. Thanks!
20.01.2016 - 19:23DROPS Design answered:
Dear Kristine, edge sts are included in the number of sts to cast on, so that you will cast on 81 sts in the larger size. The white square in diagram represent a stitch worked in stocking st, ie K these sts from RS and P these sts from WS. On row 1 in A.1 (from RS) work: K2, on row 2 in A.1 (from WS), work K1,P1 and repeat these 2 rows. Happy knitting!
21.01.2016 - 10:19
![]() Iris wrote:
Iris wrote:
Liebes Drops-Team, wenn ich diese Jacke mit C-Garn stricken möchte, welche Garn-Mengen muß ich dann planen? LG Iris
21.12.2015 - 09:36DROPS Design answered:
Das kommt auf das Garn an. Sie können die Lauflänge errechnen, die Sie für E (Originalgarn Cloud) brauchen: Cloud hat auf 50 g 80 m Lauflänge. Nun müssen Sie ausrechnen, wie viel Meter Sie in Ihrer Größe benötigen, z.B. Größe S: 600 g = 12 x 50 g = 12 x 80 m = 960 m. Da Sie bei Garngruppe C den Faden doppelt nehmen, benötigen Sie auch die doppelte Lauflänge, also 1920 m. Das müssen Sie dann wieder auf das von Ihnen gewählte C-Garn umrechnen, um auf die Knäuelmenge zu kommen.
29.12.2015 - 19:12
|
|||||||
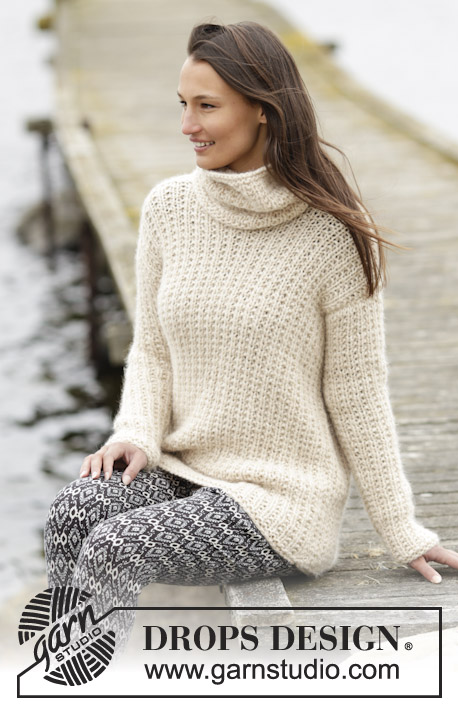
Morning Walk#morningwalkcardigan |
|||||||
|
|
|||||||
Knitted DROPS jacket with textured pattern and shawl collar in 1 thread Cloud or 2 threads Air. Size: S - XXXL.
DROPS 166-10 |
|||||||
|
GARTER ST (back and forth): K all rows. 1 ridge = 2 rows K. PATTERN: See diagram A.1. The diagram shows all rows in pattern seen from RS. MEASURING TIP: All measurements must be done when holding the piece up on needle. INCREASE TIP: Inc with 1 YO, work YO twisted on next row to avoid holes. Work the inc sts in the pattern A.1. ---------------------------------------------------------- BACK PIECE: Worked back and forth on circular needle. Cast on 57-59-63-69-75-81 sts (incl 1 edge st in each side) on circular needle size 8 mm with 1 thread Cloud or 2 threads Air. Work 2 ridges in GARTER ST - see explanation above. Switch to circular needle size 9 mm. Then work as follows from RS: 1 edge sts in garter st, A.1 (= 2 sts) until 2 sts remain, K 1, 1 edge sts in garter st. REMEMBER THE KNITTING TENSION When piece measures 51-52-53-54-55-56 cm – READ MEASURING TIP – cast off 5 sts for armholes at beg of the next 2 rows = 47-49-53-59-65-71 sts. Work A.1 as before until piece measures 66-68-70-72-74-76 cm. Now cast off for neck as follows: Work A.1 over the first 19-20-21-24-26-29 sts as before, cast off the next 9-9-11-11-13-13 sts and work A.1 over the last 19-20-21-24-26-29 sts as before. Now finish each shoulder separately. On next row from the neck, cast off 1 st = 18-19-20-23-25-28 sts remain on shoulder. When piece measures 67-69-71-73-75-77 cm, work 1 ridge over all sts. Cast off. Work the other shoulder the same way. RIGHT FRONT PIECE: Worked back and forth on circular needle. Cast on 51-53-57-63-69-75 sts (incl 1 edge st in the side and 2 band sts towards mid front) on circular needle size 8 mm with 1 thread Cloud or 2 threads Air. Work 2 ridges in GARTER ST - see explanation above. Switch to circular needle size 9 mm. Then work as follows from RS: 2 band sts in garter st, A.1 (= 2 sts) until 1 st remains, 1 st in garter st. Work band sts in garter st until finished measurements. When piece measures 51-52-53-54-55-56 cm, cast off 5 sts for armhole at beg of row from WS = 46-48-52-58-64-70 sts. When piece measures 67-69-71-73-75-77 cm, adjust so that next row is from WS, work 1 ridge in garter st over the first 18-19-20-23-25-28 sts, A.1 until 2 sts remain on needle and finish with 2 band sts in garter st. Then cast off the first 18-19-20-23-25-28 sts on next row from WS (= shoulder) = 28-29-32-35-39-42 sts remain for shawl collar. On next row from RS, cast on 6-6-7-7-8-8 sts at the end of row = 34-35-39-42-47-50 sts. Work 1 ridge over the new sts, work the remaining sts in A.1, work band in garter st. Then work 2 band sts in garter st towards mid front and the remaining sts in A.1. When piece measures 4 cm from where the new sts were cast on, adjust so that next row is from RS, * K 3 rows, AT THE SAME TIME on first row inc 3-3-3-4-4-4 sts evenly * = 37-38-42-46-51-54 sts. Work 2 band sts in garter st towards mid front and A.1 over the remaining sts, until piece measures 9 cm (from where the new sts were cast on), adjust so that next row is from RS, then repeat from *-* = 40-41-45-50-55-58 sts. Cast off. LEFT FRONT PIECE: Work as right but reversed. Cast off for armhole at beg of row from RS. Cast off sts for shoulder at beg of row from RS, and cast on new sts at the end of row from WS. SLEEVE: Worked back and forth on needle. Cast on 26-26-28-28-30-30 sts (incl 1 edge st in each side) on circular needle size 8 mm with 1 thread Cloud or 2 threads Air. Work 2 ridges. Switch to circular needle size 9 mm. Work A.1 with 1 edge st in garter st in each side of piece. Continue like this. When piece measures 8 cm, inc 1 st inside 2 sts in each side of piece - READ INCREASE TIP! Repeat inc every 9½-8-8-6-6-4½ cm 4-5-5-6-6-7 more times = 36-38-40-42-44-46 sts. Cast off when piece measures 51-51-50-48-46-44 cm (shorter measurements in the larger sizes because of longer sleeve cap and wider shoulders). Knit another sleeve the same way. ASSEMBLY: Sew the shoulder seams. Sew the collar tog mid back and sew it to the neckline. Sew in sleeves. Sew the sleeve and side seams inside 1 edge st. TIES: Cut 3 strands of Cloud or 6 strands of Air, approx. 70 cm long, thread them half way through the side of jacket and approx. 15 cm down from armhole (try the jacket on and adjust), make a braid of approx. 22 cm, tie a knot, the remaining yarn becomes a tassel. Do the same mid front approx. 40 cm down (measured from shawl collar). |
|||||||
Diagram explanations |
|||||||
|
|||||||
 |
|||||||
 |
|||||||
Have you finished this pattern?Tag your pictures with #dropspattern #morningwalkcardigan or submit them to the #dropsfan gallery. Do you need help with this pattern?You'll find 17 tutorial videos, a Comments/Questions area and more by visiting the pattern on garnstudio.com. © 1982-2026 DROPS Design A/S. We reserve all rights. This document, including all its sub-sections, has copyrights. Read more about what you can do with our patterns at the bottom of each pattern on our site. |
|||||||


With over 40 years in knitting and crochet design, DROPS Design offers one of the most extensive collections of free patterns on the internet - translated to 17 languages. As of today we count 324 catalogues and 12290 patterns translated into English (UK/cm).
We work hard to bring you the best knitting and crochet have to offer, inspiration and advice as well as great quality yarns at incredible prices! Would you like to use our patterns for other than personal use? You can read what you are allowed to do in the Copyright text at the bottom of all our patterns. Happy crafting!
Post a comment to pattern DROPS 166-10
We would love to hear what you have to say about this pattern!
If you want to leave a question, please make sure you select the correct category in the form below, to speed up the answering process. Required fields are marked *.