
Popular categories
Looking for a yarn?


Comments / Questions (151)
![]() Mien Tielrooy wrote:
Mien Tielrooy wrote:
Hallo ik ben met het vest begonnen nu ben ik bij de armsgaten aan gekomen ik snap het gedeelte met de lossen tot het midden maat niet met het meerderen in iedere steek en ik welke toer doe je dat kunt u mij misschien helpen mvg
08.07.2015 - 11:31DROPS Design answered:
Hoi Mien. Na het maken van de lossen voor de armsgaten ga je door met het patroon en de meerderingen in elke hoek zoals eerst - je haakt het patroon dus ook zoals eerst over de lossen van de armsgaten.
31.07.2015 - 16:53
![]() Beate wrote:
Beate wrote:
Hvordan hekler jeg prøvelapp for heklefasthet på denne? I mønsteret er stavene heklet om en ring og om luftmaskebuer... En lapp må vel hekles i rekker?
03.07.2015 - 11:28DROPS Design answered:
Hej Beate, Jo men du hækler bare i rekker, de fylder lige meget og du skal have 3,5 st-grupper i bredden på 10 cm. God fornøjelse!
08.07.2015 - 15:34
![]() Mercedes Díez wrote:
Mercedes Díez wrote:
Muchas gracias DROPS por tu respuesta del 13 de Junio, ya acabé la chaqueta, preciosa, cómoda y muy resultona con ropa variada, yo solita descubrí qué hacía mal y era empeñarme en tejer en redondo cuando lo lógico es coger los puntos alrededor de toda la sisa y seguir recto, thank's
30.06.2015 - 23:03
![]() Ashley wrote:
Ashley wrote:
Where it says "On next round work pattern and inc as before over all sts, also in ch for armholes. Continue like this until square measures approx..." Does that mean start round 7 or repeat round 6? And when it says in chain, does that mean on chain or where round 6 is?
22.06.2015 - 03:01DROPS Design answered:
See answer below - and remember you can contact your DROPS store for any individual assistance. Happy crocheting!
22.06.2015 - 13:23Efi wrote:
What means dec 1 ch space???and what is the arrow??
18.06.2015 - 23:03DROPS Design answered:
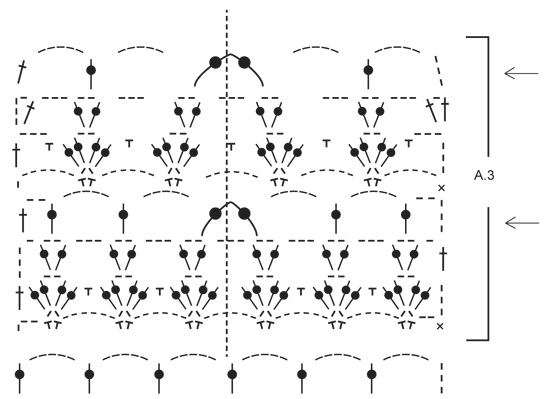
Dear Efi, when working A.3 you will dec 1 tr mid front of sleeve as shown in A.3 row 4 and 8 (see arrow at the right side of A.3). Happy crocheting!
19.06.2015 - 09:34Efi wrote:
I cant understand the orology for sleeves.please help me.i dont know what to do...and how!!!i loved this pattern and its my first!!!can you help me???my english are not good enought to understand it..
18.06.2015 - 22:56DROPS Design answered:
Dear Efi, start working sleeve from RS on the bottom of armhole, then work around 1 dc in first st (under arm), and continue working as on row 4 or 8 in A.Z around armhole so that you get 12-16 ch-spaces (see size) to the other end of armhole (under arm). Turn and work back and forth in pattern according to A.2. Happy crocheting!
19.06.2015 - 09:32
![]() Ashley wrote:
Ashley wrote:
Where it says "On next round work pattern and inc as before over all sts, also in ch for armholes. Continue like this until square measures approx..." Does that mean start round 7 or repeat round 6? And when it says in chain, does that mean on chain or where round 6 is?
17.06.2015 - 07:01DROPS Design answered:
Dear Ashley, after you have crocheted the 2 chains for the armholes on each side, continue on next row in pattern as before, crocheting the next row of pattern over the sts and over the chains. Happy crocheting!
17.06.2015 - 09:57
![]() Mercedes Díez Herrero wrote:
Mercedes Díez Herrero wrote:
Ay, ay, ay, con lo bonita que me está quedando tengo grandes dificultades con la manga, no hay manera, he probado ya tres veces, no consigo hacer la manga en redondo a partir de las explicaciones manteniendo 12 arcos y la secuencia correcta de cada fila, ayuda, por favor
09.06.2015 - 09:05DROPS Design answered:
Hola Mercedes, primero se trabaja una base de 12 arcos iguales a los de la fila 4 del patrón del delantero (1 p.a.+5 p.de cad) y a continuación se empieza a trabajar A.2
13.06.2015 - 17:14
![]() Paula Joynson wrote:
Paula Joynson wrote:
I am loving your designs- but how do I know what size to make? I can see sizes s-xxxl but no measurements. Please help. Paula.
30.05.2015 - 23:05DROPS Design answered:
Dear Mrs Joynson, you will find at the bottom of the pattern a measurement chart with all measurement in cm taken flat from side to side. Compare these to a similar garment you have and like the shape to find out the matching size. Happy crocheting!
01.06.2015 - 09:42
![]() Marimer wrote:
Marimer wrote:
Qué bonita chaqueta veraniega, tengo París del mismo color, os iré contando, gracias Drops por los nuevos patrones, son preciosos, me lo haría todo!!!!!!! 💐
29.05.2015 - 16:23
|
||||||||||||||||||||||
Spring Bliss#springblisscardigan |
||||||||||||||||||||||
 |
 |
|||||||||||||||||||||
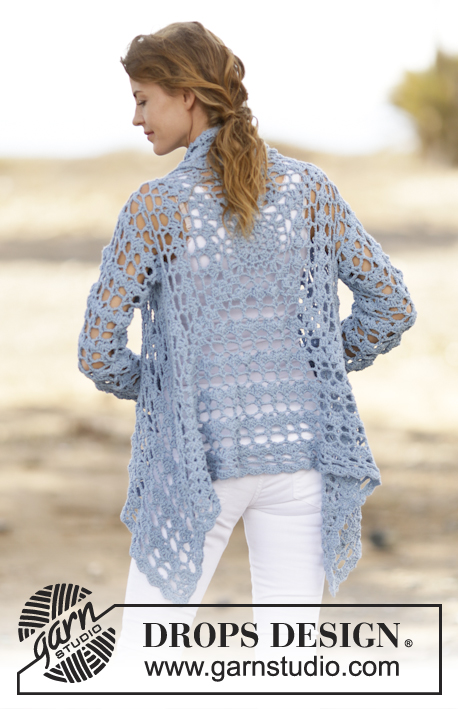
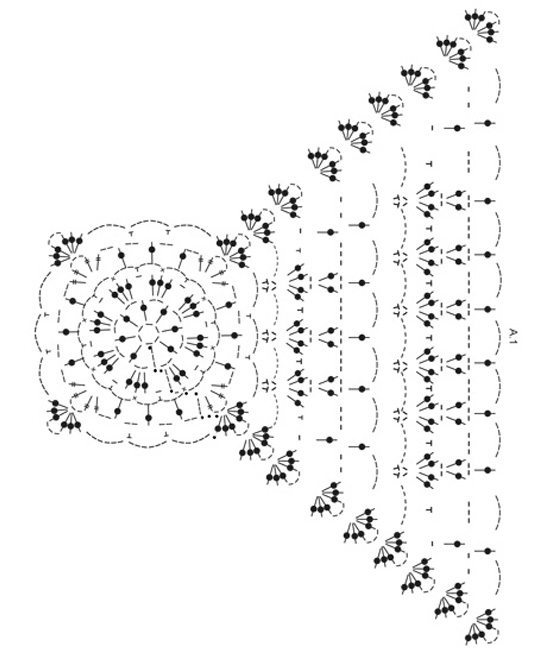
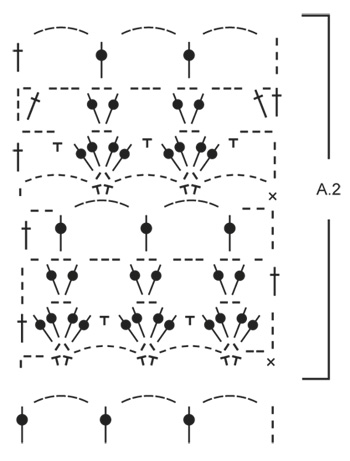
Crochet DROPS jacket with lace pattern in ”Paris”. Size: S - XXXL.
DROPS 162-5 |
||||||||||||||||||||||
|
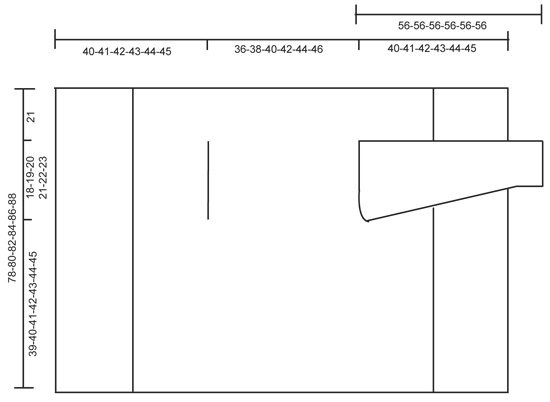
PATTERN: See diagrams A.1 and A.2. DECREASE TIP: Dec 1 tr by working 2 tr tog as follows: Work 1 tr in first ch-space but wait with last pull through, skip 3 ch, work 1 tr in next ch-space but on last pull through, pull yarn through all 3 loops on hook. ---------------------------------------------------------- BODY: Worked in the round from mid back on the back. Work 6 ch with Paris on hook size 5 mm and form a ring with 1 sl st in first ch. Work according to diagram A.1, i.e. work as follows: ROUND 1: 5 ch (= 1 tr + 2 ch), * 1 tr in ring, 2 ch *, repeat from *-* a total of 7 times, finish with 1 sl st in 3rd ch from beg of round = 8 tr with 2 ch between each. ROUND 2: 1 sl st in first ch-space, 3 ch (= 1 tr), 2 tr in same ch-space, * 1 ch, 3 tr in next ch-space *, repeat from *-* 7 times in total, and finish with 1 ch and 1 sl st in 3rd ch from beg of round = 8 tr-groups with 1 ch between each. ROUND 3: 1 ch, 1 dc in the middle tr in tr-group, * 3 ch, 1 dc in ch before next tr-group, 3 ch, 1 dc in the middle tr in next tr-group *, repeat from *-* 7 times in total, 3 ch, 1 dc in last ch, 3 ch and 1 sl st in first dc at beg of round = 16 ch-spaces. ROUND 4: Now work the circle into a square, i.e. work as follows: 1 sl st in first ch-space, 4 ch (= 1 dtr), 1 dtr + 3 ch + 2 dtr in same ch-space (= corner), * (2 ch, 1 tr in next ch-space) repeat from (-) 3 times in total, 2 ch, 2 dtr + 3 ch + 2 dtr in next ch-space (= corner) *, repeat from *-* 3 times in total, repeat from (-) 3 times in total and finish with 2 ch and 1 sl st in 4th ch from beg of round. ROUND 5: Work sl sts until ch-space in the corner, 3 ch (= 1 tr), 2 tr + 3 ch + 3 tr in same ch-space (= corner), * 5 ch, skip 1 ch-space, 1 dc in next ch-space, 5 ch, 1 dc in next ch-space, 5 ch, skip 1 ch-space, in next ch-space (= corner) work 3 tr + 3 ch + 3 tr *, repeat from *-* 3 times in total, 5 ch, skip 1 ch-space, 1 dc in next ch-space, 5 ch, 1 dc in next ch-space, 5 ch, skip last ch-space and finish with 1 sl st in 3rd ch at beg of round. ROUND 6: Work sl sts until ch-space in the corner, 3 ch (= 1 tr), 2 tr + 3 ch + 3 tr in same ch-space (= corner), * (6 ch, 1 dc + 2 ch + dc in next ch-space), repeat from (-) until corner, 6 ch, work 3 tr + 3 ch + 3 tr in ch-space in the corner *, repeat from *-* 3 times in total, repeat from (-) until the corner and finish with 6 ch and 1 sl st in 3rd ch at beg of round. ROUND 7: Work sl sts until ch-space in the corner, 3 ch (= 1 tr), 2 tr + 3 ch + 3 tr in same ch-space (= corner), * 1 ch, (1 dc in 6-ch-space, 2 tr + 2 ch + 2 tr in 2-ch-space), repeat from (-) until one 6-ch-space remains before the corner, 1 dc in 6-ch-space, 1 ch, 3 tr + 3 ch + 3 tr in ch-space in the corner *, repeat from *-* 3 times in total, 1 ch, repeat from (-) until one 6-ch-space remains before the corner and finish with 1 ch and 1 sl st in 3rd ch at beg of round. ROUND 8: Work sl sts until ch-space in the corner, 3 ch (= 1 tr), 2 tr + 3 ch + 3 tr in same ch-space (= corner), * 2 ch, 1 tr in first ch, (3 ch, 1 tr + 2 ch + 1 tr in ch-space in tr-group), repeat from (-) until corner, 3 ch, 1 tr in ch before corner, 2 ch, 3 tr + 3 ch + 3 tr in ch-space in the corner *, repeat from *-* 3 times in total, 2 ch, 1 tr in first ch, repeat from (-) until corner, 3 ch, 1 tr in last ch, 2 ch and 1 sl st in 3rd ch at beg of round. ROUND 9: Work sl sts until ch-space in the corner, 3 ch (= 1 tr), 2 tr + 3 ch + 3 tr in same ch-space (= corner), * 5 ch, 1 tr in first ch-space, (5 ch, 1 tr in ch-space in tr-group), repeat from (-) until 1 ch-space remains before tr-group in the corner, 5 ch, 1 tr in last ch-space before the corner, 5 ch and 3 tr + 3 ch + 3 tr in ch-space in the corner *, repeat from *-* 3 times in total, 5 ch, 1 tr in first ch-space, repeat from (-) until 1 ch-space remains before the corner, 5 ch, 1 tr in last ch-space, 5 ch and 1 sl st in 3rd ch at beg of round. REMEMBER THE CROCHET TENSION! Repeat 6th to 9th round (4 rounds) outwards as shown in diagram. Continue like this until square measures approx. 36-38-40-42-44-46 cm x 36-38-40-42-44-46 cm. Now work arm holes as follows: Work as before until first corner, work 3 tr + 3 ch + 3 tr in ch-space in the corner. Now work ch until the middle of next side (i.e. in the middle between 1st and 2nd corner) as follows: Work 1 ch for every ch/tr skipped. Then work pattern as before until the middle between 3rd and 4th corner. Now work ch until beg of round as follows: Work 1 ch for every ch/tr skipped. On next round work pattern and inc as before over all sts, also in ch for armholes. Continue like this until square measures approx. 78-80-82-84-86-88 cm x 78-80-82-84-86-88 cm (i.e. approx. 21 cm in all sizes from armhole) - adjust to finish after 9th round (round with ch-spaces and trebles). Cut the yarn. FRONT PIECE: Beg from WS and work back and forth between first and second corner. NOTE: Work front piece without inc. Work according to diagram A.2 from first corner, i.e. work as follows: ROW 1: 3 ch (= 1 dc + 2 ch), 1 dc + 2 ch + 1 dc in first ch-space, * 6 ch, 1 dc + 2 ch + 1 dc in next ch-space*, repeat from *-* the entire row and finish with 2 ch and 1 dc in first ch-space in the corner, turn piece. ROW 2 (= RS): 3 ch (= 1 tr), * 2 tr + 2 ch + 2 tr in ch-space between 2 dc, 1 dc in 6-ch-space *, repeat from *-* the entire row and finish with 1 tr in 1st ch from beg of previous row, turn piece. ROW 3: 4 ch (= 1 tr + 1 ch), * 1 tr + 2 ch + 1 tr in ch-space in the middle of tr-group, 3 ch *, repeat from *-* until 1 tr-group remains before the corner, 1 tr + 2 ch + 1 tr in ch-space in last tr-group, finish with 1 ch and 1 tr in 3rd ch from beg of previous row, turn piece. ROW 4 (= RS): 5 ch (= 1 tr + 2 ch), * 1 tr in ch-space in tr-group, 5 ch *, repeat from *-* until 1 tr-group remains, 1 tr in ch-space in last tr-group, 2 ch and 1 tr in 3rd ch from beg of previous row, turn piece. ROW 5: 7 ch (= 1 dc + 6 ch), * 1 dc + 2 ch + 1 dc in 5-ch-space, 6 ch *, repeat from *-* the entire row and finish with 1 dc in 3rd ch from beg of previous row, turn piece. ROW 6 (= RS): 6 ch (= 1 tr + 3 ch), * 1 dc in 6-ch-space, 2 tr + 2 ch + 2 tr in 2-ch-space *, repeat from *-* the entire row and finish with 1 dc in last 6-ch-space, 3 ch and 1 tr in first ch from beg of previous row, turn piece. ROW 7: 4 ch (= 1 tr + 1 ch), 1 tr in same st, * 3 ch, 1 tr + 2 ch + 1 tr in ch-space in the middle of next tr-group *, repeat from *-* the entire row and finish with 3 ch and 1 tr + 1 ch + 1 tr in 3rd ch from beg of previous row, turn piece. ROW 8 (= RS): 8 ch (= 1 tr + 5 ch), * 1 tr in ch-space in the middle of tr-group, 5 ch *, repeat from *-* the entire row and finish with 5 ch and 1 tr in 3rd ch from beg of previous row, turn piece. Repeat rows 1 to 8 outwards. Continue like this until approx. 19-20-21-22-23-24 cm have been worked back and forth, fasten off (adjust after 1st or 5th row in pattern). Repeat on the other side, now work back and forth from third to fourth corner. EDGE: Finally work a round around the entire piece with 2nd or 6th row in pattern but in ch-space in each corner work 6 tr. Fasten off. SLEEVE: Work back and forward and sew togheter at the end. Sleeve is worked straight out of armhole of the body, top down. Beg mid under armhole, from RS. 1 dc in first st, then work ch-space as on 4th or 8th row in A.2. Work so that there are 12-13-14-15-15-16 ch-spaces around armhole. Then continue with pattern according to diagram A.2. Work pattern like this until sleeve measures 26 cm. Now work according to A.3. On every row with arrow work 2 tr tog into 1 tr mid front of sleeve (i.e. dec 1 ch-space on every row with arrow) - READ DECREASE TIP. The dotted line shows mid front of sleeve. Otherwise continue the pattern as before. Dec on every 4th row a total of 4 times. Then work according to diagram A.2 until sleeve measures 56 cm in all sizes. Fasten off. Repeat in the other side. |
||||||||||||||||||||||
Diagram explanations |
||||||||||||||||||||||
|
||||||||||||||||||||||
 |
||||||||||||||||||||||
 |
||||||||||||||||||||||
 |
||||||||||||||||||||||
 |
||||||||||||||||||||||
Have you finished this pattern?Tag your pictures with #dropspattern #springblisscardigan or submit them to the #dropsfan gallery. Do you need help with this pattern?You'll find 12 tutorial videos, a Comments/Questions area and more by visiting the pattern on garnstudio.com. © 1982-2026 DROPS Design A/S. We reserve all rights. This document, including all its sub-sections, has copyrights. Read more about what you can do with our patterns at the bottom of each pattern on our site. |
||||||||||||||||||||||


With over 40 years in knitting and crochet design, DROPS Design offers one of the most extensive collections of free patterns on the internet - translated to 17 languages. As of today we count 325 catalogues and 12298 patterns translated into English (UK/cm).
We work hard to bring you the best knitting and crochet have to offer, inspiration and advice as well as great quality yarns at incredible prices! Would you like to use our patterns for other than personal use? You can read what you are allowed to do in the Copyright text at the bottom of all our patterns. Happy crafting!
Post a comment to pattern DROPS 162-5
We would love to hear what you have to say about this pattern!
If you want to leave a question, please make sure you select the correct category in the form below, to speed up the answering process. Required fields are marked *.