
Popular categories
Looking for a yarn?


Comments / Questions (151)
![]() Jessica Krüger wrote:
Jessica Krüger wrote:
Jag förstår inte alls hur jag ska virka varvet efter jag gjort lm för ärmar. Ska jag virka I den lmkedjan eller ska jag virka I orfinalrutan och låta lm hänga med? Beskrivningen skulle behöva en bild på hur man gör
07.03.2021 - 23:46DROPS Design answered:
Hei Jessica. Når du hekler luftmaskeraden til ermene hekles det 1 luftmaske for hver luftmaske / stav det hoppes over, slik at ved neste omgang skal du hekle i disse luftmasken som om det var en luftmaske / stav i mønstret. Mvh DROPS design
15.03.2021 - 12:02
![]() VERONIQUE GEUDIN wrote:
VERONIQUE GEUDIN wrote:
Bonjour Drops Design, J'adore votre modèle, merci beaucoup ! En revanche j'ai un problème de compréhension dans la partie "dos & devants" , comment enchainer après les ml des emmanchures vous écrivez : " Au tour suivant, crocheter en point fantaisie et augmenter comme avant au-dessus de toutes les mailles, y compris dans les chaînettes des emmanchures" ; ma question : doit-on travailler tout autour du carré, même les ml ? Merci beaucoup Bonne journée
03.12.2020 - 16:34DROPS Design answered:
Bonjour Mme Geudin et merci, et tout à fait, après ce tour, vous continuez donc comme avant, en crochetant dans les chaînettes le même nombre de motifs que vous avez sauté (comme si vous les aviez crochetées) - les chaînettes des emmanchures ont formé deux "trous" sur les côtés, c'est là que vous crochèterez les manches plus tard, de haut en bas. Bon crochet!
03.12.2020 - 16:45
![]() Mary wrote:
Mary wrote:
Is there any particular row that it's better to finish the back piece on before working the armholes?
25.08.2020 - 19:18DROPS Design answered:
Dear Mary, adjust the large square for body after 9th round (round wicht ch-spaces and trebles). Happy crocheting!
26.08.2020 - 08:11
![]() +27829519601 wrote:
+27829519601 wrote:
Is there instructions in English. I am looking for this pattern for months!!!! Finally found it, but cannot understand the language. Please!
21.06.2020 - 00:41DROPS Design answered:
Hi, we have our patterns for free in about 17 languages :-) You can choose your language in menu under the main photo. Happy crocheting!
21.06.2020 - 12:54
![]() Flora wrote:
Flora wrote:
E possibile avere uno schema ho fatto il dietro ma non ho capito con gli scalfi maniche grazie mille
20.04.2020 - 18:49DROPS Design answered:
Buongiorno Flora. Purtroppo non abbiamo materiale aggiuntivo a quanto pubblicato. Per gli scalfi, non lavora la prima metà del lato tra il 1° e il 2° angolo, ma avvia 1 catenella per ogni maglia (catenella o m.alta) non lavorata; procede come prima fino alla metà del lato tra il 3° e il 4° angolo e qui avvia lo stesso numero di catenelle. Buon lavoro!
21.04.2020 - 09:26
![]() Hannelie wrote:
Hannelie wrote:
When starting with the front piece, do you still work the corner (3dc, 3ch, 3dc) before starting the first ch 3 in Row 1 and then end with a corner again before starting with row 2?
13.01.2020 - 09:17DROPS Design answered:
Dear Hannelie, when working the front piece, you don't increase anymore, work A.3 as explained under written pattern. Happy crocheting!
13.01.2020 - 10:58
![]() Mirta wrote:
Mirta wrote:
Las mangas se tejen en redondo o van cosidas?
26.09.2019 - 22:26DROPS Design answered:
Hola Mirta. Las mangas se trabajan de ida y vuelta, comenzando en la sisa de la chaqueta y se hace una costura en el centro bajo la manga para finalizar
28.09.2019 - 23:39
![]() Hilde wrote:
Hilde wrote:
Ben bezig met dit patroon. Gaat prima ! Ik ben nieuwsgierig voor het resultaat....
07.07.2019 - 08:22
![]() Cajun wrote:
Cajun wrote:
Hallo, ich bin etwas verwirrt, das Garn Drops Paris betreffend. Auf der Seite "Pflegehinweise" ist folgende Empfehlung zu finden:Maschinenwäsche 60°C / liegend trocknen. Gleichzeitig ist jedoch sowohl dort wie auch auf dem Etikett ein Tumbler-Symbol mit 2 Punkten angegeben, welches besagt, dass das Garn im Trockner sogar ohne Schontrocknung getrocknet werden kann. Man kann Drops Paris ergo bedenkenlos in den Trockner geben? Für eine kurze Info besten Dank!
27.06.2019 - 11:05DROPS Design answered:
Liebe Frau Cajun, wenn Sie keinen Trockner haben, dann soll die Jacke flach liegen, aber sonnst können Sie im Trockner trocknen - siehe Symbol, Paris ist 100% Baumwolle. Viel Spaß beim häkeln!
28.06.2019 - 09:30
![]() Mrs Jones wrote:
Mrs Jones wrote:
Please tell me there is a video tutorial! I’m so stuck!
19.06.2019 - 18:25DROPS Design answered:
Dear Mrs Jones, there are not specified video to this pattern, but these informations might help you reading diagrams. Happy crocheting!
20.06.2019 - 08:28
|
||||||||||||||||||||||
Spring Bliss#springblisscardigan |
||||||||||||||||||||||
 |
 |
|||||||||||||||||||||
Crochet DROPS jacket with lace pattern in ”Paris”. Size: S - XXXL.
DROPS 162-5 |
||||||||||||||||||||||
|
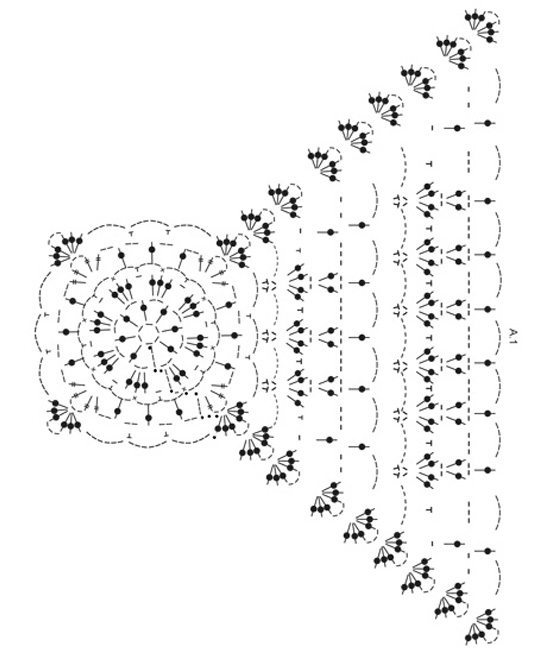
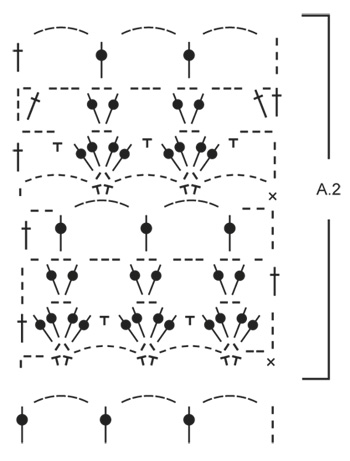
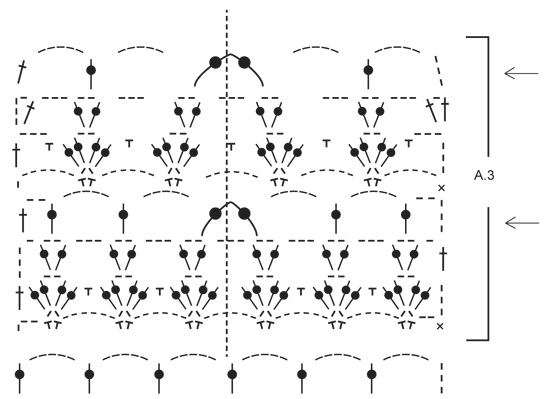
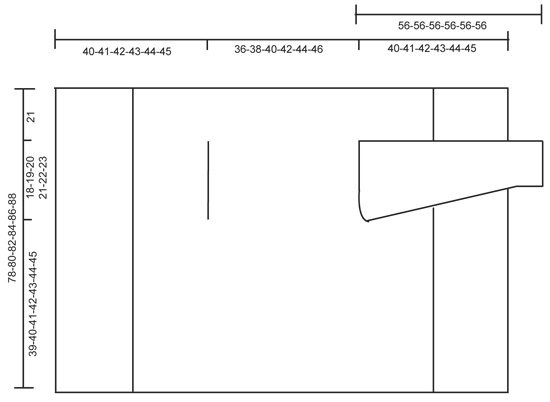
PATTERN: See diagrams A.1 and A.2. DECREASE TIP: Dec 1 tr by working 2 tr tog as follows: Work 1 tr in first ch-space but wait with last pull through, skip 3 ch, work 1 tr in next ch-space but on last pull through, pull yarn through all 3 loops on hook. ---------------------------------------------------------- BODY: Worked in the round from mid back on the back. Work 6 ch with Paris on hook size 5 mm and form a ring with 1 sl st in first ch. Work according to diagram A.1, i.e. work as follows: ROUND 1: 5 ch (= 1 tr + 2 ch), * 1 tr in ring, 2 ch *, repeat from *-* a total of 7 times, finish with 1 sl st in 3rd ch from beg of round = 8 tr with 2 ch between each. ROUND 2: 1 sl st in first ch-space, 3 ch (= 1 tr), 2 tr in same ch-space, * 1 ch, 3 tr in next ch-space *, repeat from *-* 7 times in total, and finish with 1 ch and 1 sl st in 3rd ch from beg of round = 8 tr-groups with 1 ch between each. ROUND 3: 1 ch, 1 dc in the middle tr in tr-group, * 3 ch, 1 dc in ch before next tr-group, 3 ch, 1 dc in the middle tr in next tr-group *, repeat from *-* 7 times in total, 3 ch, 1 dc in last ch, 3 ch and 1 sl st in first dc at beg of round = 16 ch-spaces. ROUND 4: Now work the circle into a square, i.e. work as follows: 1 sl st in first ch-space, 4 ch (= 1 dtr), 1 dtr + 3 ch + 2 dtr in same ch-space (= corner), * (2 ch, 1 tr in next ch-space) repeat from (-) 3 times in total, 2 ch, 2 dtr + 3 ch + 2 dtr in next ch-space (= corner) *, repeat from *-* 3 times in total, repeat from (-) 3 times in total and finish with 2 ch and 1 sl st in 4th ch from beg of round. ROUND 5: Work sl sts until ch-space in the corner, 3 ch (= 1 tr), 2 tr + 3 ch + 3 tr in same ch-space (= corner), * 5 ch, skip 1 ch-space, 1 dc in next ch-space, 5 ch, 1 dc in next ch-space, 5 ch, skip 1 ch-space, in next ch-space (= corner) work 3 tr + 3 ch + 3 tr *, repeat from *-* 3 times in total, 5 ch, skip 1 ch-space, 1 dc in next ch-space, 5 ch, 1 dc in next ch-space, 5 ch, skip last ch-space and finish with 1 sl st in 3rd ch at beg of round. ROUND 6: Work sl sts until ch-space in the corner, 3 ch (= 1 tr), 2 tr + 3 ch + 3 tr in same ch-space (= corner), * (6 ch, 1 dc + 2 ch + dc in next ch-space), repeat from (-) until corner, 6 ch, work 3 tr + 3 ch + 3 tr in ch-space in the corner *, repeat from *-* 3 times in total, repeat from (-) until the corner and finish with 6 ch and 1 sl st in 3rd ch at beg of round. ROUND 7: Work sl sts until ch-space in the corner, 3 ch (= 1 tr), 2 tr + 3 ch + 3 tr in same ch-space (= corner), * 1 ch, (1 dc in 6-ch-space, 2 tr + 2 ch + 2 tr in 2-ch-space), repeat from (-) until one 6-ch-space remains before the corner, 1 dc in 6-ch-space, 1 ch, 3 tr + 3 ch + 3 tr in ch-space in the corner *, repeat from *-* 3 times in total, 1 ch, repeat from (-) until one 6-ch-space remains before the corner and finish with 1 ch and 1 sl st in 3rd ch at beg of round. ROUND 8: Work sl sts until ch-space in the corner, 3 ch (= 1 tr), 2 tr + 3 ch + 3 tr in same ch-space (= corner), * 2 ch, 1 tr in first ch, (3 ch, 1 tr + 2 ch + 1 tr in ch-space in tr-group), repeat from (-) until corner, 3 ch, 1 tr in ch before corner, 2 ch, 3 tr + 3 ch + 3 tr in ch-space in the corner *, repeat from *-* 3 times in total, 2 ch, 1 tr in first ch, repeat from (-) until corner, 3 ch, 1 tr in last ch, 2 ch and 1 sl st in 3rd ch at beg of round. ROUND 9: Work sl sts until ch-space in the corner, 3 ch (= 1 tr), 2 tr + 3 ch + 3 tr in same ch-space (= corner), * 5 ch, 1 tr in first ch-space, (5 ch, 1 tr in ch-space in tr-group), repeat from (-) until 1 ch-space remains before tr-group in the corner, 5 ch, 1 tr in last ch-space before the corner, 5 ch and 3 tr + 3 ch + 3 tr in ch-space in the corner *, repeat from *-* 3 times in total, 5 ch, 1 tr in first ch-space, repeat from (-) until 1 ch-space remains before the corner, 5 ch, 1 tr in last ch-space, 5 ch and 1 sl st in 3rd ch at beg of round. REMEMBER THE CROCHET TENSION! Repeat 6th to 9th round (4 rounds) outwards as shown in diagram. Continue like this until square measures approx. 36-38-40-42-44-46 cm x 36-38-40-42-44-46 cm. Now work arm holes as follows: Work as before until first corner, work 3 tr + 3 ch + 3 tr in ch-space in the corner. Now work ch until the middle of next side (i.e. in the middle between 1st and 2nd corner) as follows: Work 1 ch for every ch/tr skipped. Then work pattern as before until the middle between 3rd and 4th corner. Now work ch until beg of round as follows: Work 1 ch for every ch/tr skipped. On next round work pattern and inc as before over all sts, also in ch for armholes. Continue like this until square measures approx. 78-80-82-84-86-88 cm x 78-80-82-84-86-88 cm (i.e. approx. 21 cm in all sizes from armhole) - adjust to finish after 9th round (round with ch-spaces and trebles). Cut the yarn. FRONT PIECE: Beg from WS and work back and forth between first and second corner. NOTE: Work front piece without inc. Work according to diagram A.2 from first corner, i.e. work as follows: ROW 1: 3 ch (= 1 dc + 2 ch), 1 dc + 2 ch + 1 dc in first ch-space, * 6 ch, 1 dc + 2 ch + 1 dc in next ch-space*, repeat from *-* the entire row and finish with 2 ch and 1 dc in first ch-space in the corner, turn piece. ROW 2 (= RS): 3 ch (= 1 tr), * 2 tr + 2 ch + 2 tr in ch-space between 2 dc, 1 dc in 6-ch-space *, repeat from *-* the entire row and finish with 1 tr in 1st ch from beg of previous row, turn piece. ROW 3: 4 ch (= 1 tr + 1 ch), * 1 tr + 2 ch + 1 tr in ch-space in the middle of tr-group, 3 ch *, repeat from *-* until 1 tr-group remains before the corner, 1 tr + 2 ch + 1 tr in ch-space in last tr-group, finish with 1 ch and 1 tr in 3rd ch from beg of previous row, turn piece. ROW 4 (= RS): 5 ch (= 1 tr + 2 ch), * 1 tr in ch-space in tr-group, 5 ch *, repeat from *-* until 1 tr-group remains, 1 tr in ch-space in last tr-group, 2 ch and 1 tr in 3rd ch from beg of previous row, turn piece. ROW 5: 7 ch (= 1 dc + 6 ch), * 1 dc + 2 ch + 1 dc in 5-ch-space, 6 ch *, repeat from *-* the entire row and finish with 1 dc in 3rd ch from beg of previous row, turn piece. ROW 6 (= RS): 6 ch (= 1 tr + 3 ch), * 1 dc in 6-ch-space, 2 tr + 2 ch + 2 tr in 2-ch-space *, repeat from *-* the entire row and finish with 1 dc in last 6-ch-space, 3 ch and 1 tr in first ch from beg of previous row, turn piece. ROW 7: 4 ch (= 1 tr + 1 ch), 1 tr in same st, * 3 ch, 1 tr + 2 ch + 1 tr in ch-space in the middle of next tr-group *, repeat from *-* the entire row and finish with 3 ch and 1 tr + 1 ch + 1 tr in 3rd ch from beg of previous row, turn piece. ROW 8 (= RS): 8 ch (= 1 tr + 5 ch), * 1 tr in ch-space in the middle of tr-group, 5 ch *, repeat from *-* the entire row and finish with 5 ch and 1 tr in 3rd ch from beg of previous row, turn piece. Repeat rows 1 to 8 outwards. Continue like this until approx. 19-20-21-22-23-24 cm have been worked back and forth, fasten off (adjust after 1st or 5th row in pattern). Repeat on the other side, now work back and forth from third to fourth corner. EDGE: Finally work a round around the entire piece with 2nd or 6th row in pattern but in ch-space in each corner work 6 tr. Fasten off. SLEEVE: Work back and forward and sew togheter at the end. Sleeve is worked straight out of armhole of the body, top down. Beg mid under armhole, from RS. 1 dc in first st, then work ch-space as on 4th or 8th row in A.2. Work so that there are 12-13-14-15-15-16 ch-spaces around armhole. Then continue with pattern according to diagram A.2. Work pattern like this until sleeve measures 26 cm. Now work according to A.3. On every row with arrow work 2 tr tog into 1 tr mid front of sleeve (i.e. dec 1 ch-space on every row with arrow) - READ DECREASE TIP. The dotted line shows mid front of sleeve. Otherwise continue the pattern as before. Dec on every 4th row a total of 4 times. Then work according to diagram A.2 until sleeve measures 56 cm in all sizes. Fasten off. Repeat in the other side. |
||||||||||||||||||||||
Diagram explanations |
||||||||||||||||||||||
|
||||||||||||||||||||||
 |
||||||||||||||||||||||
 |
||||||||||||||||||||||
 |
||||||||||||||||||||||
 |
||||||||||||||||||||||
Have you finished this pattern?Tag your pictures with #dropspattern #springblisscardigan or submit them to the #dropsfan gallery. Do you need help with this pattern?You'll find 12 tutorial videos, a Comments/Questions area and more by visiting the pattern on garnstudio.com. © 1982-2026 DROPS Design A/S. We reserve all rights. This document, including all its sub-sections, has copyrights. Read more about what you can do with our patterns at the bottom of each pattern on our site. |
||||||||||||||||||||||


With over 40 years in knitting and crochet design, DROPS Design offers one of the most extensive collections of free patterns on the internet - translated to 17 languages. As of today we count 325 catalogues and 12298 patterns translated into English (UK/cm).
We work hard to bring you the best knitting and crochet have to offer, inspiration and advice as well as great quality yarns at incredible prices! Would you like to use our patterns for other than personal use? You can read what you are allowed to do in the Copyright text at the bottom of all our patterns. Happy crafting!
Post a comment to pattern DROPS 162-5
We would love to hear what you have to say about this pattern!
If you want to leave a question, please make sure you select the correct category in the form below, to speed up the answering process. Required fields are marked *.