
Popular categories
Looking for a yarn?


Comments / Questions (39)
![]() Gayle Dayman wrote:
Gayle Dayman wrote:
Thank you 😊
16.07.2024 - 12:43
![]() Gayle Dayman wrote:
Gayle Dayman wrote:
That's for the collar once you have cast off for shoulder edge. I'm talking about the collar when you first start to work into the collar width. Do you have these 2 short rows all the way up the collar from beginning to shoulders? Cheers Gayle
16.07.2024 - 01:21DROPS Design answered:
Dear Gayla, after that initial two rows (as short rows) the next time you knit short rows, after you cast off the sholders and knit only on the stitches for the collar. Happy Knitting!
16.07.2024 - 12:22
![]() Gayle wrote:
Gayle wrote:
The front collar says to "knit 2 rows seed stitch only over outer most 7 sets. "Then it says "these short rows begin collat shaping" but it doesn't say to continue to do these short rows on subsequent rows. Please help, do I continue to add these short rows when I increase the collars outer edge?? Thank you Cheers Gayle
14.07.2024 - 07:39DROPS Design answered:
Dear Gayle the instructions for the short rows can be found at the last paragraph for the left fron, i.e: "2 rows over all sts, 2 rows over only the outermost 16 sts *, repeat from * - * until the collar measures approx. 8 cm or length needed to reach center back." I hope this helps. Happy Knitting!
16.07.2024 - 01:11
![]() Sylvie wrote:
Sylvie wrote:
Bonjour, J'ai du mal à comprendre les augmentations du col, faut-il augmenter et comment sur le bord extérieur de la bordure entre les mailles du point de riz? Comment diminuer l'encolure et augmenter en même temps? ce n'est pas clair... Les 12 mailles de diminutions se font elles juste après la dernière maille du point de riz et ensuite je fais un surjet et je tricote ensuite le point fantaisie? Les rangs raccourcis sont-ils fait à la manière d'une maille enrobée?
05.02.2024 - 13:29DROPS Design answered:
Bonjour Sylvie, on doit d'abord augmenter 2 mailles à 1 maille du bord = tricotez par ex 2 fois la 2ème et la 3ème m à partir du bord (les 2 mailles avant la maille lisière pour le devant gauche), puis vous augmentez 1 seule maille à 1 maille du bord (avant la dernière maille sur l'endroit pour le devant gauche). En même temps vous diminuer pour former l'encolure: vous diminuez 1 maille avant le point de riz (les mailles de bordure devant augmentées des mailles du col), diminuez ainsi 12 fois 1 maille tous les rangs sur l'endroit. Bon tricot!
05.02.2024 - 15:53
![]() Helene Auclair wrote:
Helene Auclair wrote:
Bonjour , je suis a faire la manche grandeur XL, après avoir fait les diminutions de chaque côtés de la manche il est écrit ( puis 2 m jusqu'à ce que la manche mesure 57-57-58 cm, puis 1 fois 3 m. La manche mesure environ 58-58-59 cm de hauteur totale, rabattre les mailles restantes.) Es ce que sa veux dire que je diminue 2 m de chaque côté tout les 2 rangs jusqu'à 58cm ?
03.06.2023 - 02:34DROPS Design answered:
Bonjour Mme Auclair, tout à fait, vous rabattez 2 mailles de chaque côté tous les 2 rangs (autrement dit 2 mailles au début de chaque rang sur l'endroit et sur l'envers) jusqu'à ce que la manche mesure 58 cm, assurez-vous juste d'avoir bien rabattu le même nombre de fois 2 mailles de chaque côté avant de rabattre les 3 m de chaque côté. Bon tricot!
05.06.2023 - 09:50
![]() Katia Marelli wrote:
Katia Marelli wrote:
Can you translate this pattern into italian please? Thank you.
20.01.2023 - 00:30DROPS Design answered:
Dear Katia, you'll find Italian translation for this pattern online within the nex few days. Happy crafting!
21.01.2023 - 22:20
![]() Emma wrote:
Emma wrote:
Ich habe eine Frage bezüglich der Ärmel bei den letzten Abnahmen wie häufig muss ich 2 Maschen abnehmen bevor ich einmal je 3 Maschen abnehmen muss. Wie viele Maschen werden beim letzten Schritt noch abgekettet, bei der Endlänge von 58-58-59 cm Liebe Grüße Emma
24.05.2021 - 11:35DROPS Design answered:
Liebe Emma, je nach Ihrer Maschenprobe in der Höhe wir diese Anzahl unterschiedlich sein, Wichig ist hier, daß Sie 2 Maschen beiseitig abketten bis die Ärmel 57 oder 58 cm misst. Viel Spaß beim stricken!
25.05.2021 - 08:25
![]() Helena wrote:
Helena wrote:
Hallo zusammen, muss ich bei den Ärmelabnahmen bei Größe XS/S die Abnahmen jeweils beidseitig machen? Ich habe Verständnisprobleme bei dem letzten Satz: "Nach 50-48-47 cm, bei jeder 2. R., gegen die Schulter abk.: 3 M. 2-2-1 Mal, 2 M. 2-2-3 Mal, 1 M. 0-2-4 Mal, weiter 2 M. auf beiden Seiten bis die Arb. 57-57-58 cm misst, danach 3 M. 1 Mal. Nach ca. 58-58-59 cm alle M. abk."
17.05.2021 - 22:39DROPS Design answered:
Liebe Helena, ja genau, die Maschen werden beidseitig abgekettet (= am Anfang jeder Reihe). Viel Spaß beim stricken!
18.05.2021 - 08:14
![]() Solveig Jensen wrote:
Solveig Jensen wrote:
Krave: Skal jeg kun lave 1 pind vendestrik? Skal jeg tage ud 8 masker ud på pinden derefter? Skal jeg først strikke venstre side, når jeg har taget 18 masker ud til krave?
28.12.2020 - 08:17DROPS Design answered:
Hej Solveig, ja du strikker kun 1 vendepind. Så tager du 1 maske ud (indenfor kantmasken) på de næste 8 pinde osv. God fornøjelse
07.01.2021 - 12:06
![]() Clo wrote:
Clo wrote:
Bjr pour le motif du diagramme, est ce qu’il faut tricoter le rang retour comme les mailles se présentent? Merci
11.10.2020 - 17:31DROPS Design answered:
Bonjour Clo, tous les rangs du motifs sont représentés dans le diagramme, autrement dit, vous lisez le diagramme de droite à gauche sur l'endroit et de gauche à droite sur l'envers (plus d'infos ici. Bon tricot!
12.10.2020 - 08:28
|
|||||||
DROPS 71-1 |
|||||||
 |
 |
||||||
DROPS Cardigan in Alaska
DROPS 71-1 |
|||||||
|
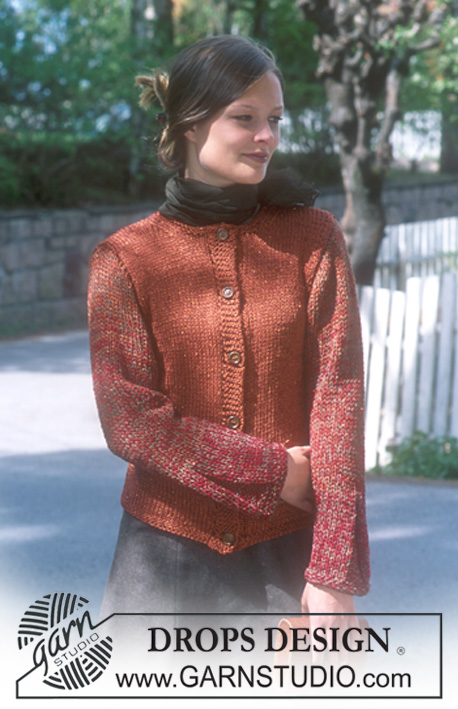
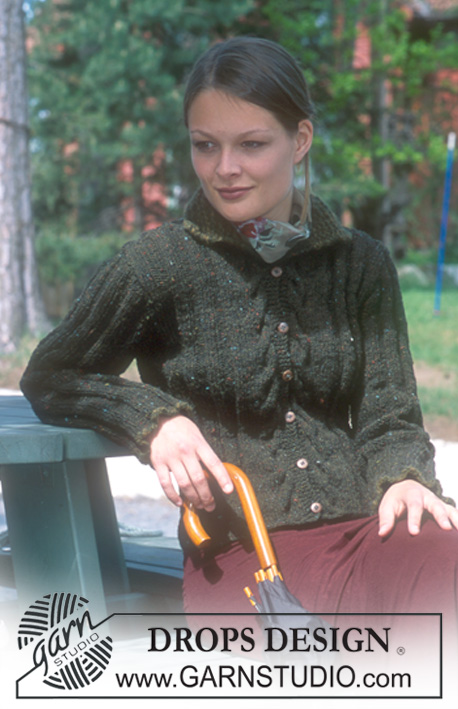
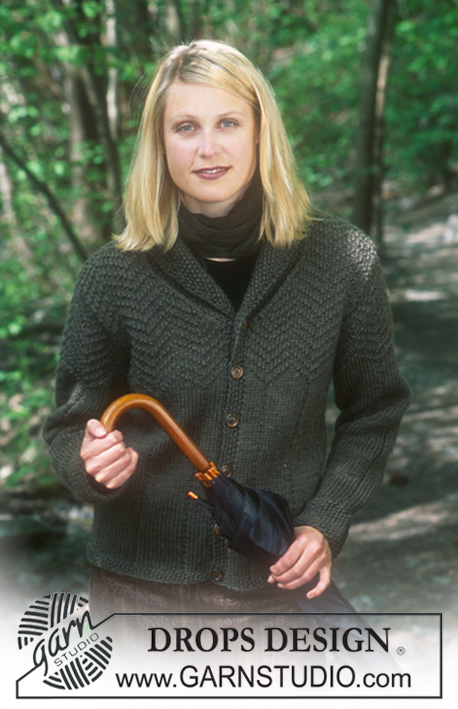
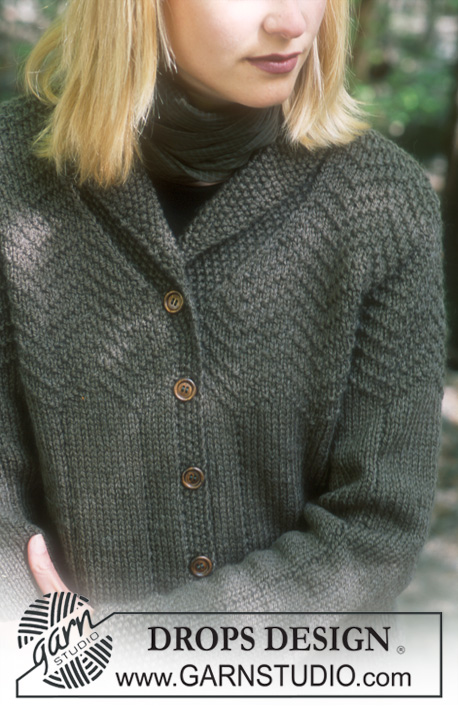
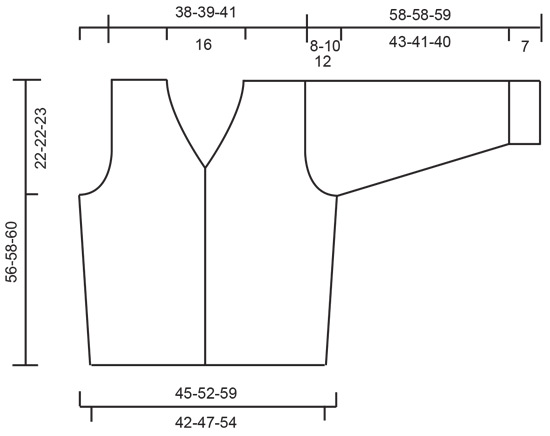
Gauge: 16 sts x 20 rows on larger needles in stockinette st = 10 x 10 cm Garter st, when knitting flat: Knit all sts, all rows. Pattern: See chart. The chart is showing every row in the pattern seen from the right side Buttonhole: Make buttonholes along right buttonband. 1 buttonhole = bind off the 3rd and 4th sts from front edge and cast on 2 new sts on the next row. The top buttonhole will be made in the collar sts. Make buttonholes when the piece measures: Size XS/S: 1, 9, 16, 24, 31 and 38 cm. Size M: 1, 9, 17, 25, 33 and 40 cm Size L/XL: 2, 10, 18, 26, 34 and 41 cm Knitting tips (for neck): All decs are made from right side. Right front (as when the garment as worn): Dec 1 st as follows: sl 1, K 1, psso. Left front: Dec 1 st as follows: K 2 tog. Seed Stitch (on an even number of sts): Row 1: * K 1, P 1 * Row 2: * P 1, K 1 * Repeat Rows 1-2. ---------------------------------------------------------------- BODY Cast on 145-161-185 sts on smaller needles. Knit 5 rows seed st - make buttonholes on right buttonband - see instructions above. Change to larger needles, placing a marker 39-43-49 sts in from each center front edge (to mark the sides). Establish pattern as follows (right side row): 5 edge sts in seed st, 33-37-43 sts in Pattern 1 - start at appropriate arrow on the chart, 1 st in seed st, 9-7-7 sts stockinette st, then knit Pattern 1 - start at right side of chart, not at arrow - over 58-68-80 sts, 1 st seed st, 9-7-7 sts stockinette st, 24-30-36 sts in Pattern 1 - start at right side of chart, not at arrow - then 5 edge sts in seed st. Continue with pattern as established until the piece measures 10-7-7 cm . Inc 1 st at each side of side st (st in seed st) every 10-6-6 cm 2-4-4 times - knit the increased sts in stockinette st as you go along. After all incs there are 153-177-201 sts on needles and the pattern now continues across all the sts. When the piece measures 30-32-33 cm knit Pattern 2 and then repeat Pattern 3 to finished measurements - start at appropriate arrow on the chart after the button band in seed st. When the piece measures 34-36-37 cm knit the next row as follows: 38-44-49 sts for the front, bind off 5-5-7 sts for armhole, 67-79-89 sts for the back, bind off 5-5-7 sts for armhole, 38-44-49 sts for the front. Knit each side separately. Left front: = 38-44-49 sts. Read the entire next section before knitting. Armhole: bind off for armhole at the side every other row: 2 sts 0-2-4 times and 1 st 3-4-4 times. Collar: At the same time when the piece measures 35-37-38 cm inc 2 sts inside 1 edge st at center front edge, for collar - knit the increased sts for collar in seed st as you go along. Then knit 2 rows seed st only over the outermost 7 sts (button band) - do not knit the remaining sts on the row. These short rows begin the collar shaping. Then inc 1 st inside 1 edge st every row 8 times, then every other row 6 times, then every 4 rows 2 times = 18 sts increased for collar - knit the increased sts in seed st as you go along. Neck shaping: At the same time when the piece measures 39-41-42 cm dec for the neckline (while continuing to inc for collar) as follows: dec 1 st inside the seed sts 12 times every other row - see knitting tips. When the piece measures 56-58-60 cm bind off the 18-19-20 shoulder sts. Now only the seed sts remain on needles = 23 sts. Continue with seed st over these sts as follows: * 2 rows over all sts, 2 rows over only the outermost 16 sts *, repeat from * - * until the collar measures approx. 8 cm or length needed to reach center back. Put sts on a st holder. Right front: = 38-44-49 sts. Knit the same as left front, reversing all shaping, and make buttonholes on button band (see instructions above). Back: = 67-79-89 sts. Bind off for armholes at both sides as on front = 61-63-65 sts. When the piece measures 54-56-58 cm bind off the center 23-23-23 sts for the neck. On the next row dec 1 st at each neck edge. Bind off the remaining 18-19-20 shoulder sts when the piece measures 56-58-60 cm. Sleeve: Cast on 38-42-46 sts on smaller needles. Knit seed st for 7 cm. Change to larger needles and Pattern 1 - place the pattern on the sleeve so that there is a single seed st column at the center. When the piece measures 8 cm inc 1 st at each side every 6 rows 14-13-12 times = 66-68-70 sts - knit the increased sts in the pattern as you go along. At the same time when the piece measures 46-44-43 cm knit Pattern 2, then repeat Pattern 3 to finished measurements. When sleeve measures 50-48-47 cm bind off for sleeve cap at each side every other row: 3 sts 2-2-1 time, 2 sts 2-2-3 times, 1 st 0-2-4 times, then 2 sts at each side until the piece measures 57-57-58 cm and then 3 sts each side 1 time. The piece measures approx. 58-58-59 cm , bind off the remaining sts. Assembly: Sew shoulder seams. Sew the collar together at center back invisibly. Sew the collar to back neck. Sew the sleeve seams and set into Body. Sew on buttons. |
|||||||
Diagram explanations |
|||||||
|
|||||||
 |
|||||||
 |
|||||||
Have you finished this pattern?Tag your pictures with #dropspattern or submit them to the #dropsfan gallery. Do you need help with this pattern?You'll find 27 tutorial videos, a Comments/Questions area and more by visiting the pattern on garnstudio.com. © 1982-2026 DROPS Design A/S. We reserve all rights. This document, including all its sub-sections, has copyrights. Read more about what you can do with our patterns at the bottom of each pattern on our site. |
|||||||


With over 40 years in knitting and crochet design, DROPS Design offers one of the most extensive collections of free patterns on the internet - translated to 17 languages. As of today we count 325 catalogues and 12298 patterns translated into English (UK/cm).
We work hard to bring you the best knitting and crochet have to offer, inspiration and advice as well as great quality yarns at incredible prices! Would you like to use our patterns for other than personal use? You can read what you are allowed to do in the Copyright text at the bottom of all our patterns. Happy crafting!
Post a comment to pattern DROPS 71-1
We would love to hear what you have to say about this pattern!
If you want to leave a question, please make sure you select the correct category in the form below, to speed up the answering process. Required fields are marked *.