
Popular categories
Looking for a yarn?


Comments / Questions (5)
![]() Claire Davenport wrote:
Claire Davenport wrote:
Hi Help please, my garter stitch edging is curling up, what have I done wrong ? Thank you Claire
22.09.2022 - 09:39DROPS Design answered:
Dear Mrs Davenport, blocking the garment afterwards can help: slightly moisten piece and let it dry flat. Happy knitting!
22.09.2022 - 10:05
![]() Thea wrote:
Thea wrote:
Hallo, omdat de mouwen erg smal zijn zou ik de mouwen van een grotere maat willen breien en de rest van het vest in de kleinste maat. Er wordt op de panden niet geminderd voor de mouw daarom lijkt het mij geen probleem, klopt mijn redenering?
21.06.2021 - 16:53DROPS Design answered:
Dag Thea,
Er wordt wel gemeerderd op de panden voor de armsgaten, bij het achterpand staat namelijk Kant bij een hoogte van 46-47-48-49-50-51 cm 4-4-5-5-6-7 st af voor de armsgaten aan het begin van de volgende 2 nld = 78-84-90-98-106-114 st op de nld.. Dit is bij het voorpand ook zo. Maar als je de mouw bijvoorbeeld 2 cm breder wilt hebben, dan zou je dit afkanten op de panden 1 cm eerder moeten doen, zodat het armsgat in totaal 2 cm groter wordt.
24.06.2021 - 10:28
![]() Detlev wrote:
Detlev wrote:
Mit welcher Alternativen kann man dieses Modell noch stricken? Danke
30.04.2019 - 23:24DROPS Design answered:
Lieber Detlev, versuchen Sie unseren Garnumrechner für jedes Garn (= Alpaca und Kid-Silk) um einige Alternativen zu sehen. Hier lesen Sie noch mehr über Garnalternativen. Viel Spaß beim stricken!
02.05.2019 - 09:28
![]() Benedetta wrote:
Benedetta wrote:
Buongiorno, ho problemi nel cominciare il davanti sinistro. Non capisco come devo interpretare il grafico.Io ho cominciato con 5 m legaccio e 2 m.diritte po come continuo? Grazie di cuore
24.09.2015 - 08:58DROPS Design answered:
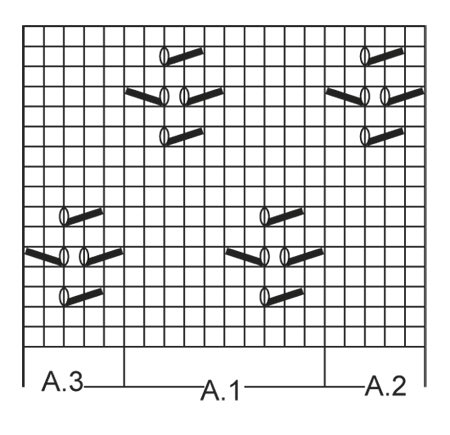
Buongiorno Benedetta. Deve lavorare come segue (taglia S): 5 m a legaccio, 2 m a maglia rasata, diagramma A.1 3 volte, diagramma A.3 una volta, 5 m a legaccio. A 8 cm, aumenterà 1 m all'inizio del ferro sul diritto. Dopo la costa a legaccio sulle 6 m laterali, lavorerà: 1 m vivagno, 2 m a maglia rasata, diag. A.2, diag.A.1, diag.A.3, 5 m a legaccio. Ci riscriva se ancora in difficoltà. Buon lavoro!
25.09.2015 - 07:02
![]() Doris wrote:
Doris wrote:
Sehr hübsche Jacke, zeitlos tragbar.
22.12.2014 - 15:17
|
|||||||||||||
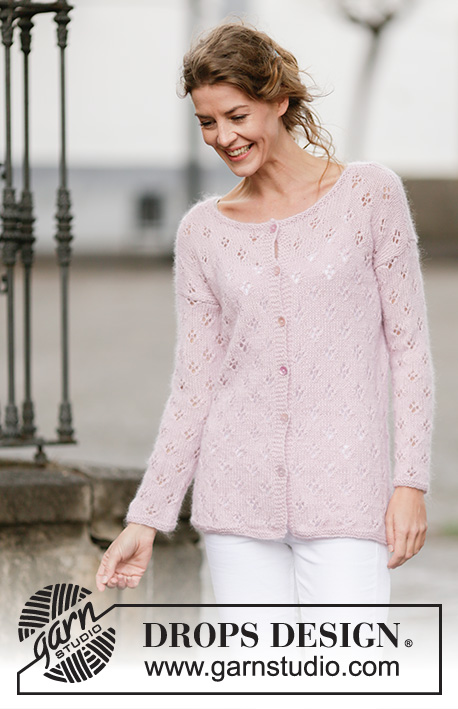
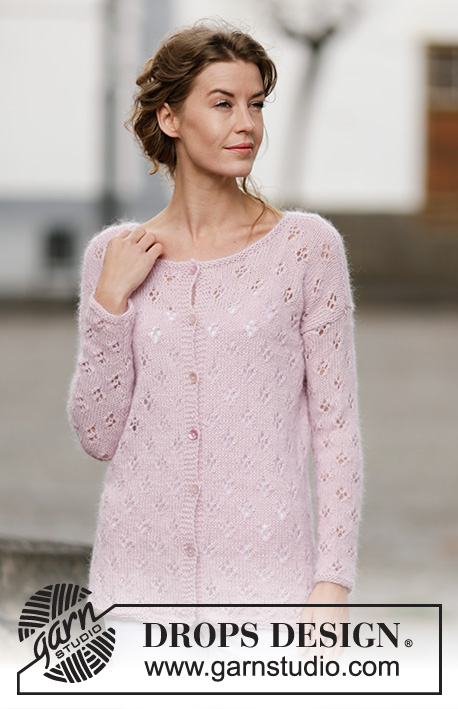
Sweet Bliss Cardigan#sweetblisscardigan |
|||||||||||||
 |
 |
||||||||||||
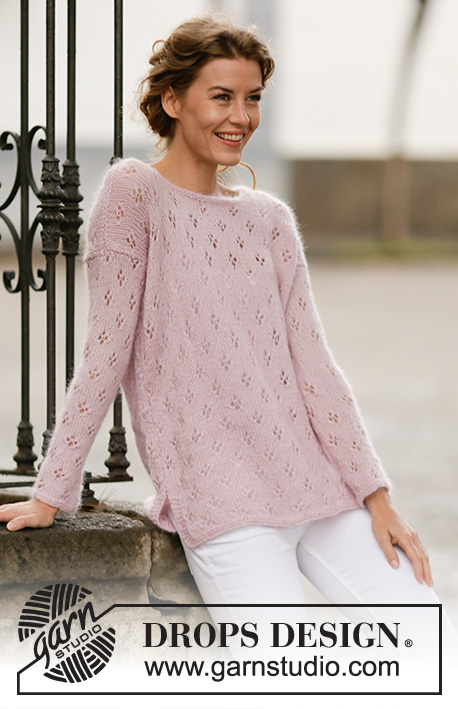
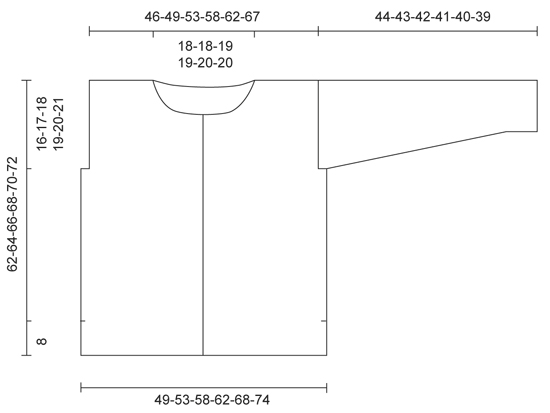
Knitted DROPS jacket with lace pattern and vent in ”Alpaca” and ”Kid-Silk”. Size: S - XXXL.
DROPS 160-13 |
|||||||||||||
|
GARTER ST (back and forth): K all rows. 1 ridge = 2 rows K. PATTERN: See diagrams A.1 to A.3. The diagrams show all rows in pattern seen from RS. BUTTONHOLES: Dec for buttonholes on right band. 1 buttonhole = K tog third and fourth st from edge and make 1 YO. Dec for buttonholes when piece measures: SIZE S: 13, 21, 28, 35, 42 and 49 cm. SIZE M: 11, 19, 27, 35, 43 and 51 cm. SIZE L: 13, 21, 29, 37, 45 and 53 cm. SIZE XL: 13, 21, 29, 37, 45 and 53 cm. SIZE XXL: 13, 20, 27, 34, 41, 48 and 55 cm SIZE XXXL: 10, 17, 25, 33, 41, 49 and 57 cm ---------------------------------------------------------- BACK PIECE: Worked back and forth on circular needle. Cast on 84-90-98-106-116-126 sts on circular needle size 4.5 mm with 1 strand of each yarn (= 2 strands). Work 2 ridges in GARTER ST - see explanation above. Switch to circular needle size 5 mm. Work as follows from RS: 5 sts in garter st, 2-0-4-3-3-3 sts in stocking st, A.1 (= 10 sts) 7-8-8-9-10-11 times in total, 2-0-4-3-3-3 sts in stocking st, 5 sts in garter st. Continue the pattern like this. When piece measures 8 cm, cast on 1 edge st in each side of piece at the end of the next 2 rows = 86-92-100-108-118-128 sts. Work edge sts in garter st until finished measurements. REMEMBER THE KNITTING TENSION Work 1 more ridge over the 6 sts in garter st (incl edge st) in each side of piece, work the remaining sts as before. Then work as follows from RS: 1 edge st in garter st, 2-0-4-3-3-3 sts in stocking st, A.2 (= 5 sts), A.1 as before until 8-6-10-9-9-9 sts remain, A.3 (= 5 sts), 2-0-4-3-3-3 sts in stocking st and 1 edge st in garter st. NOTE: Adjust A.2 and A.3 according to A.1. Continue pattern like this. When piece measures 46-47-48-49-50-51 cm, cast off 4-4-5-5-6-7 sts for armhole at beg of the next 2 rows = 78-84-90-98-106-114 sts on needle. Continue with pattern over the remaining sts, work the sts that do not fit A.1-A.3 in stocking st. When piece measures 58-60-62-64-66-68 cm, cast off for neck as follows: Cast off the middle 30-30-32-32-34-34 sts (= 24-27-29-33-36-40 sts on each side) and finish each shoulder separately. Continue to cast off 1 st on next row from neck = 23-26-28-32-35-39 sts remain on the shoulder. Work A.1 and in stocking st over the sts that do not fit A.1 until piece measures 61-63-65-67-69-71 cm, adjust to finish nicely with lace pattern. Work 1 ridge in garter st over all sts. Cast off. Work the other shoulder the same way. RIGHT FRONT PIECE: Worked back and forth on circular needle. Cast on 47-50-54-58-63-68 sts (incl 5 band sts) on circular needle size 4.5 mm with 1 strand of each yarn (= 2 strands). Work 2 ridges. Switch to circular needle size 5 mm. Work as follows from RS: 5 band sts in garter st, A.2 1-0-0-1-0-1 time, A.1 until 7-5-9-8-8-8 sts remain (= 3-4-4-4-5-5 times in total), 2-0-4-3-3-3 sts in stocking st, 5 sts in garter st. Continue pattern like this. Work band sts in garter st until finished measurements. When piece measures 8 cm, cast on 1 edge st at the end of next row from RS = 48-51-55-59-64-69 sts. Work edge sts in garter st until finished measurements. Work 1 ridge over the 6 sts in garter st (incl edge st), work the remaining sts as before, then work as follows from RS: 5 band sts in garter st, A.2 1-0-0-1-0-1 time as before, A.1 as before until 8-6-10-9-9-9 sts remain, A.3, 2-0-4-3-3-3 sts in stocking st, 1 edge st in garter st. NOTE: Adjust A.2 and A.3 according to A.1. Continue pattern like this. Remember BUTTONHOLES - see explanation above. When piece measures 46-47-48-49-50-51 cm, cast off 4-4-5-5-6-7 sts for armhole at beg of next row from WS =44-47-50-54-58-62 sts. Continue with pattern over the remaining sts, work the sts that do not fit A.1-A.3 in stocking st. When piece measures 50-52-54-54-56-58 cm, shape neck as follows: On next row from RS slip the first 12 sts on a stitch holder for neck, then cast off 2 sts at beg of every row from the neck 3 times and 1 st 3-3-4-4-5-5 times in total = 23-26-28-32-35-39 sts remain for shoulder. Work A.1 and in stocking st over the sts that do not fit pattern until piece measures 61-63-65-67-69-71 cm, adjust to finish nicely with lace pattern. Work 1 ridge in garter st over all sts. Cast off. LEFT FRONT PIECE: Work as right but reversed. I.e. work A.2 instead of A.3 and A.3 instead of A.2. The edge st in the side is cast on at the end of a row from WS and cast off for armhole at beg of row from RS. Do not dec for buttonholes. SLEEVE: Worked back and forth on circular needle. Cast on 42-42-46-46-48-48 sts (incl 1 edge st in each side of piece) on circular needle size 4.5 mm with 1 strand of each yarn (= 2 strands). Work 2 ridges. Switch to circular needle size 5 mm. Then work as follows from RS: 1 edge st in garter st, 0-0-2-2-3-3 sts in stocking st, A.1 until 1-1-3-3-4-4 sts remain (= 4 times in total), 0-0-2-2-3-3 sts in stocking st, 1 edge st in garter st. Work edge sts in garter st until finished measurements. Continue pattern like this. When piece measures 8 cm, inc 1 st inside 1 edge st in each side of piece, repeat inc every 5½-4-4-3½-3-2½ cm 6-8-8-9-10-12 more times = 56-60-64-66-70-74 sts. Work the inc sts in the pattern. Continue with pattern until piece measures 44-43-42-41-40-39 cm (shorter measurements in the larger sizes because of longer sleeve cap and wider shoulders). Loosely cast off. Work the other sleeve the same way. ASSEMBLY: Sew shoulder seams inside cast-off edges. Sew in sleeves and sew sleeve seams. Sew side seam from armhole down to where 1 edge st was cast on in each side of piece (= approx. 8 cm vent) inside 1 edge st. Sew the buttons on to the left front band. NECK EDGE: Worked back and forth on circular needle. Pick up from RS approx. 80-92 sts (incl sts on stitch holder) along the neck on circular needle size 4.5 mm with 1 strand of each yarn (= 2 strands). Work 2 rigdes and cast off. |
|||||||||||||
Diagram explanations |
|||||||||||||
|
|||||||||||||
 |
|||||||||||||
 |
|||||||||||||
Have you finished this pattern?Tag your pictures with #dropspattern #sweetblisscardigan or submit them to the #dropsfan gallery. Do you need help with this pattern?You'll find 27 tutorial videos, a Comments/Questions area and more by visiting the pattern on garnstudio.com. © 1982-2026 DROPS Design A/S. We reserve all rights. This document, including all its sub-sections, has copyrights. Read more about what you can do with our patterns at the bottom of each pattern on our site. |
|||||||||||||


With over 40 years in knitting and crochet design, DROPS Design offers one of the most extensive collections of free patterns on the internet - translated to 17 languages. As of today we count 324 catalogues and 12290 patterns translated into English (UK/cm).
We work hard to bring you the best knitting and crochet have to offer, inspiration and advice as well as great quality yarns at incredible prices! Would you like to use our patterns for other than personal use? You can read what you are allowed to do in the Copyright text at the bottom of all our patterns. Happy crafting!
Post a comment to pattern DROPS 160-13
We would love to hear what you have to say about this pattern!
If you want to leave a question, please make sure you select the correct category in the form below, to speed up the answering process. Required fields are marked *.