
Popular categories
Looking for a yarn?


Comments / Questions (30)
![]() Olina wrote:
Olina wrote:
Är det verkligen drops air 04 mellangrå den är stickad i? Koftan ser ut att vara stickad i mer beige hållet?
13.12.2015 - 16:02DROPS Design answered:
Hej Olina. Den er strikket i graa. Vi har heller ingen beige Air
15.12.2015 - 16:03
![]() Helle Morild wrote:
Helle Morild wrote:
Skal de 7 nye masker på forstk/ryg strikkes vrang på alle pinde?
10.11.2015 - 10:25DROPS Design answered:
Vilka 7 nya maskor menar du?
19.11.2015 - 14:13
![]() Monica wrote:
Monica wrote:
Hei! Har begynt å strikke med pinne 3,5 og da ble bakstykket 65 cm bredt. Vil tro at bredden på bakstykket skal være det samme som bredden foran, altså 48 cm i str s? Lagde flere prøvelapper, og på pinne 2 er prøvelappen 11 cm med 19 masker. Synes ikke det ble så pent med så små pinner heller. Har vanligvis normal strikkefasthet, så skjønner ingen ting her.. Hvis bakstykket skal være 48 cm må jeg ha 26 masker mindre!
31.07.2015 - 11:46
![]() Chiara wrote:
Chiara wrote:
Non capisco la spiegazione per iniziare le maniche. L unica cosa che ho capito è che bisogna riprendere 60 m ma se poteste chiarirmi meglio sarebbe aprezzato. Grazie
11.02.2015 - 20:57DROPS Design answered:
Buongiorno Chiara. Deve riprendere le m lungo gli scalfi del davanti e del dietro, in modo che la manica sia già attaccata al davanti /dietro. Non deve però riprendere nessuna m nelle 5 m intrecciate per gli scalfi sul davanti/dietro. Sulla manica, avvierà poi 5 m da ciascun lato, che cucirà alle 5 m intrecciate del davanti/dietro alla fine. Buon lavoro!
12.02.2015 - 12:15
![]() Gabriele Zöttl wrote:
Gabriele Zöttl wrote:
Meine Maschenprobe mit Air: Nadel Nr.4,5 = 14 Maschen, Nadel 4 = 15 Maschen. Ich kann auch nicht erkennen, dass sich das Strickstück mit Halbpatent zusammenzieht, bei mir wird es weiter! Mache ich vielleicht etwas falsch?
02.02.2015 - 10:48DROPS Design answered:
Schauen Sie sich am besten einmal das Video zum falschen Patentmuster an, im Kopf neben dem Foto unter "Videos" gibt es eins namens "Muster: Falsches Patent - 1". Wenn Sie es bereits genauso gestrickt haben - kann es sein, dass Sie generell sehr locker stricken? Und wie messen Sie die Probe, ziehen Sie sie etwas auseinander? Am besten stricken Sie eine recht große Probe und halten Sie vor dem Messen nach oben, sodass das Muster wie bei der Jacke hängt.
04.02.2015 - 19:21
![]() Barbro wrote:
Barbro wrote:
Halbpatent zieht ja die Maschen zusammen!
30.01.2015 - 17:19
![]() Gabriele Zötttl wrote:
Gabriele Zötttl wrote:
Die Maschenprobe 19 Maschen in Halbpatent, mit Nadel 4 kann nicht stimmen. Das Garn hat glatt gestrickt 17 M /10 cm. Ist die Angabe falsch?
30.01.2015 - 11:50DROPS Design answered:
Doch, die Maschenprobe stimmt. Weicht Ihre denn so stark ab?
30.01.2015 - 19:52
![]() Pia Sepstrup wrote:
Pia Sepstrup wrote:
Hvis jeg bruger Brushed Alpaca Silk, skal jeg så også have to tråde?
17.01.2015 - 08:45DROPS Design answered:
Hej Pia. Nej, du strikker den kun med 1 traad.
19.01.2015 - 13:42AnnieAngele wrote:
Rebonjour,j'ai enfin compris les explications pour les emmanchures aussi j'aimerai faire une petite critique,la traduction n'est pas toujours compréhensible et le dessin du modèle pas assez détaillé.Merci et bonne année pour le tricot.AA
04.01.2015 - 19:05AnnieAngele wrote:
Bonjour,je ne comprends pas les explications pour monter les mailles des emmanchures car il faut relever 60m.entre les mailles rabattues pour les emmanchures et il y a une note qui indique qu'il ne faut pas relever de mailles au dessus des mailles rabattues pour les emmanchures.Merci pour la réponse.
04.01.2015 - 15:56DROPS Design answered:
Bonjour Annie Angele, on relève les mailles des manches le long de l'emmanchure dos & devant, mais pas le long des 5 m rabattues au dos et au devant pour les emmanchures. On monte ensuite 5 m de chaque côté (ces 5 m montées de chaque côté seront assemblées aux 5 m rabattues au dos + au devant). Bon tricot!
05.01.2015 - 09:20
|
|
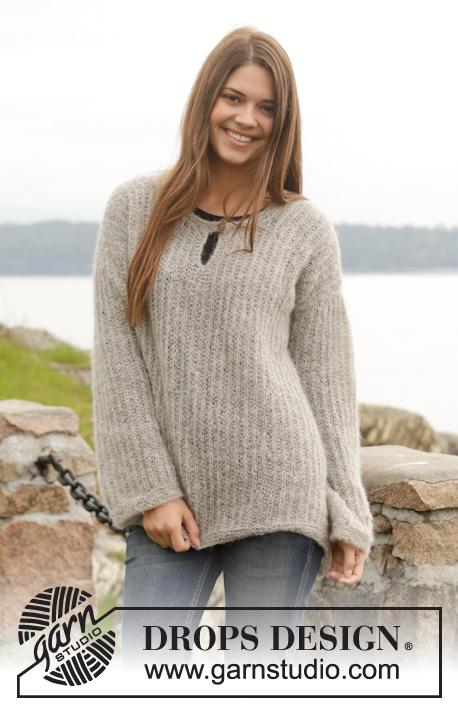
Brume Cardigan#brumecardigan |
|
|
|
|
Knitted DROPS jacket with false English rib in "Air" or "Brushed Alpaca Silk". Size: S - XXXL.
DROPS 158-24 |
|
|
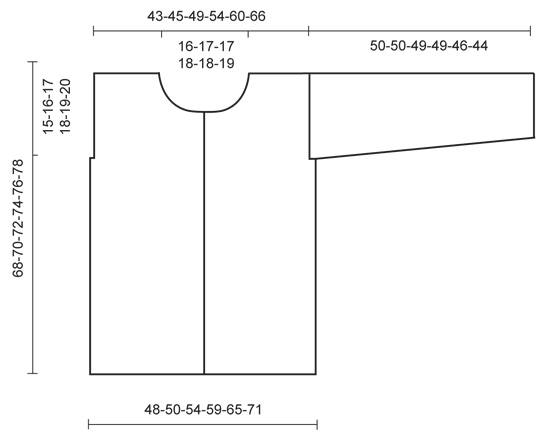
GARTER ST (back and forth on needle): K all rows. 1 ridge = 2 rows K. MEASURING TIP: All measurements must be done when piece is held up because the texture makes the piece elastic. FALSE ENGLISH RIB: Row 1: 1 edge st in garter st, * K 1, 1 YO, slip 1 st as if to P (with yarn behind piece) *, repeat from *-* until 2 sts remain, finish with K 1 and 1 edge st in garter st. Row 2: 1 edge st in garter st, * K 1, P tog YO and slipped st *, repeat from *-* until 2 sts remain, finish with K 1 and 1 edge st in garter st. Repeat 1st and 2nd row upwards. DECREASE TIP (applies to sleeve): Dec 1 st in each side by K 2 tog inside 1 edge st in garter st. Work sts in the side that do not fit the pattern in stocking st. BUTTONHOLES: Dec for buttonhole by K tog 3rd and 4th st in garter st in band and make a YO, K YO on next row. Dec for buttonholes when piece measures: SIZE S: 24, 33, 42, 51 and 60 cm SIZE M: 26, 35, 44, 53 and 62 cm SIZE L: 28, 37, 46, 55 and 64 cm SIZE XL: 21, 30, 39, 48, 57 and 66 cm. SIZE XXL: 23, 32, 41, 50, 59 and 68 cm. SIZE XXXL: 25, 34, 43, 52, 61 and 70 cm. -------------------------------------------------------- JACKET: Worked back and forth on circular needle. BACK PIECE: Cast on 93-97-105-113-125-137 sts on circular needle size 4 mm with 2 strands Air or Brushed Alpaca Silk. Then continue piece with 1 strand. Work in GARTER ST – see explanation above – until piece measures 2 cm. REMEMBER THE KNITTING TENSION! Then work FALSE ENGLISH RIB - see explanation above. READ MEASURING TIP! When piece measures 53-54-55-56-57-58 cm, cast off 5 sts in each side. On next row cast on 1 edge st in each side which is worked in garter st until finished measurements = 85-89-97-105-117-129 sts. Continue to work until piece measures 64-66-68-70-72-74 cm. Work the first 27-29-32-36-41-47 sts, cast off the next 31-31-33-33-35-35 sts and work the rest of row. Then finish each shoulder separately. On next row dec 1 more st towards the neck = 26-28-31-35-40-46 sts. Work until piece measures 68-70-72-74-76-78 cm. K 1 row from WS and cast off with K on next row. Work the same way on the other side. RIGHT FRONT PIECE: Cast on 50-52-56-60-66-72 sts on circular needle size 4 mm with 2 strands Air or Brushed Alpaca Silk. Then continue piece with 1 strand. Work back and forth in garter st until piece measures 2 cm. Then work false English rib with 4 band sts in garter st in towards mid front. When piece measures 24-26-28-21-23-25 cm, dec for BUTTONHOLE - see explanation above! When piece measures 53-54-55-56-57-58 cm, cast off 5 sts in the side for armhole. On next row cast on 1 edge st in the side which is worked in garter st until finished measurements = 46-48-52-56-62-68 sts. Continue to work until piece measures 58-60-62-64-66-68 cm. Now dec in every row from RS for neck towards mid front as follows: 10-10-11-11-12-12 sts 1 time, 3 sts 1 time and 2 sts 3 times and 1 st 1 time = 26-28-31-35-40-46 sts. Continue to work until piece measures 68-70-72-74-76-78 cm. K 1 row from WS and cast off with K from RS. LEFT FRONT PIECE: Work as right front piece but reversed. Do not dec for buttonholes on left band. ASSEMBLY: Sew tog shoulder seams inside cast-off edges. SLEEVES: Worked back and forth on circular needle, top down. Beg from RS and pick up 60-80 sts with circular needle size 4 mm and Air or Brushed Alpaca Silk. Pick up sts between where sts were cast off for armhole (NOTE: Do not work over sts cast off for armhole). P 1 row - AT THE SAME TIME adjust no of sts to 57-61-65-69-73-77 and cast on 5 new sts in each side of piece = 67-71-75-79-83-87 sts. Then work piece in false English rib with 1 edge st in garter st in each side - AT THE SAME TIME when piece measures 3 cm, dec 1 st in each side - READ DECREASE TIP. Repeat dec every 4-4-3-3-3-2 cm 9-10-11-12-13-14 times in total = 49-51-53-55-57-59 sts. Work until sleeve measures 48-48-47-47-44-42 cm. Work in garter st over all sts for 2 cm and cast off 2 strands. Knit another sleeve the same way. NECK EDGE: Worked back and forth on circular needle with Air or Brushed Alpaca Silk. Pick up approx. 64-72 sts with circular needle size 4 mm along neck edge, beg in right side of front piece from RS. K 1 row from WS. On next row dec for a buttonhole by K tog 3rd and 4th st and making a YO. K from WS, K YO to make a hole. Work 1 ridge. Cast off with 2 strands from RS. ASSEMBLY: Sew sleeves tog inside 1 edge st, sew sts cast on on sleeve to sts cast off for armhole on body. Finally sew down along the side of front piece and back piece. Sew on buttons. |
|
 |
|
Have you finished this pattern?Tag your pictures with #dropspattern #brumecardigan or submit them to the #dropsfan gallery. Do you need help with this pattern?You'll find 20 tutorial videos, a Comments/Questions area and more by visiting the pattern on garnstudio.com. © 1982-2026 DROPS Design A/S. We reserve all rights. This document, including all its sub-sections, has copyrights. Read more about what you can do with our patterns at the bottom of each pattern on our site. |


With over 40 years in knitting and crochet design, DROPS Design offers one of the most extensive collections of free patterns on the internet - translated to 17 languages. As of today we count 324 catalogues and 12290 patterns translated into English (UK/cm).
We work hard to bring you the best knitting and crochet have to offer, inspiration and advice as well as great quality yarns at incredible prices! Would you like to use our patterns for other than personal use? You can read what you are allowed to do in the Copyright text at the bottom of all our patterns. Happy crafting!
Post a comment to pattern DROPS 158-24
We would love to hear what you have to say about this pattern!
If you want to leave a question, please make sure you select the correct category in the form below, to speed up the answering process. Required fields are marked *.