
Popular categories
Looking for a yarn?


Comments / Questions (195)
![]() Cinzia wrote:
Cinzia wrote:
Buongiorno ho proprio bisogno del vostro aiuto ma per email è un po difficile perchè il testo è troppo lungo ..sono bloccata con il lavoro.Per favore!! Grazie Cinzia
28.08.2014 - 09:31DROPS Design answered:
Buongiorno Cinzia. Per un aiuto più personalizzato, può rivolgersi al seguente indirizzo mail: italy@garnstudio.com Le verrà risposto quanto prima. Grazie e buon lavoro!
29.08.2014 - 11:18
![]() Mieke Schuttinga wrote:
Mieke Schuttinga wrote:
Bij de voorpanden moet je de sjaalkraag maken maar moet er op de achterkant geen sjaalkraag gemaakt worden
26.08.2014 - 17:12DROPS Design answered:
Hoi Mieke. Nee, dat doe je niet. De sjaalkraag van de voorpanden worden tegen de halskant gelegd en vastgenaaid.
27.08.2014 - 15:23Miemie wrote:
The pattern makes no sense when trying to go to the sleeves. Did anyone get it further than that. HELP PLEASE
21.08.2014 - 11:00DROPS Design answered:
Dear Miemie, when piece measures 45-50 cm (see size) on back piece, cut the yarn. Start with a new ch of 29 ch (first sleeve), work over the back piece as before and work a ch of 31 ch at the end of row, both "fundation rows" are now made for sleeves each side. Continue as in pattern. Happy crocheting!
21.08.2014 - 12:11Silvia wrote:
Hola! como puedo saber a que talle corresponden mis medidas? Muchas gracias!!
19.08.2014 - 20:13DROPS Design answered:
Hola Silvia. Debajo de cada patrón viene el diagrama con las medidas de la prenda en cm. Tienes que compararlo con tus medidas para elegir la talla correcta.
20.08.2014 - 12:34
![]() Cinzia wrote:
Cinzia wrote:
Buongiorno avrei bisigno di aiuto! Leggendo le istruzioni per quanto riguarda il dietro della giacca ( parliamo delle prime righe delle istruzioni del dietro)non mi è chiaro se le indicazioni scritte ma non visibili sul disegno del diagramma ,di inserire 4 ma,tra una seri e l'altra di diagrammi 1/2/3 , vale anche x lo schema Az?In quanto se doves si attenermi al disegno no ma alla foto si! Grazie
17.08.2014 - 11:44DROPS Design answered:
Buonasera Cinzia. Le 4 m.a vanno ripetute, sostituendo però la prima e l'ultima m.a con 3 cat. Trova la corretta impostazione della ripetizione dei diagrammi e delle m.a nel paragrafo che inizia con ATTENZIONE. Ci riscriva se ancora in difficoltà. Buon lavoro!
17.08.2014 - 19:03
![]() Mona Ueland wrote:
Mona Ueland wrote:
Kan ikke se at det står beskrevet montering av kragen.Har prøvd,men det ble ikke bra.Kragen blir altfor stor.
16.08.2014 - 22:20DROPS Design answered:
Se montering af sjalskrave i videoen ovenfor. God fornøjelse!
18.08.2014 - 15:55
![]() Connie Lundquist wrote:
Connie Lundquist wrote:
Jeg forstår ikke forklaringen når man har hæklet det første af ryggen og skal lave luftmasker. Kan i skære det ud i pap??
06.08.2014 - 22:30DROPS Design answered:
Hej Connie. Er det hvor du skal begynde med ærmerne? Du har her hæklet det nederste af ryggen og ærmerne bliver hæklet i ét stykke sammen med ryggen. Du starter da med at hækle det 29 lm (ærme 1) og fortsæt så med mønstret over ryggen, slut af med 31 lm (ærme 2 - 29 lm + 2 lm til at "vende"). Du har altså nu rygstykket med lm på hver side (= ærmerne). Nu hækler du så også mønster over lm i hver side + ryggen som før. Dvs, du hækler nu ærme-rygstykke-ærme videre. Er det bedre?
07.08.2014 - 12:01
![]() Phyllis Weidmann wrote:
Phyllis Weidmann wrote:
This pattern does not give instructions for dealing with the 2-4-7-11-4-9 dc's of 1st row in A.z when you get to the NEXT row. I'd like to make this but I'm still trying to understand the instructions. Please help. Thank you.
10.07.2014 - 00:02DROPS Design answered:
Dear Mrs Weidmann, you continue in dc over these dc, but replace 1st and last dc with 3 ch after A.1 and before A.3. Happy crocheting!
10.07.2014 - 08:47
![]() Wendy wrote:
Wendy wrote:
I really need some directions for the stitches not in the diagram for all of the rows Size Large 9 dc goes to 7 dc and then I am lost for the next 3 rows to finish diagram A.z. Please help
09.07.2014 - 18:01DROPS Design answered:
Dear Wendy, when you work 1st row in A.Z (= from wrong side), you finish with 1 sc (lastst in A.1), the 3 ch will replace the 1st of the next dc, work 7 dc and replace the last of the 9 dc with 3 ch, continue with A.3, A.2, A.1. Happy crocheting!
10.07.2014 - 08:45
![]() Wendy wrote:
Wendy wrote:
It would be very nice to have a diagram for the other stitches not shown First row 9 dc, next row 7 dc etc then I am not sure what happens to those dc for the rest of the A.z rows???
09.07.2014 - 17:25
|
||||||||||||||||||||||
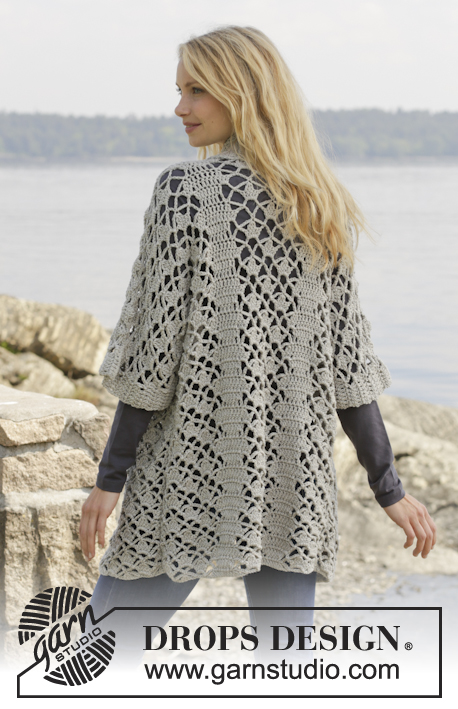
Shining Star#shiningstarcardigan |
||||||||||||||||||||||
 |
 |
|||||||||||||||||||||
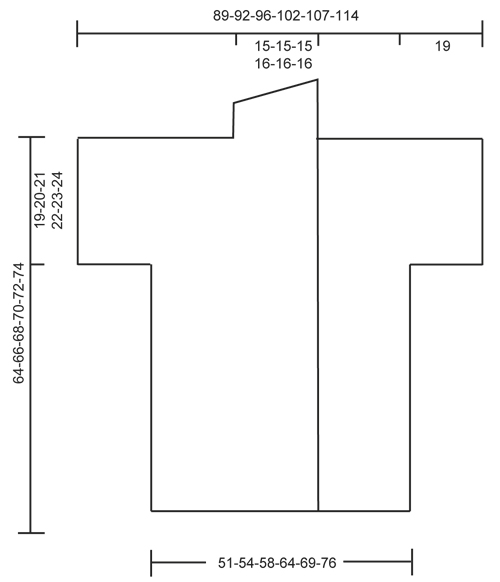
Crochet DROPS jacket with lace pattern and shawl collar in ”Merino Extra Fine”. Size: S - XXXL.
DROPS 157-18 |
||||||||||||||||||||||
|
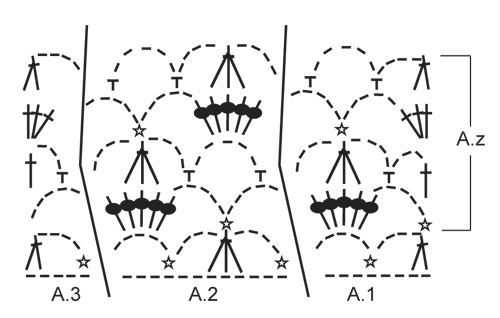
CROCHET INFO: Replace first tr at beg of every tr row with 3 ch. PATTERN: See diagrams A.1-A.3. ---------------------------------------------------------- BACK PIECE: Worked back and forth. Work 83-87-93-101-111-121 ch on hook size 5 mm with Merino Extra Fine. Then work as follows from RS: Work A.1 – see explanation above, over the first 8 ch, NOTE: Replace 1st tr with 3 ch – see CROCHET INFO above, A.2 over the next 12-12-12-12-24-24 ch, A.3 over the next 5 ch, 1 tr in each of the next 4-6-9-13-6-11 ch, A.1, A.2, A.3, 1 tr in each of the next 4-6-9-13-6-11 ch, A.1, A.2 over the next 12-12-12-12-24-24 ch and A.3. Then repeat A.z vertically until finished measurements. NOTE: On 1st row in A.z (= from WS) work as follows: Work A.3, A.2 1-1-1-1-2-2 times in width, A.1, 3 ch (replace 1 tr), 1 tr in each of the next 2-4-7-11-4-9 tr, 3 ch (replace 1 tr), 1 dc in next st, A.3, A.2, A.1, 3 ch (replace 1 tr), 1 tr in each of the next 2-4-7-11-4-9 tr, 3 ch (replace 1 tr), 1 dc in next st, A.3, A.2 1-1-1-1-2-2 times in width and A.1. REMEMBER THE CROCHET TENSION! When piece measures approx. 45-46-47-48-49-50 cm, adjust to finish with 2nd row in A.z - cut the yarn. Then work sleeves as follows: Work 29 loose ch, beg from WS and continue A.3, A.2 and A.1 and tr over back piece as before and finish with 31 loose ch, turn piece. Now work 1st row in A.1-A.3 over ch from RS, AT THE SAME TIME continue with pattern over back piece as before (i.e. work 4th row in A.z over these sts) as follows: Work 1 tr in each of the first 6 ch, A.1 over the next 8 ch, A.2 2 times in width (i.e. work last A.2 over the last 5 ch, then work the rest of A.2 over A.1), work A.2 1-1-1-1-2-2 times in width as before, A.3, 1 tr in each of the next 4-6-9-13-6-11 tr, A.1, A.2, A.3, 1 tr in each of the next 4-6-9-13-6-11 tr, A.1, A.2 1-1-1-1-2-2 times in width, then work A.2 2 times in width (i.e. work the first A.2 over A.3 and the next 6 ch), A.3 over the next 5 ch and 1 tr in each of the last 6 ch. Continue this pattern until piece measures approx. 62-64-66-68-70-72 cm - adjust to finish after a row from WS. Then finish each shoulder/sleeve separately as follows: RIGHT SHOULDER/SLEEVE: Work 6 tr, A.1 1 time and A.2 3-3-3-3-4-4 times, A.3, 1 tr in each of the next 4-6-9-13-6-11 tr. Turn and work pattern as before. Continue like this until piece measures 64-66-68-70-72-74 cm in total, adjust to finish with a whole repetition of A.z. Fasten off. LEFT SHOULDER/SLEEVE: Work the left shoulder/sleeve the same way but reversed, work A.1 instead of A.3 at beg of row. RIGHT FRONT PIECE: Worked back and forth. Work 63-65-70-74-81-86 ch (incl 3 ch to turn with) on hook size 5 mm with Merino Extra Fine. Work 1 tr in 4th ch from hook, 1 tr in each of the next 5-5-7-7-9-9 ch (= band), A.1 over the next 8 ch, A.2 over the next 12 ch, A.3 over the next 5 ch, 1 tr in each of the next 4-6-9-13-6-11 ch, A.1 over the next 8 ch, A.2 over the next 12-12-12-12-24-24 ch, A.3 over the last 5 ch. Then repeat A.z vertically until finished measurements. NOTE: On 1st row in A.z (= from WS) work as follows: Work A.3, A.2 1-1-1-1-2-2 times in width, A.1, 3 ch (replace 1 tr),1 dc in next st, 1 tr in each of the next 2-4-7-11-4-9 tr, 3 ch (replace 1 tr), A.3, A.2, A.1, 3 ch (replace 1 tr), 1 dc in next st, 1 tr in each of the next 5-5-7-7-9-9 tr. When piece measures approx. 45-46-47-48-49-50 cm, adjust to finish with 2nd row in A.z. Cut the yarn. Then work 29 loose ch for sleeve and continue as on back piece. When piece measures 64-66-68-70-72-74 cm, adjust to finish with a whole repetition of A.z (i.e. last row is from RS) - cut the yarn. Then work shawl collar. SHAWL COLLAR: Work shawl collar back and forth, beg from RS as follows: Work 1 tr in each of the first 6-6-8-8-10-10 tr, 1 tr in first tr on A.1, * 3 tr in next ch-space *, repeat from *-* 2 more times, 1 tr in next tr, * 3 tr in next ch-space *, repeat from *-* 2 more times, 1 tr in last tr in A.3, 0-0-0-1-1-1 tr in next tr = 27-27-29-30-32-32 tr. Then work short rows over band sts as follows: ROW 1 (WS): 5 dc, 5 htr, 17-17-19-20-22-22 tr ROW 2 (RS): Work 1 tr in each of the 27-27-29-30-32-32 sts. Repeat these 2 rows until piece measures approx. 10 cm on the most narrow part – adjust to finish with 2nd row (RS). Fasten off. LEFT FRONT PIECE: Work as right but reversed. Work according to diagram A.3 instead of A.1 at beg of row. When piece measures 45-46-47-48-49-50 cm, adjust to finish with 2nd row in A.z, work as before over front piece from WS, then work 31 loose ch for sleeve. When piece measures 64-66-68-70-72-74 cm, adjust to finish with a whole repetition of A.z (i.e. last row is from RS), work shawl collar. NOTE: There is no need to cut the yarn. ASSEMBLY: Place front pieces on top of back piece and work the shoulders as follows: 1 dc through both layers, * 3 ch, 1 dc in next ch-space *, repeat from *-* along the entire shoulder/sleeve and finish with 1 dc. Work the sides tog as follows: 1 dc, * 3 ch, 1 dc in ch-space on next row *, repeat from *-* along the entire side and finish with 1 dc. Work tog under sleeves as follows: * 1 dc in ch in next ch-space, 3 ch *, repeat from *-* and finish with 1 dc. Work collor tog mid back as follows: 1 dc *1 ch, 1 dc in st*, repeat from *-*. Sew the collor to the neck. |
||||||||||||||||||||||
Diagram explanations |
||||||||||||||||||||||
|
||||||||||||||||||||||
 |
||||||||||||||||||||||
 |
||||||||||||||||||||||
Have you finished this pattern?Tag your pictures with #dropspattern #shiningstarcardigan or submit them to the #dropsfan gallery. Do you need help with this pattern?You'll find 8 tutorial videos, a Comments/Questions area and more by visiting the pattern on garnstudio.com. © 1982-2026 DROPS Design A/S. We reserve all rights. This document, including all its sub-sections, has copyrights. Read more about what you can do with our patterns at the bottom of each pattern on our site. |
||||||||||||||||||||||


With over 40 years in knitting and crochet design, DROPS Design offers one of the most extensive collections of free patterns on the internet - translated to 17 languages. As of today we count 324 catalogues and 12290 patterns translated into English (UK/cm).
We work hard to bring you the best knitting and crochet have to offer, inspiration and advice as well as great quality yarns at incredible prices! Would you like to use our patterns for other than personal use? You can read what you are allowed to do in the Copyright text at the bottom of all our patterns. Happy crafting!
Post a comment to pattern DROPS 157-18
We would love to hear what you have to say about this pattern!
If you want to leave a question, please make sure you select the correct category in the form below, to speed up the answering process. Required fields are marked *.