
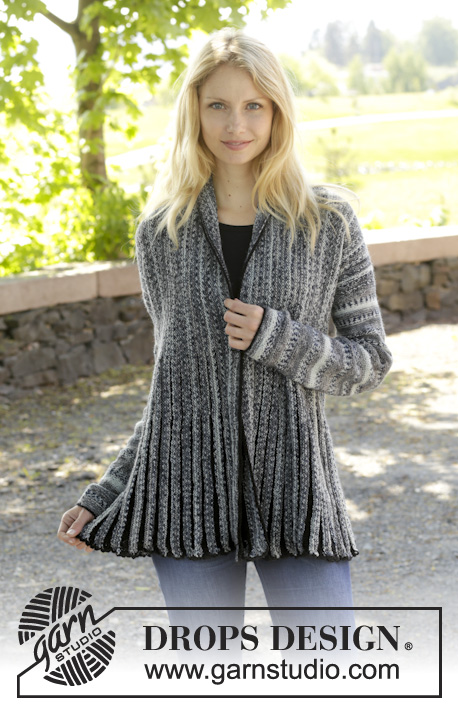
Popular categories
Looking for a yarn?


Comments / Questions (195)
Nurul wrote:
Hi, I am making this pattern. After the completion of the front left, no need to cut the yarn and how to continue after that? Do I have to connect the front left and front right ? where should I start?
29.06.2016 - 11:59DROPS Design answered:
Dear Nurul, correct, on left front piece, chain for sleeve at the end of row from WS and continue over the new sts + front piece. Front and left piece are not "connected" they will be crocheted tog at the end - see "Assembly". Happy crocheting!
29.06.2016 - 17:48
![]() Susanne wrote:
Susanne wrote:
Hallo, ich häkel in Größe L und finde nicht heraus, wie ich den Ärmel ansetze. Ich häkel 29 LM und dann? Welche Reihe aus dem Mustersatz häkel ich dann genau? Wie verknüpfe ich dann den angefangenen Ärmel mit dem Vorderteil? 29 M reichen nicht für den Mustersatz und die 6 Stäbchen für das Bündchen des Ärmels - was übersehe ich? Am Rückenteil habe ich es irgendwie geschafft, aber bei dem Vorderteil verzweifele ich :-(
14.06.2016 - 21:17DROPS Design answered:
Liebe Susanne, über die neuen Lauftmaschen am Ärmel häkeln Sie genau wie beim Rückenteil und über das Vorderteil häkeln Sie einfach weiter wie bisher, da ändert sich durch die Ärmel nichts.
06.07.2016 - 10:22
![]() Sabine wrote:
Sabine wrote:
Beste, ik zal waarschijnlijk wel iets fout doen, maar met jullie uitleg kom ik er helaas niet. Ik begin met 29l, daarna verder met toer 3 en dan 31l. Wanneer ik A1-2-3 (25 st) af heb staat in de tekst 6stk ( alles samen = 31st). Ga dan verder met toer 4 maar bij de 2de x A2 zit ik na de laatste 5l niet boven A1 maar boven de 6 stk van toer 3. Waar gaat het mis, anders vrees ik dat ik creatief zal moeten zijn en zelf de mouwen inschatten en dit zou ik heel jammer vinden. Mvg
19.05.2016 - 22:36
![]() Sabine wrote:
Sabine wrote:
Bedankt voor de info, maar verder in de tekst spreken jullie over toer 4 in Az beginnende met A1, dan 2x A2 zodat de rest van A2 boven A1 komt. Ik zit dan boven de 6 stuk van toer 3. Enfin vanaf jullie tekst TEGELIJKERTIJD ben ik helaas de draad kwijt. Hopende op jullie ervaring, mvg
18.05.2016 - 18:18DROPS Design answered:
Hoi Sabine. Plaats een markeerder tussen de st voor de mouw en de st voor het achterpand. Als je 3e toer van A.z hebt gehaakt (verkeerde kant) eindig je met 31 lossen, keert en haakt eerste toer A.1-2-3 over de mouwsteken, markeerder, en haak 4e toer (goede kant) over de st voor het achterpand zoals beschreven. Dan zou de st passen over elkaar.
19.05.2016 - 13:45
![]() Sabine wrote:
Sabine wrote:
Beste, zoals vele anderen heb ook ik problemen met het patroon 157-18 en meer bepaalde de mouwen. Heb 29 l opgezet, rug verder afgewerkt en daarna 31l. Keer het werk en dan begint het, betekend A1-A3 dat A2 niet dient gehaakt te worden? Wanneer ik dan verder ga met 4de toer van Az zit heel mijn achterpand in de knoop. Hopelijk brengen jullie me meer licht in de duisternis. Mvg
17.05.2016 - 22:41DROPS Design answered:
Hoi Sabine. Ja, je haakt ook A.2 (A.1, A.2 en A.3) over de lossen voor de mouw en herhaalt het patroon over het achterpand zoals eerst
18.05.2016 - 15:07
![]() Karin Robbers wrote:
Karin Robbers wrote:
Ik had eerder een opmerking gemaakt over het sterretje in de legenda. Nadat ik een hele bol had opgehaakt realiseerde ik me dat het toch een halve vaste moest zijn en dat de video niet klopt. Ben maar weer opnieuw begonnen.
16.05.2016 - 13:03
![]() Karin wrote:
Karin wrote:
In de legenda boven het schema zeggen jullie dat een sterretje een hv iis maar in het filmpje haken jullie een vaste. Ik had al twee toeren gehaakt. Kan ik weer opnieuw beginnen. Bovendien is onduidelijk wat ik in de tweede toer moet haken na de stokjes in het midden boven de samengehaakte stokjes van A3. Aangezien je het filmpje niet voor of achteruit kunt spoelen, moet je het hele stuk kijken om erachter te komen. Jammer.
11.05.2016 - 21:50
![]() Randi wrote:
Randi wrote:
Svar på mitt eget spørsmål OG tips til forbedring i oppskriften: de 31 luftmaskene til det ene ermet INKLUDERER 3 lm/1.st. Ganske vesentlig. Når det står at jeg skal hekle 6 st, lager jeg selvfølgelig 3 lm ekstra som første stav, når det ikke står noe annet. Ikke rart det ikke stemte. Help in english for everybody: for the arm, the 31 ch in the recipe is included 3 ch that equal the first dc. Don't make 3 more ch after you have made 31 ch.
01.05.2016 - 19:25
![]() Randi wrote:
Randi wrote:
Hei, jeg får ikke ermet til å stemme. Jeg har heklet luftmaskene på begge sider, snudd, heklet mønster over første ermet, så bakstykket. Når jeg så kommer til neste erme går det ikke opp. Jeg har 2 masker for lite på slutten. I oppskriften står det "første A2 hekles over A3 og de neste 6 lm. Dette får jeg ikke til å stemme. Skal jeg bare hekle en halv A2, da? Eller er det A2 motsatt vei av forrige ermet? Jeg regner med at ermene skal være like med tanke på mønsteret?
01.05.2016 - 18:37Adrianna wrote:
This yarn stretches way to much when it is washed, even when washed correctly and it is not very suitable for a pattern such as this. My jacket is completely ruined after wash. Hours of work and a lot of yarn down the drain. I'm never using this yarn again. Ever!!!
24.04.2016 - 22:56DROPS Design answered:
Dear Adrianna, Merino is spun from multiple thin strands to give it extra elasticity, it's then very important to make sure to get the correct tension, rather tight than loose and take care to the washing instructions (don't wash it too warm, never let it soack and let it dry flat) - see shadecard and read more here and contact your DROPS store for more individual tips & advices how to care the yarns.
25.04.2016 - 10:21
|
||||||||||||||||||||||
Shining Star#shiningstarcardigan |
||||||||||||||||||||||
 |
 |
|||||||||||||||||||||
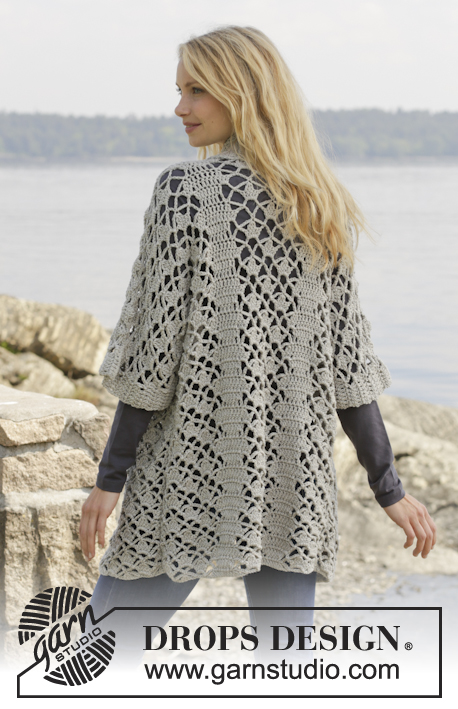
Crochet DROPS jacket with lace pattern and shawl collar in ”Merino Extra Fine”. Size: S - XXXL.
DROPS 157-18 |
||||||||||||||||||||||
|
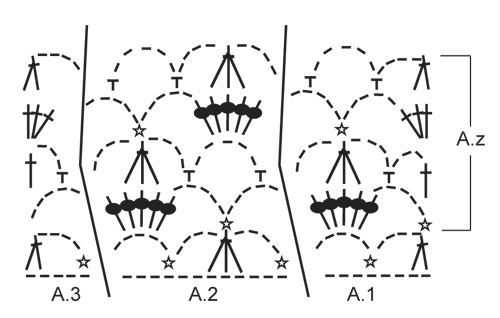
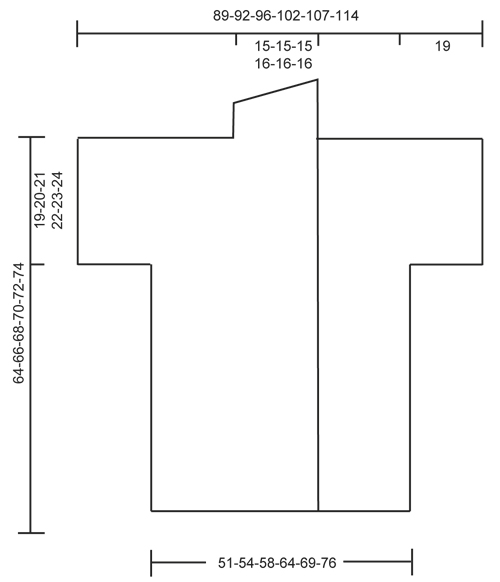
CROCHET INFO: Replace first tr at beg of every tr row with 3 ch. PATTERN: See diagrams A.1-A.3. ---------------------------------------------------------- BACK PIECE: Worked back and forth. Work 83-87-93-101-111-121 ch on hook size 5 mm with Merino Extra Fine. Then work as follows from RS: Work A.1 – see explanation above, over the first 8 ch, NOTE: Replace 1st tr with 3 ch – see CROCHET INFO above, A.2 over the next 12-12-12-12-24-24 ch, A.3 over the next 5 ch, 1 tr in each of the next 4-6-9-13-6-11 ch, A.1, A.2, A.3, 1 tr in each of the next 4-6-9-13-6-11 ch, A.1, A.2 over the next 12-12-12-12-24-24 ch and A.3. Then repeat A.z vertically until finished measurements. NOTE: On 1st row in A.z (= from WS) work as follows: Work A.3, A.2 1-1-1-1-2-2 times in width, A.1, 3 ch (replace 1 tr), 1 tr in each of the next 2-4-7-11-4-9 tr, 3 ch (replace 1 tr), 1 dc in next st, A.3, A.2, A.1, 3 ch (replace 1 tr), 1 tr in each of the next 2-4-7-11-4-9 tr, 3 ch (replace 1 tr), 1 dc in next st, A.3, A.2 1-1-1-1-2-2 times in width and A.1. REMEMBER THE CROCHET TENSION! When piece measures approx. 45-46-47-48-49-50 cm, adjust to finish with 2nd row in A.z - cut the yarn. Then work sleeves as follows: Work 29 loose ch, beg from WS and continue A.3, A.2 and A.1 and tr over back piece as before and finish with 31 loose ch, turn piece. Now work 1st row in A.1-A.3 over ch from RS, AT THE SAME TIME continue with pattern over back piece as before (i.e. work 4th row in A.z over these sts) as follows: Work 1 tr in each of the first 6 ch, A.1 over the next 8 ch, A.2 2 times in width (i.e. work last A.2 over the last 5 ch, then work the rest of A.2 over A.1), work A.2 1-1-1-1-2-2 times in width as before, A.3, 1 tr in each of the next 4-6-9-13-6-11 tr, A.1, A.2, A.3, 1 tr in each of the next 4-6-9-13-6-11 tr, A.1, A.2 1-1-1-1-2-2 times in width, then work A.2 2 times in width (i.e. work the first A.2 over A.3 and the next 6 ch), A.3 over the next 5 ch and 1 tr in each of the last 6 ch. Continue this pattern until piece measures approx. 62-64-66-68-70-72 cm - adjust to finish after a row from WS. Then finish each shoulder/sleeve separately as follows: RIGHT SHOULDER/SLEEVE: Work 6 tr, A.1 1 time and A.2 3-3-3-3-4-4 times, A.3, 1 tr in each of the next 4-6-9-13-6-11 tr. Turn and work pattern as before. Continue like this until piece measures 64-66-68-70-72-74 cm in total, adjust to finish with a whole repetition of A.z. Fasten off. LEFT SHOULDER/SLEEVE: Work the left shoulder/sleeve the same way but reversed, work A.1 instead of A.3 at beg of row. RIGHT FRONT PIECE: Worked back and forth. Work 63-65-70-74-81-86 ch (incl 3 ch to turn with) on hook size 5 mm with Merino Extra Fine. Work 1 tr in 4th ch from hook, 1 tr in each of the next 5-5-7-7-9-9 ch (= band), A.1 over the next 8 ch, A.2 over the next 12 ch, A.3 over the next 5 ch, 1 tr in each of the next 4-6-9-13-6-11 ch, A.1 over the next 8 ch, A.2 over the next 12-12-12-12-24-24 ch, A.3 over the last 5 ch. Then repeat A.z vertically until finished measurements. NOTE: On 1st row in A.z (= from WS) work as follows: Work A.3, A.2 1-1-1-1-2-2 times in width, A.1, 3 ch (replace 1 tr),1 dc in next st, 1 tr in each of the next 2-4-7-11-4-9 tr, 3 ch (replace 1 tr), A.3, A.2, A.1, 3 ch (replace 1 tr), 1 dc in next st, 1 tr in each of the next 5-5-7-7-9-9 tr. When piece measures approx. 45-46-47-48-49-50 cm, adjust to finish with 2nd row in A.z. Cut the yarn. Then work 29 loose ch for sleeve and continue as on back piece. When piece measures 64-66-68-70-72-74 cm, adjust to finish with a whole repetition of A.z (i.e. last row is from RS) - cut the yarn. Then work shawl collar. SHAWL COLLAR: Work shawl collar back and forth, beg from RS as follows: Work 1 tr in each of the first 6-6-8-8-10-10 tr, 1 tr in first tr on A.1, * 3 tr in next ch-space *, repeat from *-* 2 more times, 1 tr in next tr, * 3 tr in next ch-space *, repeat from *-* 2 more times, 1 tr in last tr in A.3, 0-0-0-1-1-1 tr in next tr = 27-27-29-30-32-32 tr. Then work short rows over band sts as follows: ROW 1 (WS): 5 dc, 5 htr, 17-17-19-20-22-22 tr ROW 2 (RS): Work 1 tr in each of the 27-27-29-30-32-32 sts. Repeat these 2 rows until piece measures approx. 10 cm on the most narrow part – adjust to finish with 2nd row (RS). Fasten off. LEFT FRONT PIECE: Work as right but reversed. Work according to diagram A.3 instead of A.1 at beg of row. When piece measures 45-46-47-48-49-50 cm, adjust to finish with 2nd row in A.z, work as before over front piece from WS, then work 31 loose ch for sleeve. When piece measures 64-66-68-70-72-74 cm, adjust to finish with a whole repetition of A.z (i.e. last row is from RS), work shawl collar. NOTE: There is no need to cut the yarn. ASSEMBLY: Place front pieces on top of back piece and work the shoulders as follows: 1 dc through both layers, * 3 ch, 1 dc in next ch-space *, repeat from *-* along the entire shoulder/sleeve and finish with 1 dc. Work the sides tog as follows: 1 dc, * 3 ch, 1 dc in ch-space on next row *, repeat from *-* along the entire side and finish with 1 dc. Work tog under sleeves as follows: * 1 dc in ch in next ch-space, 3 ch *, repeat from *-* and finish with 1 dc. Work collor tog mid back as follows: 1 dc *1 ch, 1 dc in st*, repeat from *-*. Sew the collor to the neck. |
||||||||||||||||||||||
Diagram explanations |
||||||||||||||||||||||
|
||||||||||||||||||||||
 |
||||||||||||||||||||||
 |
||||||||||||||||||||||
Have you finished this pattern?Tag your pictures with #dropspattern #shiningstarcardigan or submit them to the #dropsfan gallery. Do you need help with this pattern?You'll find 8 tutorial videos, a Comments/Questions area and more by visiting the pattern on garnstudio.com. © 1982-2026 DROPS Design A/S. We reserve all rights. This document, including all its sub-sections, has copyrights. Read more about what you can do with our patterns at the bottom of each pattern on our site. |
||||||||||||||||||||||


With over 40 years in knitting and crochet design, DROPS Design offers one of the most extensive collections of free patterns on the internet - translated to 17 languages. As of today we count 324 catalogues and 12290 patterns translated into English (UK/cm).
We work hard to bring you the best knitting and crochet have to offer, inspiration and advice as well as great quality yarns at incredible prices! Would you like to use our patterns for other than personal use? You can read what you are allowed to do in the Copyright text at the bottom of all our patterns. Happy crafting!
Post a comment to pattern DROPS 157-18
We would love to hear what you have to say about this pattern!
If you want to leave a question, please make sure you select the correct category in the form below, to speed up the answering process. Required fields are marked *.