
Popular categories
Looking for a yarn?


Comments / Questions (32)
![]() Kamila Zoufalá wrote:
Kamila Zoufalá wrote:
Dobrý den, jsem u těchto šatů u prvního ujimani. Když mám u vel. L nyní 90 ok, co znamená - rovnoměrně ujměte 4 oka. Chápu to dobře, že je to na začátku a na konci a potom 2x někde uprostřed? Že to má ve výsledku mít nějakou linii, když se ujimani opakuje celkem 5x po 2 cm? Děkuji za odpověď.
12.06.2021 - 19:14
![]() Sarah Ulkan wrote:
Sarah Ulkan wrote:
Wirklich ein wunderschönes Kleid, Wolle ist schon bestellt und ich kann es kaum erwarten damit zu beginnen und es im Sommer zu tragen
23.02.2019 - 04:29
![]() Susanne wrote:
Susanne wrote:
Hallo. Kurze Frage: Die Maschenzunahme von 5 Maschen, bezieht sich das auf je 5 Maschen pro Reihe oder gesamt und was bedeutet 4-4-6-6-6-6? Vielen Dank für eine Antwort. LG Susanne
07.03.2018 - 10:44DROPS Design answered:
Liebe Suzanne, in den 2 ersten Größe werden Sie 4 M zunehmen und in den 4 letzten Größen werden Sie 6 M zunehmen. Viel Spaß beim häkeln!
07.03.2018 - 12:51
![]() Karen wrote:
Karen wrote:
Voor kleding heb ik maat s (zowel voor broek als shirt) maar ik twijfel of dit wel gaat passen bij deze jurk, het breedste stuk is 80 cm omtrek maar bij mijzelf is het breedste stuk 96cm omtrek, maar als ik maat L zou aanhouden is het aantal cm bij de taile en borst weer veel te ruim, hebben jullie een advies welke maat ik het beste zou kunnen haken?
07.12.2017 - 20:14DROPS Design answered:
Als je taille en buste maat S is en bij de heupen maat L, dan zou ik in maat L beginnen en na de heupen meer minderingen maken, zodat je ongeveer op maat S uitkomt bij de taille. Als je hem helemaal in maat L maakt, zit het niet mooi bij de schouders en borst e.d.
11.12.2017 - 12:43
![]() Karen Dijkstra wrote:
Karen Dijkstra wrote:
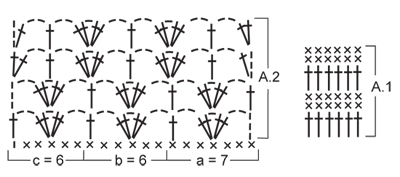
Ik ben pas begonnen aan purple crocus by drops design 146-23. Bij telpatroon A.1 tel ik 6 steken horizontaal, betekend dit dat ik na iedere 6 steken, 1 steek moet overslaan en dan weer 6 steken moet maken?
14.11.2017 - 19:47DROPS Design answered:
Hoi Karen, Nee, je hoeft geen steken over te slaan. A.1 is 'toevallig' per 6 steken aangegeven en deze herhaal je steeds.
15.11.2017 - 10:55
![]() Marja wrote:
Marja wrote:
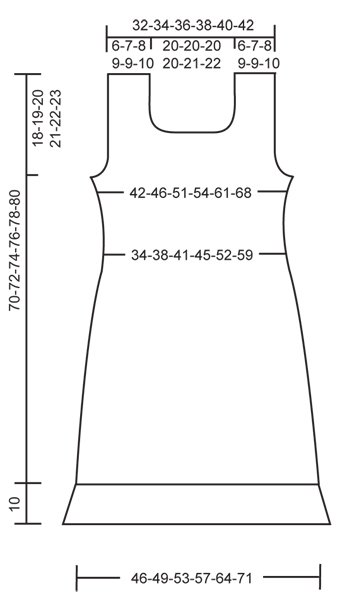
Wat is de lengte van deze jurk? Ik ben 1.65 lang en meestal is alles te lang voor mij.
27.05.2017 - 12:13DROPS Design answered:
Hoi Marja, De totale lengte is 80 cm (Vanaf schouder naar beneden). Om de lengte aan te passen kun je in het rokgedeelte een aantal toeren minder maken. Veel haakplezier!
29.05.2017 - 13:20
![]() Margurithe Zellén wrote:
Margurithe Zellén wrote:
Skall jag fortsätta efter mönstret när jag minskar för ärmhål. Eller bara göra fm?
26.05.2017 - 10:14DROPS Design answered:
Hej, du fortsätter med att virka A.1. Lycka till!
29.05.2017 - 14:48
![]() Yolanda wrote:
Yolanda wrote:
Ik moet nu meerderen voor de bovenkant (vanaf taille). Maar moet ik meerderen aan de zijkant? Of moet ik gelijkmatig over de gehele breedte meerderen?
02.02.2016 - 10:34DROPS Design answered:
Hoi Yolanda. Nee, je moet meerderen gelijkmatig over de hele breedte - net zoals je deed bij het minderen voor de taille. Veel haakplezier verder.
03.02.2016 - 17:37
![]() Julie wrote:
Julie wrote:
Pattern sized at s thru to xxxl. But what are the measurements?? I don't know which size to make
27.05.2014 - 20:09DROPS Design answered:
Dear Julie, you will find at the bottom of the page a measurement chart with all measures for each size taken flat, from side to side. Compare these with a similar garment you like the shape to find the matching size. Happy crocheting!
28.05.2014 - 08:52
![]() Øygunn Kallevik wrote:
Øygunn Kallevik wrote:
Under volang nede står det: Øk jevnt fordelt til 103 masker. Utgangspunktet er 104 masker. Skal det bare økes med en maske? Er det litt lite garn? Jeg har brukt 350 g av 700 g mangler fortsatt volang nede.
11.05.2014 - 17:28DROPS Design answered:
Hej. I large har du 104 lm men du har 90 fm på 1.rad. Så om du hekler i hver av de 90 fm så må det ökes i tillägg jevnt fördelt så det blir 103 m totalt. Vi har ikke hört tidigare at det skulle vara för lite eller för mye garn till denne design.
12.05.2014 - 19:24
|
||||||||||
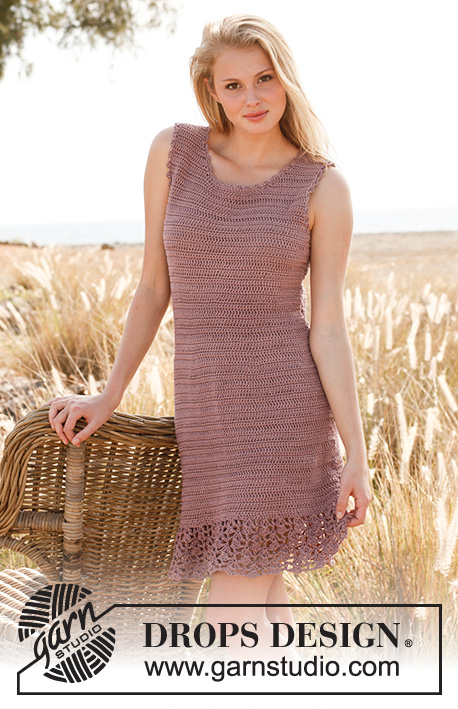
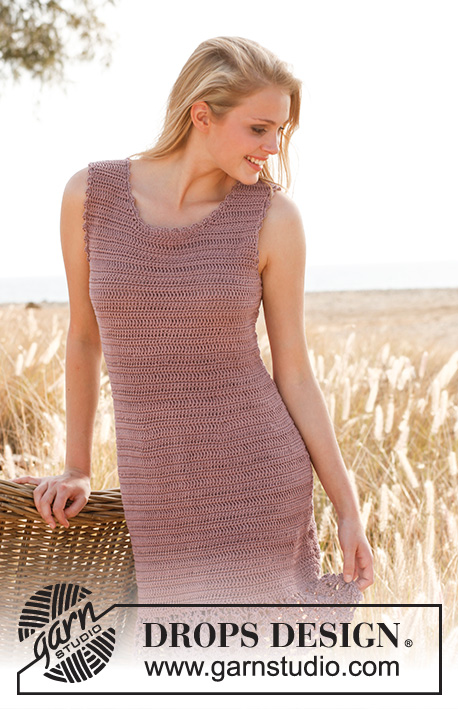
Purple Crocus#purplecrocusdress |
||||||||||
 |
 |
|||||||||
Crochet DROPS dress with lace pattern at the bottom and buttons in the side in ”Muskat”.
DROPS 146-23 |
||||||||||
|
CROCHET INFO: Replace first dc on every dc row with 1 ch. Replace first tr on every tr row with 3 ch. PATTERN: See diagrams A.1 and A.2. DECREASE TIP: Dec 1 st by working 2 sts tog. Crochet 2 tr tog as follows: Work 1 tr in first st but wait with last pull through, work 1 tr in next st but on last pull through, pull thread through all 3 loops on hook. Crochet 2 dc tog as follows: Insert hook in st and pull thread through, insert hook in next st and pull thread through, make 1 YO and pull thread through all 3 loops on hook. -------------------------------------------------------- DRESS: To make the texture the same on the entire piece, work piece back and forth in 2 parts and sew them tog when finished. FRONT PIECE: Work 90-97-104-111-125-139 ch on hook size 4 mm with Muskat. Continue with 1 dc in 2nd ch from hook, then 1 dc in each of the next 4 ch, * skip 1 ch, 1 dc in each of the next 6 ch *, repeat from *-* the entire row = 78-84-90-96-108-120 dc (ch used to turn with is also counted as 1 dc) - READ CROCHET INFO. Turn and work 1 dc in every st. Continue with diagram A.1. REMEMBER THE CROCHET TENSION! When piece measures approx. 23-24-25-26-27-28 cm (adjust so that next row is a row with tr), dec 4 sts evenly – READ DECREASE TIP. Repeat dec every 2 cm 4 more times (make sure to dec on row with tr) = 58-64-70-76-88-100 sts on row. When piece measures 38-39-40-41-42-43 cm, inc 5 sts evenly by working 2 sts in 1 st. Repeat inc every 3 cm 2 more times - but the last time inc 4-4-6-6-6-6 sts evenly. After all inc there are 72-78-86-92-104-116 sts on row. When piece measures 52-53-54-55-56-57 cm, dec for armholes in each side. This is done as follows: Work sl sts over the first 4-5-5-6-7-8 sts, then work until 4-5-5-6-7-8 sts remain, turn piece. On next row work the 4 outermost sts in each side tog 2 by 2 – SEE DECREASE TIP! Repeat dec on every row 0-0-1-1-2-3 more times. On next row work the 2 outermost sts tog, repeat dec on every row 2-2-2-3-4-5 more times. After all dec are done, 54-58-62-64-68-72 sts remain on row. Continue with A.1. When piece measures 60-61-63-64-66-67 cm, finish each shoulder separately. 1ST SHOULDER: Work pattern A.1 as before over the first 17-19-21-22-23-24 sts, turn and work the first 4 sts tog 2 by 2, then work the rest of row. Turn and work until 4 sts remain before neck, work these tog 2 by 2, turn. On next row work the first 2 sts tog, then work the rest of row. Turn, work until 2 sts remain, work these tog. Turn, work the first 2 sts tog, work the rest of row = 10-12-14-15-16-17 sts remain on shoulder. Continue A.1 until piece measures 70-72-74-76-78-80 cm, cut the thread. 2ND SHOULDER: Work as first - make sure to beg on the correct row in diagram and to finish at the top on the same row as 1st shoulder. FLOUNCE AT THE BOTTOM: Now work a flounce at the bottom of front piece as follows: Beg by working 1 row with dc from RS – inc evenly so that there are 91-97-103-109-121-139 dc in total on row. Turn and continue with diagram A.2 as follows: a over the first 7 sts, then b until 6 sts remain, finish with c. Work the 4 rows in A.2 two times vertically, flounce measures approx. 10 cm, cut and fasten the thread. BACK PIECE: Work as front piece up to and with armhole dec = 54-58-62-64-68-72 sts on row. Continue to work until piece measures approx. 68-70-72-74-76-78 cm. Now finish each shoulder separately as follows: Work 1 row over the first 12-14-16-17-18-19 sts, turn and work the first 2 sts tog, work the rest of row. Turn, work until 2 sts remain, work these tog. Turn, work 1 st in every st the entire row, cut the thread. Repeat on the other shoulder. Work a flounce at the bottom the same way as on front piece. ASSEMBLY: Sew shoulder seams edge to edge to avoid a chunky seam. Sew right side seam the entire way - edge to edge to make it less visible. Sew left side seam the same way but leave an opening in the side for buttons. This opening should be approx. 18 cm long and beg approx. 10 cm below the armhole. BUTTONHOLE STRAPS: Work as follows along the opening on front piece – beg at the top: 1 dc, * 3 ch, skip approx. 1 cm, then work dc for approx. 2.5 cm *, repeat from *-* a total of 4 times, finish with 3 ch and 1 dc at the bottom of opening. Sew button at the edge of opening on back piece to match the front piece. EDGE AROUND THE ARMHOLES AND NECK: Work as follows around the neck edge and armholes: 1 dc, * 3 ch, 1 tr in 3rd ch from hook, skip approx. 1 cm and make 1 dc *. Repeat from *-* the entire round, finish with 1 sl st in first dc from beg of round. |
||||||||||
Diagram explanations |
||||||||||
|
||||||||||
 |
||||||||||
 |
||||||||||
Have you finished this pattern?Tag your pictures with #dropspattern #purplecrocusdress or submit them to the #dropsfan gallery. Do you need help with this pattern?You'll find 7 tutorial videos, a Comments/Questions area and more by visiting the pattern on garnstudio.com. © 1982-2026 DROPS Design A/S. We reserve all rights. This document, including all its sub-sections, has copyrights. Read more about what you can do with our patterns at the bottom of each pattern on our site. |
||||||||||


With over 40 years in knitting and crochet design, DROPS Design offers one of the most extensive collections of free patterns on the internet - translated to 17 languages. As of today we count 324 catalogues and 12290 patterns translated into English (UK/cm).
We work hard to bring you the best knitting and crochet have to offer, inspiration and advice as well as great quality yarns at incredible prices! Would you like to use our patterns for other than personal use? You can read what you are allowed to do in the Copyright text at the bottom of all our patterns. Happy crafting!
Post a comment to pattern DROPS 146-23
We would love to hear what you have to say about this pattern!
If you want to leave a question, please make sure you select the correct category in the form below, to speed up the answering process. Required fields are marked *.