
Popular categories
Looking for a yarn?


Comments / Questions (92)
![]() Alison Kennedy wrote:
Alison Kennedy wrote:
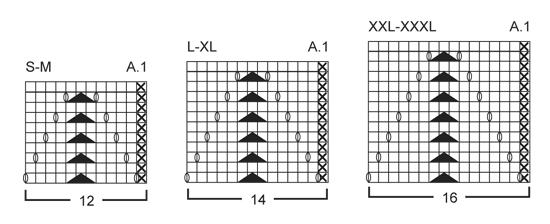
I'm really struggling with the pattern. Do I need to purl a stitch on rs every time I repeat the pattern or is it only beginning and end. If not how do I do yo twice on first row many thanks
14.03.2025 - 14:15DROPS Design answered:
Dear Mrs Kennedy, work the first row in A.1 as follows: 1 edge stitch, repeat 10 times the stitches A.1, 2 stitches remain, purl 1 and work 1 edge stitch. From WS, this purl stitch will be knitted, so work: 1 edge stitch, knit 1, then repeat A.1 reading from the left towards the right, and finish with 1 edge stitch. Happy knitting!
14.03.2025 - 16:15
![]() Silvia wrote:
Silvia wrote:
Nelle istruzioni dei BORDI DAVANTI si conclude il ferro con 2 m dir e 3 m a punto legaggio: non riesco a vedere se sono in alto (dal collo) o in basso.
08.02.2025 - 17:24DROPS Design answered:
Buongiorno Silvia, le 3 maglie a legaccio dovrebbero essere verso il collo. Buon lavoro!
09.02.2025 - 11:01
![]() Heather Bronkhorst wrote:
Heather Bronkhorst wrote:
I love this pattern. Have knitted it three times already. Busy with the third time. Each time i have used normal chunky forgetting it is a seriously bulky yarn. So the next time i knit will be in our equivalent mega chunky yarn.
18.11.2024 - 07:39
![]() Marielle wrote:
Marielle wrote:
Hallo, Ik begrijp niet hoe de knoopsgaten worden gebreid in de voorbies. Het staat voor mij te summier omschreven. Ik zou graag een uitgebreidere uitleg willen lezen hoe ik deze moet breien. Hartelijk dank alvast.
23.12.2022 - 22:11DROPS Design answered:
Dag Marielle,
Eerst brei je 2 steken averecht samen en op de volgende naald zet je een steek op boven deze samengebreide steken. Als je onderaan bij het patroon bij de video's kijkt kun je een video vinden over hoe je averecht samen breit en eentje over nieuwe steken opzetten aan de zijkant. Deze techniek kun je gebruiken om de steek op te zetten boven de samengebreide steken.
28.12.2022 - 08:17
![]() Marielle wrote:
Marielle wrote:
Ik zou graag willen weten hoe ik achterpand na het meerderen moet verder breien. Ik kom er niet uit. Begrijp niet de halve herhaling in tricot?, Is het de bedoeling dat je van A1 , 5 hele en 2 halve maakt? Groetjes
26.11.2022 - 20:30DROPS Design answered:
Dag Marielle,
Voor het splitsen van het lij in het achterpand en de voorpanden breide je 10 herhalingen van A.1 in de breedte. Nu je de eerste en de laatste steken aan beide kanten op een hulpdraad heb gezet, heb je voor het achterpand aan beide zijkante een de helft van A.1 in de breedte. Deze steken brei je in tricotsteek.
27.11.2022 - 14:01
![]() Marie Garpefjäll wrote:
Marie Garpefjäll wrote:
Hej, jag måste få fråga gällande kragen som ska stickas på slutet. Jag har stickat framkanten som det står och har även maskor satta på tråd. Sen står det på storlek M att man ska plocka upp 70 maskor för kragen, va lite, är det halva kragen? Jag får dubbelt så mycket?
29.01.2022 - 20:50DROPS Design answered:
Hej Marie, du kan godt strikke flere masker op, men når man ser på antal masker du strikker op langs med forkanten, så ser det ud til at stemme godt nok med 70 masker rundt i halsen...
03.02.2022 - 14:37
![]() Jami Finnerty wrote:
Jami Finnerty wrote:
What size buttons does the cardigan take?
11.12.2021 - 06:08DROPS Design answered:
Dear Jami, the buttons are of 25mm. Happy knitting!
11.12.2021 - 20:18
![]() Kelley O'Leary wrote:
Kelley O'Leary wrote:
What do you mean on the right front piece when you say "slip 8-8-10-10-12-12 sts towards mid front on a stitch holder " and then start binding off for the neck? I am confused as to which stitches I am pulling in front and what happens totem.
15.12.2019 - 17:41DROPS Design answered:
Dear Mrs O'Leary, on right front piece, work the first 8-10-12 stitches from RS and slip them on a thread (will be used later for neck); work to the end of row, turn and work row back from WS. Cast off now stitches for neck at the beg of row from RS. Happy knitting!
16.12.2019 - 08:50
![]() Erin Largent wrote:
Erin Largent wrote:
This is a follow up question to the response to my first question. Is the column of stitches in stockinette stitch just for the first two rows of the back when you increase the stitches on each side? After that are you back to incorporating the A.1 pattern? The sleeve in the picture does not look like there is a column of stockinette on the sleeve going all the way up. Thanks.
14.10.2018 - 14:32DROPS Design answered:
Dear Mrs Largent, when you are working back piece, there is one half repetition on each side of back piece, these sts are now worked in stocking stich until you have cast on the new sts on each side, then you will work A.1 over all sts with 1 edge st on each side + P1 before the last edge st from RS. Happy knitting!
15.10.2018 - 10:27
![]() Erin Largent wrote:
Erin Largent wrote:
For the back piece, what is meant when you say “the half repetition in each side is worked in stockinette st”? Thank you!
12.10.2018 - 19:09DROPS Design answered:
Dear Erin, it means that you should knit only half of the pattern repeat, for the other stitches, knit stockinett,so you will have a colum of stitches without patterning. Happy Knitting!
13.10.2018 - 09:16
|
|||||||||||||
Best West#bestwestjacket |
|||||||||||||
|
|
|||||||||||||
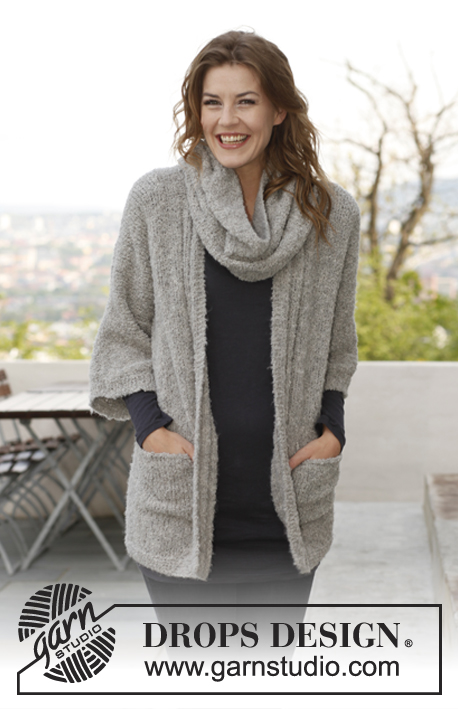
Knitted DROPS jacket with lace pattern in ”Andes”. Size: S - XXXL.
DROPS 142-13 |
|||||||||||||
|
GARTER ST (back and forth on needle): K all rows. 1 ridge = 2 rows K. PATTERN: See diagram A.1. Diagram shows all rows in pattern seen from RS. NOTE! See diagram for size. ---------------------------------------------------------- BODY: Worked back and forth on circular needle. Cast on 148-148-172-172-196-196 sts on circular needle size 7 mm with Andes. P 1 row from WS, then work as follows - from RS: 1 edge st in GARTER ST - see explanation above, * K 2, P 2 *, repeat from *-*, finish with K 2 and 1 edge st in garter st. Work rib until piece measures 8 cm. Switch to circular needle size 8 mm. K 1 row from RS while at the same time dec 25-25-29-29-33-33 sts evenly = 123-123-143-143-163-163 sts. P 1 row from WS. Then work as follows from RS: 1 edge st, repeat diagram A.1 a total of 10 times, finish with P 1 (K on rows from WS) and 1 edge st. Continue this pattern until piece measures 46-47-48-49-50-51 cm. Slip the first 31-31-36-36-41-41 sts and the last 31-31-36-36-41-41 sts on stitch holders for front piece = 61-61-71-71-81-81 sts remain on needle. BACK PIECE: = 61-61-71-71-81-81 sts. Continue with A.1 (the half repetition in each side is worked in stocking st) AT THE SAME TIME cast on 7-7-8-8-9-9 sts at the end of the next 2 rows = 75-75-87-87-99-99 sts. Work as follows from RS: 1 edge st in garter st, repeat A.1 a total of 6 times, P 1, 1 edge st in garter st. When piece measures 70-72-74-76-78-80 cm, cast off the middle 25-25-29-29-33-33 sts for neck = 25-25-29-29-33-33 sts remain on each shoulder/sleeve. Cast off when piece measures 72-74-76-78-80-82 cm. RIGHT FRONT PIECE: = 31-31-36-36-41-41 sts. Continue with A.1, cast on 8-8-9-9-10-10 new sts at the end of row from RS = 39-39-45-45-51-51 sts. Then work as follows - seen from RS: 1 edge st in garter st, A.1 a total of 3 times, P 1 (K on rows from WS), 1 edge st in garter st. When piece measures 64-66-68-70-72-74 cm, slip 8-8-10-10-12-12 sts towards mid front on a stitch holder (work them first), then cast off for neck at beg of every row from neck: 2 sts 2 times and 1 st 2 times - work the sts that do not fit one whole repetition of A.1 in stocking st when casting off = 25-25-29-29-33-33 sts remain on shoulder/sleeve. Continue the pattern upwards, cast off when piece measures 72-74-76-78-80-82 cm. LEFT FRONT PIECE: Work as right front piece but reversed. ASSEMBLY: Sew shoulder/sleeve seams. BAND: Knit up 94-98-102-106-110-114 sts along right front piece inside 1 edge st on circular needle size 7 mm. K 1 row, then work as follows from RS: 1 edge st in garter st, * K 2, P 2 *, repeat from *-*, finish with K 2 and 3 sts in garter st. When band measures 4-4-4-5-5-5 cm, cast off for 6-6-6-6-7-7 buttonholes evenly – top buttonhole should be 1 cm from the top and bottom hole should be approx. 6 cm from bottom edge. 1 BUTTONHOLE = P 2 tog (seen from RS) and cast on 1 new st on next row over this st. Work until band measures 8-8-9-9-10-10 cm, cast off with K over K and P over P. Work the same way on left front piece but do not cast off for buttonhole. COLLAR: Knit up 70-70-74-74-78-78 sts around the neck (incl sts on stitch holders and over bands) on circular needle size 7 mm from RS. K 1 row. K 1 row from RS while AT THE SAME TIME inc 22 sts evenly = 92-92-96-96-100-100 sts. Continue to work as follows (1st row = from WS): 3 sts in garter st, * K 2, P 2 *, repeat from *-*, finish with K 2 and 3 sts in garter st. Continue like this until rib measures 15 cm. Cast off sts with K over K and P over P. SLEEVE EDGE: Worked back and forth on circular needle. Knit up 66-66-70-70-74-74 sts inside 1 edge st at the edge of sleeve on circular needle size 7 mm. K 1 row, then work as follows: 1 edge st in garter st, * K 2, P 2 *, repeat from *-* and finish with 1 edge st in garter st. Continue like this until piece measures 8 cm, cast off with K over K and P over P. ASSEMBLY: Sew underarm seam inside 1 edge st. Sew the buttons on to left band. POCKET: Cast on 19-19-21-21-23-23 sts on needle size 8 mm with Andes. Work 2 ridges, then work as follows - from RS: 3 sts in garter st, A.1, P 1 (K on rows from WS), 3 sts in garter st. Continue this pattern until piece measures 15 cm, P 1 row from WS while adjusting the no of sts to 20-20-20-20-24-24. Then work as follows from RS: 3 sts in garter st, * K 2, P 2 *, repeat from *-* and finish with K 2 and 3 sts in garter st. Continue until pocket measures 18 cm, cast off with K over K and P over P. Work another pocket and sew them on to the front pieces of jacket, directly above the rib at the bottom and approx. in the middle of front piece. |
|||||||||||||
Diagram explanations |
|||||||||||||
|
|||||||||||||
 |
|||||||||||||
 |
|||||||||||||
Have you finished this pattern?Tag your pictures with #dropspattern #bestwestjacket or submit them to the #dropsfan gallery. Do you need help with this pattern?You'll find 11 tutorial videos, a Comments/Questions area and more by visiting the pattern on garnstudio.com. © 1982-2026 DROPS Design A/S. We reserve all rights. This document, including all its sub-sections, has copyrights. Read more about what you can do with our patterns at the bottom of each pattern on our site. |
|||||||||||||


With over 40 years in knitting and crochet design, DROPS Design offers one of the most extensive collections of free patterns on the internet - translated to 17 languages. As of today we count 324 catalogues and 12290 patterns translated into English (UK/cm).
We work hard to bring you the best knitting and crochet have to offer, inspiration and advice as well as great quality yarns at incredible prices! Would you like to use our patterns for other than personal use? You can read what you are allowed to do in the Copyright text at the bottom of all our patterns. Happy crafting!
Post a comment to pattern DROPS 142-13
We would love to hear what you have to say about this pattern!
If you want to leave a question, please make sure you select the correct category in the form below, to speed up the answering process. Required fields are marked *.