DROPS Alpaca Bouclé
DROPS Alpaca Bouclé
80% Alpaca, 15% Wool, 5% Polyamide
from 3.60 £ /50g
Get the yarn to make this pattern from 28.80£.

The yarn cost is calculated from the pattern’s smallest size and the yarn’s cheapest product type. Looking for an even better price? You might find it on the DROPS Deals!

DROPS Super Sale

Snuggle

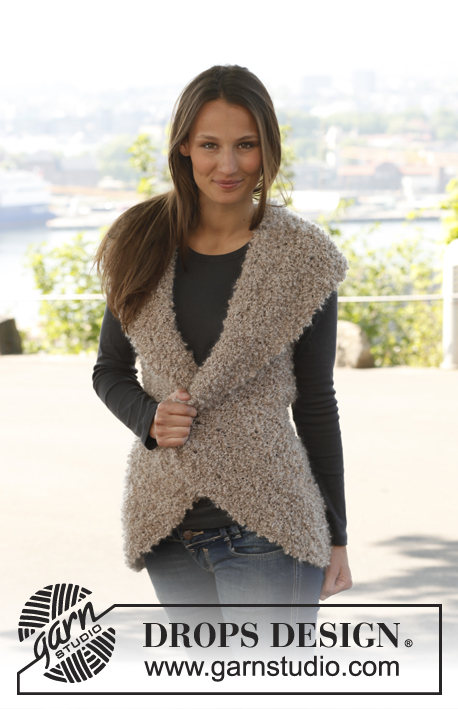
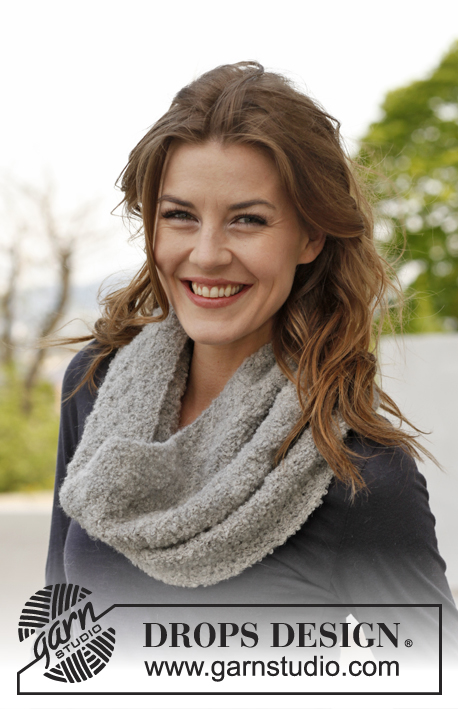
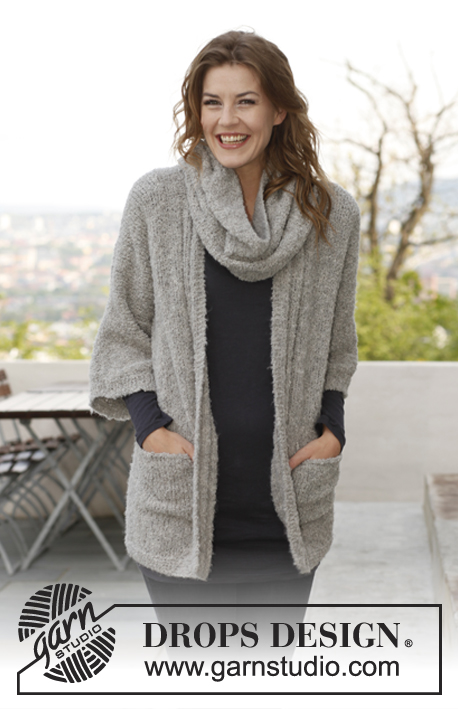
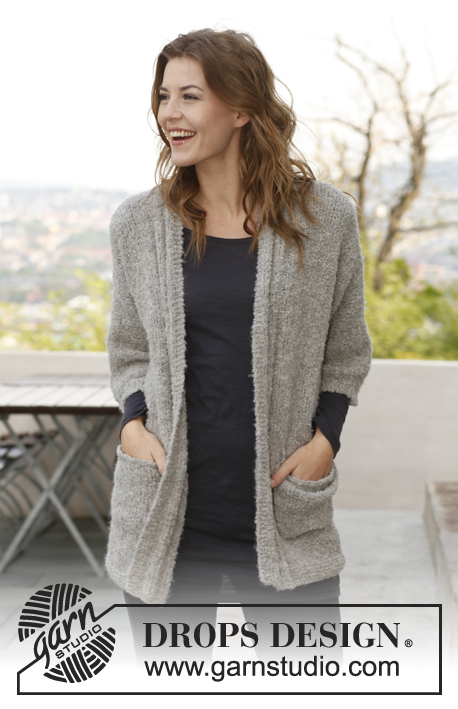
Set consists of: Knitted DROPS jacket and neck warmer in ”Alpaca Bouclé.” Size: S - XXXL.

DROPS 142-21
DROPS design: Pattern no ab-025
Yarn group C
----------------------------------------------------------
JACKET:
Size: S - M - L - XL - XXL - XXXL
Materials: DROPS ALPACA BOUCLÉ from Garnstudio
Colour no 5110, light grey:
300-350-400-400-450-500 g

DROPS CIRCULAR NEEDLE SIZE 5 mm (80 cm) - or size needed to get 17 sts x 22 rows in stocking st = 10 x 10 cm.
---------------------------------------------------------
NECK WARMER:
Size: One-size
Circumference: 71 cm
Height: 36 cm
Materials: DROPS ALPACA BOUCLÉ from Garnstudio
Colour no 5110, light grey: 100 g

DROPS CIRCULAR NEEDLE SIZE 5 mm (60 cm) - or size needed to get 17 sts x 22 rows in stocking st = 10 x 10 cm.

-------------------------------------------------------

Alternative Yarn – See how to change yarns here
Yarn Groups A to F – Use the same pattern and change the yarn here
Yarn usage using an alternative yarn – Use our yarn converter here

-------------------------------------------------------

DROPS Alpaca Bouclé
DROPS Alpaca Bouclé
80% Alpaca, 15% Wool, 5% Polyamide
from 3.60 £ /50g
Get the yarn to make this pattern from 28.80£.

The yarn cost is calculated from the pattern’s smallest size and the yarn’s cheapest product type. Looking for an even better price? You might find it on the DROPS Deals!

DROPS Super Sale

SAVE 30% on 6 cotton favourites!
Valid until 12.04.2024

Pattern instructions

NOTE: This pattern is written in British English. All measurements in charts are in cm. For conversion from cm to inches - click here. There are different terms for crocheting in British and American English. If this pattern includes crochet, click for "crochet terms" here. For this pattern in American English, please click here.
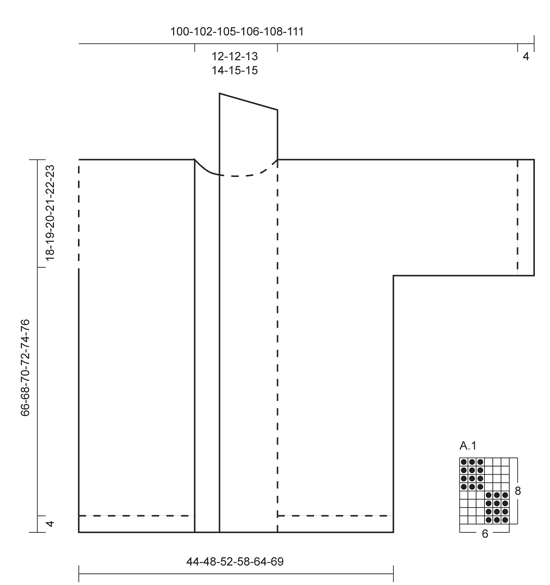
GARTER ST (back and forth on needle):
K all rows.

GARTER ST (in the round on needle):
* K 1 round and P 1 round *, repeat from *-*.

BAND STS:
At beg of row from RS: Work 4-4-4-6-6-6 sts in garter st, * K 3, P 3 *, repeat from *-* 1 more time = 16-16-16-18-18-18 sts.
At end of row from RS: Work * P 3, K 3 *, repeat from *-* 1 more time, 4-4-4-6-6-6 sts in garter st = 16-16-16-18-18-18 sts.
From WS work the outermost 4-4-4-6-6-6 sts in garter st, and K over K and P over P over the other band sts.

INCREASE TIP:
Inc 1 st in each side as follows: K 1, make 1 YO, work until 1 st remains, make 1 YO, K 1. On next row work YO twisted to avoid holes.

MEASURING TIP:
Measure when piece is flat, it is important not to stretch the piece when measuring.

PATTERN (applies to neck warmer):
See diagram A-1, diagram shows all rows in 1 repetition of pattern.
--------------------------------------------------------

BODY:
Worked back and forth on circular needle from mid front. Cast on 160-176-186-208-226-246 sts on circular needle size 5 mm with Alpaca Bouclé. On 1st row (= RS) work as follows: Work BAND STS - read explanation above, work in GARTER ST - read explanation above - until 16-16-16-18-18-18 sts remain on row, work BAND STS. Continue in garter st over the middle sts and 16-16-16-18-18-18 band sts in each side for 4 cm. REMEMBER THE KNITTING TENSION!
Then work in stocking st with 16-16-16-18-18-18 band sts in each side. When piece measures 48-49-50-51-52-53 cm, divide the piece 43-47-49-55-59-64 sts in from each side (= front piece, there are 74-82-88-98-108-118 sts on back piece), and finish each part separately.

BACK PIECE:
= 74-82-88-98-108-118 sts. Continue in stocking st - AT THE SAME TIME at end of the next 2 rows, cast on 48-46-45-41-38-35 new sts for sleeve in each side = 170-174-178-180-184-188 sts. Continue in stocking st - but work the outermost 6 sts in each side in garter st until finished measurements (= band on sleeve in each side). When piece measures 64-66-68-70-72-74 cm, cast off the middle 18-18-20-22-24-24 sts for neck and finish each shoulder separately. On next row from neck, cast off 1 st = 75-77-78-78-79-81 sts remain on shoulder. Loosely cast off all sts when piece measures 66-68-70-72-74-76 cm. NOTE: Make sure that the cast off edge is not too tight.

LEFT FRONT PIECE:
= 43-47-49-55-59-64 sts. Continue in stocking st and 16-16-16-18-18-18 band sts towards mid front - AT THE SAME TIME at end of next row from WS, cast on 48-46-45-41-38-35 new sts for sleeve = 91-93-94-96-97-99 sts. Continue in stocking st and band sts towards mid front but work the outermost 6 sts at beg of row seen from RS in garter st until finished measurements (= band on sleeve). When piece measures 66-68-70-72-74-76 cm, cast off on next row from RS the first 75-77-78-78-79-81 sts for shoulder = 16-16-16-18-18-18 band sts remain for collar. NOTE: Make sure that the cast off edge is not too tight.
Continue to work over these band sts until collar measures 7-7-8-8-9-9 cm from the shoulder. Then cast off at beg of every row from RS as follows: Cast off 5 sts 2-2-2-0-0-0 times, 6 sts 1-1-1-3-3-3 times.

RIGHT FRONT PIECE:
Work as left front piece but reversed.

ASSEMBLY:
Sew shoulder and sleeve seams in front loop of outermost sts. Sew collar tog mid back and sew on to neck line at the back of neck. Sew seams under sleeves in front loop of outermost sts.

POCKET:
Worked back and forth on needle. Cast on 24-24-24-26-26-26 sts on circular needle size 5 mm with Alpaca Bouclé. Then work in stocking st. When piece measures 3 cm, inc 1 st in each side - READ INCREASE TIP. Repeat inc every 3 cm a total of 3 times = 30-30-30-32-32-32 sts. Cast off all sts when piece measures 16-16-16-17-17-17 cm. Sew pockets on to front piece, approx. 10-10-11-11-12-12 cm from cast on edge and 12 cm from mid front. NOTE: Right and left edge on pocket are sewn parallel with band mid front.
--------------------------------------------------------

NECK WARMER:
Worked in the round. Loosely cast on 120 sts on circular needle size 5 mm with Alpaca Bouclé. Work 4 rounds in GARTER ST - read explanation above. Then work A.1 in the round. When piece measures approx. 35 cm (finish with last row in pattern), work 4 rounds in garter st and loosely cast off all sts. NOTE: Make sure that the cast off edge is not too tight.

Diagram

symbols = K
symbols = P
diagram
Do you have a question? See a list of frequently asked questions (FAQ)

Knitting tension is what determines the final measurements of your work, and is usually measured per 10 x 10 cm. It is provided like so: number of stitches in width x number of rows in height - eg: 19 stitches x 26 rows = 10 x 10 cm.

The knitting tension is very individual; some people knit/crochet loosely while others work tightly. You adjust the knitting tension with the needle size, which is why the suggested needle size is only meant as a guide! You need to adjust this (up or down) to ensure that YOUR knitting tension matches the knitting tension provided in the pattern. If you work with a different knitting tension than provided you will have a different yarn consumption, and your work will have different measurements than what the pattern suggests.

The knitting tension also determines which yarns can replace each other. As long as you achieve the same knitting tension you can replace one yarn with another.

See DROPS lesson: How to measure your tension/gauge

See DROPS video: How to make a gauge tension swatch

The required amount of yarn is provided in grams, eg: 450 g. To calculate how many balls you’ll need you first need to know how many grams are in 1 ball (25g, 50g or 100g). This information is available if you click on the individual yarn quality on our pages. Divide the amount required with the amount of each ball. For example, if each ball is 50g (the most common amount), the calculation will be as follows: 450 / 50 = 9 balls.

The important thing when changing from one yarn to another is that the knitting/crochet tension remains the same. This is so that the measurements of the finished piece will be the same as on the sketch provided. It is easier to achieve the same knitting tension using yarns from the same yarn group. It is also possible to work with multiple strands of a thinner yarn to achieve the knitting tension of a thicker one. Please try our yarn converter. We recommend you to always work a test swatch.

Please NOTE: when changing yarn the garment might have a different look and feel to the garment in the photo, due to individual properties and qualities of each yarn.

See DROPS lesson: Can I use a different yarn than the one mentioned in the pattern?

All our yarns are categorised into yarn groups (from A to F) according to thickness and knitting tension – group A contains the thinnest yarns and group F the thickest. This makes it easier for you to find alternative yarns to our patterns, should you wish to switch yarn. All yarns within the same group have a similar knitting tension and can easily replace each other. However, different yarn qualities have different structures and properties which will give the finished work a unique look and feel.

Click here for an overview of the yarns in each yarn group

At the top of all our patterns you’ll find a link to our yarn calculator, which is a helpful tool should you wish to use a different yarn than suggested. By filling in the yarn quality you wish to replace, the amount (in your size) and number of strands, the calculator will present good alternative yarns with the same knitting tension. Additionally it will tell you how much you’ll require in the new qualities and whether you’ll need to work with multiple strands. Most skeins are 50g (some are 25g or 100g).

If the pattern is worked with multiple colours, every colour will have to be calculated separately. Similarly, if the pattern is worked with several strands of different yarns (for example 1 strand Alpaca and 1 strand Kid-Silk) you will have to find alternatives for each, individually.

Click here to see our yarn calculator

Since different yarns have different qualities and textures we have chosen to keep the original yarn in our patterns. However, you can easily find options among our available qualities by using our yarn calculator, or simply pick a yarn from the same yarn group.

It is possible that some retailers still have discontinued yarns in stock, or that someone has a few skeins at home that they would like to find patterns for.

The yarn calculator will provide both alternative yarn as well as required amount in the new quality.

If you think it's hard to decide what size to make, it can be a good idea to measure a garment you own already and like the size of. Then you can pick the size by comparing those measures with the ones available in the pattern's size chart.

You'll find the size chart at the bottom of the pattern.

See DROPS lesson: How to read size chart

The needle size provided in the pattern serves only as a guide, the important thing is to follow the knitting tension. And since knitting tension is very individual, you will have to adjust the needle size to ensure that YOUR tension is the same as in the pattern – maybe you’ll have to adjust 1, or even 2 needle sizes, up or down to achieve the correct tension. For this, we recommend that you work test swatches.

Should you work with a different knitting tension than the one provided, the measurements of the finished garment might deviate from the measurement sketch.

See DROPS lesson: How to measure your tension/gauge

See DROPS video: How to make a tension/gauge swatch

Working a garment top-down provides more flexibility and room for personal adjustment. For example it is easier to try the garment on while working, as well as making adjustments to length of yoke and shoulder caps.

The instructions are carefully explaining every step, in the correct order. Diagrams are adjusted to the knitting direction and are worked as usual.

The diagram depicts all rows/rounds, and every stitch seen from the right side. It is read from bottom to top, from right to left. 1 square = 1 stitch.

When working back and forth, every other row is worked from the right side and every other row is worked from the wrong side. When working from the wrong side, the diagram will have to be worked reversed: from left to right, knit stitches are purled, purl stitches are knit etc.

When working in the round every round is worked from the right side and the diagram are worked from right to left on all rounds.

See DROPS lesson: How to read knitting diagrams

The diagram depicts all rows/rounds, and every stitch seen from the right side. It is worked from bottom to top, from right to left.

When working back and forth every other row is worked from the right side: from right to left and every other row is worked from the wrong side: from left to right.

When working in the round, every row in the diagram are worked from the right side, from right to left.

When working a circular diagram you start in the middle and work your way outwards, counter clockwise, row by row.

The rows usually start with a given number of chain stitches (equivalent to the height of the following stitch), this will either be depicted in the diagram or explained in the pattern.

See DROPS lesson: How to read crochet diagrams

Instructions for working several diagrams after each other on the same row/round, will often be written like so: “work A.1, A.2, A.3 a total of 0-0-2-3-4 times". This means you work A.1 once, then A.2 is worked once, and A.3 is repeated (in width) the number of times provided for your size – in this case like so: S = 0 times, M = 0 times, L=2 times, XL= 3 times and XXL = 4 times.

The diagrams are worked as usual: begin with the first row in A.1, then work the first row in A.2 etc.

See DROPS lesson: How to read knitting diagrams

See DROPS lesson: How to read crochet diagrams

The total width of the garment (from wrist-to-wrist) will be larger in the larger sizes, despite the actual sleeves being shorter. The larger sizes have longer sleeve caps and wider shoulders, so there will be a good fit in all sizes.

The measurement sketch/schematic drawing provides information regarding the full length of the garment. If it’s a jumper or a jacket the length is measured from the highest point on the shoulder closest to the neckline, and straight down to the bottom of the garment. It is NOT measured from the tip of shoulder. Similarly, the length of yoke is measured from the highest point on the shoulder and down to where yoke is split into body and sleeves.

On a jacket measures are never taken along bands, unless specifically stated. Always measure inside band stitches when measuring the length.

See DROPS lesson: How to read a schematic drawing

Diagrams are often repeated on the round or in height. 1 repeat is the diagram the way it appears in the pattern. If it says to work 5 repeats of A.1 in the round, then you work A.1 a total of 5 times after/next to each other in the round. If it says to work 2 repeats of A.1 vertically/in height you work the entire diagram once, then begin again at the start and work the entire diagram one more time.

Chain stitches are slightly narrower than other stitches and to avoid working the cast-on edge too tight, we simply chain more stitches to begin with. The stitch count will be adjusted on the following row to fit the pattern and measurement sketch.

The rib edge is more elastic and will contract slightly compared to, for example, stocking stitch. By increasing before the rib edge, you avoid a visible difference in width between the rib edge and the rest of the body.

It’s very easy to cast off too tightly, and by making yarn overs while casting off (and simultaneously casting these off) you avoid a too tight cast off edge.

See DROPS video: How to bind off with yarn overs (yo)

To achieve an even increase (or decrease) you can increase on, for example: every 3rd and 4th row alternately, like so: work 2 rows and increase on the 3rd row, work 3 rows and increase on the 4th. Repeat this until the increase is complete.

See DROPS lesson: Increase or decrease 1 st on every 3rd and 4th row alternately

Should you prefer to work in the round instead of back and forth, you may of course adjust the pattern. You’ll need to add steeks mid-front (usually 5 stitches), and follow the instructions. When you would normally turn and work from the wrong side, simply work across the steek and continue in the round. At the end you’ll cut the piece open, pick up stitches to work bands, and cover the cut edges.

See DROPS video: How to knit steeks and cut open

Should you prefer to work back and forth instead of in the round, you may of course adjust the pattern so you work the pieces separately and then assemble them at the end. Divide the stitches for the body in 2, add 1 edge stitch in each side (for sewing) and work the front and back pieces separately.

See DROPS lesson: Can I adapt a pattern for circular needles into straight needles?

Pattern repeats can vary slightly in the different sizes, in order to get the correct proportions. If you’re not working the exact same size as the garment in the photo, yours might deviate slightly. This has been carefully developed and adjusted so that the complete impression of the garment is the same in all sizes.

Make sure to follow instructions and diagrams for your size!

If you have found a pattern you like which is available in women’s size it’s not very difficult to convert it to men’s size. The biggest difference will be the length of sleeves and body. Start working on the women size that you think would fit across the chest. The additional length will be worked right before you cast off for the armhole/sleeve cap. If the pattern is worked top-down you can add the length right after the armhole or before the first decrease on sleeve.

Regarding additional yarn amount, this will depend on how much length you add, but it is better with a skein too many than too few.

All yarns will have excess fibres (from production) that might come off as lint or shedding. Brushed yarns (ie hairier yarns) have more of these loose, excess fibres, causing more shedding.

Shedding also depends on what is worn under or over the garment, and whether this pulls at the yarn fibres. It’s therefore not possible to guarantee that there will be no shedding

Below are some tips on how to get the best result when working with hairier yarns:

1. When the garment is finished (before you wash it) shake it vigorously so the looser hairs come off. NOTE: do NOT use a lint roller, brush or any method that pulls at the yarn.

2. Place the garment in a plastic bag and put it in your freezer - the temperature will cause the fibres to become less attached to each other, and excess fibres will come off easier.

3. Leave in the freezer for a few hours before taking it out and shaking it again.

4. Wash the garment according to the instructions on the yarn label.

Pilling is a natural process that happens to even the most exclusive of fibers. It's a natural sign of wear and tear that is hard to avoid, and that is most visible in high friction areas of your garment like a sweater's arms and cuffs.

You can make your garment look as new by removing the pilling, using a fabric comb or a pill/lint remover.

Still can't find the answer you need? Then scroll down and leave your question so one of our experts can try to help you. This will be done normally within 5 to 10 working days.
In the meantime, you can read the questions and answers that others have left to this pattern or join the DROPS Workshop on Facebook to get help from fellow knitters/crocheters!

You might also like...

Post a comment to pattern DROPS 142-21

We would love to hear what you have to say about this pattern!

If you want to leave a question, please make sure you select the correct category in the form below, to speed up the answering process. Required fields are marked *.

Comments / Questions (61)

country flag Bettina wrote:

Ich hänge bei den Kragenende an den Vorderteilen. Dort steht bei Größe M, nachdem man 7cm gestrickt hat: "zu Beginn jeder Hin-R 2x5 M und 1x6 M abketten." Da nur noch 16 M übrig sind, würde das ja heißen, dass ich sofort alle M abketten muss? Aber das kann ja auch nicht sein, da das Stück ja schräg werden soll. Wie geht es denn dort weiter? lG Bettina

02.10.2021 - 16:03

DROPS Design answered:

Liebe Bettina, die 16 Maschen vom Kragen werden nach und nach abgekettet, am Anfang jeder Hinreihe: zuerst 5 Maschen x 2 dann die 6 übrige Maschen - dieses Video zeigt (für ein anderes Modell, dh mit anderen Maschenanzahl), wie man die Maschen für den Kragen so abkettet. Viel Spaß beim stricken!

04.10.2021 - 08:08

country flag Kathi wrote:

Das habe ich alles schon fertig. Jetzt bin ich aber beim linken Vorderteil, und da steht folgendes: LINKES VORDERTEIL: = 43-47-49-55-59-64 M... GLEICHZEITIG am Ende der nächsten Rück nächsten Rück-R 46 neue M für den Ärmel anschlagen (=93M). wie ist das gemeint? LG

27.05.2020 - 12:48

DROPS Design answered:

Liebe Kathi, Sie stricken eine Rückreihe und am Ende dieser Rückreihe schlagen Sie die 46 neuen Maschen, wenden und jetzt beginnen die Hinreihen mit den neuen Maschen für den Ärmel. Viel Spaß beim stricken!

27.05.2020 - 14:08

country flag Kathi wrote:

Hallo, liebes Drops-Team, ich bin nun beim linken Vorderteil angekommen, und verstehe nicht, wann die Maschen für die Ärmel angeschlagen werden sollen. Wie ist das gemeint: „ GLEICHZEITIG am Ende der nächsten Rück-R 46 neue M für den Ärmel anschlagen“? Ich stricke M, sehr 46 Maschen. Aber was heißt, am Ende der nächsten Rückrunde? LG, Kathi

27.05.2020 - 09:58

DROPS Design answered:

Liebe Kathi, am Ende der 2 ersten Reihe über nur Rückenteil schlagen Sie die 46 neuen Maschen, dh nachdem Sie die letzte Reihe vom Rumpfteil gestrickt haben (die Maschen von beiden Vorderteile stilllegen), stricken Sie die nächste Hinreihe über die Maschen vom Rückentil, am Ende dieser Reihe schlagen Sie 46 M an, wenden, die Rückreihe stricken und am Ende dieser Reihe schlagen Sie 46 M an. Viel Spaß beims tricken!

27.05.2020 - 11:40

country flag Kathi wrote:

Hallo liebes Drops- Team, bei der Unterteilung des Rumpfteils habe ich festgestellt, dass mir zwei Maschen fehlen. Ich stricke Größe M. Wie kann ich das nun am besten lösen? Ich möchte natürlich nicht noch mal neu beginnen, und habe deshalb überlegt, die Mitte (Rückenteil) dann nur mit 80 Maschen zu stricken. Macht das Sinn? Oder gibt es eine andere Möglichkeit, die am Ende nicht zu sehr auffällt? Vielen Dank schon mal für die Unterstützung. LG

27.12.2019 - 11:05

DROPS Design answered:

Liebe Kathi, leider können wir nicht jede Anleitung nach jeder Wunsch anpassen - am besten wenden Sie sich bitte an Ihrem Laden, wo Sie die Wolle gekauft haben - auch telefonisch oder per E-Mail. Viel Spaß beim stricken!

02.01.2020 - 11:28

country flag Dollygk wrote:

Hello and many thanks for all the free designs you offer! I am knitting this pattern but the design 'dips' after the edge rib stitches. Is it supposed to do this?? How can I send you a picture so you can understand. Thankyou all!

24.10.2019 - 10:14

DROPS Design answered:

Dear Mrs Dollygk, make sure you keep correct tension, please show your work to your store (even sending a picture by mail), so that they can check together with you. Happy knitting!

24.10.2019 - 10:57

country flag Patty Manzi wrote:

What is the EASE measurement for this garment? The Finished Measurement says 41" (for Large size), but on the diagram is shows 52. Does it truly have 11 inch Ease for size Large? thank you.

01.10.2019 - 20:38

DROPS Design answered:

Dear Mrs Manzi, we are not used to work with ease; to check your size, measure a similar garment you have and like the shape and compare them to the measurements in the chart (= in cm, not in inches). Read more about sizing and convert into inches here. Happy knitting!

02.10.2019 - 08:18

Georgann B. Smallwood wrote:

I would like to use a cotton/linen blend yard for this jacket. (Aran 8 wpi) Do you have any size suggestions / instructions for this weight? Thank you! I love this pattern and want to use the yarn I have.

26.03.2018 - 01:55

DROPS Design answered:

Dear Mrs Smallwood, you can use here DROPS Bomull-Lin, please find here all relevant informations about alternatives. Happy knitting!

26.03.2018 - 11:43

country flag Yvonne wrote:

Heb patroon exact gevolgd, steeds gemeten conform aanwijzingen, steekproef was goed etc. Toch was het vest al snel te kort en te wijd. En met het dragen werd dit steeds erger: het werd steeds korter en wijder! Ik kan het vest helaas niet meer dragen, het is helemaal uit verhouding. Ik heb ook poncho 133-4 gemaakt en daarbij gebeurt dit ook, alleen bij een poncho komen de verhoudingen minder precies, dus dan maar korter en wijder. Maar hoe kan het dat deze wol zo reageert na correcte verwerking?

20.12.2017 - 23:38

DROPS Design answered:

Hallo Yvonne, Dat is erg jammer om te horen. Voor klachten over het garen kun je het beste even contact opnemen met het verkooppunt waar je het garen hebt gekocht. Zij kunnen je eventueel verder helpen.

12.03.2018 - 10:58

country flag Lene Thorkelin wrote:

Jeg bryder mig ikke om bouclé garn. Kan I anbefale en anden garntype til denne model?

24.09.2017 - 10:31

DROPS Design answered:

Hei Lene. DROPS Alpaca Boucle tilhører garngruppe C og du kan velge andre kvaliteter vi har i samme garngruppe. Om du ønsker ensfarget ullkvalitet kan du velge DROPS Brushed Alpaca Silk, DROPS Nepal, DROPS Big Merino, DROPS Air og DROPS Alaska eller multifarget ved DROPS Big Delight. Du kan også velge mellom DROPS Paris og DROPS Bomull-Lin om du ønsker bomullsgarn. Bare gå inn på oversikten over garn og velg kvalitet og farger, men HUSK å overholde strikkefastheten som er oppgitt i oppskriften. God Fornøyesle!

27.09.2017 - 08:19

country flag Gina Von Staden wrote:

Danke vielmals. Alles Gute, bis zur nächsten dummen Frage. Gina

18.04.2016 - 10:15