
Popular categories
Looking for a yarn?


Comments / Questions (12)
![]() Titi wrote:
Titi wrote:
Bonjour, le bandeau fait quelle largeur (sans les bouclettes)? Merci
11.01.2026 - 13:06DROPS Design answered:
Bonjour Titi, env. 10 cm. Bon tricot!
12.01.2026 - 11:09
![]() Pia Liukku wrote:
Pia Liukku wrote:
Hei! Ja vielä kysyisin neulotaanko A1mallikertaa oikealta vasemmalle vai vasemmalta oikealle? Neulotaanko jokainen rivi vain yhden kerran siten että kaaviosta neulotaan 16 riviä vai neulotaanko edestakas 32 riviä. Miksi näitä ei merkitä kaavioon? Ja neulotaanko ensimmäinen rivi nurjalta nurjilla silmukoilla? Yst. Pia Liukku
06.03.2024 - 10:18DROPS Design answered:
Työ neulotaan tasona, joten oikean puolen kerrokset neulotaan oikealta vasemmalle ja nurjan puolen kerrokset neulotaan vasemmalta oikealle. Jokainen rivi neulotaan kerran. Piirroksen ensimmäinen kerros neulotaan työn oikealta puolelta.
06.03.2024 - 17:04
![]() Pia Liukku wrote:
Pia Liukku wrote:
Otsapannan mallikerta kaljaa nurjilla silmukoilla. Neulotaanko niiden eteen ja jälkeen lopussa 2 ainaoikeaa vai miten? Aloitetaanko neulominen nurjalla puolelta neulomalla, se oikein vai aloitetaanko oikealta puolelta? Tuleeko aloitus riviin 2 n, 4 o. Eikä 4 n 4 o kuten mallikerrassa. Tuo alku on vaikeasti selitetty.. Ja minkälaista joustinneuletta neulotaan? Yst. Terv. Pia
05.03.2024 - 06:31
![]() Tiina wrote:
Tiina wrote:
Mis mustri osa korrata, et saada pikemat kinnast(suurele käele, pikkade sõrmedega)?
12.12.2023 - 18:33
![]() Jane Newton wrote:
Jane Newton wrote:
I am making the headband. What does k 1 row ws mean do i knit one row which then necomes the wrong side or do i perl one row do that the next row is the right side?
15.05.2023 - 16:28DROPS Design answered:
Dear Mrs Newton, for the headband, the first worked row will be a wrong side row, this means you will purl all stitches then turn and work next row from right side increasing stitches as explained. Happy knitting!
16.05.2023 - 08:52
![]() Johanna wrote:
Johanna wrote:
Sind die 100g Wolle der Verbrauch für einen oder beide Handschuhe?
27.07.2022 - 15:15DROPS Design answered:
Liebe Johanna, der Verbrauch gilt für beide Handschuhe. Viel Spaß beim Stricken!
28.07.2022 - 08:08
![]() Giedre wrote:
Giedre wrote:
Mitten measures 30cm!!! It can't be right. Is it for giant?
01.01.2020 - 12:42DROPS Design answered:
Dear Giedre, mittens are measuring 30 cm in total, but the rib edge will be folded double. Happy knitting!
02.01.2020 - 15:12
![]() Anne wrote:
Anne wrote:
¿Se podría dar una explicación más detallada de estos pasos? Muchas Gracias. Tejer la vta sig de la manera sig: 2 pjr, 1r, * 2d en cada uno de los 2 pts sig (= 4d), 1r, 2r en el pt sig, 1r (es decir, 3 reveses se convierten en 4r) *, repetir de *a* 1 vez más, 2d en cada uno de los 2 pts sig (= 4d), ** 2 pjr, 1r, 2d **, repetir de **a** 4 veces más = 42 pts.
16.03.2018 - 13:24DROPS Design answered:
Hola Anne, Tejer la vuelta siguiente de la siguiente manera: 2 puntos juntos de reves, 1 reves* 2 derechos en cada uno de los 2 puntos siguientes (=4 derechos), 1 reves, 2 reveses en el punto siguiente, 1 reves (es decir, 3 reveses se convierten en 4 reveses)*, repetir de *a* 1 vez mas, 2 derechos en cada uno de los 2 puntos siguientes (= 4 derechos), ** 2 puntos juntos de reves, 1 reves, 2 derechos**, repetir de ** a ** 4 veces mas= 42 puntos.
24.03.2018 - 07:38Mette wrote:
Hej Lisbeth, hvi du tager den norske udgave af opskriften, får du også opskrift på pandebånd. God fornøjelse. Hilsen Mette
08.10.2012 - 07:54
![]() Lisbeth Sangill wrote:
Lisbeth Sangill wrote:
Jeg kan ikke finde opskriften på pandebåndet. Ligger den her ikke? VH Lisbeth Sangill
07.10.2012 - 22:08DROPS Design answered:
Jo da, den ligger her øverst i opskriften :)
20.11.2012 - 09:58
|
|||||||||||||||||||||||||||||||
Princess of Siberia#princessofsiberiaset |
|||||||||||||||||||||||||||||||
 |
 |
||||||||||||||||||||||||||||||
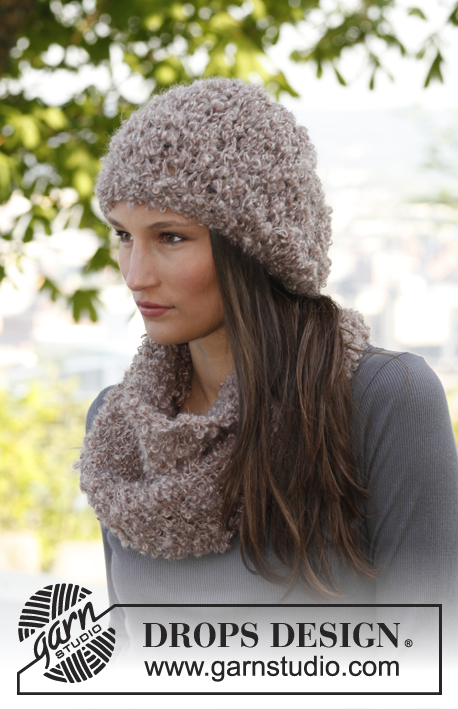
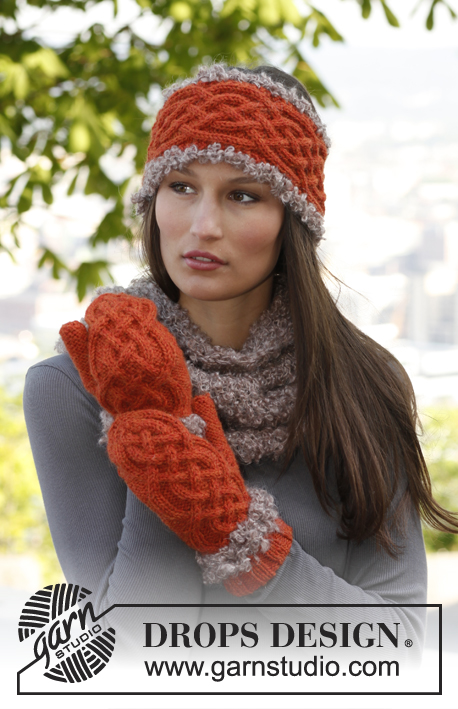
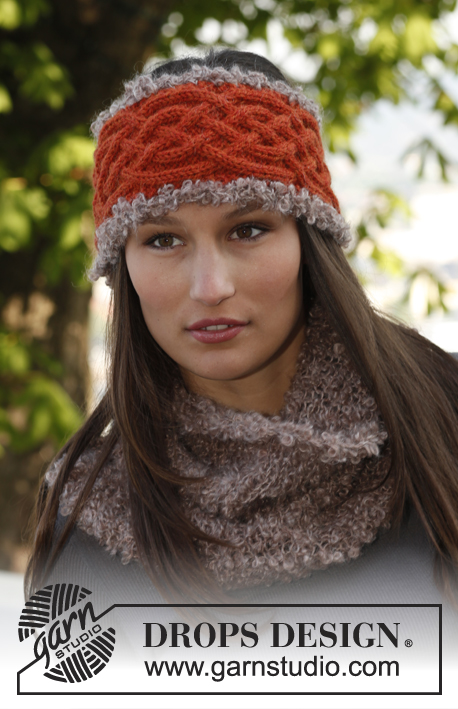
Set consist of: Knitted DROPS mittens and head band with cables in ”Nepal” and crochet edges in ”Puddel” and knitted neck warmer in ”Puddel”.
DROPS 143-24 |
|||||||||||||||||||||||||||||||
|
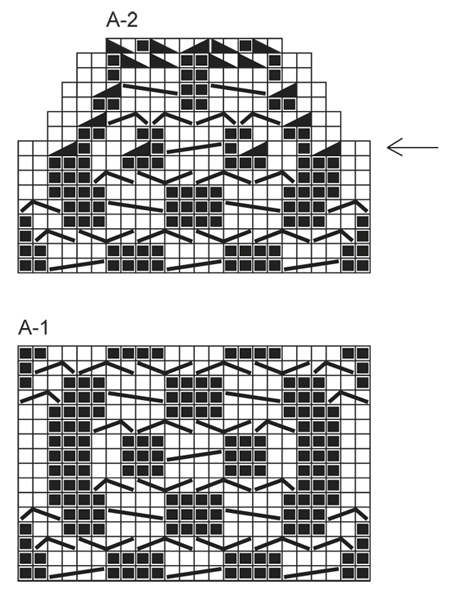
GARTER ST: K sts on every row. PATTERN: See diagram A-1 for head band. See diagram A-1 and A-2 for mittens. Diagrams shows 1 repetition of pattern, all rows in diagram are seen from RS. ---------------------------------------------------------- HEAD BAND: Worked back and forth on needle. Cast on 22 sts on needle size 4.5 mm with Nepal. K 1 row from WS. Work next row as follows: 2 sts in GARTER ST – see explanation above, * P 2, K 2 in each of the next 2 sts (= K 4), P 2 *, repeat from *-* 2 more times, finish with 2 sts in garter st = 28 sts. Work 1 row from WS with K over K and P over P with 2 sts in garter st in each side. Continue with A-1 with 2 sts in garter st in each side until piece measures approx 48-50 cm - adjust after 1 whole repetition of pattern. Work next row as follows: 2 sts in garter st, * P 2, K 2 tog, K 2 tog, P 2 *, repeat from *-* 2 more times, finish with 2 sts in garter st = 22 sts. K 1 row from WS over all sts, then cast off. ASSEMBLY: Sew head band tog mid back, edge to edge to avoid a chunky seam. Crochet with Puddel on hook size 5 mm along both sides of head band as follows: 1 dc in first st, * 2 ch, skip 1 ridge (= 2 rows K), 1 dc in next ridge *, repeat from *-* and finish with 1 sl st in first dc. ---------------------------------------------------------- NECK WARMER: Worked in the round on circular needle. LOOSELY cast on 62 sts on circular needle size 8 mm with Puddel - NOTE: Make sure that the cast on edge is not too tight. Work in stocking st until piece measures approx. 32 cm, LOOSELY cast off - NOTE: Make sure that the cast off edge is not too tight. ---------------------------------------------------------- LEFT MITTEN: Worked in the round on double pointed needles. Cast on 40 sts on double pointed needles size 3.5 mm with Nepal. Work rib = P 3/K 2 for 10 cm (it is important that round beg with 3 P sts). Work next round as follows: P 2 tog, P 1, * K 2 in each of the next 2 sts (= K 4), P 1, P 2 in next st, P 1 (i.e. 3 P becomes 4 P) *, repeat from *-* 1 more time, K 2 in each of the next 2 sts (= K 4), ** P 2 tog, P 1, K 2 **, repeat from **-** 4 more times = 42 sts. K 1 round and P 1 round over all sts (crochet in this P-round). Switch to double pointed needles size 4.5 mm. Continue with diagram A-1 over the first 24 sts and P over the last 18 sts – insert a marker in the next to last st on round (= thumb st). When 2 cm have been worked after rib, inc 1 st on each side of thumb st by making 1 YO, on next round P YOs twisted to avoid holes. Repeat inc every other round 4 more times (thumb sts inc by 2 sts after every inc) = 11 thumb sts and 52 sts in total. When piece measures 16 cm in total, slip the 11 thumb sts on a stitch holder and cast on 1 new st over thumb = 42 sts. Continue A-1 on top of hand and P inside hand until A-1 has been worked 2 times vertically. Then work A-2 on top of hand and P inside hand. When reaching the row marked with 1 arrow in diagram, beg dec. On top of hand dec after diagram and inside hand P tog the first and the last 2 sts every other round a total of 4 times. On last round in diagram, P the remaining 10 P-sts tog 2 by 2 = 12 sts remain on needle (i.e. 7 sts on top of hand and 5 sts inside hand), cut the thread, pull it through the remaining sts and tighten. The entire mitten measures approx. 30 cm. THUMB: Slip the 11 sts from stitch holder over thumb gusset on double pointed needles size 4.5 mm and knit in addition up 3 sts along the edge behind the thumb sts = 14 sts. P in the round for 6 cm, then P all sts tog 2 by 2. Cut the thread and pull it through the remaining 7 sts, tighten tog and fasten. CROCHET EDGES: Work on hook size 5 mm with Puddel at the bottom of mitten as follows: 1 dc in first st, * 2 ch, skip 1 st, 1 dc in next st *, repeat from *-* the entire round, finish with 1 sl st in first dc. Work the same way in the P-round after rib. RIGHT MITTEN: Work as left mitten but inc for thumb gusset on each side of the 2nd P st of the 18 P sts inside hand. |
|||||||||||||||||||||||||||||||
Diagram explanations |
|||||||||||||||||||||||||||||||
|
|||||||||||||||||||||||||||||||
 |
|||||||||||||||||||||||||||||||
Have you finished this pattern?Tag your pictures with #dropspattern #princessofsiberiaset or submit them to the #dropsfan gallery. Do you need help with this pattern?You'll find 13 tutorial videos, a Comments/Questions area and more by visiting the pattern on garnstudio.com. © 1982-2026 DROPS Design A/S. We reserve all rights. This document, including all its sub-sections, has copyrights. Read more about what you can do with our patterns at the bottom of each pattern on our site. |
|||||||||||||||||||||||||||||||


With over 40 years in knitting and crochet design, DROPS Design offers one of the most extensive collections of free patterns on the internet - translated to 17 languages. As of today we count 324 catalogues and 12290 patterns translated into English (UK/cm).
We work hard to bring you the best knitting and crochet have to offer, inspiration and advice as well as great quality yarns at incredible prices! Would you like to use our patterns for other than personal use? You can read what you are allowed to do in the Copyright text at the bottom of all our patterns. Happy crafting!
Post a comment to pattern DROPS 143-24
We would love to hear what you have to say about this pattern!
If you want to leave a question, please make sure you select the correct category in the form below, to speed up the answering process. Required fields are marked *.