
Popular categories
Looking for a yarn?


Comments / Questions (47)
![]() Murielle Kingsbury wrote:
Murielle Kingsbury wrote:
Apres avoir 27cm du marqueur ...a l'endroit tricoter les 12 ere m .? .end?puis mettre m. en attente..tricoter les m restantes . .. tricoter 1 rang sur les m de l'aiguille (maintenant cote envers???) et les glisser en attente???? j\enchaine . avec le a-2 sur les 12 m envers??? que je remets encore en attente???? je me retrouve avec ma laine au debut des 12m cote endroit....comment je peut continuer avec les m restantes... Comment et OU je commence le dos ????Merci!!!!!!!
05.06.2020 - 06:29DROPS Design answered:
Bonjour Mme Kingsbury, à 27 cm du marqueur, au début du rang suivant sur l'endroit, vous tricotez les 12 premières mailles et les glissez en attente = les mailles de A.1 (devant droit/manche) ou bien les 12 premières mailles sur l'envers = celles de A.2 (devant gauche/manche). Ces mailles seront ensuite reprises pour le col. Il vous reste maintenant 25 mailles sur l'aiguille, tricotez ces 25 mailles pour terminer le rang. Mettez 1 marqueur sur les mailles pour délimiter la hauteur, tricotez le devant gauche, puis le dos ainsi: les 25 m du devant gauche + montez 11 m + les 25 m du devant droit = 61 m. Bon tricot!
05.06.2020 - 07:51
![]() Murielle Kingsbury wrote:
Murielle Kingsbury wrote:
Bonjour, sur le video qui accompagne le modele 140-47 nous tricotons 4 m de bordure au point mousse de chaque côté et avons déjà tricoté 2 fois le diagramme en hauteur. vous commencez le diagramme a-1 avec 2m end sur le video.. Mais quand on debute le modele avec 3 rangs end...,,,je me retrouve au début du 4e rang avec des mailles env.....???? je commence le diagramme A-1 avec 2 m envers ou 2 m endroit??????? Un gros merci a l'avance pour les info grandement toujours appréciées!
28.05.2020 - 23:33DROPS Design answered:
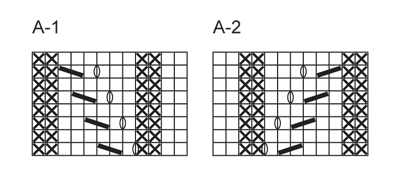
Bonjour Mme Kingsbury, le 1er rang de A.1 (= sur l'endroit) commence par 2 m end, 2 m env puis 1 jeté, 1 m end, glissez ensuite 1 m à l'end, 1 m end, passez la m glissée par-dessus la m tricotée, 3 m end et 2 m env. Comme le montre la vidéo également, après les 4 premières mailles au point mousse (= à l'endroit). Bon tricot!
29.05.2020 - 08:18
![]() رياضيات المتوسط wrote:
رياضيات المتوسط wrote:
Merci pour les explications, elles sont trés éfficaces
27.11.2019 - 14:21
![]() Regnier wrote:
Regnier wrote:
Bonjour J aime la torsade de votre modèle Dora mais je n arrive pas à bien visualiser sa réalisation sur la vidéo Auriez vous une explication écrite ? Je ne comprends pas comment réaliser les mailles que vous semblez tourner ! Merci pour votre réponse Cordialement Catherine Regnier
16.11.2019 - 10:22DROPS Design answered:
Bonjour Mme Regnier, vous trouverez ici la vidéo pour le point ajouré A.1 et là, la vidéo du point ajouré A.2. Bon tricot!
18.11.2019 - 08:58
![]() Doris wrote:
Doris wrote:
Kann ich die Jacke auch mit Drops Cloud stricken?
17.02.2018 - 17:21DROPS Design answered:
Liebe Doris, 1 Faden F (= Polaris) = 2 Fäden E (= Cloud, Eskimo, Andes), so können Sie auch mit 2 Fäden Cloud stricken, wenn Sie doch einige haben, bei uns wird diese Wolle nicht mehr verfügbar. Sie können auch mit 4 Fäden Air stricken - hier lesen Sie mehr über Garnalternative. Viel Spaß beim stricken!
19.02.2018 - 09:23
![]() Carol wrote:
Carol wrote:
What number yarn is this is it knitted worsted 100%acrylic
05.10.2016 - 04:51DROPS Design answered:
Dear Carole, please find all relevant informations about the yarn on its shadecard - for any further individual help, you are welcome to contact your DROPS store. Happy knnitting!
05.10.2016 - 08:54
![]() HELENE CHARDON wrote:
HELENE CHARDON wrote:
Bonjour, Je suis en train de tricoter le modèle en question. Comme il m'a fallu quasiment 300 grammes pour faire un devant, je suppose que je n'aurai pas assez des 900 grammes préconisés pour la taille S. Je tricote pourtant "serré". Il va me falloir trouver, acheter et transporter 3 pelotes complémentaires du même bain. Dur-dur ! De plus, il semble y avoir une erreur dans l'explication du devant droit : Le motif sur 12 mailles se fait en début de rang et non en fin.
21.02.2015 - 12:12DROPS Design answered:
Bonjour Mme Chardon, pensez à toujours bien vérifier votre tension, vous devez avoir 7 m x 8 rangs jersey = 10 x 10 cm. Pour le devant droit, on commence bien par le motif, soit vu sur l'endroit: A.1 et jersey sur les 11 dernières m (en taille S). Bon tricot!
23.02.2015 - 11:11
![]() Bernardi wrote:
Bernardi wrote:
Bonsoir, pour le modèle en taille M il faut 1kg200 de laine voire 1kg300. Sur les tricots en grosse laine, votre grammage est souvent insuffisant.
16.02.2015 - 20:29DROPS Design answered:
Bonjour Mme Bernardi, aviez-vous bien la bonne tension et conservé cette même tension pendant toute la réalisation soit 7 m x 8 rangs jersey = 10 x 10 cm ? Merci. Bon tricot!
17.02.2015 - 15:39
![]() Claire Thomas wrote:
Claire Thomas wrote:
Hi, I'm just wondering what size xxxl would be in normal UK women's dress sizes? I want to make for a friend who is a UK dress size 30 and wondered if xxxl would fit, thanks
08.11.2014 - 15:44DROPS Design answered:
Dear Mrs Thomas, you will find at the end of the pattern a measurement chart with all measures taken flat from side to side, compare these to a similar garment she likes the shape to find out the matching size. Happy knitting!
10.11.2014 - 09:09
![]() Antje Schupp wrote:
Antje Schupp wrote:
Maschenprobe stimmt. Ich stricke Grüße M, ein Vorderteil hat jetzt über 30 cm. Das ist viel zu groß. Maschenzahl stimmt, alles richtig. Ich kann ziemlich gut stricken. Wenn ich glatt rechts weglasse, ist der STreifen Muster in Relation sehr breit. Was tun?
31.05.2014 - 22:28DROPS Design answered:
Liebe Frau Schupp, die Vorderteile sind so berechnet, dass sie sich überlappen, daher die größere Breite. Die Zopfmusterbereiche sind als Blenden konzipiert, die in den Kragen übergehen. Auf dem Bild ist die Jacke offen und locker getragen. Wenn Sie Maschen an den Vorderteilen weglassen, haben Sie hinterher nicht mehr genügend für das Rückenteil.
03.06.2014 - 22:17
|
||||||||||||||||
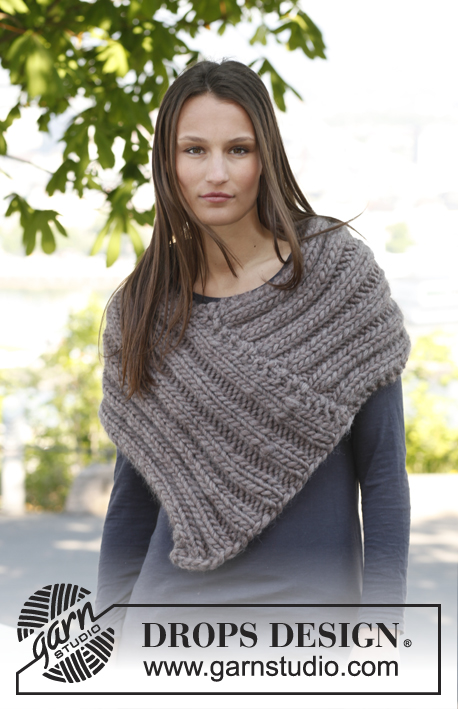
Dora#dorajacket |
||||||||||||||||
|
|
||||||||||||||||
Knitted DROPS wide jacket with lace pattern and shawl collar in ”Polaris”. Size: S - XXXL.
DROPS 140-47 |
||||||||||||||||
|
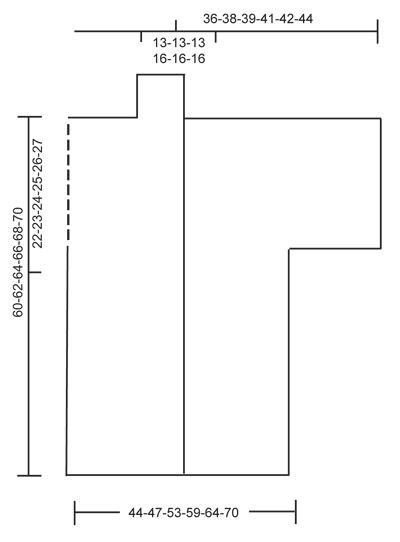
TIP FOR SWITCHING THREADS: When switching ball with Polaris, split the old thread in two on the last 15 cm – cut off one part, do the same on the new thread. Place the first and last 15 cm on top of each other so that the yarn is the normal thickness and continue to work – this is done to make the thread switch invisible in the yarn. PATTERN: See diagrams A.1 and A.2. The diagrams show pattern from RS. -------------------------------------------------------- RIGHT FRONT PIECE + SLEEVE: Worked back and forth on a circular needle to make room for all the sts. READ TIP FOR SWITCHING THREADS! Cast on 23-24-26-27-29-31 sts on circular needle size 15 mm with Polaris. K 3 rows. Work next row as follows from RS: A.1 (= 12 sts), stocking st over the last 11-12-14-15-17-19 sts. Continue like this. When piece measures 38-39-40-41-42-43 cm, cast on 10-10-9-8-7-6 new sts at the end of next row from RS = 33-34-35-35-36-37 sts. Insert a marker - NOW MEASURE PIECE FROM HERE! Work the new sts in stocking st except the outermost 2 sts which is worked K on all rows. When piece measures approx. 22-23-24-25-26-27 cm from marker (adjust so that next row is worked from RS), work the first 12 sts as before, then slip these sts on a stitch holder = 21-22-23-23-24-25 sts remain on needle, work the rest of row. Insert another marker (= mid on top of shoulder) – NOW MEASURE PIECE FROM HERE! Work 1 row over sts on needle. Slip sts on a stitch holder and put piece aside. LEFT FRONT PIECE + SLEEVE: Work as right front piece but reversed - work A.2 instead of A.1. Work the 12 sts in A.2 at the top by shoulder from WS before slipping them on a stitch holder. Work the rest of row, continue with back piece without slipping sts on a stitch holder. BACK PIECE: Work 1st row from RS as follows: Work sts from left front piece + sleeve, cast on 9-9-9-11-11-11 new sts (= back of neck) and work right front piece + sleeve on to circular needle = 51-53-55-57-59-61 sts. Continue back and forth in stocking st with 2 edge sts in each side which is worked K on all rows, until piece measures 22-23-24-25-26-27 cm from marker mid on top of shoulder. On next row cast off the first and last 10-10-9-8-7-6 sts, cut the thread. Work in stocking st over the remaining 31-33-37-41-45-49 sts. When piece measures approx. 57-59-61-63-65-67 cm (adjust so that next row is worked from WS), K 3 rows over all sts, then loosely cast off with K from RS. COLLAR: Slip the 12 sts from stitch holder on right front piece back on circular needle. Cast on 1 new st towards the shoulder = 13 sts. Continue as before with 1 edge st in the side which is worked K on all rows. When collar measures approx. 7-7-7-8-8-8 cm, cast off. Work the same way over sts from stitch holder on left front piece. Sew collar parts tog edge to edge mid back, and sew collar to back of neck inside edge st. ASSEMBLY: Sew sleeve and side seam in one, sew tog edge to edge in front loop of outermost st to avoid a chunky seam. |
||||||||||||||||
Diagram explanations |
||||||||||||||||
|
||||||||||||||||
 |
||||||||||||||||
 |
||||||||||||||||
Have you finished this pattern?Tag your pictures with #dropspattern #dorajacket or submit them to the #dropsfan gallery. Do you need help with this pattern?You'll find 20 tutorial videos, a Comments/Questions area and more by visiting the pattern on garnstudio.com. © 1982-2026 DROPS Design A/S. We reserve all rights. This document, including all its sub-sections, has copyrights. Read more about what you can do with our patterns at the bottom of each pattern on our site. |
||||||||||||||||


With over 40 years in knitting and crochet design, DROPS Design offers one of the most extensive collections of free patterns on the internet - translated to 17 languages. As of today we count 324 catalogues and 12290 patterns translated into English (UK/cm).
We work hard to bring you the best knitting and crochet have to offer, inspiration and advice as well as great quality yarns at incredible prices! Would you like to use our patterns for other than personal use? You can read what you are allowed to do in the Copyright text at the bottom of all our patterns. Happy crafting!
Post a comment to pattern DROPS 140-47
We would love to hear what you have to say about this pattern!
If you want to leave a question, please make sure you select the correct category in the form below, to speed up the answering process. Required fields are marked *.