
Popular categories
Looking for a yarn?


Comments / Questions (36)
![]() Janni wrote:
Janni wrote:
Jeg er lidt i tvivl. Skal man forsætte med mønsteret: 2 rækker fm, 1 række st og 1 række fm, resten af stykket efter stribemønsteret, og helt op til alle aflukningerne?
27.09.2018 - 19:33DROPS Design answered:
Hej Janni, ja det stemmer, se her: Når stribemønsteret er færdig, måler arb ca 27-28-29-30-31-32 cm. Fortsæt med marineblå således: * 2 rækker fm, 1 række st, 1 række fm *, gentag fra *-* til færdig mål. God fornøjelse!
28.09.2018 - 15:14
![]() Steffi wrote:
Steffi wrote:
Nachdem man die Markierung eingezogen hat, bei der Ersten Reihe nimmt man auf beien Seite je eine Masche auf. Dass ist mir noch klar.dann heisst es weiter "total 4 mal alle 2 cm\" Heißt das, dass man wenn man weiter die Streifen Reihen häkelt, immer nach 2 cm eine Masche aufnimmt? Dashabe ich gemacht, jetzt wellt sich das ganz aber, so das es wie Rüschen aussieht. Außerdem heisst es "4 mal"ich habe jetzt die Anzahl der endgültigen Maschen, (184) aber richtig sieht das nicht aus.
10.06.2018 - 21:10DROPS Design answered:
Liebe Steffi, bei der 1. Reihe im Streifenmuster nehmen Sie 4 M zu (= 1 M auf beiden Seiten der beiden Markierungen), dann *2 cm weiter häkeln, 4 M zunehmen* und von *bis* noch 3 Mal (= 5Mal insgesamt) wiederholen. Viel Spaß beim häkeln!
11.06.2018 - 10:01
![]() Paola Ntl wrote:
Paola Ntl wrote:
NON HO CAPITO BENE QUESTO PEZZO: Girare e lavorare il motivo come prima sopra tutte le m del dietro e dei davanti, sopra la catena di catenelle delle maniche lavorare così: 1 m.b/m.a (dipende dalla riga che devi lavorare del motivo). Come devo lavorare sopra le catenelle?GRazie
09.05.2018 - 17:02DROPS Design answered:
Buongiorno Paola. In ognuna delle prime 6 cat, lavora 1 m.a o 1 m.b a seconda della riga che deve lavorare per proseguire correttamente il motivo, poi ripete * saltare 1 catenella, lavorare 1 m.a/m.b in ognuna delle 6 cat successive* sulle altre catenelle. Buon lavoro!
10.05.2018 - 09:47
![]() Raffaella wrote:
Raffaella wrote:
Buongiorno, credo che sia sbagliata l indicazione dei gr da usare per la tg XL . Grazie Raffaella
28.08.2017 - 17:23
![]() Moni wrote:
Moni wrote:
Hallo! Ich häkel gerade dieses bezaubernde Jäckchen. nun bin ich bei 40cm und hab die abnahmen am halsauschnitt begonnen. nach einer anprobe festgestellt das es oben viel zu viele maschen sind und ganz locker sitzt.... hab aber alles strikt nach anleitung gehäkelt. auch in der kleinsten größe. Maschenprobe stimmte auch überein. was kann da passiert sein?
23.05.2016 - 10:00DROPS Design answered:
Liebe Moni, das ist aus der Ferne etwas schwer zu beurteilen. Ich habe nachgeprüft, wir haben noch keine weiteren Rückmeldung in dieser Art erhalten. Könnten Sie nochmals genau mit der Anleitung prüfen?
23.05.2016 - 17:15
![]() Constanze wrote:
Constanze wrote:
Nachtrag zur Frage Überspringe ich an den Ärmeln immer die 7 Masche, auch wenn ich generell Maschen abnehme, oder gilt es nur für die erste Reihe .
30.12.2014 - 20:05DROPS Design answered:
Das gilt nur für die erste R, für das Häkeln in die Lm. Indem etwas mehr Lm angeschlagen werden, wird bewirkt, dass die Lm-R nicht zu stramm wird. Sie häkeln dann wieder ganz normal in jedes Stb bzw. in jede fM und nehmen dann wie beschrieben ab.
30.12.2014 - 20:30
![]() Constanze wrote:
Constanze wrote:
Hallo, ich habe eine Frage zu den Ärmel. Ich bin gerade an der Luftmaschenkette. In der nächsten Runden sollen in die Luftmaschen 1fm/Stb in die ersten 6 - eine Überspringen und wiederholen. Was ist hier genau gemeint ? 6 Fm - frei - 6 Std. im Wechsel ? 1 fm - 1 Stb - wiederholen - bis 6 Lm gehäkelt ?? Bitte um rasche Antwort - danke und Frohe Weihnachten
28.12.2014 - 11:56DROPS Design answered:
Nein, es bedeutet, dass Sie entweder fM oder Stb häkeln, je nachdem, an welcher Stelle im Streifenmuster Sie gerade sind. Sie häkeln über die Lm am Ärmel ebenso wie an Vorder- und Rückenteil, wenn Sie dort gerade fM häkeln, häkeln Sie diese auch in die Ärmel-Lm, wenn Sie bei Vorder- und Rückenteil gerade Stb häkeln, häkeln Sie Stb in die Ärmel-Lm. Jede 7. Lm überspringen Sie dabei.
29.12.2014 - 09:39
![]() Constanze wrote:
Constanze wrote:
Hallo, ich habe eine Frage zu den Ärmel. Ich bin gerade an der Luftmaschenkette. In der nächsten Runden sollen in die Luftmaschen 1fm/Stb in die ersten 6 - eine Überspringen und wiederholen. Was ist hier genau gemeint ? 6 Fm - frei - 6 Std. im Wechsel ? 1 fm - 1 Stb - wiederholen - bis 6 Lm gehäkelt ?? Bitte um rasche Antwort - danke und Frohe Weihnachten
26.12.2014 - 11:48DROPS Design answered:
Antwort siehe oben! :-)
29.12.2014 - 10:10
![]() Mack wrote:
Mack wrote:
Wish there was a long-sleeve version of the cardigan.
23.06.2014 - 01:01
![]() Trudi wrote:
Trudi wrote:
Struggling to work out what sizes S-M-L-XL etc correspond to. Sorry if it is really obvious but I can't seem to find it anywhere on the website.
15.05.2014 - 21:08DROPS Design answered:
Dear Trudi, you will find a measurement chart in cm at the bottom of the pattern. These measures are taken flat, from side to side. Compare them to a similar garment you like the shape to find the matching size. Happy crocheting!
16.05.2014 - 08:51
|
|
Marina#marinacardigan |
|
 |
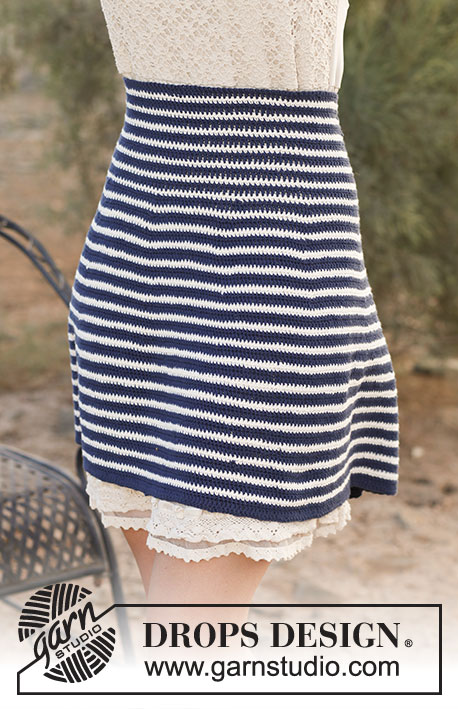 |
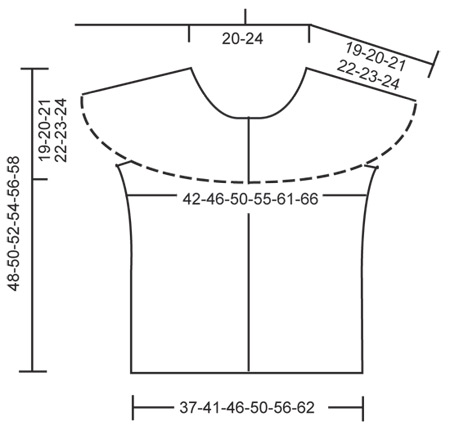
Crochet DROPS jacket with short sleeves and round yoke in ”Safran”. Size: S - XXXL
DROPS 136-14 |
|
|
STRIPE PATTERN: * Work 2 dc rows with off white, then 1 tr row with navy blue and 1 dc row with navy blue *, repeat from *-* for approx. 12 cm, finish after 1 whole repetition. CROCHET TIP: Beg every dc row with 1 ch and beg every tr row with 3 ch – these do not replace first dc/tr on row. DECREASE TIP (applies to neck): Dec at beg of row by working sl st over the no of sts to be dec. Dec at end of row by working until same no of sts to be dec remains, turn piece. -------------------------------------------------------- BODY: Worked back and forth from mid front. Work 192-210-234-257-290-318 ch on hook size 3 mm with navy blue. Turn and work 1 dc in 2nd ch from hook, then work 1 dc in each of the next 1-5-1-3-1-1 ch, * skip 1 ch, work 1 dc in each of the next 6 ch *, repeat from *-* the rest of row = 164-180-200-220-248-272 dc. Then work dc back and forth for 15-16-17-18-19-20 cm - READ CROCHET TIP! REMEMBER THE CROCHET TENSION! Insert 2 markers in the piece; 41-45-50-55-62-68 dc in from each side (= 82-90-100-110-124-136 dc between markers on back piece). Continue with STRIPE PATTERN - see explanation above. AT THE SAME TIME on 1st row in stripe pattern, inc 1 st on each side of markers in the sides – inc by working 2 sts in 1 st. Repeat inc every 2 cm 4 more times = 184-200-220-240-268-292 sts on row. When stripe pattern has been worked, piece measures approx. 27-28-29-30-31-32 cm. Continue with navy blue as follows: * 2 dc rows, 1 tr row, 1 dc row *, repeat from *-* until finished measurements. When piece measures 29-30-31-32-33-34 cm, work next row as follows: Work as before over the first 41-44-49-53-60-65 sts, then work 62-69-69-76-76-83 ch (= over sleeve), skip 10-12-12-14-14-16 sts and work over the next 82-88-98-106-120-130 sts, work 62-69-69-76-76-83 ch (= over sleeve), skip 10-12-12-14-14-16 sts and work over the last 41-44-49-53-60-65 sts. Turn and work pattern as before over all sts on front and back piece, over ch-row on each sleeve work as follows: 1 dc/tr (depending on where you are in the pattern) in each of the first 6 ch, * skip 1 ch, 1 dc/tr in each of the next 6 ch *, repeat from *-* over all ch. There are now 272-296-316-344-372-404 sts on row. Insert 15-16-16-17-17-18 markers in the piece as follows: Insert first marker after 10-13-16-12-18-15 sts, then insert the next markers 18-18-19-20-21-22 sts apart, then 10-13-15-12-18-15 sts remain after last marker. Work 2 more rows with pattern before beg dec. Then on next row dec 1 st before every marker (i.e. dec 15-16-16-17-17-18 sts) – dec by skipping 1 st. Repeat dec on every 4th row 7 more times and then on every other row 2-3-4-5-6-7 times – NOTE: Dec alternately before and after all the markers. AT THE SAME TIME when piece measures 40-42-44-46-48-50 cm (measured mid front), dec for neck – Read DECREASE TIP. Dec on every row in each side: 8 sts 1 time, 4 sts 1 time, 2 sts 1 time and then 1 st until all dec on yoke are done. After all dec, approx. 70 to 90 sts remain on row, work 1 more row, cut the thread. LEFT BAND: Work approx. 85 to 105 dc with navy blue along left band – make sure that no of sts neither tightens nor widens the edge. Work a total of 6 dc rows back and forth, cut the thread. RIGHT BAND: Work as left band but after 2 rows, work 5-5-5-6-6-6 button holes evenly – see explanation below – bottom button hole should be approx. 2 cm from cast on edge and upper button hole should be approx. 3 cm from the top (there should also be 1 button hole on the neck edge). 1 button hole = work 2 ch, skip 2 dc and fasten with 1 dc in next dc. On next row work 2 dc in every ch-loop. NECK EDGE: Work approx. 120 to 140 dc around the neck (also over bands) with navy blue. Work 4 more dc rows back and forth – AT THE SAME TIME on 2nd row work 1 button hole over the others on right band. Cut and fasten the thread. ASSEMBLY: Sew on buttons. |
|
 |
|
Have you finished this pattern?Tag your pictures with #dropspattern #marinacardigan or submit them to the #dropsfan gallery. Do you need help with this pattern?You'll find 6 tutorial videos, a Comments/Questions area and more by visiting the pattern on garnstudio.com. © 1982-2026 DROPS Design A/S. We reserve all rights. This document, including all its sub-sections, has copyrights. Read more about what you can do with our patterns at the bottom of each pattern on our site. |
|


With over 40 years in knitting and crochet design, DROPS Design offers one of the most extensive collections of free patterns on the internet - translated to 17 languages. As of today we count 324 catalogues and 12291 patterns translated into English (UK/cm).
We work hard to bring you the best knitting and crochet have to offer, inspiration and advice as well as great quality yarns at incredible prices! Would you like to use our patterns for other than personal use? You can read what you are allowed to do in the Copyright text at the bottom of all our patterns. Happy crafting!
Post a comment to pattern DROPS 136-14
We would love to hear what you have to say about this pattern!
If you want to leave a question, please make sure you select the correct category in the form below, to speed up the answering process. Required fields are marked *.