
Looking for a yarn?


Comments / Questions (35)
![]() Andy wrote:
Andy wrote:
Hola, no puedo encontrarle la vuelta al patron del cuello. Si pudieran darme una explicación sencilla con el talle S. Me quedé barada alli lo demás está terminado
08.04.2024 - 03:40
![]() Vanesa wrote:
Vanesa wrote:
¿Después del patrón de franjas se teje todo a p.b o se sigue haciendo como en el patrón de franjas hasta terminar el cuerpo pero solo a 1 color? Gracias
21.05.2023 - 18:41DROPS Design answered:
Hola Vanesa, como se indica en el patrón: "Continuar con azul marino de la manera sig: * 2 hileras de p.b., 1 hilera de p.a., 1 hilera de p.b. *, repetir de *a* hasta completar las medidas. " Así que tendrás que alternar entre hileras de p.b e hileras de p.a.
21.05.2023 - 19:55
![]() Therese Kristensen wrote:
Therese Kristensen wrote:
I had a very difficult time understanding the decrease. 1. When it says \"every 4th row\" is that decrease a row, then crochet three rows, then decrease another row? \r\n2. Is the 8-4-2-1 decrease on the sides repeated until you have completed all of the decreases in the body? Or do you only do that one time?
23.04.2023 - 02:58DROPS Design answered:
Dear Therese, for question nº1: yes, that's right, you work decreases on 1 row and then work 3 rows without decreases. Now decrease on the next row and work the next 3 rows without decreases. Repeat in this way. for question nº2: decrease 8 sts 1 time, 4 sts 1 time, 2 sts 1 time. From here on, decrease 1 st on every row in each side until the decreases are done. Happy knitting!
23.04.2023 - 20:17
![]() Fransien wrote:
Fransien wrote:
Ik heb alle minderingen van de pas van het vestje gemaakt en moet nu met de halsrand beginnen; ik krijg dan een soort sprong tussen de laatste mindering (middenvoor hals) en de laatste toer van de pas. Ik weet niet hoe ik verder moet! Kunt u mij advies geven?
29.03.2022 - 23:36DROPS Design answered:
Dag Fransien,
Je kunt halve vasten minderen over het aantal steken dat geminderd moet worden aan het begin van de toer. Op die manier heb je geen sprong. (Dit staat ook aangegeven bovenaan bij 'tip voor het minderen').
04.04.2022 - 13:32
![]() Bieke Van Bauwel wrote:
Bieke Van Bauwel wrote:
Beste, Ik ben aan het einde van het vestje, maar ik kom na alle minderingen aan de markeerders en de hals op veel meer dan 70 tot 90 steken? Bij XL start je bij 372 steken en minder je 7x17 en 6x17 steken op 40 toeren, dan nog 28 aan de zijkanten, dan kom ik op 123 steken en is de hoogte nog niet bereikt, en de hals is te breed. Doe ik iets verkeerd? Verder heel leuk model, hopelijk kan ik het tot een goed einde brengen. 🙏 Alvast bedankt. Bieke
26.07.2021 - 19:29DROPS Design answered:
Dag Bieke,
Je mindert in totaal 8 x 17 steken en 6 x 17 steken op de pas = 238 steken geminderd. Voor de hals minder je in totaal minimaal 14 steken aan beide kanten (8 + 4 + 2), dus 28 steken. 372-238-28=106 steken. Vervolgens minder je steeds 1 steek aan elke kant van de hals totdat alle minderingen voor de pas klaar zijn. Waarschijnlijk kom je dan wel op ongeveer 70 tot 90 steken (70 voor de kleinste maat, 90 voor de grootste maat).
19.08.2021 - 14:03
![]() Josefin wrote:
Josefin wrote:
Hej! Vad syftar "sida" på när man börjar maska av till hals? Förstår inte riktigt
21.03.2021 - 11:04DROPS Design answered:
Hej Josefin, når du maskar av till hals gør du det i hver side mod midt foran, altså først 8 masker i den ene side (foran) og så 8 masker i den anden side (foran). God fornøjelse!
23.03.2021 - 13:52
![]() Maddalena wrote:
Maddalena wrote:
Risulta strana la quantità per la tg. XL Raffaella 28.08.2017 - 17:23: Buongiorno, credo che sia sbagliata l indicazione dei gr da usare per la tg XL . Grazie Raffaella
22.08.2019 - 22:33
![]() Annette wrote:
Annette wrote:
Jag ställde en fråga den17/4 jag har inte fått något svar ännu
23.04.2019 - 09:44
![]() Annette wrote:
Annette wrote:
När jag har virkat 41 fm in och gjort den första ökningen, hur gör jag vid nästa ökning? Virkar jag 41fm igen innan jag gör ökning igen, det blir ju fyra maskor mer för varje ökning
17.04.2019 - 11:31DROPS Design answered:
Hej. Du gör ökningarna på varje sida av markörerna varje gång, totalt 5 gånger (2 cm mellan varje ökning). Det blir alltså 4 maskor mer per ökningsvarv. När ökningarna är färdiga har du 20 mer maskor totalt. Lycka till!
23.04.2019 - 10:29
![]() Janni wrote:
Janni wrote:
Jeg er lidt i tvivl. Skal man forsætte med mønsteret: 2 rækker fm, 1 række st og 1 række fm, resten af stykket efter stribemønsteret, og helt op til alle aflukningerne?
27.09.2018 - 19:33DROPS Design answered:
Hej Janni, ja det stemmer, se her: Når stribemønsteret er færdig, måler arb ca 27-28-29-30-31-32 cm. Fortsæt med marineblå således: * 2 rækker fm, 1 række st, 1 række fm *, gentag fra *-* til færdig mål. God fornøjelse!
28.09.2018 - 15:14
|
|
Marina#marinacardigan |
|
 |
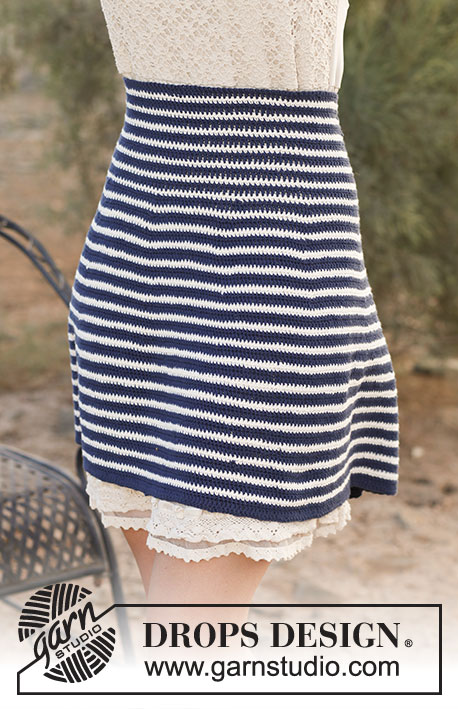 |
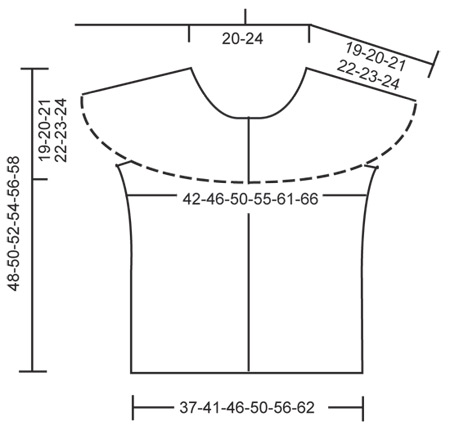
Crochet DROPS jacket with short sleeves and round yoke in ”Safran”. Size: S - XXXL
DROPS 136-14 |
|
|
STRIPE PATTERN: * Work 2 sc rows with off white, then 1 dc row with navy blue and 1 sc row with navy blue *, repeat from *-* for approx. 12 cm / 4¾", finish after 1 whole repetition. CROCHET TIP: Beg every sc row with 1 ch and beg every dc row with 3 ch – these do not replace first sc/tr on row. DECREASE TIP (applies to neck): Dec at beg of row by working sl st over the no of sts to be dec. Dec at end of row by working until same no of sts to be dec remains, turn piece. -------------------------------------------------------- BODY: Worked back and forth from mid front. Work 192-210-234-257-290-318 ch on hook size 3 mm / C with navy blue. Turn and work 1 sc in 2nd ch from hook, then work 1 sc in each of the next 1-5-1-3-1-1 ch, * skip ch 1, work 1 sc in each of the next 6 ch *, repeat from *-* the rest of row = 164-180-200-220-248-272 sc. Then work sc back and forth for 15-16-17-18-19-20 cm / 6"-6¼"-6¾"-7"-7½"-8" - READ CROCHET TIP! REMEMBER THE CROCHET GAUGE! Insert 2 markers in the piece; 41-45-50-55-62-68 sc in from each side (= 82-90-100-110-124-136 sc between markers on back piece). Continue with STRIPE PATTERN - see explanation above. AT THE SAME TIME on 1st row in stripe pattern, inc 1 st on each side of markers in the sides – inc by working 2 sts in 1 st. Repeat inc every 2 cm / ¾" 4 more times = 184-200-220-240-268-292 sts on row. When stripe pattern has been worked, piece measures approx. 27-28-29-30-31-32 cm / 10⅝"-11"-11⅜"-11¾"-12¼"-12½". Continue with navy blue as follows: * 2 sc rows, 1 dc row, 1 sc row *, repeat from *-* until finished measurements. When piece measures 29-30-31-32-33-34 cm / 11⅜"-11¾"-12¼"-12½"-13"-13⅜", work next row as follows: Work as before over the first 41-44-49-53-60-65 sts, then work 62-69-69-76-76-83 ch (= over sleeve), skip 10-12-12-14-14-16 sts and work over the next 82-88-98-106-120-130 sts, work 62-69-69-76-76-83 ch (= over sleeve), skip 10-12-12-14-14-16 sts and work over the last 41-44-49-53-60-65 sts. Turn and work pattern as before over all sts on front and back piece, over ch-row on each sleeve work as follows: 1 sc/tr (depending on where you are in the pattern) in each of the first ch 6, * skip ch 1, 1 sc/tr in each of the next 6 ch *, repeat from *-* over all ch. There are now 272-296-316-344-372-404 sts on row. Insert 15-16-16-17-17-18 markers in the piece as follows: Insert first marker after 10-13-16-12-18-15 sts, then insert the next markers 18-18-19-20-21-22 sts apart, then 10-13-15-12-18-15 sts remain after last marker. Work 2 more rows with pattern before beg dec. Then on next row dec 1 st before every marker (i.e. dec 15-16-16-17-17-18 sts) – dec by skipping 1 st. Repeat dec on every 4th row 7 more times and then on every other row 2-3-4-5-6-7 times – NOTE: Dec alternately before and after all the markers. AT THE SAME TIME when piece measures 40-42-44-46-48-50 cm / 15¾"-16½"-17¼"-18"-19"-19¾" (measured mid front), dec for neck – Read DECREASE TIP. Dec on every row in each side: 8 sts 1 time, 4 sts 1 time, 2 sts 1 time and then 1 st until all dec on yoke are done. After all dec, approx. 70 to 90 sts remain on row, work 1 more row, cut the yarn. LEFT BAND: Work approx. 85 to 105 sc with navy blue along left band – make sure that no of sts neither tightens nor widens the edge. Work a total of 6 sc rows back and forth, cut the thread. RIGHT BAND: Work as left band but after 2 rows, work 5-5-5-6-6-6 button holes evenly – see explanation below – bottom button hole should be approx. 2 cm / ¾" from cast on edge and upper button hole should be approx. 3 cm / 1⅛" from the top (there should also be 1 button hole on the neck edge). 1 button hole = ch 2, skip 2 sc and fasten with 1 sc in next sc. On next row work 2 sc in every ch-space. NECK EDGE: Work approx. 120 to 140 sc around the neck (also over the front bands) with navy blue. Work 4 more sc rows back and forth – AT THE SAME TIME on 2nd row work 1 button hole over the others on right band. Fasten off. ASSEMBLY: Sew on buttons. |
|
|
|
Have you finished this pattern?Tag your pictures with #dropspattern #marinacardigan or submit them to the #dropsfan gallery. Do you need help with this pattern?You'll find 6 tutorial videos, a Comments/Questions area and more by visiting the pattern on garnstudio.com. © 1982-2025 DROPS Design A/S. We reserve all rights. This document, including all its sub-sections, has copyrights. Read more about what you can do with our patterns at the bottom of each pattern on our site. |
|


With over 40 years in knitting and crochet design, DROPS Design offers one of the most extensive collections of free patterns on the internet - translated to 17 languages. As of today we count 314 catalogs and 11822 patterns - 11812 of which are translated into English (US/in).
We work hard to bring you the best knitting and crochet have to offer, inspiration and advice as well as great quality yarns at incredible prices! Would you like to use our patterns for other than personal use? You can read what you are allowed to do in the Copyright text at the bottom of all our patterns. Happy crafting!
Post a comment to pattern DROPS 136-14
We would love to hear what you have to say about this pattern!
If you want to leave a question, please make sure you select the correct category in the form below, to speed up the answering process. Required fields are marked *.