
Popular categories
Looking for a yarn?


Comments / Questions (113)
![]() Josje wrote:
Josje wrote:
Goedemiddag, Ik brei maat M met Polaris. De opgegeven benodigde 1000 gr is echt te weinig. Ik heb voor de 2 voorpanden al 600 gr gebruikt. Dus herziening patroon lijkt me nodig. Groet, Josje
16.12.2025 - 14:21
![]() Irene wrote:
Irene wrote:
Ahhh, die Biegung für die Schultern ist bei allen ungefähr an der selben Stelle, egal welchen Körperumfang man hat. Damit der Ärmel bis zur Armbeuge reicht bedarf es daher bei den größeren Größen nur noch einer geringeren Maschenzunahme. Bedeutet im Umkehrschluss: wer die Jacke etwas figurbetonter strickt, sollte mehr Maschen für die Ärmel aufnehmen. Danke!
06.11.2025 - 07:42
![]() Irene wrote:
Irene wrote:
Was für eine tolle Jacke, scheint ganz schnell gestrickt zu sein - danke für die Anleitung! Eine Frage stellt sich mir jedoch: Wieso werden für die Ärmel bei den großen Größen weniger Maschen zugenommen, als bei den kleinen ("10-10-9-8-7-6 anschlagen")?
03.11.2025 - 23:05DROPS Design answered:
Liebe Irene, das liegt daran, dass Sie bereits durch die Maschen vom Anfang und durch die seitlichen Zunahmen eine breitere Breite bei den größeren Größen haben und daher nicht mehr so viele Maschen für die Ärmel anzuschlagen brauchen. Viel Spaß beim Stricken!
03.11.2025 - 23:23
![]() Isabelle wrote:
Isabelle wrote:
Beim rechten Vorderteil werden am Schluss noch 2 R. über die 23 Schultermaschen gestrickt. Müsste man dies nicht auch beim linken Vorderteil machen?
16.02.2025 - 18:22DROPS Design answered:
Liebe Isabelle, Sie können sofort die Hinreihe für das Rückenteil stricken. Viel Spaß beim Stricken!
17.02.2025 - 09:59
![]() Maricel wrote:
Maricel wrote:
Hola, para qué tipo de prendas se usan las agujas circulares? Veo modelos de sacos o prendas que son abiertas por delante y no me imagino cómo se logra eso. Muchas gracias, Maricel
01.06.2024 - 22:59DROPS Design answered:
Hola Maricel, las agujas circulares se pueden usar para casi cualquier prenda. Se usan sobre todo para prendas trabajadas en redondo, donde puedes trabajar todo como en tubo y no necesitas hacer costuras después, o cuando tienes muchos puntos, que se pueden mover más cómodamente en un cable largo de una aguja circular y no acumularlos en las agujas rectas. Pero también se pueden usar para trabajar de ida y vuelta, como con las agujas rectas; simplemente tienes que girar las agujas después de trabajar cada fila. Puedes ver así cómo trabajar de ida y vuelta con una aguja circular: https://www.garnstudio.com/video.php?id=45&lang=es.
03.06.2024 - 00:43
![]() IRMGARD SCHUMANN wrote:
IRMGARD SCHUMANN wrote:
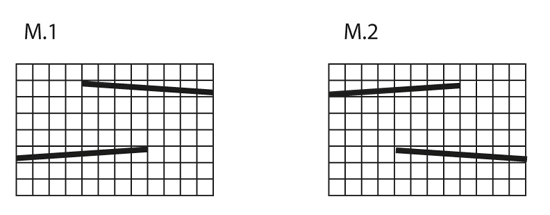
Good day In the M1 (M2) diagram the cable forming is very close, in other words there are only 3 rows between the cable. Am I reading this correctly that or is this a double cable? Thank you for your answer.
29.03.2024 - 10:25DROPS Design answered:
Dear Irmgard, the cable's pattern repeat is 12 stitch wide, that has two sides, meaning, on the 3d row, you do the cabling on the 8 stitches on the left, , in the 7th row on the 8 stitches on the right. (on M.2 it is the opposite). I hope this helps. Happy Knitting!
30.03.2024 - 00:56
![]() Danielle wrote:
Danielle wrote:
Bonjour, Je ne comprends pas comment terminer les torsades des devants , ensuite pour monter le col. Merci.
18.03.2023 - 16:58DROPS Design answered:
Bonjour Danielle, reprenez les 12 mailles de la torsade que vous avez mises en attente et montez 1 maille côté épaule/encolure dos, continuez maintenant simplement M.1 comme avant (jersey endroit et torsades) avec 1 m lis au point mousse côté épaule/encolure dos pendant 7 à 8 cm, rabattez ensuite les mailles. En d'autres termes, vous procédez comme dans cette vidéo mais en tricotant la torsade au lieu de tricoter au point mousse. Bon tricot!
20.03.2023 - 08:28
![]() Danielle wrote:
Danielle wrote:
Bonjour , je n’arrive pas à monter le côté gauche du devant avec la torsade, comment faire svp. Merci
09.03.2023 - 15:54DROPS Design answered:
Bonjour Danielle, montez le même nombre de mailles que pour le devant droit, mais cette fois vos rangs sur l'endroit commencent par le côté et se terminer par la torsade A.2; sur l'envers, on commence par A.2 et on termine en jersey. Les mailles sur le côté vont être montées en fin de rang sur l'envers (pour la manche). Bon tricot!
09.03.2023 - 17:41
![]() Giovanna wrote:
Giovanna wrote:
Il modello è bello ma le spiegazioni sono pessime. Come tutte le spiegazioni degli altri vostri modelli
01.03.2023 - 11:42DROPS Design answered:
Buonasera Giovanna, ci dispiace per questa sua opinione sui modelli DROPS: le ricordiamo che il sito offre migliaia di modelli gratuiti e che in caso di difficoltà può sempre chiedere aiuto compilando il modulo per i commenti nella pagina di ogni modello. Buon lavoro!
02.03.2023 - 18:50
![]() Danielle Gaudens wrote:
Danielle Gaudens wrote:
Bonjour pourrais je savoir si le dos se tricote en un seul morceau et le tricot commence par le bas ou par le haut . merci
16.07.2022 - 06:03DROPS Design answered:
Bonjour Daniele, le dos est tricote en une seule partie, par le haut. On n'a pas les coutures pour les epaules. Bon tricot!
17.07.2022 - 09:46
|
||||||||||
Sophisticated Twist#sophisticatedtwistcardigan |
||||||||||
|
|
||||||||||
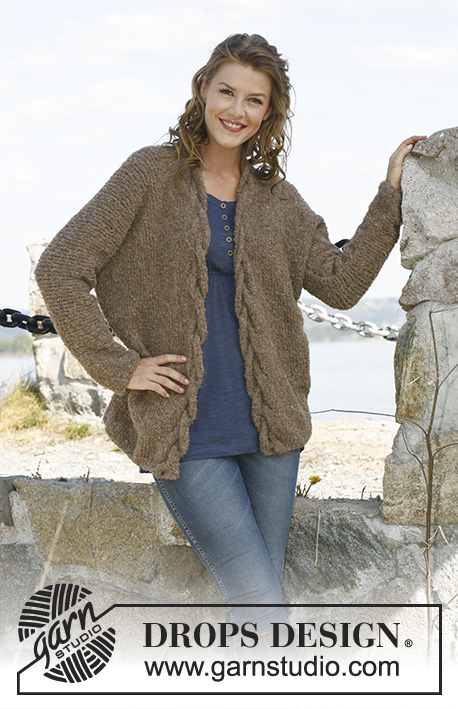
Knitted DROPS wide jacket with cables in ”Polaris”. Size: S - XXXL
DROPS 133-36 |
||||||||||
|
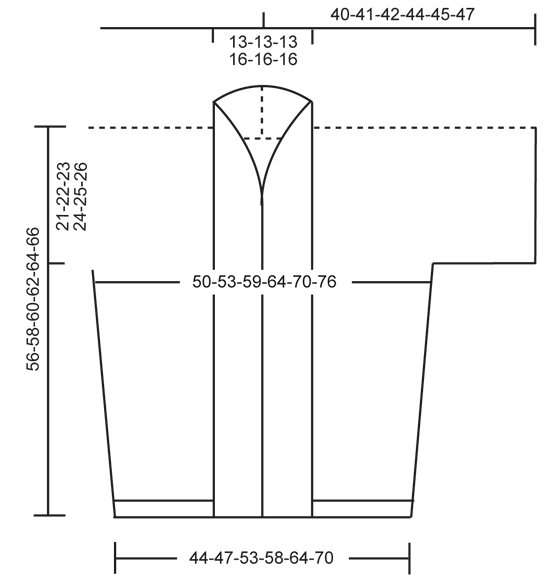
TIP FOR SWITCHING THREADS: When switching ball with Polaris, split the old thread in two on the last 15 cm – cut off one part, do the same on the new thread. Place the first and last 15 cm on top of each other so that the yarn is the normal thickness and continue to work – this is done to make the thread switch invisible in the yarn. PATTERN: See diagrams M.1 and M.2. The diagrams show pattern from RS. -------------------------------------------------------- RIGHT FRONT PIECE + SLEEVE: Worked back and forth on a circular needle to make room for all the sts. READ TIP FOR SWITCHING THREADS! Cast on 23-24-26-27-29-31 sts on circular needle size 15 mm with Polaris. The first 12 sts on needle (seen from RS) are worked according to diagram M.1, K 4 rows over the remaining sts before continuing in stocking st. REMEMBER THE KNITTING TENSION! When piece measures 25-26-27-28-29-30 cm, inc 1 st in the side. Repeat inc when piece measures 31-32-33-34-35-36 cm = 25-26-28-29-31-33 sts. When piece measures 35-36-37-38-39-40 cm, cast on 10-10-9-8-7-6 new sts at the end of next row from RS = 35-36-37-37-38-39 sts on needle. Insert a marker - NOW MEASURE PIECE FROM HERE! Work the new sts in stocking st except the outermost st which is worked K on all rows. When piece measures approx. 19-20-21-22-23-24 cm from marker (adjust so that next row is worked from RS), work the first 12 sts as before according to diagram M.1, then slip these sts on a stitch holder = 23-24-25-25-26-27 sts remain on needle, work the rest of row. Insert another marker (= mid on top of shoulder) – NOW MEASURE PIECE FROM HERE! Work 2 rows back and forth over sts on needle. Slip sts on a stitch holder and put piece aside. LEFT FRONT PIECE + SLEEVE: Work as right front piece but reversed - work diagram M.2 instead of diagram M.1. Work the 12 sts in diagram M.2 at the top by shoulder from WS before slipping them on a stitch holder. Work the rest of row, continue with back piece without slipping sts on a stitch holder. BACK PIECE: Work 1st row from RS as follows: Work sts from left front piece + sleeve, cast on 9-9-9-11-11-11 new sts (= back of neck) and work right front piece + sleeve on to circular needle = 55-57-59-61-63-65 sts. Continue back and forth in stocking st with 1 edge st in each side which is worked K on all rows, until piece measures 21-22-23-24-25-26 cm from marker mid on top of shoulder. On next row cast off the first and last 10-10-9-8-7-6 sts, cut the thread. Work in stocking st over the remaining 35-37-41-45-49-53 sts until piece measures 28-29-30-31-32-33 cm. Now dec 1 st in each side. Repeat dec when piece measures 34-35-36-37-38-39 cm = 31-33-37-41-45-49 sts. Continue to work until piece measures approx. 53-55-57-59-61-63 cm (adjust so that next row is worked from WS). K 3 rows over all sts, then loosely cast off. COLLAR: Slip the 12 sts from stitch holder on right front piece back on circular needle. Cast on 1 new st towards the shoulder = 13 sts. Work diagram M.1 with 1 edge st in the side which is worked K on all rows. When collar measures approx. 7-7-7-8-8-8 cm, cast off. Work the same way over sts from stitch holder on left front piece. Sew collar parts tog edge to edge mid back, and sew collar to back of neck inside edge st. ASSEMBLY: Sew sleeve and side seam in one, sew tog edge to edge in front loop of outermost st to avoid a chunky seam. |
||||||||||
Diagram explanations |
||||||||||
|
||||||||||
 |
||||||||||
 |
||||||||||
Have you finished this pattern?Tag your pictures with #dropspattern #sophisticatedtwistcardigan or submit them to the #dropsfan gallery. Do you need help with this pattern?You'll find 11 tutorial videos, a Comments/Questions area and more by visiting the pattern on garnstudio.com. © 1982-2026 DROPS Design A/S. We reserve all rights. This document, including all its sub-sections, has copyrights. Read more about what you can do with our patterns at the bottom of each pattern on our site. |
||||||||||


With over 40 years in knitting and crochet design, DROPS Design offers one of the most extensive collections of free patterns on the internet - translated to 17 languages. As of today we count 325 catalogues and 12298 patterns translated into English (UK/cm).
We work hard to bring you the best knitting and crochet have to offer, inspiration and advice as well as great quality yarns at incredible prices! Would you like to use our patterns for other than personal use? You can read what you are allowed to do in the Copyright text at the bottom of all our patterns. Happy crafting!
Post a comment to pattern DROPS 133-36
We would love to hear what you have to say about this pattern!
If you want to leave a question, please make sure you select the correct category in the form below, to speed up the answering process. Required fields are marked *.