DROPS Alpaca Bouclé
DROPS Alpaca Bouclé
80% Alpaca, 15% Wool, 5% Polyamide
from 3.60 £ /50g
Get the yarn to make this pattern from 25.20£.

The yarn cost is calculated from the pattern’s smallest size and the yarn’s cheapest product type. Looking for an even better price? You might find it on the DROPS Deals!

DROPS SS24

Arizona

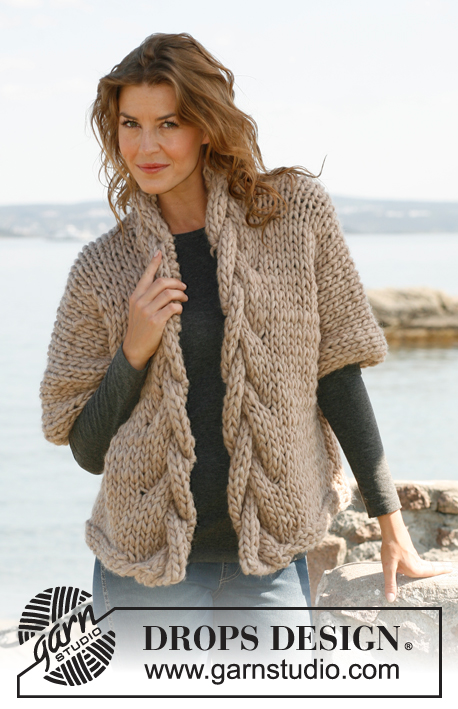
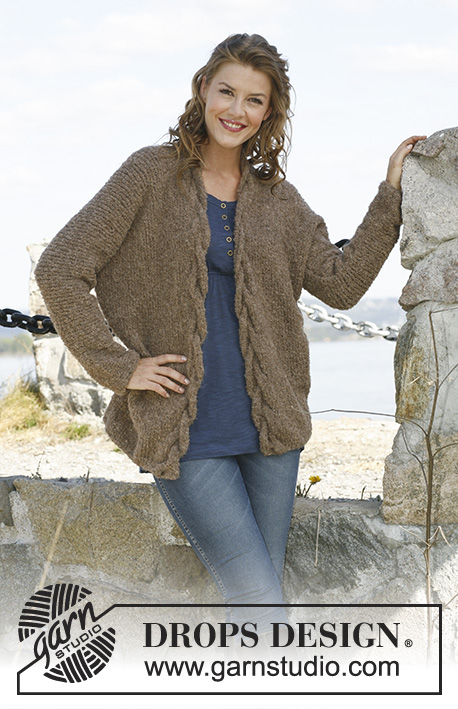
Knitted DROPS wide jacket with cable edge in ”Alpaca Bouclé”. Size: S - XXXL

DROPS 133-22
DROPS design: Pattern no AB-009
Yarn group C
--------------------------------------------------------
Size: S - M - L - XL - XXL - XXXL

Materials: DROPS ALPACA BOUCLÉ from Garnstudio
300-350-350-400-450-450 g colour no 602m, brown

DROPS DOUBLE POINTED NEEDLES and CIRCULAR NEEDLE (80 cm) SIZE 5 mm - or size needed to get 17 sts x 22 rows in stocking st = 10 x 10 cm.

-------------------------------------------------------

Alternative Yarn – See how to change yarns here
Yarn Groups A to F – Use the same pattern and change the yarn here
Yarn usage using an alternative yarn – Use our yarn converter here

-------------------------------------------------------

DROPS Alpaca Bouclé
DROPS Alpaca Bouclé
80% Alpaca, 15% Wool, 5% Polyamide
from 3.60 £ /50g
Get the yarn to make this pattern from 25.20£.

The yarn cost is calculated from the pattern’s smallest size and the yarn’s cheapest product type. Looking for an even better price? You might find it on the DROPS Deals!

Pattern instructions

NOTE: This pattern is written in British English. All measurements in charts are in cm. For conversion from cm to inches - click here. There are different terms for crocheting in British and American English. If this pattern includes crochet, click for "crochet terms" here. For this pattern in American English, please click here.
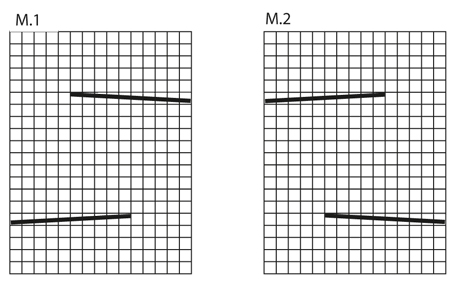
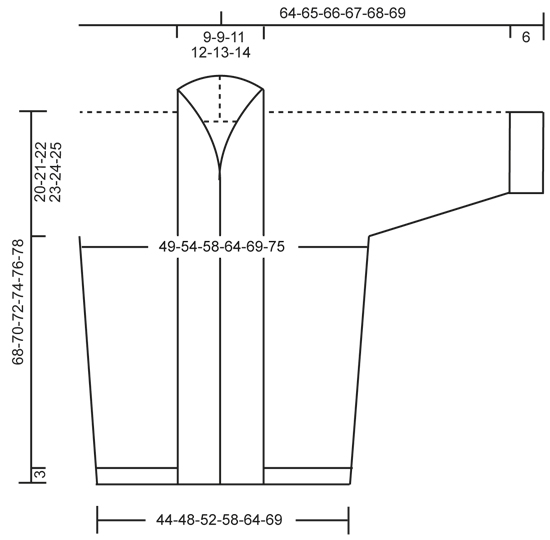
PATTERN:
See diagrams M.1 and M.2 – diagrams show pattern from RS.
--------------------------------------------------------

RIGHT FRONT PIECE + SLEEVE:
Worked back and forth on a circular needle to make room for all the sts.
Cast on 45-49-51-55-61-65 sts (incl 1 edge st in the side) on circular needle size 5 mm with Alpaca Bouclé. Work as follows (1st row = from RS): Diagram M.1 (= 15 sts), * P 1, K 1 *, repeat from *-* and finish with P 1 and 1 edge st in the side which is worked K on all rows. Continue like this until piece measures 3 cm. Continue diagram M.1, work the remaining sts in stocking st with 1 edge st in the side as before. When piece measures 7-8-9-6-7-8 cm, inc 1 st in the side. Repeat inc every 9-9-9-10-10-10 cm a total of 5 times.
Size XXL + XXXL: At the same time when piece measures approx. 35 cm, dec 1 st for neck. Dec 1 st from RS by K 2 sts tog inside diagram M.1. Repeat dec (in the two largest sizes) when piece measures 55 cm.
ALL SIZES: At the same time when piece measures 48-49-50-51-52-53 cm, cast on new sts for sleeve at the end of every row from RS as follows: 5 sts 7 times and then 22-19-18-15-11-8 sts 1 time.
When all new sts for sleeve are cast on, insert 1 marker (piece now measures approx. 55-56-57-58-59-60 cm) – NOW MEASURE PIECE FROM HERE! Continue with diagram M.1, stocking st and 1 edge st in the side until piece measures 13-14-15-16-17-18 cm from marker (adjust so that next row is worked from RS). When all dec and inc are done, there are 107-108-109-110-110-111 sts on needle. Work the first 15 sts (= diagram M.1), and then slip them on a stitch holder = 92-93-94-95-95-96 sts remain on needle. Insert a marker (= mid on top of shoulder) – NOW MEASURE PIECE FROM HERE! Work 2 cm back and forth over all sts on needle, finish after 1 row from WS and then slip them on a new stitch holder.

LEFT FRONT PIECE + SLEEVE:
Work as right front piece but reversed - work diagram M.2 instead of diagram M.1. Work the 15 sts in diagram M.2 at the top by shoulder from WS before slipping them on a stitch holder. Work 2 cm back and forth over the remaining sts, finish after 1 row from WS. Continue with back piece without slipping sts on a stitch holder.

BACK PIECE:
Work sts from left front piece + sleeve, cast on 16-16-18-20-22-24 new sts (= back of neck) and work right front piece + sleeve on to circular needle = 200-202-206-210-212-216 sts. Continue back and forth in stocking st with 1 edge st in each side (which is worked K on all rows) until piece measures 13-14-15-16-17-18 cm from marker. Now cast off at beg of every row in each side: 22-19-18-15-11-8 sts 1 time and 5 sts 7 times = 86-94-100-110-120-130 sts remain on needle. Insert another marker - NOW MEASURE PIECE FROM HERE! When piece measures 2 cm (from marker), dec 1 st in each side. Repeat dec every 9-9-9-10-10-10 cm a total of 5 times = 76-84-90-100-110-120 sts. When piece measures 45-46-47-48-49-50 cm (from marker), continue in rib as follows (from RS): 1 edge st as before, * K 1, P 1 *, repeat from *-* and finish with K 1 and 1 edge st as before – AT THE SAME TIME on first row in rib inc 1 st mid back = 77-85-91-101-111-121 sts. When rib measures approx. 3 cm (adjust according to front piece), cast off with K over K and P over P.

COLLAR:
Slip the 15 sts from stitch holder on right front piece back on circular needle. Cast on 1 new st towards the shoulder = 16 sts. Continue diagram M.1 back and forth with 1 edge st in the side, which is worked K on all rows, for approx. 5-5-6-6-7-7 cm, cast off. Work the same way over sts from stitch holder on left front piece. Sew collar parts tog mid back, and sew collar to back of neck inside edge st.

ASSEMBLY:
Sew sleeve and side seams in one inside 1 edge st.

RIB ON SLEEVE:
Knit up from RS inside 1 edge st at the bottom of one sleeve: 48-52-56-58-64-66 sts on double pointed needles size 5 mm. P 1 round, continue in rib = K 1/P 1 for 6 cm (or desired length). Cast off with K over K and P over P.
Work the same way around the bottom edge of the other sleeve.

Diagram

symbols = K from RS, P from WS
symbols = slip 5 sts on cable needle in front of piece, K 5, K 5 from cable needle
symbols = slip 5 sts on cable needle behind piece, K 5, K 5 from cable needle
diagram
diagram
Do you have a question? See a list of frequently asked questions (FAQ)

Knitting tension is what determines the final measurements of your work, and is usually measured per 10 x 10 cm. It is provided like so: number of stitches in width x number of rows in height - eg: 19 stitches x 26 rows = 10 x 10 cm.

The knitting tension is very individual; some people knit/crochet loosely while others work tightly. You adjust the knitting tension with the needle size, which is why the suggested needle size is only meant as a guide! You need to adjust this (up or down) to ensure that YOUR knitting tension matches the knitting tension provided in the pattern. If you work with a different knitting tension than provided you will have a different yarn consumption, and your work will have different measurements than what the pattern suggests.

The knitting tension also determines which yarns can replace each other. As long as you achieve the same knitting tension you can replace one yarn with another.

See DROPS lesson: How to measure your tension/gauge

See DROPS video: How to make a gauge tension swatch

The required amount of yarn is provided in grams, eg: 450 g. To calculate how many balls you’ll need you first need to know how many grams are in 1 ball (25g, 50g or 100g). This information is available if you click on the individual yarn quality on our pages. Divide the amount required with the amount of each ball. For example, if each ball is 50g (the most common amount), the calculation will be as follows: 450 / 50 = 9 balls.

The important thing when changing from one yarn to another is that the knitting/crochet tension remains the same. This is so that the measurements of the finished piece will be the same as on the sketch provided. It is easier to achieve the same knitting tension using yarns from the same yarn group. It is also possible to work with multiple strands of a thinner yarn to achieve the knitting tension of a thicker one. Please try our yarn converter. We recommend you to always work a test swatch.

Please NOTE: when changing yarn the garment might have a different look and feel to the garment in the photo, due to individual properties and qualities of each yarn.

See DROPS lesson: Can I use a different yarn than the one mentioned in the pattern?

All our yarns are categorised into yarn groups (from A to F) according to thickness and knitting tension – group A contains the thinnest yarns and group F the thickest. This makes it easier for you to find alternative yarns to our patterns, should you wish to switch yarn. All yarns within the same group have a similar knitting tension and can easily replace each other. However, different yarn qualities have different structures and properties which will give the finished work a unique look and feel.

Click here for an overview of the yarns in each yarn group

At the top of all our patterns you’ll find a link to our yarn calculator, which is a helpful tool should you wish to use a different yarn than suggested. By filling in the yarn quality you wish to replace, the amount (in your size) and number of strands, the calculator will present good alternative yarns with the same knitting tension. Additionally it will tell you how much you’ll require in the new qualities and whether you’ll need to work with multiple strands. Most skeins are 50g (some are 25g or 100g).

If the pattern is worked with multiple colours, every colour will have to be calculated separately. Similarly, if the pattern is worked with several strands of different yarns (for example 1 strand Alpaca and 1 strand Kid-Silk) you will have to find alternatives for each, individually.

Click here to see our yarn calculator

Since different yarns have different qualities and textures we have chosen to keep the original yarn in our patterns. However, you can easily find options among our available qualities by using our yarn calculator, or simply pick a yarn from the same yarn group.

It is possible that some retailers still have discontinued yarns in stock, or that someone has a few skeins at home that they would like to find patterns for.

The yarn calculator will provide both alternative yarn as well as required amount in the new quality.

If you think it's hard to decide what size to make, it can be a good idea to measure a garment you own already and like the size of. Then you can pick the size by comparing those measures with the ones available in the pattern's size chart.

You'll find the size chart at the bottom of the pattern.

See DROPS lesson: How to read size chart

The needle size provided in the pattern serves only as a guide, the important thing is to follow the knitting tension. And since knitting tension is very individual, you will have to adjust the needle size to ensure that YOUR tension is the same as in the pattern – maybe you’ll have to adjust 1, or even 2 needle sizes, up or down to achieve the correct tension. For this, we recommend that you work test swatches.

Should you work with a different knitting tension than the one provided, the measurements of the finished garment might deviate from the measurement sketch.

See DROPS lesson: How to measure your tension/gauge

See DROPS video: How to make a tension/gauge swatch

Working a garment top-down provides more flexibility and room for personal adjustment. For example it is easier to try the garment on while working, as well as making adjustments to length of yoke and shoulder caps.

The instructions are carefully explaining every step, in the correct order. Diagrams are adjusted to the knitting direction and are worked as usual.

The diagram depicts all rows/rounds, and every stitch seen from the right side. It is read from bottom to top, from right to left. 1 square = 1 stitch.

When working back and forth, every other row is worked from the right side and every other row is worked from the wrong side. When working from the wrong side, the diagram will have to be worked reversed: from left to right, knit stitches are purled, purl stitches are knit etc.

When working in the round every round is worked from the right side and the diagram are worked from right to left on all rounds.

See DROPS lesson: How to read knitting diagrams

The diagram depicts all rows/rounds, and every stitch seen from the right side. It is worked from bottom to top, from right to left.

When working back and forth every other row is worked from the right side: from right to left and every other row is worked from the wrong side: from left to right.

When working in the round, every row in the diagram are worked from the right side, from right to left.

When working a circular diagram you start in the middle and work your way outwards, counter clockwise, row by row.

The rows usually start with a given number of chain stitches (equivalent to the height of the following stitch), this will either be depicted in the diagram or explained in the pattern.

See DROPS lesson: How to read crochet diagrams

Instructions for working several diagrams after each other on the same row/round, will often be written like so: “work A.1, A.2, A.3 a total of 0-0-2-3-4 times". This means you work A.1 once, then A.2 is worked once, and A.3 is repeated (in width) the number of times provided for your size – in this case like so: S = 0 times, M = 0 times, L=2 times, XL= 3 times and XXL = 4 times.

The diagrams are worked as usual: begin with the first row in A.1, then work the first row in A.2 etc.

See DROPS lesson: How to read knitting diagrams

See DROPS lesson: How to read crochet diagrams

The total width of the garment (from wrist-to-wrist) will be larger in the larger sizes, despite the actual sleeves being shorter. The larger sizes have longer sleeve caps and wider shoulders, so there will be a good fit in all sizes.

The measurement sketch/schematic drawing provides information regarding the full length of the garment. If it’s a jumper or a jacket the length is measured from the highest point on the shoulder closest to the neckline, and straight down to the bottom of the garment. It is NOT measured from the tip of shoulder. Similarly, the length of yoke is measured from the highest point on the shoulder and down to where yoke is split into body and sleeves.

On a jacket measures are never taken along bands, unless specifically stated. Always measure inside band stitches when measuring the length.

See DROPS lesson: How to read a schematic drawing

Diagrams are often repeated on the round or in height. 1 repeat is the diagram the way it appears in the pattern. If it says to work 5 repeats of A.1 in the round, then you work A.1 a total of 5 times after/next to each other in the round. If it says to work 2 repeats of A.1 vertically/in height you work the entire diagram once, then begin again at the start and work the entire diagram one more time.

Chain stitches are slightly narrower than other stitches and to avoid working the cast-on edge too tight, we simply chain more stitches to begin with. The stitch count will be adjusted on the following row to fit the pattern and measurement sketch.

The rib edge is more elastic and will contract slightly compared to, for example, stocking stitch. By increasing before the rib edge, you avoid a visible difference in width between the rib edge and the rest of the body.

It’s very easy to cast off too tightly, and by making yarn overs while casting off (and simultaneously casting these off) you avoid a too tight cast off edge.

See DROPS video: How to bind off with yarn overs (yo)

To achieve an even increase (or decrease) you can increase on, for example: every 3rd and 4th row alternately, like so: work 2 rows and increase on the 3rd row, work 3 rows and increase on the 4th. Repeat this until the increase is complete.

See DROPS lesson: Increase or decrease 1 st on every 3rd and 4th row alternately

Should you prefer to work in the round instead of back and forth, you may of course adjust the pattern. You’ll need to add steeks mid-front (usually 5 stitches), and follow the instructions. When you would normally turn and work from the wrong side, simply work across the steek and continue in the round. At the end you’ll cut the piece open, pick up stitches to work bands, and cover the cut edges.

See DROPS video: How to knit steeks and cut open

Should you prefer to work back and forth instead of in the round, you may of course adjust the pattern so you work the pieces separately and then assemble them at the end. Divide the stitches for the body in 2, add 1 edge stitch in each side (for sewing) and work the front and back pieces separately.

See DROPS lesson: Can I adapt a pattern for circular needles into straight needles?

Pattern repeats can vary slightly in the different sizes, in order to get the correct proportions. If you’re not working the exact same size as the garment in the photo, yours might deviate slightly. This has been carefully developed and adjusted so that the complete impression of the garment is the same in all sizes.

Make sure to follow instructions and diagrams for your size!

If you have found a pattern you like which is available in women’s size it’s not very difficult to convert it to men’s size. The biggest difference will be the length of sleeves and body. Start working on the women size that you think would fit across the chest. The additional length will be worked right before you cast off for the armhole/sleeve cap. If the pattern is worked top-down you can add the length right after the armhole or before the first decrease on sleeve.

Regarding additional yarn amount, this will depend on how much length you add, but it is better with a skein too many than too few.

All yarns will have excess fibres (from production) that might come off as lint or shedding. Brushed yarns (ie hairier yarns) have more of these loose, excess fibres, causing more shedding.

Shedding also depends on what is worn under or over the garment, and whether this pulls at the yarn fibres. It’s therefore not possible to guarantee that there will be no shedding

Below are some tips on how to get the best result when working with hairier yarns:

1. When the garment is finished (before you wash it) shake it vigorously so the looser hairs come off. NOTE: do NOT use a lint roller, brush or any method that pulls at the yarn.

2. Place the garment in a plastic bag and put it in your freezer - the temperature will cause the fibres to become less attached to each other, and excess fibres will come off easier.

3. Leave in the freezer for a few hours before taking it out and shaking it again.

4. Wash the garment according to the instructions on the yarn label.

Pilling is a natural process that happens to even the most exclusive of fibers. It's a natural sign of wear and tear that is hard to avoid, and that is most visible in high friction areas of your garment like a sweater's arms and cuffs.

You can make your garment look as new by removing the pilling, using a fabric comb or a pill/lint remover.

Still can't find the answer you need? Then scroll down and leave your question so one of our experts can try to help you. This will be done normally within 5 to 10 working days.
In the meantime, you can read the questions and answers that others have left to this pattern or join the DROPS Workshop on Facebook to get help from fellow knitters/crocheters!

You might also like...

Post a comment to pattern DROPS 133-22

We would love to hear what you have to say about this pattern!

If you want to leave a question, please make sure you select the correct category in the form below, to speed up the answering process. Required fields are marked *.

Comments / Questions (29)

country flag Mdlenka wrote:

Dobrý den, máte tam chybu u rukávu - místo 22-19-18-15-11-8x 1 oko má být 1x 22-19-18-15-11-8 ok.

16.10.2019 - 15:38

DROPS Design answered:

Hi Mdlenka! Yes you're right. Thank you!

26.02.2020 - 16:28

country flag Gery wrote:

Hi, I would like to know where to dec into the diagram M1? Is this mean that the diagram get more narrow? Thanks

31.03.2019 - 20:20

DROPS Design answered:

Dear Gery you are not supposed to decrease in the diagram M.1. Pattern should be worked over the 15 sts as shown in diagram. Happy knitting!

01.04.2019 - 14:08

country flag Magdalena wrote:

Witam. Wykonałam z powodzeniem prawy przód sweterka i niestety przy lewym przodzie zaczął sie problem. Albo błędnie odczytuje schemat ( zaczynam odp rawego dolnego rogu) albo nie potrafie odczytać wskazówek. Warkocz lewego przodu nie jest odbiciem warkocza prawego przodu. Byłabym wdzięczna za podpowiedź. pozdrawiam. magdalena

06.04.2018 - 23:14

DROPS Design answered:

Witaj Magdo, schemat czytamy od prawego dolnego rogu, więc jest ok. Zobacz proszę video, gdzie jest pokazane jak wykonać symetryczne warkocze (inne niż w tym swetrze, ale chodzi o samą technikę): TUTAJ. Pozdrawiamy

09.04.2018 - 10:38

country flag Magdalena wrote:

Witam. Wykonałam z powodzeniem prawy przód sweterka i niestety przy lewym przodzie zaczął sie problem. Albo błędnie odczytuje schemat M2( zaczynam odp prawego dolnego rogu) albo nie potrafie odczytać wskazówek. Warkocz lewego przodu nie jest odbiciem warkocza prawego przodu. Byłabym wdzięczna za podpowiedź. Pozdrawiam. Magda

06.04.2018 - 23:12

country flag Michela wrote:

Buonasera sto iniziando questo capo,non ho mai fatto le trecce,sono in difficoltà non credo di aver capito bene lo schema.e poi non ho capito quando devo iniziare le diminuzioni e aumenti .sto facendo la m.grazie buona serata

15.09.2017 - 20:11

DROPS Design answered:

Buonasera Michela, i diagrammi si leggono dal basso verso l'alto e da destra verso sinistra sul ferro di andata e da sinistra verso destra sul ferro di ritorno. Per le trecce, deve mettere in sospeso le maglie e lavorare come indicato nella legenda. Ci riscriva se si trova ancora in difficoltà. Buon lavoro!

15.09.2017 - 20:57

country flag Radka Čeganová wrote:

Dobrý den, při nahazování rukávů se přidává 7x 5ok a potom 19x 1oko nebo 1x 19ok? Přidávala jsem 19x 1 oko a díl měří 68cm, místo uvedených 56cm. Je to tak v pořádku? Děkuji.

14.07.2016 - 09:16

country flag Denise Reeves wrote:

Hi - please could you tell me where I can find the dimensions for each of the sizes? Thanks!

01.01.2014 - 17:48

DROPS Design answered:

Dear Mrs Reeves, you will find a measurement chart at the end of the pattern, all measures are taken flat from side to side and are in cm. Happy knitting!

02.01.2014 - 09:39

country flag Nancy Aikman wrote:

Beautiful sweater! I want to make a long sweater/coat. Would this pattern work just by making it longer?

27.10.2013 - 23:39

DROPS Design answered:

Dear Mrs Aikman, you can adjust the lenght as you like to, working more row before starting inc or between inc - do not forget more yarn will be then required. Your store may help you for any further assistance. Happy knitting!

29.10.2013 - 09:23

country flag Uta Zeuner wrote:

...das Diagramm zeigt die Hin- und die Rückreihen von der Vorderseite. XXL + XXXL: Gleichzeitig nach ca. 35 cm 1 M..... ...es ist kein Diagramm da! Mit freundliche Grüßen aus dem regnerischen Bayern Uta Zeuner

30.05.2013 - 09:59

DROPS Design answered:

Liebe Frau Zeuner, das Diagramm finden Sie jeweils unterhalb von der Anleitung.

31.05.2013 - 10:39

Anteide wrote:

Ist meine Lieblingsjacke. Die Wolle war fast eine erotische Stricksensation :-) Die Ärmel sind allerdings 3/4 lang geworden, irgendwo bin ich da in die Irre gegangen. Find ich aber hübscher als das Modell :-)

05.04.2013 - 00:07