
Popular categories
Looking for a yarn?


Comments / Questions (27)
![]() Cheri wrote:
Cheri wrote:
Is the back of the DROPS Touch of Mint pattern worked in two separate pieces? What is the placement of the part labeled Body and the part labeled Back?
09.04.2025 - 20:22DROPS Design answered:
Dear Cheri, the part "Body" applies to the bottom of the cardigan, ie from cast on/bottom edge to armholes you work in just one part; then you divide piece at markers for armholes and finish each part separately, starting with back piece then both front pieces. Happy knitting!
10.04.2025 - 09:44
![]() Patricia McDonald wrote:
Patricia McDonald wrote:
Border for drops design R-596 has a chevron effect which makes peaks and valleys on both edges. This pulls the front edge of the jacket out of shape. How do you get a straight edge on the one side where it joins the body?
02.10.2022 - 14:40DROPS Design answered:
Dear Mrs McDonald, make sure to pick up enough stitches along edges and keep the same tension as before to keep same measurements; you can always block the edge at the end if necessary. Happy knitting!
03.10.2022 - 09:22
![]() Ula wrote:
Ula wrote:
Dzień dobry wspaniały Team'ie Drops'a. Potrzebowała zaadaptować wzór do potrzeb mej nieco grubszej włóczki. Oczka przodu mam 4 powtorzenia wzoru wiec 29 na kazda polowe przodu. Jednak tyl w opisie ma 88 oczek-niepodzielna przez 7. Rozumiem ze 84o. jako 7x12 plus 4. Do czego potrzebne sa extra 4? Prosze o pomoc jako ze musze konwertowac wzor na potrzeby mojej włóczki. Pozdrawiam serdecznie. Ula
09.06.2020 - 14:57DROPS Design answered:
Witaj Ulu! To jest po to aby wzór M1 był symetryczny na drugim przodzie. Cieszę się, że nasze starsze wzory cieszą się również powodzeniem :) Koniecznie pokaż nam gotowy sweterek na naszej grupie DROPS Workshop na facebooku. Pozdrawiamy!
10.06.2020 - 08:38
![]() Ulrike Hartmannschott wrote:
Ulrike Hartmannschott wrote:
Guten Morgen, Wieviele Maschen muss ich in M2 bei Grösse XXL stricken? Ich finde M2 in der Anleitung gar nicht. Danke für Ihre Hilfe.
16.05.2020 - 05:29DROPS Design answered:
Liebe Frau Hartmannschott, M.2 wird über die Blende gestrickt. Sie sollen dann 313 Maschen haben, und diese Maschen so (bei den Hinreihen) stricken: die 12 Maschen von M.2 26 Mal wiederholen, und mit der 1. Masche von M.2 enden. Viel Spaß beim stricken!
18.05.2020 - 07:22
![]() Elisabeth Grahn wrote:
Elisabeth Grahn wrote:
Tack, för svaren. Förstår nu lite bättre, jag ska alltså lägga upp 260 m (efterom jag stickar L)??, då jag kommer till framkanten, framkanten =M2. Det som står under Bakstycke, Vä framstycke och höger framstycke gäller alltså efter 37 cm, då man utökar för ärmarna? Tacksam för kommentar/svar! Med vänlig hälsning, Elisabeth
26.04.2016 - 22:39DROPS Design answered:
Hej. Det är riktigt att det som står under BAKST, VÄNSTER FRAMST och HÖGER FRAMST är efter att du stickat de 37 cm under FRAM- OCH BAKSTYCKE. När du kommer till framkanten stickar du upp mellan 260-320 m som sedan justeras till 301 m (strl L). Lycka till!
27.04.2016 - 12:10
![]() Johanna wrote:
Johanna wrote:
M2 är ju framkanten som stickas sist.
24.04.2016 - 11:47
![]() Elisabeth Grahn wrote:
Elisabeth Grahn wrote:
Jag har börjat sticka stl L, lagt upp 188 m o stickat rätstickning 2,5 cm, ska byta till grövre maskor. jag förstår inte!, när ska jag sticka mönster 2, är det inte i början o slutet av varven?? jag rycker det framgår inte alls när M 2 ska stickas!?!!
24.04.2016 - 08:18DROPS Design answered:
Hej. M.2 är framkanten som du stickar när du är färdig med alla stycken och har monterat ihop de. Se under stycket "FRAMKANT". Lycka till!
26.04.2016 - 13:57Nashwaahmed wrote:
I am sorry again as i couldn't get it when i cast of while working the first row of M.2, how would i cast of a yo ? should i work the next stitch following it then pass the yo over it then pass the very first stitch over it ?
15.04.2013 - 15:27DROPS Design answered:
Dear Mrs Nashwaahmed, you just make a you on right needle and cast off as a usual st. Happy Knitting!
15.04.2013 - 16:13Nashwaahmed wrote:
Quick question : how to bind off and at the same time work the first row of M.2 ??
14.04.2013 - 17:46DROPS Design answered:
Dear Mrs Nashwaahmed, just work all sts as stated in 1st row in M.2 and cast off as usual, don't forget to make the yos and cast of them as sts. Happy knitting!
15.04.2013 - 10:09
![]() Drops Design wrote:
Drops Design wrote:
Diagrammerne stemmer, så det er bare at komme igang! God fornöjelse!
19.07.2011 - 18:30
|
|||||||||||||||||||
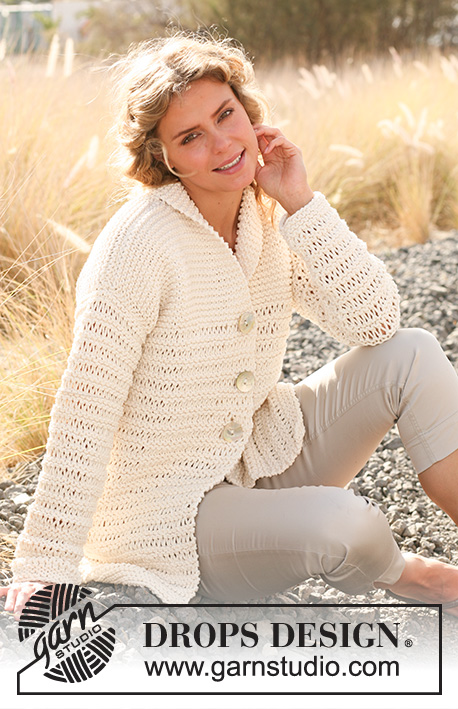
Touch of Mint#touchofmintcardigan |
|||||||||||||||||||
 |
 |
||||||||||||||||||
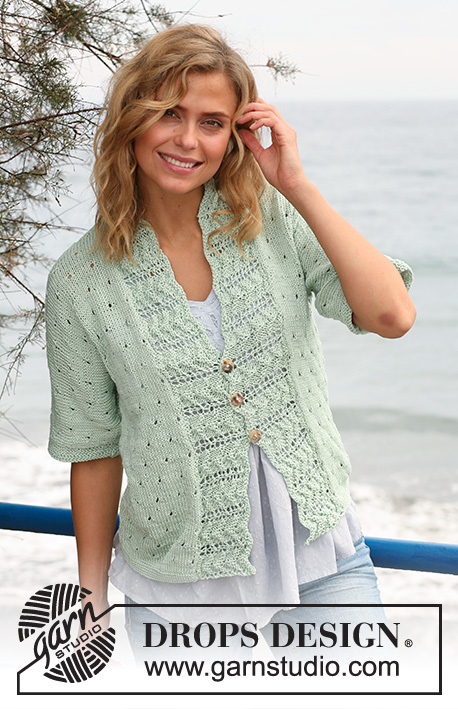
Knitted DROPS jacket with lace pattern in "Muskat". Size: S - XXXL.
DROPS 129-25 |
|||||||||||||||||||
|
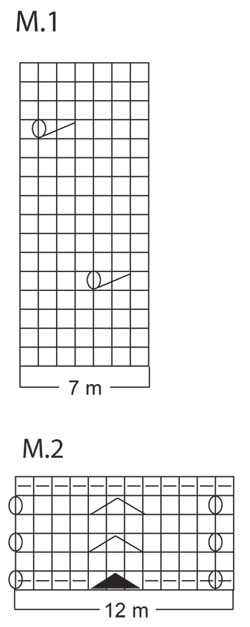
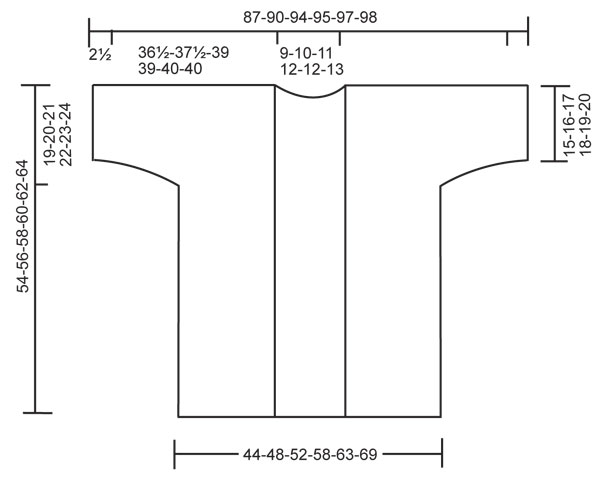
GARTER ST (back and forth on needle): K all rows. PATTERN: See diagram M.1 and M.2. The diagram shows the pattern from RS. -------------------------------------------------------- BODY: Worked back and forth on circular needle from mid front. Cast on 160-174-188-209-230-251 sts (incl 1 edge st in each side) on circular needle size 3 mm with Muskat. Work in Garter st for approx. 2.5 cm - See explanation above. Switch to circular needle size 4 mm and continue as follows (1st row = RS): 1 edge st in garter st, repeat M.1 until 5 sts remain, work 1st st to 4th st in M.1, 1 edge st in garter st - see explanation above. Insert 2 markers in the piece after 36-39-42-47-52-57 sts in from each side. REMEMBER THE KNITTING TENSION! Continue to work like this until piece measures approx. 35-36-37-38-39-40 cm. Now divide the piece at the markers and finish each part separately. BACK PIECE: = 88-96-104-115-126-137 sts. Work M.1 as before - AT THE SAME TIME cast on new sts for sleeves at the end of every row in each side as follows: 4 sts a total of 1-1-1-3-4-5 times, 6 sts a total of 4-4-4-2-1-0 times (work the new sts in pattern) = 144-152-160-163-170-177 sts. Then cast on 11-10-10-9-8-5 new sts at the end of the next two rows = 166-172-180-181-186-187 sts (incl 1 edge st in each side worked in garter st until finished measurements). Continue with pattern as before. When piece measures approx. 52-54-56-58-60-62 cm, cast off the middle 16-18-20-21-22-23 sts for neck = 75-77-80-80-82-82 sts remain on each shoulder (incl 1 edge st in each side worked in garter st until finished measurements). Now finish each shoulder separately. Continue with pattern and 1 st in garter st towards the neck until piece measures 54-56-58-60-62-64 cm. Cast off. LEFT FRONT PIECE: = 36-39-42-47-52-57 sts. Now cast on new sts for sleeve in the side as on back piece, while AT THE SAME TIME working the new sts in pattern. When all inc are done, there are 75-77-80-80-82-82 sts on the shoulder (incl 1 edge st in each side worked in garter st until finished measurements). Continue to work until piece measures 54-56-58-60-62-64 cm. Cast off. RIGHT FRONT PIECE: Work as left front piece but reversed. ASSEMBLY: Sew overarm seams and shoulder seams. At the bottom of the sleeve inside 1 edge st knit up 64-68-72-76-80-84 sts on circular needle size 3 mm with Muskat. Work in garter st back and forth on needle for 2.5 cm. Loosely cast off. Work the same way around the edge of the other sleeve. Sew underarm seams inside 1 edge st. FRONT BAND: Knit up 260-320 sts inside 1 edge st on circular needle size 3 mm with Muskat. Start at the bottom of right front piece, up along front piece, around the neck on back piece and down along left front piece. K 1 row from WS - while AT THE SAME TIME adjusting the no of sts to 277-289-301-313-325-337 (no that can be divided by 12 + 1). Then work M.2 - See diagram, work last st on row as 1st st in M.2. Continue until M.2 has been worked 4 times vertically. Now cast off while AT THE SAME TIME working 1st row in M.2. ASSEMBLY: Sew the buttons on to the left front band as follows: SIZE S, M, L: Sew one button in the 5th, 6th and 7th tip from bottom edge of jacket. SIZE XL, XXL, XXXL: Sew one button in the 5th, 6th, 7th and 8th tip from bottom edge of jacket. The holes (YOs in M.2) on right front band are used as button holes. |
|||||||||||||||||||
Diagram explanations |
|||||||||||||||||||
|
|||||||||||||||||||
 |
|||||||||||||||||||
 |
|||||||||||||||||||
Have you finished this pattern?Tag your pictures with #dropspattern #touchofmintcardigan or submit them to the #dropsfan gallery. Do you need help with this pattern?You'll find 18 tutorial videos, a Comments/Questions area and more by visiting the pattern on garnstudio.com. © 1982-2026 DROPS Design A/S. We reserve all rights. This document, including all its sub-sections, has copyrights. Read more about what you can do with our patterns at the bottom of each pattern on our site. |
|||||||||||||||||||


With over 40 years in knitting and crochet design, DROPS Design offers one of the most extensive collections of free patterns on the internet - translated to 17 languages. As of today we count 324 catalogues and 12290 patterns translated into English (UK/cm).
We work hard to bring you the best knitting and crochet have to offer, inspiration and advice as well as great quality yarns at incredible prices! Would you like to use our patterns for other than personal use? You can read what you are allowed to do in the Copyright text at the bottom of all our patterns. Happy crafting!
Post a comment to pattern DROPS 129-25
We would love to hear what you have to say about this pattern!
If you want to leave a question, please make sure you select the correct category in the form below, to speed up the answering process. Required fields are marked *.