Comments / Questions (34)
![]() Annette Busch wrote:
Annette Busch wrote:
Hejsa. Når man skal lukke af på kropsdelen til ærmer, står der luk 4 af. På selve ærmerne skal man lukke 6 af. Er det fordi de to ekstra masker er til at sy sammen i?
14.12.2022 - 01:42DROPS Design answered:
Hej Annette, det er lettere at få ærmet ind på rundpinden når du lukker 6 masker af på ærmet :)
15.12.2022 - 09:19
![]() Stephanie Wall wrote:
Stephanie Wall wrote:
I have knitted this pattern 3 times. Every time it takes ALL my strength to knit the rows where the arms meet the body
12.11.2020 - 21:52
![]() Joëlle wrote:
Joëlle wrote:
Pouvez vous me dire si c'est normal que les manches se tricotent en jersey hors le reste se tricote au point mousse. D'avance merci pour votre réponse
15.02.2015 - 18:31DROPS Design answered:
Bonjour Joëlle, le dos et les devants du gilet se tricotent également en jersey, avec 4 m de bordure devant au point mousse (bordures de boutonnage), l'empiècement se tricote ensuite entièrement en jersey, toujours avec les 4 m au point mousse au début et à la fin du rang (= de chaque côté). Bon tricot!
16.02.2015 - 11:05
![]() Constance wrote:
Constance wrote:
Love the neckline and the shaped fit. Would work well without the sleeves given the dropped shoulder design. Well done!
30.07.2013 - 14:48
![]() Noreen wrote:
Noreen wrote:
On Pattern 129-9 there is a 2 purl 2 plain and then button bands are garter and the neck is stocking stitch I would like to ask if there is a reason for the difference regarding rib at start and garter button bands please Thanks Noreen As I am ready to start if anyone can help great
05.07.2013 - 20:32DROPS Design answered:
Dear Noreen, you start at the bottom of the jacket with ribbing K2/P2 and 4 sts in garter st each side for button band - these 4 sts each side are worked in garter st all the way. For the neck, you finish with 1 ridge (2 rows garter st)on all sts. Happy knitting!
06.07.2013 - 11:41
![]() Sabine wrote:
Sabine wrote:
Beim Vorder- und Rückenteil: 4 Marker setzen. dann nach 9 cm auf beiden Seiten und links und rechts der 6 M. je 1 M. abn. ( und das ganze 2x wiederholen bei 11 und 13 cm) man kommt von 120 auf 108 Maschen. also 4 Maschen pro Ausführung. Aber was heißt dann LINKS und RECHTS der 6 M. - bei 4 Markern wären das 8 Maschen pro Reihe, die man abnimmt. das ganze 3x insgesamt kommt man auf 24 Maschen Reduzierung.
21.05.2013 - 22:20DROPS Design answered:
Liebe Sabine, es sind nur an zwei Stellen 6 M zwischen den Markierungen (in der Mitte sind mehr Maschen) also nehmen Sie Sie pro Abnahmereihe 4 M ab. 3 x 4 M = 12 Maschen, dann also 120 M – 12 M = 108 M.
22.05.2013 - 09:47
![]() Marita wrote:
Marita wrote:
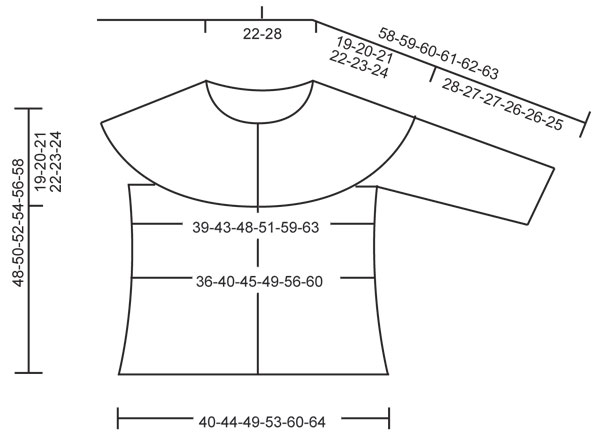
Hej, måtten på diagrammet är det kroppsmått eller mått på färdigt plagg?
04.09.2012 - 15:42DROPS Design answered:
Det är på färdigt plagg.
05.09.2012 - 12:10
![]() Elisabeth wrote:
Elisabeth wrote:
Super
25.02.2012 - 19:00Ewa wrote:
Sehr schick!
28.01.2011 - 16:42
![]() Gunnel wrote:
Gunnel wrote:
När kommer mönstret? Jag vill sticka den nu!!!!!!
25.01.2011 - 15:30
Mar de Invierno#mardeinviernocardigan |
|
 |
 |
Knitted DROPS jacket in stocking st with ¾ sleeves and round yoke in "Verdi". Size: S-XXXL.
DROPS 129-9 |
|
|
GARTER ST (back and forth on needle): K all rows. DECREASE TIP 1: All dec are done from RS. Dec as follows before 6 sts in the side: Beg 2 sts before marker, K 2 sts tog. Dec as follows after 6 sts in the side: Slip 1 st as if to K, K 1, psso. DECREASE TIP 2: Dec 1 st on each side of marker. Dec as follows before marker: Beg 2 sts before marker, slip 1 st as if to K, K 1, psso. Dec as follows after marker: K 2 tog. INCREASE TIP: Inc 1 st by making 1 YO from RS. On next row P YO twisted (i.e. work in the back loop of YO instead of front) to avoid holes. BUTTON HOLES: Cast off for button holes on right front band. 1 button hole = cast off 2nd band st from edge. On next row cast on 1 new st over the cast off st. Cast off for button holes when piece measures: SIZE S: 2, 11, 20, 29, 38 and 47 cm. SIZE M: 3, 11, 18, 26, 34, 41 and 49 cm SIZE L: 3, 11, 19, 27, 35, 43 and 51 cm SIZE XL: 4, 11, 18, 25, 32, 39, 46 and 53 cm SIZE XXL: 4, 12, 19, 26, 33, 40, 47 and 55 cm SIZE XXXL: 4, 12, 19, 27, 34, 42, 49 and 57 cm -------------------------------------------------------- BODY: Worked back and forth on circular needle from mid front. Cast on 122-134-146-158-178-190 sts (incl 4 band sts in each side towards mid front) on circular needle size 6 mm with Verdi. Work as follows (1st row = from RS): 4 band sts in GARTER ST - see explanation above -, K 2, * P 2, K 2 *, repeat from *-* and finish with 4 band sts in GARTER ST. When 3-3-3-5-5-5 rows have been worked, work 1 row from WS while AT THE SAME TIME dec 2-2-0-2-2-2 sts evenly (do not dec over band sts) = 120-132-146-156-176-188 sts. Continue in stocking st with 4 band sts in garter st in each side. NOTE! Remember to cast off for BUTTON HOLES - see explanation above. Insert 4 markers in the piece as follows, from beg of row: 1st marker after 29-32-35-38-43-46 sts, 2nd marker after 35-38-41-44-49-52 sts, 3rd marker after 85-94-105-112-127-136 sts and 4th marker after 91-100-111-118-133-142 sts (= 6 sts between markers in each side). When piece measures 9 cm from cast on edge, dec 1 st on each side of 6 sts in each side - Read DECREASE TIP 1! Repeat dec when piece measures 11 cm and 13 cm = 108-120-134-144-164-176 sts. Continue in stocking st with 4 band sts in each side. When piece measures 23 cm, inc 1 st on each side of 6 sts in the sides - Read INCREASE TIP! Repeat inc when piece measures 25-26-27-28-29-30 cm = 116-128-142-152-172-184 sts. Continue in stocking st and 4 band sts in each side until piece measures 29-30-31-32-33-34 cm. Now work next row from RS as follows: Work 29-32-35-38-43-46 sts, cast off the next 4 sts, work 50-56-64-68-78-84 sts, cast off the next 4 sts and work the last 29-32-35-38-43-46 sts. Put piece aside = 108-120-134-144-164-176 sts remain on needle. SLEEVE: The sleeve is worked back and forth on circular needle. Cast on 34-34-34-38-38-42 sts (incl 1 edge st in each side) on circular needle size 6 mm with Verdi. Work rib as follows (1st row = from RS): 1 edge st, * K 2, P 2 *, repeat from *-* and finish with 1 edge st. Continue like this until rib measures approx. 4 cm. Now continue working in stocking st with 1 edge st each side. When piece measures 8 cm, inc 1 st in each side inside 1 edge st. Repeat inc every 2-1½-1½-1½-1-1 cm a total of 9-10-11-11-12-12 times - Read INCREASE TIP! = 52-54-56-60-62-66 sts. When piece measures approx. 28-27-27-26-25-25 cm (NOTE! Shorter measurements in the larger sizes because of broader shoulder width) cast off 3 sts at beg of the next 2 rows = 46-48-50-54-56-60 sts. Put piece aside and knit another sleeve. ASSEMBLY: Sew the sleeves tog inside 1 edge st. YOKE: Slip sleeves on to same circular needle as body where armholes were cast off = 200-216-234-252-276-296 sts. Insert 1 marker after 23-24-26-26-30-31 sts, then insert 7-7-7-8-8-9 markers with 22-24-26-25-27-26 sts between each = 23-24-26-26-30-31 sts remain after last marker (= a total of 8-8-8-9-9-10 markers). Now measure the piece from here! Continue working in stocking st (4 band sts in each side are worked as before). When piece measures 3 cm, dec 1 st on each side of every marker (= 16-16-16-18-18-20 sts dec) - Read DECREASE TIP 2! Repeat dec every 3 cm 2 more times and then every 2 cm a total of 4-4-5-5-6-6 times = 88-104-106-108-114-116 sts. Continue to work until piece measures 18-19-20-21-22-23 cm. On next row from RS, K over all sts while AT THE SAME TIME dec 13-26-26-22-25-25 sts evenly (do not dec over band sts) = 75-78-80-86-89-91 sts. Turn piece. P 1 row from WS but turn piece when 15 sts remain towards mid front. Tighten the thread and K from RS until 15 sts remain in the other side towards mid front. Turn piece and tighten thread. P 1 row from WS the entire row. K 1 row from RS and K 1 row from WS over all sts. Then loosely cast off with K from RS. ASSEMBLY: Sew the openings under the sleeves. Sew on buttons. |
|
 |
|
Have you finished this pattern?Tag your pictures with #dropspattern #mardeinviernocardigan or submit them to the #dropsfan gallery. Do you need help with this pattern?You'll find 18 tutorial videos, a Comments/Questions area and more by visiting the pattern on garnstudio.com. © 1982-2026 DROPS Design A/S. We reserve all rights. This document, including all its sub-sections, has copyrights. Read more about what you can do with our patterns at the bottom of each pattern on our site. |
|


Post a comment to pattern DROPS 129-9
We would love to hear what you have to say about this pattern!
If you want to leave a question, please make sure you select the correct category in the form below, to speed up the answering process. Required fields are marked *.