
Popular categories
Looking for a yarn?


Comments / Questions (30)
![]() Wickie Morsing wrote:
Wickie Morsing wrote:
Hvis man ikke vil bruge glimmertråden, skal man erstatte den tråd med noget andet? På forhånd tak for hjælpen. Mvh Wickie
10.03.2026 - 21:04DROPS Design answered:
Hej Wickie, glimmertråden kan du undlade, den behøver du ikke erstatte med noget andet :)
16.03.2026 - 08:14
![]() Pia Fridell wrote:
Pia Fridell wrote:
Hej Om jag vill byta garn kan jag använda er garnkonverterare, men den fungerar inte på garnet Glitter! Behövs något tunt garn som tillägg istället för Glitter?
03.03.2024 - 15:03DROPS Design answered:
Hej Pia, nej du behøver ikke erstatte glitter, da det kun er en tynd tråd som giver glitter-effekt :)
05.03.2024 - 15:02
![]() Monika Dello Russo wrote:
Monika Dello Russo wrote:
Hallo, ich möchte die Jacke in etwas abgewandelter Form stricken, ähnlich einer gekauften Jacke meiner Tochter. Und zwar etwas kürzer und unten am Bündchen und evtl. an der Knopfleiste sollen Spitzenrüschen angebracht werden. Wie kann ich die anbringen, von Hand annähren? Hat jemand schon sowas gemacht?
10.02.2023 - 10:32DROPS Design answered:
Liebe Frau Dello Russo, am besten fragen Sie Ihr DROPS Händler (auch per Telefon oder per E-Mail) - oder vielleicht können Sie mal auch andere Strickerinnen um Rag mal in unserem DROPS Workshop fragen. Viel Spaß beim stricken!
10.02.2023 - 13:14
![]() BRIGITTE wrote:
BRIGITTE wrote:
Bonjour je voudrais transformer ce gilet en pull. Comment puis-je faire ?
08.01.2022 - 13:29DROPS Design answered:
Bonjour Brigitte, nous ne sommes malheureusement pas en mesure de pouvoir adapter chacun de nos modèles à chaque demande; n'hésitez pas à demander conseil à votre magasin si besoin, ils sauront vous aider, même par mail ou téléphone. Vous pouvez également demander conseil à d'autres tricoteuses du monde entier dans notre DROPS Workshop. Merci pour votre compréhension. Bon tricot!
10.01.2022 - 07:52
![]() Iona Eadie wrote:
Iona Eadie wrote:
Hello, how would I make these sleeves longer please. I want to knit them to my elbow.. Kindest regards Iona
07.10.2021 - 21:03DROPS Design answered:
Dear Iona, please understand that we cannot modify our patterns to each individual request. To have a longer sleeve, you have to your arm, where you want he sleeve end, calculate the stitchnumber you need to start, then compare it with the number of stitches the sleeve has when you start the cast off for the armscye, and calculate how often you have to increase 1 stitches on both side to get to that number. I hope this helps. Happy Stitching!
08.10.2021 - 01:18
![]() Fausta wrote:
Fausta wrote:
Salve, per il modello Sea Rose cosa si intende 2 capi di Kid silk e 2 capi di glitter? I filati vanno messi a doppio? grazie
25.03.2021 - 12:57DROPS Design answered:
Buonasera Fausta, si, esatto deve usare 2 fili di Kid Silk e 2 fili di Glitter. Buon lavoro!
26.03.2021 - 00:03
![]() Fausta wrote:
Fausta wrote:
Buongiorno, per il modello Sea Rose, posso utilizzare i ferri diritti? Grazie
22.03.2021 - 13:17DROPS Design answered:
Buongiorno Fausta, il modello è un cardigan ed è lavorato in piano, per cui può utilizzare i ferri dritti. Buon lavoro!
22.03.2021 - 14:22
![]() Fausta wrote:
Fausta wrote:
Buongiorno, per il modello sea rose, posso lavorare anche con i ferri tradizionali? Grazie
22.03.2021 - 13:12DROPS Design answered:
Buongiorno Fausta, il modello è un cardigan ed è lavorato in piano, per cui può utilizzare i ferri dritti. Buon lavoro!
22.03.2021 - 14:22
![]() Angela wrote:
Angela wrote:
This is a lovely feminine design and I don't know if I'll be able to knit it yet but I'm going to try. Thank you for providing such an array of fantastic patterns.
01.07.2019 - 22:31
![]() Sara wrote:
Sara wrote:
Jag stickade den till min syster. Det gick faktiskt rätt fort eftersom man stickar på så stora stickor. Hon har använt den massor.
10.01.2012 - 10:42
|
||||||||||||||||
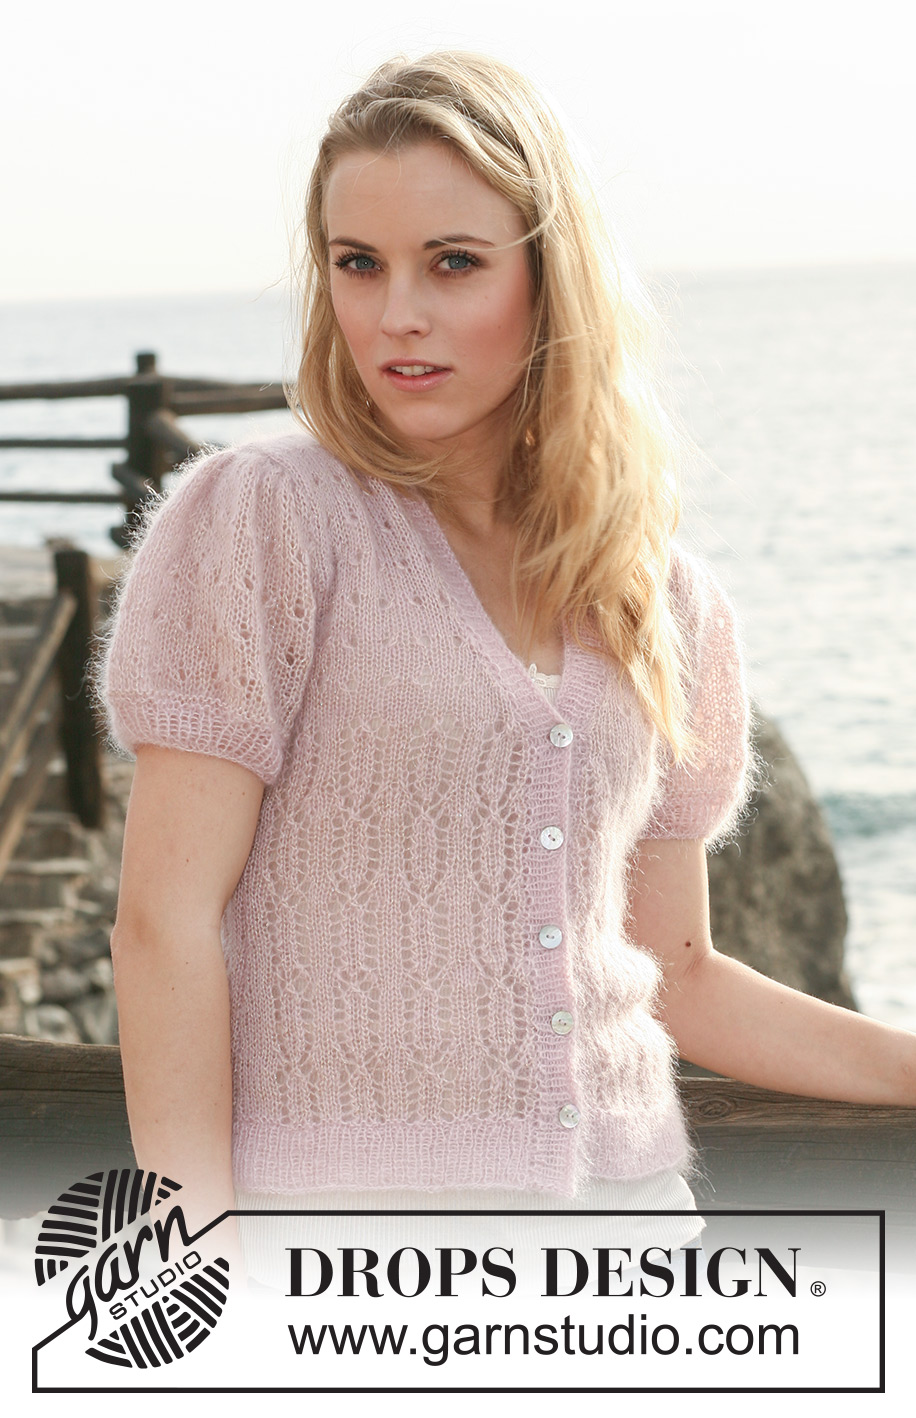
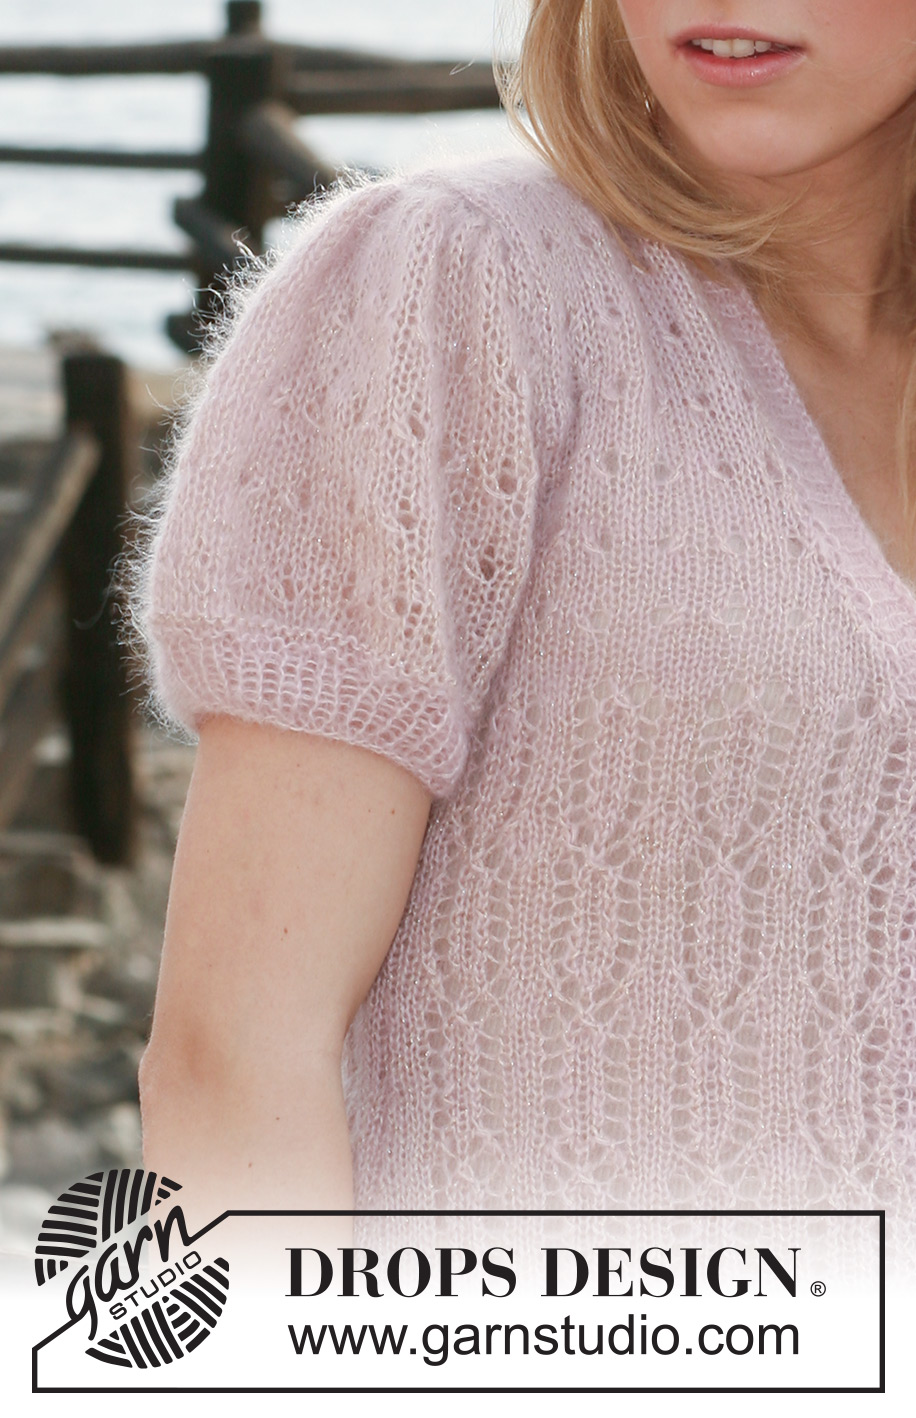
Sea Rose#searosecardigan |
||||||||||||||||
 |
 |
|||||||||||||||
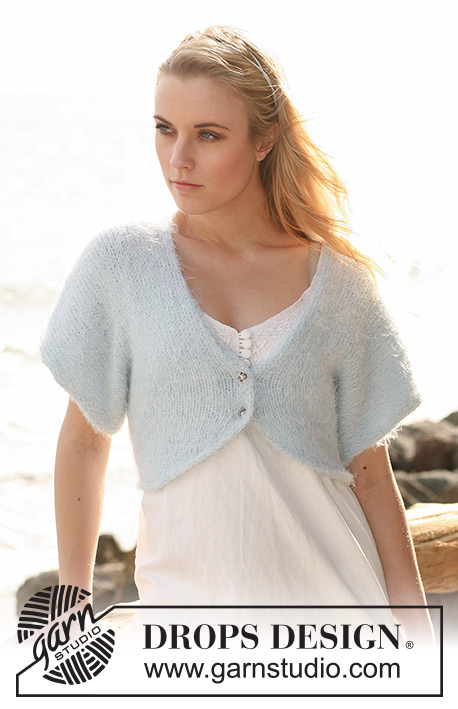
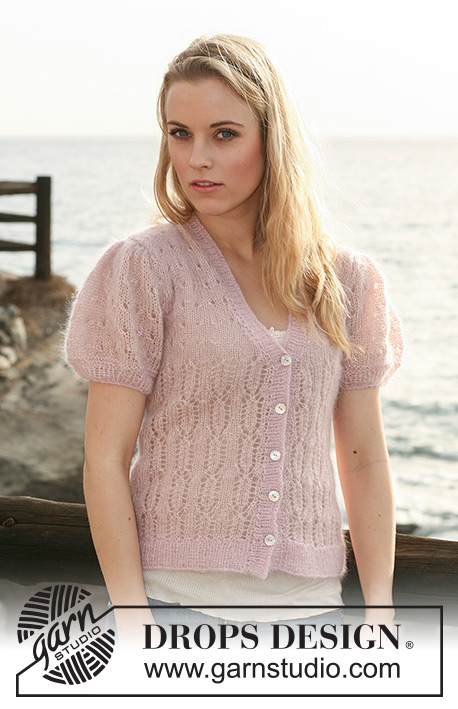
Knitted DROPS jacket with short puff sleeves and lace pattern in ”Kid-Silk” and ”Glitter”. Size S-XXXL.
DROPS 119-19 |
||||||||||||||||
|
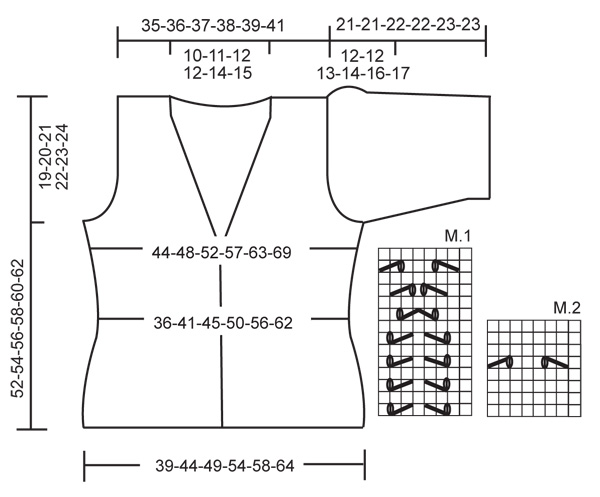
PATTERN: See diagram M.1 (= 8 sts) and M.2 (= 8 sts). Diagram shows the pattern from RS. GARTER ST (back and forth on needle): K all rows. BUTTONHOLES: Make buttonholes when right front band measures 1.5 cm (measured from where sts were picked up for front band). 1 buttonhole = cast off 1 P st from RS and cast on 1 new st on next row. Make buttonholes when piece measures (measured from bottom edge): SIZE S: 3, 9, 15, 21 and 27 cm SIZE M: 4, 10, 16, 22 and 28 cm SIZE L: 5, 11, 17, 23 and 29 cm SIZE XL: 6, 12, 18, 24 and 30 cm SIZE XXL: 3, 10, 17, 24 and 31 cm SIZE XXXL: 4, 11, 18, 25 and 32 cm -------------------------------------------------------- -------------------------------------------------------- BACK PIECE: Worked back and forth on circular needle. Cast on 93-103-113-125-135-149 sts (includes 1 edge st each side) on circular needle size 3.5 mm with 2 threads Kid-Silk and 2 threads Glitter (= 4 threads). P 1 row from WS and continue as follows from RS: 1 edge st, rib K1/P1 until 2 sts remain, finish with K1 and 1 edge st. When piece measures 4 cm work K 1 row from RS, AT THE SAME TIME dec 24-26-28-32-34-38 sts evenly = 69-77-85-93-101-111 sts. K 1 row from WS. Change to circular needle size 4.5 mm and continue in PATTERN - see above - from RS as follows: 1 edge st, 9-5-9-5-9-6 stocking sts, M.1 a total of 6-8-8-10-10-12 times, finish with 10-6-10-6-10-7 stocking sts and 1 edge st. REMEMBER THE KNITTING TENSION! Continue in M.1 like this. AT THE SAME TIME when piece measures 8 cm dec 1 st each side and repeat the dec on every 3-3-3-3-6-6 cm a total of 3-3-3-3-2-2 times = 63-71-79-87-97-107 sts. When piece measures 19 cm inc 1 st each side and repeat the inc on every 1.5-2-2-2-2.5-2.5 cm a total of 7-6-6-6-6-6 times = 77-83-91-99-109-119 sts. After 4 vertical repeats of M.1 (piece now measures approx 30 cm for all sizes) work next row from RS as follows: 1 edge st, 13-8-12-8-13-10 stocking sts, M.2 a total of 6-8-8-10-10-12 times, and finish with 14-9-13-9-14-11 stocking sts and 1 edge st. Continue in M.2 like this. AT THE SAME TIME when piece measures 33-34-35-36-37-38 cm cast off for armhole each side at beg of every row: 3 sts 1 time, 2 sts 2-3-4-5-7-9 times and 1 st 2-2-3-4-4-4 times = 59-61-63-65-67-69 sts. When piece measures 50-52-54-56-58-60 cm LOOSELY cast off the middle 15-17-19-19-21-23 sts for neck and complete each shoulder separately. Cast off 1 st on neckline on next row = 21-21-21-22-22-22 sts left on shoulder. Cast off when piece measures 52-54-56-58-60-62 cm. LEFT FRONT PIECE: Worked back and forth on circular needle. Cast on 49-53-59-65-69-77 sts (includes 1 edge st at the side and 2 edge sts towards mid front) on circular needle size 3.5 mm with 2 threads Kid-Silk and 2 threads Glitter (= 4 threads). P 1 row from WS and continue as follows from RS: 1 edge st, rib P1/K1 (NOTE! beg with P) until 2 sts remain, finish with 2 edge sts in garter st. Continue in rib like this. When piece measures 4 cm K 1 row from RS, AT THE SAME TIME dec 13-13-15-17-17-20 sts evenly = 36-40-44-48-52-57 sts. K 1 row from WS. Change to circular needle size 4.5 mm and work next row as follows from RS: 1 edge st, 7-3-7-3-7-4 stocking sts, M.1 a total of 3-4-4-5-5-6 times, finish with 2 stocking sts and 2 edge sts in garter st. Continue in M.1 like this. AT THE SAME TIME when piece measures 8 cm dec at the side as described for back piece = 33-37-41-45-50-55 sts. When piece measures 19 cm inc at the side as described for back piece = 40-43-47-51-56-61 sts. READ ALL OF THE FOLLOWING SECTION BEFORE CONTINUING: When piece measures 29-30-31-32-33-34 cm dec 1 st for neck inside the 2 edge sts towards mid front (dec by K2 tog from RS). Repeat the dec on every 4th row a total of 8-9-10-10-11-12 times (work sts not fitting into pattern in stocking st). AT THE SAME TIME when piece measures 30 cm (adjust to back piece) work next row from RS as follows: 1 edge st, 11-6-10-6-11-8 stocking sts, M.2 a total of 2-3-3-4-4-5 times, stocking st until 2 sts remain, finish with 2 edge sts in garter st. AT THE SAME TIME when piece measures 33-34-35-36-37-38 cm cast off for armhole at the side as described for back piece. When all dec are complete there are 23-23-23-24-24-24 sts left on shoulder (includes 2 edge sts towards mid front). Continue in M.2. Cast off when piece measures 52-54-56-58-60-62 cm. RIGHT FRONT PIECE: Like left front piece, but mirrored. SHORT PUFF SLEEVE: Worked back and forth on needle. Cast on 48-50-52-54-56-58 sts (includes 1 edge st each side) on needle size 3.5 mm with 2 threads Kid-Silk and 2 threads Glitter (= 4 threads). P 1 row from WS and continue as follows from RS: 1 edge st, rib K1/P1 until 1 st remain, finish with 1 edge st. When piece measures 3 cm K next row from RS, AT THE SAME TIME inc 13 sts evenly for all sizes = 61-63-65-67-69-71 sts. K 1 row from WS. Change to circular needle size 4.5 mm and work next row as follows from RS: K 12-13-11-12-10-11 sts, inc 12-12-14-14-16-16 sts on the next 36-36-42-42-48-48 sts by making 1 YO between every other and 3rd st, finish with K 13-14-12-13-11-12 sts = 73-75-79-81-85-87 sts. On next row work YO into back of loop to avoid a hole. Continue in pattern on next row from RS as follows: 1 edge st, 3-0-2-3-5-2 stocking sts, M.2 a total of 8-9-9-9-9-10 times, finish with 4-1-3-4-6-3 stocking sts and 1 edge st. When piece measures 9-9-9-8-7-6 cm cast off 4 sts for sleeve cap at beg of the next 2 rows. When piece measures 10 cm dec 2 sts each side by working the first 3 sts tog and the last 3 sts tog (work sts not fitting into pattern in stocking st). Repeat the dec on every 4-4-3-3-3-3 cm (= every 8-8-6-6-6-6 row) a total of 3-3-4-4-4-4 times = 53-55-55-57-61-63 sts. When piece measures 20-20-21-21-22-22 cm work 1 row stocking st, AT THE SAME TIME dec 2-4-1-3-1-3 sts evenly = 51-51-54-54-60-60 sts. On next row K3 tog across the row = 17-17-18-18-20-20 sts. Cast off. Piece measures approx 21-21-22-22-23-23 cm. ASSEMBLY: Sew shoulder seams. Set in sleeves. Sew sleeve and side seams inside 1 edge st. FRONT BAND/NECKLINE: Worked back and forth on needle from mid back and down along front piece. Left front band: Pick up 100-104-108-112-116-118 sts inside 2 edge sts along left front piece on circular needle size 3.5 mm with 2 threads Kid-Silk and 2 threads Glitter (= 4 threads). K 1 row from WS, AT THE SAME TIME inc 36-36-38-38-40-40 sts evenly = 136-140-146-150-156-158 sts. Continue as follows from RS: 1 edge st, * K1, P1 *, repeat from *-* until 3 sts remain, finish with K1 and 2 garter sts - see above! Continue like this until rib measures 3 cm. Work 1 row stocking st, and cast off LOOSELY. Right front band: Like left front band, but mirrored (beg from bottom edge). AT THE SAME TIME when front band measures 1.5 cm make BUTTONHOLES - see above! ASSEMBLY: Sew front bands tog inside 1 edge st mid back. |
||||||||||||||||
Diagram explanations |
||||||||||||||||
|
||||||||||||||||
 |
||||||||||||||||
Have you finished this pattern?Tag your pictures with #dropspattern #searosecardigan or submit them to the #dropsfan gallery. Do you need help with this pattern?You'll find 19 tutorial videos, a Comments/Questions area and more by visiting the pattern on garnstudio.com. © 1982-2026 DROPS Design A/S. We reserve all rights. This document, including all its sub-sections, has copyrights. Read more about what you can do with our patterns at the bottom of each pattern on our site. |
||||||||||||||||


With over 40 years in knitting and crochet design, DROPS Design offers one of the most extensive collections of free patterns on the internet - translated to 17 languages. As of today we count 325 catalogues and 12298 patterns translated into English (UK/cm).
We work hard to bring you the best knitting and crochet have to offer, inspiration and advice as well as great quality yarns at incredible prices! Would you like to use our patterns for other than personal use? You can read what you are allowed to do in the Copyright text at the bottom of all our patterns. Happy crafting!
Post a comment to pattern DROPS 119-19
We would love to hear what you have to say about this pattern!
If you want to leave a question, please make sure you select the correct category in the form below, to speed up the answering process. Required fields are marked *.