
Popular categories
Looking for a yarn?


Comments / Questions (54)
![]() Claudia wrote:
Claudia wrote:
Liebes Drops-Team, ich verstehe leider folgenden Satz ein Ärmel nicht: danach 3 M. 3 m (1) 1 Mal abk Soll heissen, ich kette bei den Erwachsenengrößen einmalig 3 M ab, und bei der Kindergröße einmalig 1 M? Danke für Ihre Antwort
11.03.2020 - 10:05DROPS Design answered:
Liebe Claudia, in allen Größen wird es am Anfang jeder Reihe so abgekettet: 3 M x 1, 2 M x 2, 1 M x 1 dann ketten Sie 2 M am Anfang jeder Reihe bis die Ärmel 55 bis 60 cm misst (siehe Größe) und dann ketten Sie 3 M 1 x beidseitig. Viel Spaß beim stricken!
11.03.2020 - 13:51
![]() Saisha Gardner wrote:
Saisha Gardner wrote:
I have knitted with straights for over 30 years this is my first use of circular needles which lengths of cable would you advise for the body, sleeves and hood! Thank you
03.01.2018 - 13:16DROPS Design answered:
Dear Mrs Gardner, each piece of this sweater is worked back and forth so that you can even used straight needles here. When working in the round with circular needles, the needle has to be always smaller than the circumference of knitted piece. Remember your DROPS store will have even more tips & advices for you, do not hesitate to contact them even per mail or telephone. Hppy knitting!
03.01.2018 - 14:23Megan wrote:
Hi again...sorry for so many questions! Yes, I will have 39 stitches left, but reading forward into the pattern then I will be short 10 stitches (I.e. I won’t have enough for the 5 collar, 12 bound off each side, and 10each side on stitch holders...these all add to 49). Do you see my dilemma? Is it an error in the pattern? What should I do?
14.11.2017 - 11:37DROPS Design answered:
Dear Megan, for collar you then put aside the middle 5 sts + all the sts on the right side of these sts (= 22 sts on a thread), then work left side (= 17 sts + cast on 5 sts towards neck = 22 sts) for the shoulder. Cast off 12 sts for shoulder and slip the remaining 10 sts on a thread, they will be used later for hood. Then work 2nd side over the 22 sts (17 + 5 middle sts) as first side but reversed. Happy knitting!
14.11.2017 - 13:12Megan wrote:
Thanks for clarifying what I’m binding off. I’m still struggling to see where the math works. If I’m making the size 12/14, I should only have 53 stitches on my needle to begin with (per earlier instructions). 53-14=39 stitches remaining which then means I’m short 10stitches. Have I misread earlier instructions? Thanks for the help!
14.11.2017 - 10:40DROPS Design answered:
Dear Megan, there was a small typo in previous answer, you should have 39 sts, not 49 sts (53-14=39, you are right). Hapy knitting!
14.11.2017 - 11:19
![]() Megan wrote:
Megan wrote:
Hi there, I’m making the smallest size of this pattern...I’m to the bit of binding off for the arm hole. If I’m reading correctly, I will end up binding off 7 stitches total each side over the next few rows (total of 14 both sides...leaving 39 total stitches on needles). When I read ahead in the pattern though, it looks like I need 49 stitches on my needles for the neck and shoulder bits. Am I missing something? Help!
11.11.2017 - 15:53DROPS Design answered:
Hi Megan, You cast off 3 stitches x 1 on each side = 6; 2 stitches x 1 on each side = 4 and 1 stitch x 2 on each side = 2 so a total of 14 stitches. This leaves you with 49 stitches on needle. Work until piece measures 38 cm then 5 stitches are put on thread for neck (and the right side while you work the left) and you have 22 stitches on left and right sides for shoulders. I hope this helps and happy knitting!
12.11.2017 - 06:49
![]() Frane wrote:
Frane wrote:
Bonjour, pour la taille M il est demandé 650 g donc presque 14 pelotes (si de 50 Gr.) cela me paraît énorme non ? j'ai souvent tricoté des pulls pour mon fils assez grand et mince et jamais je n'ai mis autant de pelotes. je sais que cela dépend de la grosseur fil mais pourtant ce fil recommandé ne paraît pas si gros si ? (tricoté en 9) En espérant être claire, pardonnez moi si la question a déjà été posé, je n'ai pas lu toutes les questions. Cordialement
08.11.2016 - 18:01DROPS Design answered:
Bonjour Frane, il faut en fait 13 pelotes en gris (= 650 g) et 2 pelotes en noir (= 100 g) en DROPS Eskimo en taille S/M. Vous trouverez en bas de page un schéma avec toutes les mesures pour chaque taille, vous pourrez ainsi comparer à un vêtement similaire et ajuster si besoin. Bon tricot!
09.11.2016 - 08:46
![]() Nassima wrote:
Nassima wrote:
Bjr, je ne sais pas combien de mailles je dois relever pour la capuche. Est-ce 35 ou 45 sachant que je tricote pour la taille M? De plus on se retrouve avec moins de mailles en attente dans les 2 cas : 13 m du dos + 20m du devant = 33 m .comment obtenir 35 ou 45? Merci
03.04.2016 - 02:45DROPS Design answered:
Bonjour Nassima, relevez les 10 m en attente du devant droit, puis relevez 1 m dans chacune des mailles autour de l'encolure dos (le long des rangs jusqu'à la hauteur finale + diminution encolure), puis les 13 m en attente et terminez par les 10 m du devant gauche. Le nbe de mailles dépend également de votre tension, mais veillez à bien en avoir suffisamment pour que le début de la capuche ne soit pas trop serré. Bon tricot!
04.04.2016 - 08:43
![]() FARGEON wrote:
FARGEON wrote:
Bonjour, j'aimerais réaliser ce pull, mais mon fils ne souhaite pas un un pull aussi épais... Quelle laine puis-je utiliser à la place d'Eskimo, en adaptant les explications bien-sûr. Bravo pour tous les modèles proposés (j'en ai déjà réalisé plusieurs...) et pour le rapport qualité/prix de vos laines.
07.11.2015 - 20:13DROPS Design answered:
Bonjour Mme Fargeon, retrouvez nos différents fils à tricoter en fonction de leur composition ou de leur groupe - n'hésitez pas à demander conseil à votre magasin DROPS. Bon tricot!
09.11.2015 - 10:09
![]() Siri Eveline Sætrang wrote:
Siri Eveline Sætrang wrote:
Hei, Jeg sliter med å forstå hva slags pinner jeg skal bruke til denne oppskriften. Planen er å strikke størrelse XL.
15.03.2015 - 08:38DROPS Design answered:
Hei Siri. I mönstret staar DROPS Pinne nr 8 og 9, DROPS Rundp nr 9. Strikkefastheten er: Husk p.nr er kun veiledende! 10 m x 14 p på p 9 og glstrikk = 10 x 10 cm. Og pindenumrene er ogsaa meldt i opskriften selv.
18.03.2015 - 15:53
![]() Amy wrote:
Amy wrote:
Oh yeah I know.. I think I misunderstood part of it! I read it as "bind off however many sts from each side every other row, then bind off 2 sts from each side on EVERY row until the piece measures 57cm. Have I got that wrong. .? Thanks!
28.02.2015 - 13:58DROPS Design answered:
Dear Amy, you will bind off (in 3rd size) at the beg of every row each side (= from RS + from WS): 3 sts 1 time, 2 sts 2 times and 1 st 1 time, then 2 sts at the beg of every row each side (= from RS + from WS) until the piece measures 57 cm, then bind off 3 sts 1 time at the beg of next 2 rows (= from RS + from WS). You should bind off same number of sts each side, ie from RS and from WS. Happy knitting!
02.03.2015 - 08:15
|
|
Theodor |
|
|
|
|
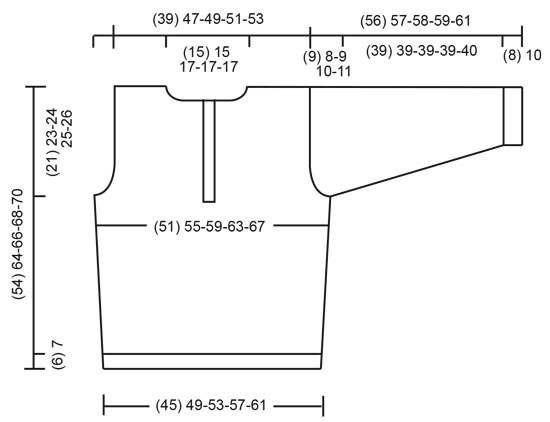
Men's pullover with hood, v-neck and stripes in DROPS Snow
DROPS 85-1 |
|
|
Gauge: 10 sts x 14 rows on larger needles in stockinette st = 10 x 10 cm. Rib: *K 1, P 2*, repeat from *-*. Front: Cast on 47-53-56-59-65 sts (includes 1 edge st each side) on smaller needles with charcoal grey and knit rib for 6-7-7-7-7 cm. Change to larger needles and knit 2 rows garter st, adjusting (dec or inc) on the 1st row to 47-51-55-59-63 sts. Change to stockinette st. Read the entire section before knitting: When the piece measures 11 cm inc 1 st at each side every 8-12-12-12-12 cm a total of 3 times = 53-57-61-65-69 sts. When the piece measures 28-35-37-38-40 cm knit 3 rows black, 2 rows charcoal grey, 15 rows black, and then knit charcoal grey to finished measurements. When the piece measures 33-41-42-43-44 cm bind off for armhole at each side every other row: 3 sts 1 time, 2 sts 1-0-0-1-1 times and 1 st 2-2-3-2-3 times. When the piece measures approx. 38-46-47-49-50 cm (adjust so that there are the same number of sts bound off for armholes at both sides), divide for the neck opening as follows: put the center 5 sts + remaining sts on right side on a st holder (there will be 5 sts more on st holder than on needle). Left side (sts on needles): Cast on 5 new sts at neck opening for placket. Continue with stockinette st, keeping 5 placket sts in garter st. When the piece measures 54-64-66-68-70 cm bind off the outermost 12-16-16-17-18 sts for shoulder. Put the remaining 10-10-11-11-11 sts on a st holder. Right side: Put sts from st holder back on needles and knit stockinette st, keeping 5 placket sts (at center front edge) in garter st. When the piece measures 54-64-66-68-70 cm bind off the outermost 12-16-16-17-18 sts for shoulder. Put the remaining 10-10-11-11-11 sts on a st holder. Back: Cast on and knit the same as the front. Bind off for armhole as on front. When the piece measures 52-62-64-66-68 cm put the center 13-13-15-15-15 sts on a st holder for the neck. On the next row dec 1 st at each neck edge = 12-16-16-17-18 sts remain on each shoulder. Bind off when the piece measures 54-64-66-68-70 cm. Sleeve: Cast on 26-26-26-29-29 sts on smaller needles with charcoal grey and knit rib for 8-10-10-10-10 cm. Change to larger needles and knit 2 rows garter st, adjusting (dec or inc) to 25-26-26-27-28 sts on the 1st row. Then knit stockinette st. When the piece measures 10-13-13-12-12 cm inc 1 st at each side every 5-4-3.5-3.5-3.5 cm a total of 8-9-10-11-11 times = 41-44-46-49-50 sts. When sleeve measures 47-49-49-49-50 cm bind off for sleeve cap at each side every other row: 3 sts 1 time, 2 sts 2 times and 1 st 1 time, then bind off 2 sts at each side until the piece measures 55-56-57-58-60 cm, then bind off 3 sts at each side 1 time. Bind off the remaining sts, the piece measures 56-57-58-59-61 cm. Assembly: Sew shoulder seams. Hood: Pick up approx. 35-45 sts (incl. sts on st holders) on larger circular needles with charcoal grey and knit back and forth as follows (round 1 = wrong side): K 1 row, P 1 row, then knit stockinette st keeping 5 sts at each edge in garter st (= continuing the placket sts). After 2 rows inc 10 sts evenly distributed = 45-55 sts. Continue until hood measures approx. 32-34-34-34-34 cm, divide sts onto 2 needles, fold hood in half and Kitchener st the top together. Sew cast-on edge on left placket behind right placket. Sew in sleeves. Sew sleeve and side seams using edge sts as a seam allowance. |
|
 |
|
Have you finished this pattern?Tag your pictures with #dropspattern or submit them to the #dropsfan gallery. Do you need help with this pattern?You'll find 21 tutorial videos, a Comments/Questions area and more by visiting the pattern on garnstudio.com. © 1982-2026 DROPS Design A/S. We reserve all rights. This document, including all its sub-sections, has copyrights. Read more about what you can do with our patterns at the bottom of each pattern on our site. |


With over 40 years in knitting and crochet design, DROPS Design offers one of the most extensive collections of free patterns on the internet - translated to 17 languages. As of today we count 324 catalogues and 12290 patterns translated into English (UK/cm).
We work hard to bring you the best knitting and crochet have to offer, inspiration and advice as well as great quality yarns at incredible prices! Would you like to use our patterns for other than personal use? You can read what you are allowed to do in the Copyright text at the bottom of all our patterns. Happy crafting!
Post a comment to pattern DROPS 85-1
We would love to hear what you have to say about this pattern!
If you want to leave a question, please make sure you select the correct category in the form below, to speed up the answering process. Required fields are marked *.