
Popular categories
Looking for a yarn?


Comments / Questions (40)
![]() Josée wrote:
Josée wrote:
Bonjour, je suis rendue à faire les rangs raccourcis et malheureusement je ne comprends pas comment les faire. Pourriez-Vous m’expliquer plus le fonctionnement. Merci
23.03.2026 - 15:31DROPS Design answered:
Bonjour Josée, vous en êtes aux rangs raccourcis des manches? En commençant sur l'endroit, tricotez le nombre de mailles indiqué pour votre taille, sur l'endroit et au rang suivant sur l'envers = vous tricotez entre 6 et 12 rangs en fonction de votre taille pour 1 série des rangs raccourcis. Tricotez entre 5 et 7 fois (cf taille) la série de rangs raccourcis puis rabattrez entre 39 et 53 mailles au début des 2 rangs suivants et tricotez les 92-116 mailles restantes pour la manche en diminuant 2 m tous les 1 à 2 cm. Bon tricot!
24.03.2026 - 08:00
![]() Rita Koppes wrote:
Rita Koppes wrote:
Kan ik het boek 114 krijgen? Het mijne is versleten!
17.04.2023 - 09:13DROPS Design answered:
Dag Rita,
Of hier nog exemplaren van zijn weet ik eerlijk gezegd niet, maar om erachter te komen kun je het beste even contact op nemen met een van onze verkooppunten. Via deze link vind je een lijst met winkels.
17.04.2023 - 20:52
![]() Helga Al-Zuobi wrote:
Helga Al-Zuobi wrote:
Muß man die halben ecken neu anschlagen ? Oder aus den vorhandenen Abgelegen Maschen Herausstrecken.
23.06.2015 - 09:53DROPS Design answered:
Sie meinen die halben Vierecke für das rechte und linke Vorderteil? Die werden jeweils neu angeschlagen.
24.06.2015 - 11:42
![]() Brenda wrote:
Brenda wrote:
This pattern needs a lot of stitch holders. Get them assembled and ready to use early. I had 8 in use at one time.
10.06.2015 - 20:32
![]() Rosana wrote:
Rosana wrote:
Este modelo es monisimo, por favor poner la traducción en español. Me encanta
07.09.2009 - 23:38
![]() Gisi wrote:
Gisi wrote:
Danke für die Klasse-Anleitung. Die Jacke ist ganz toll gelungen. Habe mit 75%Schurwolle(super wash) 25%PA LL420m/100g gearbeitet/ beeriges Farbverlaufsgarn/
29.08.2009 - 17:23
![]() Elisabeth wrote:
Elisabeth wrote:
Wat een leuk vest en erg vrolijk
22.07.2009 - 14:07Nekane wrote:
Maravillosa también...
19.07.2009 - 14:52
![]() Gisi wrote:
Gisi wrote:
Einfach Klasse, hätte gern die Anleitung
11.07.2009 - 14:31ELIANE SAVARESE wrote:
Lindo,lindo.Aguardamos em portugues.
10.07.2009 - 19:58
|
|
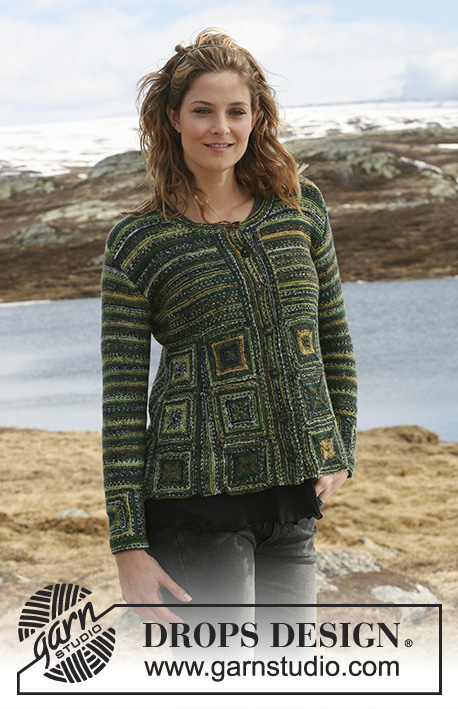
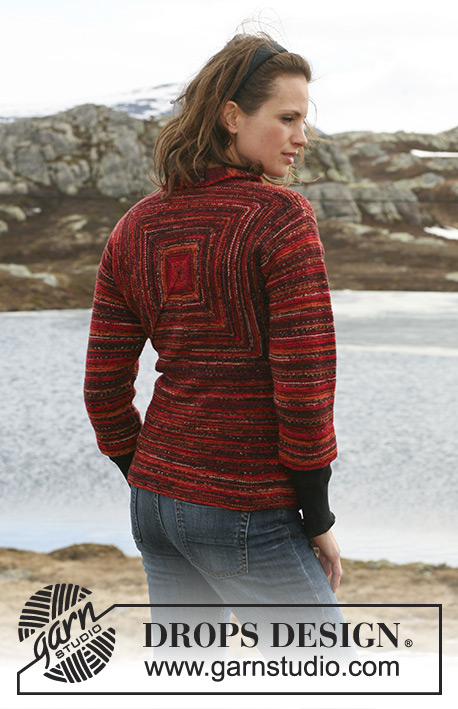
Red Brick Road#redbrickroadcardigan |
|
 |
 |
DROPS jacket with squares in garter st in ”Fabel”. Size S - XXXL.
DROPS 114-3 |
|
|
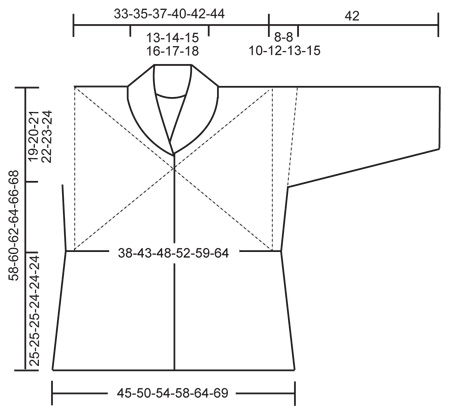
GARTER ST (in the round): K 1 round, P 1 round. GARTER ST (back and forth on needle): K all rows. WHOLE SQUARE: Cast on 8 sts on double pointed needles size 3 mm with Fabel. Distribute sts on 4 needles with 2 sts on each needle. Insert a marker in first, 3rd, 5th and 7th st. K sts with marker on every round, work remaining sts in GARTER ST – see above. Continue in the round on double pointed needles AT THE SAME TIME inc 1 st each side of each st with marker (= 8 inc per round) on every other round. Inc by making 1 YO, on next round work YO into back of loop to avoid a hole. Continue like this until there are a total of 320-336-360-384-408-424 sts on round (change to circular needle when there are enough sts). HALF SQUARE: Cast on 5 sts on needle size 3 mm with Fabel. Insert a marker in 2nd and 4th st. Work sts with marker in stocking st and the remaining sts in GARTER ST – see above. Continue back and forth on needle, AT THE SAME TIME inc 1 st each side of each marker (= 4 inc per row) on every other row. Make all inc from RS, and inc by making 1 YO, on next row K YO into back of loop to avoid a hole. Continue like this until there are a total of 161-169-181-193-205-213 sts on row. INCREASING TIP (apply to bottom edge): Make all inc from RS. Inc 1 st by making 1 YO. On next row K YO into back of loop to avoid a hole. BACK PIECE: Work WHOLE SQUARE – see above. REMEMBER THE KNITTING TENSION! Keep the first 24-25-27-29-31-32 sts on needle (= right shoulder). Cast off the next 32-34-36-38-40-42 sts (= neck), slip the next 24-25-27-29-31-32 sts on a stitch holder (= left shoulder), slip the next 80-84-90-96-102-106 sts on a new stitch holder (= left side), slip the next 80-84-90-96-102-106 sts on a new stitch holder (= bottom edge) and slip the last 80-84-90-96-102-106 sts on a new stitch holder (= right side). SHOULDER: Work garter st back and forth on the 24-25-27-29-31-32 sts on needle. After 2 cm cast off loosely. Slip the 24-25-27-29-31-32 sts from stitch holder on left shoulder back on needle, work 2 cm and cast off loosely. LEFT FRONT PIECE: Work HALF SQUARE – see above. Slip the first 40-42-45-48-51-53 sts on a stitch holder (= bottom edge), slip the next 80-84-90-96-102-106 sts on a new stitch holder (= left side) and keep the last 41-43-46-49-52-54 sts on needle. Work garter st back and forth on sts on needle for approx 2 cm. Cast off the first 24-25-27-29-31-32 sts from RS (= shoulder) and slip the last 17-18-19-20-21-22 sts on a stitch holder (= collar). RIGHT FRONT PIECE: Work HALF SQUARE. Keep the first 41-43-46-49-52-54 sts on needle, slip the next 80-84-90-96-102-106 sts on a stitch holder (= right side) and slip the last 40-42-45-48-51-53 sts on a new stitch holder (= bottom edge). Work garter st back and forth on the 41-43-46-49-52-54 sts on needle for approx 2 cm. Now slip the first 17-18-19-20-21-22 sts on a stitch holder (= collar), and cast off the remaining 24-25-27-29-31-32 sts (= shoulder). Put piece aside. ASSEMBLY: Sew shoulder seams. LEFT SLEEVE: Slip the 80-84-90-96-102-106 sts from stitch holder at the side on left front piece back on needle, pick up 5 sts up to the shoulder seam and pick up 5 sts from shoulder seam down to sts on stitch holder on back piece, slip the 80-84-90-96-102-106 sts from stitch holder on back piece back on needle = 170-178-190-202-214-222 sts. Now work shortened rows as follows (first row = RS): SIZE S: * Work 170 sts, turn piece and work 150 sts on return row. Work 130 sts, turn piece and work 111 sts on return row. Work 92 sts, turn piece and work 131 sts on return row *. Repeat from *-* a total of 6 times. Now cast off the first 39 sts, keep the next 92 sts on needle and cast off the last 39 sts. SIZE M + L + XL: * Work 178-190-202 sts, turn piece and work 157-167-178 sts on return row. Work 136-144-154 sts, turn piece and work 157-167-178 sts on return row. Work 178-190-202 sts, turn piece and work 137-145-154 sts on return row. Work 96-100-106 sts, turn piece and work 137-145-154 sts on return row *. Repeat from *-* a total of 5-6-7 times. Now cast off the first 41-45-48 sts, keep the next 96-100-106 sts on needle and cast off the last 41-45-48 sts. SIZE XXL +XXXL: * Work 214-222 sts, turn piece and work 188-196 sts on return row. Work 162-170 sts, turn piece and work 188-196 sts on return row. Work 214-222 sts, turn piece and work 214-222 sts on return row. Work 162-169 sts, turn piece and work 110-116 sts on return row. Work 162-169 sts, turn piece and work 214-222 sts on return row. Work 214-222 sts, turn piece and work 214-222 sts on return row *. Repeat from *-* a total of 5-5 times. Now cast off the first 52-53 sts, keep the next 110-116 sts on needle and cast off the last 52-53 sts. ALL SIZES: Insert a marker, and now measure piece from here. Continue in garter st back and forth on the 92-96-100-106-110-116 sts. AT THE SAME TIME when piece measures approx 3-5-5-6-6-4 cm from marker dec 1 st each side, and repeat the dec on every 2-1.5-1.5-1-1-1 cm a total of 14-15-15-17-18-20 times = 64-66-70-72-74-76 sts. Continue until piece measures 34-34-32-30-29-27 cm from marker (less for the larger sizes because of longer sleeve cap and wider shoulder). Cast off loosely – continue if you want the sleeve longer. RIGHT SLEEVE: Slip the 80-84-90-96-102-106 sts from stitch holder on right side of back piece back on needle, pick up 5 sts up to shoulder seam, pick up 5 sts from shoulder seam down to sts on stitch holder on right front piece, and slip the 80-84-90-96-102-106 sts from stitch holder on front piece back on needle = 170-178-190-202-214-222 sts. Work like left sleeve. ASSEMBLY: Sew sleeve and side seams inside 1 edge st. BOTTOM EDGE: Beg at bottom of left front piece. Slip the 40-42-45-48-51-53 sts from stitch holder on left front piece back on needle. Pick up 12-20-24-28-40-48 sts over gusset at the side, slip the 80-84-90-96-102-106 sts from stitch holder in bottom edge on back piece back on needle, pick up 12-20-24-28-40-48 sts over gusset at the side, slip the 40-42-45-48-51-53 sts from stitch holder in bottom edge on right front piece back on needle = 184-208-228-248-284-308 sts on needle. K 1 row from WS on all sts. Insert 8 markers in piece as follows: 1 marker in st 11-13-14-15-17-19, 1 marker in st 35-39-43-47-54-58, 1 marker in st 58-65-71-78-90-97, 1 marker in st 81-91-100-109-125-135, 1 marker in st 104-118-129-141-160-174, 1 marker in st 127-144-158-171-195-212, 1 marker in st 150-170-186-202-231-251 and 1 marker in st 174-196-215-234-268-290. Now measure piece from here! Work garter st back and forth on all sts, AT THE SAME TIME when piece measures 5 cm from markers inc 8 sts - see INCREASING TIP! - as follows: Inc 1 st BEFORE the first 4 markers and 1 st AFTER the last 4 markers (= 8 inc), and repeat the inc on every 5-5-5-5-7-7 cm a total of 4-4-4-4-3-3 times = 216-240-260-280-308-332 sts. Continue in garter st until bottom edge measures 25-25-25-24-24-24 cm. Cast off loosely. COLLAR: Slip the 17-18-19-20-21-22 sts on right front piece back on needle. Work collar as follows: * Work 2 rows garter st back and forth on all sts, work 2 rows garter st on 10-10-10-12-12-12 sts towards mid front only *, repeat from *-* until collar measures approx 8-9-9-10-10-11 cm from shoulder, measured where shortest. Cast off loosely. Slip the 17-18-19-20-21-22 sts on left front piece back on needle and work collar in the same way. Sew collar tog mid back and sew to neckline. CROCHET BORDER: Beg at bottom of right front piece. Crochet the border along right front piece, round the neck and down along left front piece with crochet hook size 3.5 mm as follows: 1 dc, * 2 ch, skip approx 0.5 to 1 cm, 1 dc *, repeat from *-*. AT THE SAME TIME when piece measures 18-19-16-16-17-18 cm from bottom edge make 1 buttonhole loop on right front piece by working 5 ch instead of 2 ch. Repeat on approx every 8-8-7-7-7-7 cm a total of 4-4-5-5-5-5 times – adjust so that the last loop sits in the middle of the half square on front piece. ASSEMBLY: Sew on buttons approx 1 cm from edge on left front piece. |
|
 |
|
Have you finished this pattern?Tag your pictures with #dropspattern #redbrickroadcardigan or submit them to the #dropsfan gallery. Do you need help with this pattern?You'll find 23 tutorial videos, a Comments/Questions area and more by visiting the pattern on garnstudio.com. © 1982-2026 DROPS Design A/S. We reserve all rights. This document, including all its sub-sections, has copyrights. Read more about what you can do with our patterns at the bottom of each pattern on our site. |
|


With over 40 years in knitting and crochet design, DROPS Design offers one of the most extensive collections of free patterns on the internet - translated to 17 languages. As of today we count 324 catalogues and 12290 patterns translated into English (UK/cm).
We work hard to bring you the best knitting and crochet have to offer, inspiration and advice as well as great quality yarns at incredible prices! Would you like to use our patterns for other than personal use? You can read what you are allowed to do in the Copyright text at the bottom of all our patterns. Happy crafting!
Post a comment to pattern DROPS 114-3
We would love to hear what you have to say about this pattern!
If you want to leave a question, please make sure you select the correct category in the form below, to speed up the answering process. Required fields are marked *.