
Popular categories
Looking for a yarn?


Comments / Questions (214)
![]() Eva-Maria Oimann wrote:
Eva-Maria Oimann wrote:
Bis zu welchem Markierungsfaden? Da steht: 2. Reihe=Vorderseite re bis noch 1 M vor dem Markierungsfaden zu stricken ist usw., das verstehe ich nicht so ganz!
10.12.2013 - 21:04DROPS Design answered:
Liebe Eva-Maria, können Sie uns bitte die genaue Stelle angeben? Falls es oben vor der eigentlichen Anleitung ist: die Platzierung der Markierungsfäden werden im Anleitngstext erwähnt.
12.12.2013 - 08:13
![]() Thamara wrote:
Thamara wrote:
Bedankt voor het vlotte antwoord. Ik zal jullie raad opvolgen en kijken hoe dat uitpakt.
13.11.2013 - 16:39
![]() Thamara wrote:
Thamara wrote:
Ik heb een proeflapje gebreid op naald nr. 3 zoals in het patroon aangegeven. Bij 24 steken en 48 naalden in ribbelsteek is de hoogte van het proeflapje wel correct (nl. 10 cm) maar de breedte is bij mij dan 12 cm i.p.v. 10 cm. Als ik nu een dunnere naald zou nemen dan zal de breedte waarschijnlijk wel 10 cm worden, maar de hoogte zal dan minder dan 10 cm zijn. Hoe kan ik dit oplossen???
12.11.2013 - 17:45DROPS Design answered:
Hoi Thamara. Ik zou een dunnere naald nemen, het proeflapje breien en wassen. Vaak maakt dat ook een verschil!
13.11.2013 - 15:30
![]() Lucy wrote:
Lucy wrote:
Ik heb dit vest gebreid voor mijn dochter met garen van garnstudio. na eenmaal wassen (en liggend gedroogd) is het 20 cm langer geworden. zonde van t geld en de tijd.
06.11.2013 - 20:55DROPS Design answered:
Hoi Lucy. Wat jammer om te horen. Maar kijk of de stekenverhouding correct was. Het is sowieso altijd belangrijk om te zorgen dat de stekenverhouding klopt (brei altijd een proeflapje en was deze ook!), maar bij dit model nog belangrijker ivm de steken en verschillende richtingen.
07.11.2013 - 14:32Anna wrote:
This is made in Fabel print!
28.04.2013 - 17:47
![]() Pia wrote:
Pia wrote:
P.S.Especially size M.
28.04.2013 - 15:05
![]() Pia wrote:
Pia wrote:
I´ve got some Fabel print yarn instead of pure Fabel.How to change everything to match with it?
28.04.2013 - 06:54DROPS Design answered:
This jacket is knitted in Fabel print. And anyway all Fabel variations have the same length per ball, so you don't have to change a thing.
29.04.2013 - 16:10Cynthia wrote:
Merci de votre réponse, c'est ce que j'avais déjà tenté, je recommencerai peut-être mon demi-domino au complet !!!
26.02.2013 - 18:14Cynthia wrote:
Bonjour, je suis rendue à la 4ième partie du dos, j'ai reprise mes mailles de mes arrêtes mailles, mais lorsque j'essaie de tricoter mon premier rang et ce même si j'ajoute les 30 mailles cela fait des trous. J'ai même fait mes mailles en endroit torse et cela ne fait pas une grosse différence, avez vous un truc pour faire ce rang pour que cela donne un beau rendu?
26.02.2013 - 02:30DROPS Design answered:
Bonjour Cynthia, c'est peut-être vos mailles du dernier domino qui sont un peu lâches ? n'hésitez pas à relever le fil entre les mailles et à le tricoter avec la m suiv pour "combler" ces trous. Vous pouvez sinon ensuite fermer ces trous au moment des finitions. Bon tricot !
26.02.2013 - 10:42
![]() Mathian wrote:
Mathian wrote:
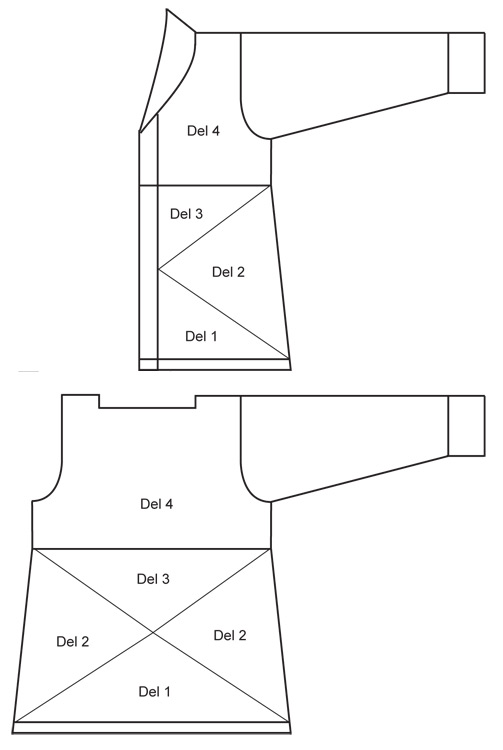
Bonjour, Je viens de commencer le modèle et il y a quelque chose que je ne comprends pas : vous dites de placer un marqueur dans la maille centrale (pour le dos) et ensuite vous dites de diminuer 1m de chaque côté. C'est 1m de chaque côté du marqueur ou 1 m de chaque côté de l'ouvrage ? Cordialement
03.02.2013 - 22:25DROPS Design answered:
Bonjour Madame Mathian, on place effectivement 1 marqueur pour le repère milieu dos, mais on diminue 1 m de chaque côté : au début et à la fin du rang comme indiqué pour former le triangle (Del 1 dans le diag.). Bon tricot !
04.02.2013 - 10:20
|
|
Domino Effect#dominoeffectjacket |
|
 |
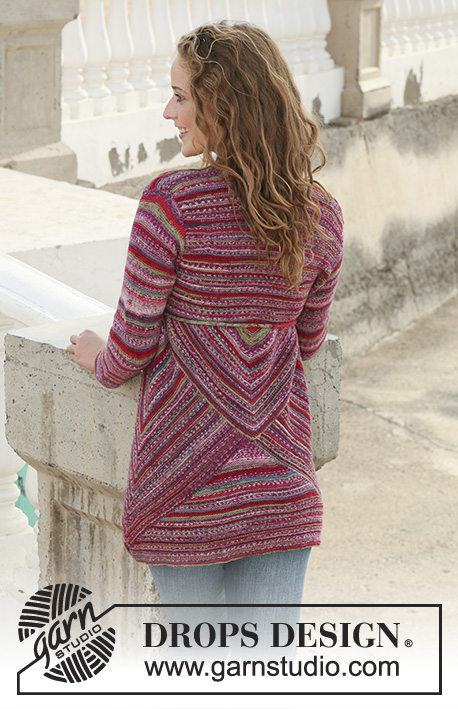 |
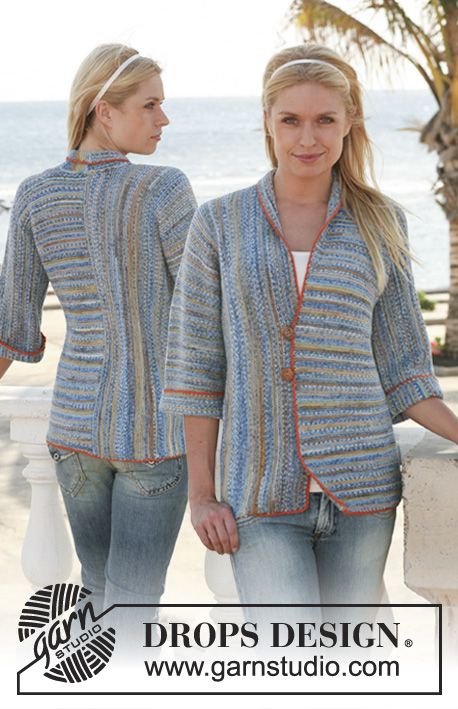
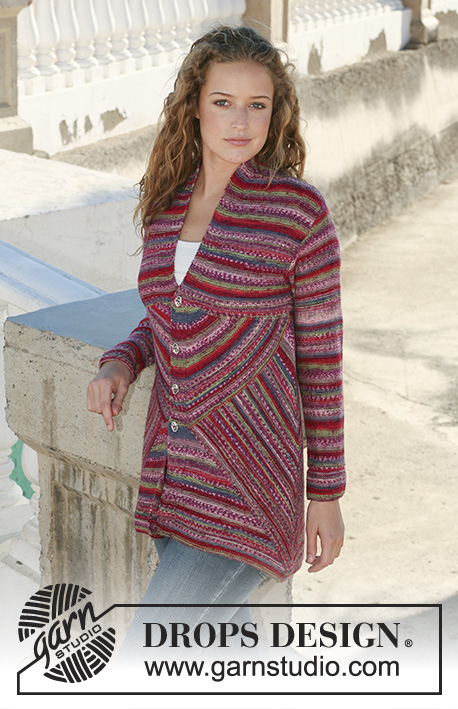
Knitted DROPS jacket with domino squares in ”Fabel”. Size S - XXXL.
DROPS 111-1 |
|
|
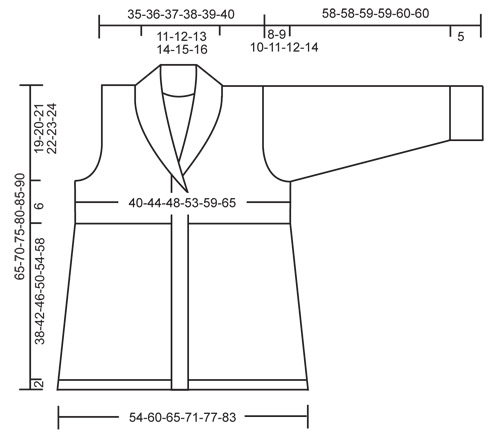
DOMINO SQUARE: 1 Domino square: (= 159-177-193-209-227-245sts): Row 1 (= WS): K all sts. Row 2 (= RS): work row until 1 st before marker, slip 1 st as if to K, K2 tog, psso, work remaining sts on row. Row 3: K all sts. Row 4: Like row 2. Row 5: Work row until 1 st before marker, K3 tog, work remaining sts on row. Row 6: Like row 2. Row 7: K all sts. Row 8: Like row 2. Row 9: K all sts. Row 10: Like row 2. Repeat row 1 to 10 until there is 1 st left on needle. Cut the thread and pull through remaining st. HALF DOMINO SQUARE: 1 Half Domino square (= 133-149-161-173-189-201 sts): Row 1 (= WS): Work row until 1 st remain, slip this st on stitch holder-1. Row 2 (= RS): Work row until 1 st before marker, slip 1 st as if to K, K2 tog, psso, work sts on row until 1 st remain, slip this st on stitch holder-2. Repeat row 1 and 2 until there is 1 st left on needle and 33-37-40-43-47-50 sts on each stitch holder. QUARTER DOMINO SQUARE: 1 quarter Domino square: Row 1 (= WS): K all sts, with 10 front band sts in P sts. Row 2 (= RS): P 10 front band sts, K2 tog, work row until 1 st remain, slip this st on stitch holder-1. Repeat row 1 and 2 until there are 11 sts left on needle (includes 10 front band sts) and 33-37-40-43-47-50 sts on stitch holder-1. BUTTONHOLES: Make buttonholes on right front band. 1 buttonhole = cast off 5th st from mid front and cast on 1 new st on return row. Make buttonholes when piece measures: SIZE S: 23, 28, 34 and 40 cm. SIZE M: 25, 31, 37 and 44 cm. SIZE L: 27, 34, 41 and 48 cm. SIZE XL: 29, 36, 44 and 52 cm. SIZE XXL: 31, 37, 43, 49 and 56 cm SIZE XXXL: 33, 39, 45, 51 and 58 cm -------------------------------------------------------- -------------------------------------------------------- BACK PIECE, PART 1: Worked in garter st throughout, i.e. K all rows. Cast on 129-143-157-171-185-199 sts on needle size 3 mm with Fabel. Work 2 cm garter st on all sts. Insert a marker in the middle st (= mid back). Continue in garter st, AT THE SAME TIME dec 1 st (by K2 tog) each side as follows: Row 1 (= RS): dec 1 st each side. Row 2 (= WS): K all sts. Row 3: dec 1 st each side. Row 4: dec 1 st each side. Row 5: dec 1 st each side. Row 6: K all sts. Row 7: dec 1 st each side. Row 8: dec 1 st each side. Row 9: dec 1 st each side. Row 10: K all sts. Repeat from row 1 to 10 a total of 9-10-11-12-13-14 times = 3 sts left on needle. Work next row from RS as follows: slip 1 st as if to K, K2 tog, psso = 1 st left on needle. Cut the thread and pull through remaining st. Piece now measures approx 21-23-25-27-29-31 cm from casting on row to the top of square. LEFT FRONT PIECE PART 1: Cast on 75-82-89-96-103-110 sts (includes 10 front band sts towards mid front) on needle size 3 mm with Fabel. Work 2 cm garter st with 10 front band sts in P sts towards mid front – P front band sts on every row throughout. Insert a marker inside the 10 front band sts. Continue in garter st, AT THE SAME TIME dec 1 st (by K2 tog) at the side as follows: Row 1 (= RS): dec 1 st at the side. Row 2 (= WS): K all sts (continue to P front band sts). Row 3: dec 1 st at the side. Row 4: dec 1 st at the side. Row 5: dec 1 st at the side. Row 6: K all sts (continue to P front band sts). Row 7: dec 1 st at the side. Row 8: dec 1 st at the side. Row 9: dec 1 st at the side. Row 10: K all sts (continue to P front band sts). Repeat from row 1 to 10 a total of 9-10-11-12-13-14 times = 12 sts left on needle. Work next row from RS as follows: K2 tog, cut thread and pull through st created by K2 tog, slip the remaining 10 front band sts on a stitch holder. Piece now measures approx 21-23-25-27-29-31 cm from cast on row to the top of square. RIGHT FRONT PIECE PART 1: Like left front piece, but mirrored. BACK PIECE/RIGHT FRONT PIECE PART 2: Pick up 79-88-96-104-113-122 sts along the side on right front piece (part 1), beg inside front band sts on stitch holder and pick up sts to where the dec at the side of Part 1 started (i.e. 2 cm at the bottom of front piece and back piece are left “open” and will be sewn tog later). Cast on 1 st between front piece and back piece, and pick up 79-88-96-104-113-122 sts along the right side on back piece (part 1) up to the point (= mid back) = a total of 159-177-193-209-227-245 sts on needle. Insert a marker in the middle st (= mid side). Now work Domino square, see above. BACK PIECE/LEFT FRONT PIECE PART 2: Beg at the point mid back on back piece. Pick up 79-88-96-104-113-122 sts along the side to where the dec at the side on Part 1 started (i.e. 2 cm at the bottom of front piece and back piece are left “open” and will be sewn tog later). Cast on 1 st between back piece and front piece, and pick up 79-88-96-104-113-122 sts along the side on front piece up to front band sts on stitch holder = a total of 159-177-193-209-227-245 sts on needle. Insert a marker in the middle st (= mid side). Now work Domino square. BACK PIECE PART 3: Pick up 66-74-80-86-94-100 sts (from RS) from the point at the top of Domino square at the right side and down along the edge to where the 2 Domino squares meet mid back, pick up 1 st between the 2 squares and pick up 66-74-80-86-94-100 sts along the side to the top of the Domino square on the left side = a total of 133-149-161-173-189-201 sts on needle. Insert a marker in the middle st. Now work Half Domino square – see above. BACK PIECE PART 4: Keep the 1 st on needle and slip sts from stitch holder-1 and stitch holder-2 back on needle. K 1 row, AT THE SAME TIME pick up 28-30-34-40-47-55 sts evenly among the sts slipped back on needle = 95-105-115-127-142-156 sts. Insert a marker in piece, now measure piece from here. Continue in garter st back and forth on needle on all sts. When piece measures approx 6 cm from marker cast off 3-3-3-4-4-4 sts each side for armhole and cast off to shape the armhole each side at the beg of every row: 3 sts 0-0-0-1-2-3 times, 2 sts 0-2-4-4-5-6 times and 1 st 2-2-2-3-4-5 times = 85-87-89-91-94-96 sts left on needle. Continue in garter st back and forth on needle until piece measures 23-24-25-26-27-28 cm from marker. Now cast off the middle 21-23-25-27-30-32 sts for neck and complete each shoulder separately. Cast off 1 st on neckline on every other row a total of 3 times = 29 sts left on shoulder. Cast off when piece measures 25-26-27-28-29-30 cm from marker, piece now measures a total of approx 65-70-75-80-85-90 cm. RIGHT FRONT PIECE PART 3: Remember BUTTONHOLES – see above. Slip 10 front band sts back on needle. Pick up (from RS) 1 st between front band and the point at the side of Domino square, then pick up 66-74-80-86-94-100 sts along the side of the Domino square up to the point at the side of jacket = 77-85-91-97-105-111 sts on needle. Insert a marker in the st between front band and Domino square. Continue to P front band sts on every row. Now work Quarter Domino square – see above. RIGHT FRONT PIECE PART 4: Keep the 11 sts on needle and slip sts from stitch holder back on needle. K 1 row, AT THE SAME TIME pick up 14-16-17-20-22-27 sts evenly among sts slipped back on needle = 58-64-68-74-80-88 sts (includes 10 front band sts). Insert a marker, and now measure piece from here. Continue in garter st back and forth on needle with front band sts as before. When piece measures approx 6 cm from marker cast off for armhole at the side as described for back piece = 53-55-55-56-56-58 sts. Continue until piece measures 25-26-27-28-29-30 cm from marker. Now cast off 29 sts from shoulder towards the neckline = 24-26-26-27-27-29 sts left on needle for collar. Continue in garter st back and forth on needle on collar sts with front band sts as before. When collar measures approx 6-7-7-8-9-9 cm from shoulder, cast off. LEFT FRONT PIECE PART 3 AND 4: Like right front piece, but mirrored and without buttonholes. SLEEVE: Worked back and forth on needle. Cast on 56-58-60-62-64-68 sts (includes 1 edge st each side) on needle size 3 mm with Fabel. Work garter st until piece measures approx 5 cm. Work 5 rows stocking st and now continue in reverse stocking st. When piece measures 8 cm inc 1 st each side and repeat the inc on every 3.5-3-2.5-2-1.5-1.5 cm a total of 12-14-15-18-21-22 times = 80-86-90-98-106-112 sts. When piece measures 50-49-49-48-48-46 cm (less for the larger sizes because of longer sleeve cap and wider shoulder) cast off for sleeve cap each side at the beg of every row: 3 sts 1 time, 2 sts 5-5-5-5-5-6 times and 1 st 1-2-4-6-7-7 times, then cast off 2 sts each side until piece measures approx 57-57-58-58-59-59 cm, now cast off 3 sts each side 1 time. Cast off remaining sts. Piece measures approx 58-58-59-59-60-60 cm. ASSEMBLY: Sew side seams and sew tog the edge (= 2 cm garter st) towards bottom edge each side. Sew in outer loops of sts. Sew sleeve seam inside 1 edge and set in sleeves. Sew collar tog mid back and sew to neckline. Sew on buttons. |
|
 |
|
 |
|
Have you finished this pattern?Tag your pictures with #dropspattern #dominoeffectjacket or submit them to the #dropsfan gallery. Do you need help with this pattern?You'll find 22 tutorial videos, a Comments/Questions area and more by visiting the pattern on garnstudio.com. © 1982-2026 DROPS Design A/S. We reserve all rights. This document, including all its sub-sections, has copyrights. Read more about what you can do with our patterns at the bottom of each pattern on our site. |
|


With over 40 years in knitting and crochet design, DROPS Design offers one of the most extensive collections of free patterns on the internet - translated to 17 languages. As of today we count 325 catalogues and 12298 patterns translated into English (UK/cm).
We work hard to bring you the best knitting and crochet have to offer, inspiration and advice as well as great quality yarns at incredible prices! Would you like to use our patterns for other than personal use? You can read what you are allowed to do in the Copyright text at the bottom of all our patterns. Happy crafting!
Post a comment to pattern DROPS 111-1
We would love to hear what you have to say about this pattern!
If you want to leave a question, please make sure you select the correct category in the form below, to speed up the answering process. Required fields are marked *.