
Popular categories
Looking for a yarn?


Comments / Questions (207)
![]() Hélène wrote:
Hélène wrote:
Bonjour, je suis en train de commencer les augmentations côté gauche après les emmanchures, et le nombre de mailles ne correspond pas. Pour un taille XL, j'ai 45 mailles et je dois faire 9 augmentations. Je devrais obtenir 54 mailles? Ou ai-je loupé une étape? Merci d'avance.
19.11.2014 - 17:18DROPS Design answered:
Bonjour Hélène, pour le devant gauche, on a 45 m en taille XL, on forme l'emmanchure sur le côté (3x2 m + 2x1 m) et on augmente 9x1 m pour le col: 45 - 8 + 9 = 46 m. Bon tricot!
20.11.2014 - 09:06
![]() Kirsten wrote:
Kirsten wrote:
Gibt es da einen Trick mit den 4 Fäden für die äußersten 2 Maschen? Ich kann doch nicht in jeder Reihe rechts und links jeweils 2 Fäden dazunehmen; die müssen doch alle am Schluss vernäht werden. Oder habe ich was falsch verstanden?
14.11.2014 - 13:31DROPS Design answered:
Sie können an beiden Seiten jeweils zwei weitere Knäuel benutzen und die dann einfach hängen lassen, oder dafür ein gutes Stück Faden zu einem kleineren Knäuel abwickeln. Jedes Mal, wenn Sie dann wieder an die Blende kommen, nehmen Sie die beiden zusätzlichen Fäden einfach hinzu und lassen sie danach wieder hängen, Sie müssen da ja nichts abschneiden, denn Sie stricken ja immer 2 R über die Blenden-M mit dem 4-fachen Faden.
16.11.2014 - 10:21
![]() Sara wrote:
Sara wrote:
Non mi risulta molto chiara la spiegazione del colletto: si richiedono degli aumenti al ferro successivo una sola volta ...ma risulta impossibile l' attaccatura al bavero in un secondo momento. Io ho fatto degli aumenti un ferro si e uno no ...Ora la misura va anche bene ...ma il colletto finisce a punta dietro ...Potete aiutarmi per piacere? Grazie in anticipo per i Vostri preziosi suggerimenti
13.11.2014 - 22:41DROPS Design answered:
Buongiorno Sara. Nelle istruzioni viene indicato di aumentare 1 sola volta quando il colletto misura 3 cm. Se però non è sufficiente, provi a riprendere, se possibile, un numero maggiore di m per il colletto, oppure di ripetere gli aumenti solo in corrispondenza dei segnapunti sulle spalle ma non sul dietro. Buon lavoro!
14.11.2014 - 08:48
![]() Doris wrote:
Doris wrote:
Okay, ich habe das so umgesetzt, finde aber, daß der untere Teil mit den abgeketteten Machen etwas breit geraten ist, das sieht auf dem Foto ganz anders aus. Schwierig fand ich auch den Umstand, daß man zwei Maschen mit doppeltem Faden stricken soll und gleichzeitig eine Masche zunehmen soll, die dann auch noch im Muster aufgehen soll. Das hat bei mir einen etwas unsauberen Rand verursacht.
21.10.2014 - 16:00DROPS Design answered:
Liebe Doris, woran es liegt, dass bei Ihnen der untere Teil zu breit geraten ist, kann ich leider nicht sagen. Was den unsauberen Rand betrifft, liegt hier bedauerlicherweise ein Übersetzungsfehler vor - die M am vorderen Rand ist innerhalb der Rand-M zuzunehmen, z.B. durch einen Umschlag, sie soll nicht neu angeschlagen werden. Es tut mir sehr leid, dass das nun erst auffällt.
22.10.2014 - 11:47
![]() Doris wrote:
Doris wrote:
Über eine Antwort auf meinen Hilferuf würde ich mich echt freuen
15.10.2014 - 17:39DROPS Design answered:
Liebe Doris, es ist etwas schwierig, sich Ihr Problem genau vorzustellen, ohne Ihre Jacke zu sehen. Ich glaube aber, Sie müssen die Kragenteile einfach nur unten an die "Lapppen" der Vorderteile annähen. Auf dem Foto sieht man ja auch die Naht. Das ist in der Anleitung allerdings nicht ganz deutlich formuliert. Ich hoffe, die Antwort löst Ihr Problem.
16.10.2014 - 14:53
![]() Doris wrote:
Doris wrote:
Habe die Jacke jetzt fertig gestrickt und bin sehr verzweifelt, weil der angestrickte Kragen und die Teile an den Seiten, wo zugenommen und dann abgekettet wurde,nicht zusammen zu passen scheinen. Die beiden unteren Teile hängen nur so komisch lappig herum. Habe schon viel von drops gestrickt, aber hier hab ich echt ein Problem.
10.10.2014 - 20:36DROPS Design answered:
Antwort siehe oben! Die Anleitung wurde an der betreffenden Stelle nun gerade etwas umformuliert.
16.10.2014 - 14:54
![]() Sara wrote:
Sara wrote:
Grazie per la Vostra rapida risposta e cortesia . Adoro questo sito ...sono felicissima di averVi trovato!
26.09.2014 - 18:41
![]() Sara wrote:
Sara wrote:
Domando scusa.Leggendo con piu' attenzione vedo che il modello si lavora a filo doppio ...Allora , indossando una "M" , dovrei ordinare 800gr di lana ?
25.09.2014 - 05:15DROPS Design answered:
Buongiorno Sara. Sì, è corretto: per la taglia M sono necessari 800 gr, 400 gr per ognuno dei due colori. Buon lavoro!
25.09.2014 - 09:29
![]() Sara wrote:
Sara wrote:
Amo questo modello ed anche il filato.Che triste però che , pronta a fare l'ordine , mi accorgo che il cammello chiaro eco alpaca sia un filato 2.5-3.5 e non 5.5 come suggerito dallo schema.Ci sono altri filati ...ma perche' suggerire un materiale che non avete nell'ordinazione??
25.09.2014 - 02:35DROPS Design answered:
Buongiorno Sara, come ha già visto, il filato è usato doppio ed è per questo che si utilizzano i ferri più grandi. Buon lavoro!
25.09.2014 - 11:58
![]() Diane Daviknes wrote:
Diane Daviknes wrote:
Finished this jacket recently. I am not very experienced, but want to give feedback. I made size XL, but the jacket became extremely large, plus I had 8 balls of yarn left over!
22.09.2014 - 19:40DROPS Design answered:
Dear Mrs Daviknes, did you got and keep the tension of 16 sts x 30 rows in moss st with 1 thread each colour = 10 x 10 cm ? At the bottom of the pattern you will find a measurement chart with all measures in cm taken flat from side to side. Compare these to a similar garment you like the shape to find out the matching size. Happy knitting!
23.09.2014 - 09:25
|
|
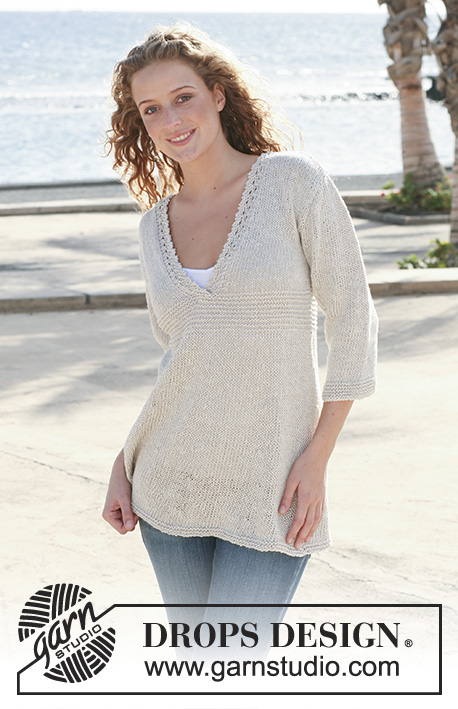
Pearl of the Fall#pearlofthefallcardigan |
|
|
|
|
DROPS jacket in moss st in ”Alpaca” with collar. Size S - XXXL.
DROPS 112-4 |
|
|
GARTER ST (back and forth on needle): K all rows. GARTER ST (in the round): K 1 round, P 1 round. MOSS ST: Row 1: * K1, P1 *, repeat from *-*. Row 2: K over P and P over K. Repeat row 2. INCREASING TIP: Inc 1 st by making 1 YO. On return row work YO into back of loop to avoid a hole. BUTTONHOLES: Make buttonholes on right front band. 1 buttonhole = cast off 3rd and 4th st from mid front and cast on 2 new sts on return row. Make buttonholes when piece measures: SIZE S: 24 and 32 cm. SIZE M: 26 and 34 cm. SIZE L: 28 and 36 cm. SIZE XL: 30 and 38 cm. SIZE XXL: 32 and 40 cm. SIZE XXXL: 34 and 42 cm. -------------------------------------------------------- JACKET: Worked back and forth on circular needle from mid front. Cast on 136-148-160-176-196-216 sts on circular needle size 5.5 mm with 1 thread in each color. Work 6 rows garter st – SEE ABOVE - AT THE SAME TIME work 2 sts each side in 2 threads of each color(= 4 threads) for a firmer edge. Insert 2 markers in piece, 37-40-43-47-52-57 sts in from each side (back piece = 62-68-74-82-92-102 sts). Continue in moss st – SEE ABOVE – on all sts (continue to work 2 sts each side in 4 threads until finished measurements). REMEMBER THE KNITTING TENSION! When piece measures 8 cm dec 1 st on each side of both markers and repeat the dec when piece measures 15 cm = 128-140-152-168-188-208 sts. Continue in moss st. When piece measures 22 cm inc 1 st on each side of both markers and repeat the inc on every 4-4-4.5-5-5.5-6 cm a total of 3 times = 140-152-164-180-200-220 sts. When piece measures 35-36-37-38-39-40 cm cast off 6 sts each side for armhole (= 3 sts on each side of both markers) and now complete each piece separately. BACK PIECE: = 58-64-70-78-88-98 sts. Cast off to shape the armhole each side at the beg of every row: 2 sts 0-1-2-3-5-7 times and 1 st 0-0-1-2-2-2 times = 58-60-60-62-64-66 sts. When piece measures 54-56-58-60-62-64 cm cast off the middle 12-14-16-18-18-20 sts for neck and cast off 1 st on neckline on next row = 22-22-21-21-22-22 sts left on each shoulder. Cast off when piece measures 56-58-60-62-64-66 cm. LEFT FRONT PIECE: = 35-38-41-45-50-55 sts. READ ALL OF THE FOLLOWING SECTION BEFORE CONTINUING! Cast off for armhole at the side as described for back piece. AT THE SAME TIME when piece measures 37-38-39-40-41-42 cm, inc 1 st for lapel inside 2 edge sts towards mid front on every 4th row – SEE INCREASING TIP – a total of 8-8-9-9-10-10 times (incorporate the inc sts in moss st as you go along) = 43-44-45-46-48-49 sts. When piece measures 47-49-51-53-55-57 cm work 2 rows garter st on 16-17-18-19-20-21 sts towards mid front with 4 threads and then cast off the same 16-17-18-19-20-21 sts on next row from RS = 27-27-27-27-28-28 sts left on row. Insert a marker. Continue in moss st, AT THE SAME TIME cast off to shape the neckline on every other row: 1 st 5-5-6-6-6-6 times = 22-22-21-21-22-22 sts left on shoulder. Cast off when piece measures 56-58-60-62-64-66 cm. RIGHT FRONT PIECE: Like left front piece, but mirrored. Remember BUTTONHOLES – see above. SLEEVE: Worked in the round on double pointed needles. Cast on 34-36-36-38-40-42 sts on double pointed needles size 5.5 mm with 1 thread of each color. Insert a marker at beg of round (= mid under sleeve). Work 6 rounds garter st – SEE ABOVE – and continue in moss st. When piece measures 5 cm inc 1 st on each side of marker and repeat the inc on every 3-3-2.5-2.5-2-2 cm a total of 13-14-16-16-17-18 times = 60-64-68-70-74-78 sts. Work inc sts in moss st. When piece measures 49-48-48-46-45-43 cm (less on the larger sizes because of longer sleeve cap and wider shoulder) cast off 6 sts mid under arm (= 3 sts on each side of marker) and complete piece back and forth on needle. AT THE SAME TIME cast off to shape the sleeve cap each side at the beg of every row: 2 sts 3-3-3-2-1-0 times, 1 st 2-3-4-9-14-20 times, then 2 sts each side until piece measures 55-55-56-56-57-57 cm, now cast off 3 sts each side 1 time and cast off remaining sts on next row. Piece measures approx 56-56-57-57-58-58 cm. ASSEMBLY: Sew shoulder seams. Set in sleeves. COLLAR: Pick up between 46 and 56 sts (an even number) on needle size 5.5 mm with 2 threads of each color(= 4 threads) from RS. Beg by marker on left front piece, continue round neckline on back piece and finish by marker on right front piece. Work moss st until collar measures 3 cm. Now insert a marker on each shoulder and a marker mid back and inc 1 st on each side of all 3 markers on next row, work inc sts in moss st. Continue until collar measures 14-14-15-16-16-17 cm and cast off. Sew collar to lapel each side. Sew on buttons. |
|
 |
|
Have you finished this pattern?Tag your pictures with #dropspattern #pearlofthefallcardigan or submit them to the #dropsfan gallery. Do you need help with this pattern?You'll find 23 tutorial videos, a Comments/Questions area and more by visiting the pattern on garnstudio.com. © 1982-2026 DROPS Design A/S. We reserve all rights. This document, including all its sub-sections, has copyrights. Read more about what you can do with our patterns at the bottom of each pattern on our site. |


With over 40 years in knitting and crochet design, DROPS Design offers one of the most extensive collections of free patterns on the internet - translated to 17 languages. As of today we count 325 catalogues and 12298 patterns translated into English (UK/cm).
We work hard to bring you the best knitting and crochet have to offer, inspiration and advice as well as great quality yarns at incredible prices! Would you like to use our patterns for other than personal use? You can read what you are allowed to do in the Copyright text at the bottom of all our patterns. Happy crafting!
Post a comment to pattern DROPS 112-4
We would love to hear what you have to say about this pattern!
If you want to leave a question, please make sure you select the correct category in the form below, to speed up the answering process. Required fields are marked *.