
Popular categories
Looking for a yarn?


Comments / Questions (207)
![]() Egle wrote:
Egle wrote:
Volevo avvisarvi che c'è un passaggio poco chiaro nelle spiegazioni: dopo aver lavorato i primi 6 f. a legaccio dite di continuare a grana di riso su tutte le m., così facendo non si può lavorare 1 aum. per il bavero incorporandolo nella grana di riso! Così ho disfatto tutto e lavorato le prime/ultime 2 m. sempre a legaccio! Mi chiedo come vanno lavorate queste m. a legaccio o a grana di riso? Se a grana di riso come e dove aum. le m. x il bavero? Grazie Egle
19.09.2013 - 14:07DROPS Design answered:
Le spiegazioni sono giuste. Dopo 6 f a legaccio bisogna lavorare tutte le m a grana di riso (2 m ad ogni lato per il bordo più fermo, sempre in grana di riso, ma con 4 fili di Alpaca!). La m che si aumenta per il bavero si fa all'inizio del ferro dopo la m a vivagno; cioè 1 m vivagno, 1 aumento, poi tutte le m in grana di riso. Al f successivo si incorpora la m aumentata. Spero sia chiaro, se no scrivici ancora!
21.09.2013 - 11:17
![]() Gunilla Karlsson wrote:
Gunilla Karlsson wrote:
Ser att fler har problem med kragen. Jag får inte heller till den som på bilden. Ska det verkligen bara ökas en gång = + 6m? Jag får ett för stort glapp mellan slagen o kragen när jag gör så. Tacksam för förslag.
23.02.2013 - 11:18DROPS Design answered:
Du ökar till slag redan på framstycket; 1m innanför 1 kantm mot mitt fram, upprepa på vart 4:e v - LÄS ÖKNINGSTIPS - totalt 8-8-9-9-10-10 ggr. Sedan stickar du kragen enligt beskrivningen nederst!
12.03.2013 - 10:45
![]() Judith Montell wrote:
Judith Montell wrote:
Håller på och stickar kragen, ska man öka vartannat varv med omslag både före och efter markeringarna? Kragen kommer inte att se ut som på bilden. Tacksam för svar.
31.01.2013 - 16:27DROPS Design answered:
Nej, du ökar bara efter de 3 cm som det står i beskrivningen. Lycka till!
01.02.2013 - 10:02
![]() Kicki wrote:
Kicki wrote:
Hur mycket ska kragen ökas med och med vilka mellanrum? Kan inte hitta det i beskrivningen
24.01.2013 - 09:03DROPS Design answered:
Jo det står under vänster framst:.... ökas det 1 m innanför 1 kant mot mitt fram... på vart 4:e varv.. osv
24.01.2013 - 11:55
![]() Myriam wrote:
Myriam wrote:
Bonjour, Merci beaucoup pour vos réponses. J'aurai encore une petite question. Quand vous dites: "tricoter 2 rangs au point mousse sur les 16-17-18-19-20-21 m côté milieu devant avec 4 fils puis rabattre ". Je ne comprends pas le sens de l'expression "côté milieu devant", ni d'ailleurs l'utilité du point mousse à cet endroit. Merci de votre aide, qui m'est très utile!
23.01.2013 - 19:39DROPS Design answered:
Bonjour Myriam, il s'agit là des mailles côté encolure sur lesquelles on tricote 2 rangs end = 1 côte mousse, puis au 3ème rang, on rabat ces mailles. Bon tricot !
24.01.2013 - 14:23
![]() Myriam wrote:
Myriam wrote:
Bonjour, pour réaliser ceci : "EN MÊME TEMPS, tricoter 2 m de chaque côté avec 2 fils de chaque couleur (= soit 4 fils) pour obtenir une bordure plus ferme", doit-on, lorsque l'on monte les mails, monter 4 fils? Comment introduire ces 4 brins? Merci !
17.01.2013 - 18:30DROPS Design answered:
Bonjour Myriam, vous pouvez monter ces 2 x 2 m avec 4 fils déjà ou bien commencer dès le 1er rang à tricoter avec 4 fils en prévoyant suffisamment de longueur pour rentrer le fil ensuite. Bon tricot !
18.01.2013 - 08:52
![]() Brigitte wrote:
Brigitte wrote:
Warum ist der Verbrauch von hellcamel eco bei den Größen M-L-XL und XXL um 50 g höher als von natur? Es wird doch durchgängig mit 2 Fäden (von jeder Qualität einer) gestrickt. Ich verstehe das nicht.
21.09.2012 - 13:06DROPS Design answered:
Liebe Brigitte, vielen Dank für die Rückmeldung, Sie haben völlig Recht und wir haben das korrigiert.
27.09.2012 - 09:09
![]() DROPS Design wrote:
DROPS Design wrote:
Only once after the 3rd cm.
11.12.2011 - 12:03Sevinc wrote:
When making the collar after the 3rd cm, do we increase at the markers at every row or only once?
11.12.2011 - 00:23
![]() Syosticka.se wrote:
Syosticka.se wrote:
Hej Inger-Lise! Ja, det var ovanligt. Jag antar att du får ha extranystan i kanterna. Det blir många trådar men de extra behöver inte vara så stora - kanske kan du nysta loss lite garn och fästa dem med säkerhetsnålar så du slipper snurrandet? En snygg kofta är det i alla fall!/Lotta
21.10.2009 - 09:13
|
|
Pearl of the Fall#pearlofthefallcardigan |
|
|
|
|
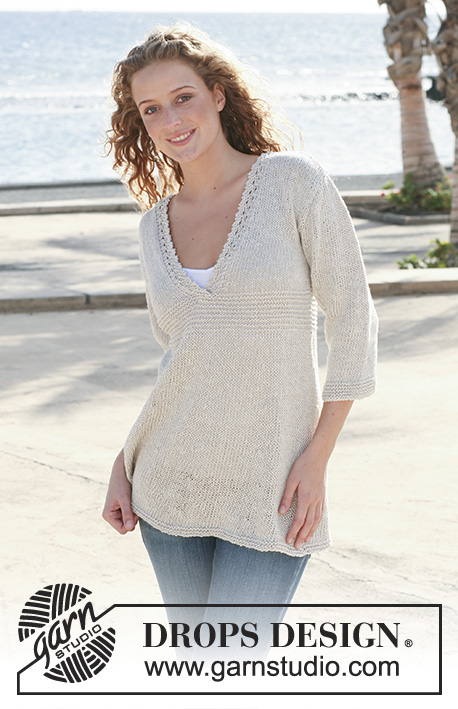
DROPS jacket in moss st in ”Alpaca” with collar. Size S - XXXL.
DROPS 112-4 |
|
|
GARTER ST (back and forth on needle): K all rows. GARTER ST (in the round): K 1 round, P 1 round. MOSS ST: Row 1: * K1, P1 *, repeat from *-*. Row 2: K over P and P over K. Repeat row 2. INCREASING TIP: Inc 1 st by making 1 YO. On return row work YO into back of loop to avoid a hole. BUTTONHOLES: Make buttonholes on right front band. 1 buttonhole = cast off 3rd and 4th st from mid front and cast on 2 new sts on return row. Make buttonholes when piece measures: SIZE S: 24 and 32 cm. SIZE M: 26 and 34 cm. SIZE L: 28 and 36 cm. SIZE XL: 30 and 38 cm. SIZE XXL: 32 and 40 cm. SIZE XXXL: 34 and 42 cm. -------------------------------------------------------- JACKET: Worked back and forth on circular needle from mid front. Cast on 136-148-160-176-196-216 sts on circular needle size 5.5 mm with 1 thread in each color. Work 6 rows garter st – SEE ABOVE - AT THE SAME TIME work 2 sts each side in 2 threads of each color(= 4 threads) for a firmer edge. Insert 2 markers in piece, 37-40-43-47-52-57 sts in from each side (back piece = 62-68-74-82-92-102 sts). Continue in moss st – SEE ABOVE – on all sts (continue to work 2 sts each side in 4 threads until finished measurements). REMEMBER THE KNITTING TENSION! When piece measures 8 cm dec 1 st on each side of both markers and repeat the dec when piece measures 15 cm = 128-140-152-168-188-208 sts. Continue in moss st. When piece measures 22 cm inc 1 st on each side of both markers and repeat the inc on every 4-4-4.5-5-5.5-6 cm a total of 3 times = 140-152-164-180-200-220 sts. When piece measures 35-36-37-38-39-40 cm cast off 6 sts each side for armhole (= 3 sts on each side of both markers) and now complete each piece separately. BACK PIECE: = 58-64-70-78-88-98 sts. Cast off to shape the armhole each side at the beg of every row: 2 sts 0-1-2-3-5-7 times and 1 st 0-0-1-2-2-2 times = 58-60-60-62-64-66 sts. When piece measures 54-56-58-60-62-64 cm cast off the middle 12-14-16-18-18-20 sts for neck and cast off 1 st on neckline on next row = 22-22-21-21-22-22 sts left on each shoulder. Cast off when piece measures 56-58-60-62-64-66 cm. LEFT FRONT PIECE: = 35-38-41-45-50-55 sts. READ ALL OF THE FOLLOWING SECTION BEFORE CONTINUING! Cast off for armhole at the side as described for back piece. AT THE SAME TIME when piece measures 37-38-39-40-41-42 cm, inc 1 st for lapel inside 2 edge sts towards mid front on every 4th row – SEE INCREASING TIP – a total of 8-8-9-9-10-10 times (incorporate the inc sts in moss st as you go along) = 43-44-45-46-48-49 sts. When piece measures 47-49-51-53-55-57 cm work 2 rows garter st on 16-17-18-19-20-21 sts towards mid front with 4 threads and then cast off the same 16-17-18-19-20-21 sts on next row from RS = 27-27-27-27-28-28 sts left on row. Insert a marker. Continue in moss st, AT THE SAME TIME cast off to shape the neckline on every other row: 1 st 5-5-6-6-6-6 times = 22-22-21-21-22-22 sts left on shoulder. Cast off when piece measures 56-58-60-62-64-66 cm. RIGHT FRONT PIECE: Like left front piece, but mirrored. Remember BUTTONHOLES – see above. SLEEVE: Worked in the round on double pointed needles. Cast on 34-36-36-38-40-42 sts on double pointed needles size 5.5 mm with 1 thread of each color. Insert a marker at beg of round (= mid under sleeve). Work 6 rounds garter st – SEE ABOVE – and continue in moss st. When piece measures 5 cm inc 1 st on each side of marker and repeat the inc on every 3-3-2.5-2.5-2-2 cm a total of 13-14-16-16-17-18 times = 60-64-68-70-74-78 sts. Work inc sts in moss st. When piece measures 49-48-48-46-45-43 cm (less on the larger sizes because of longer sleeve cap and wider shoulder) cast off 6 sts mid under arm (= 3 sts on each side of marker) and complete piece back and forth on needle. AT THE SAME TIME cast off to shape the sleeve cap each side at the beg of every row: 2 sts 3-3-3-2-1-0 times, 1 st 2-3-4-9-14-20 times, then 2 sts each side until piece measures 55-55-56-56-57-57 cm, now cast off 3 sts each side 1 time and cast off remaining sts on next row. Piece measures approx 56-56-57-57-58-58 cm. ASSEMBLY: Sew shoulder seams. Set in sleeves. COLLAR: Pick up between 46 and 56 sts (an even number) on needle size 5.5 mm with 2 threads of each color(= 4 threads) from RS. Beg by marker on left front piece, continue round neckline on back piece and finish by marker on right front piece. Work moss st until collar measures 3 cm. Now insert a marker on each shoulder and a marker mid back and inc 1 st on each side of all 3 markers on next row, work inc sts in moss st. Continue until collar measures 14-14-15-16-16-17 cm and cast off. Sew collar to lapel each side. Sew on buttons. |
|
 |
|
Have you finished this pattern?Tag your pictures with #dropspattern #pearlofthefallcardigan or submit them to the #dropsfan gallery. Do you need help with this pattern?You'll find 23 tutorial videos, a Comments/Questions area and more by visiting the pattern on garnstudio.com. © 1982-2026 DROPS Design A/S. We reserve all rights. This document, including all its sub-sections, has copyrights. Read more about what you can do with our patterns at the bottom of each pattern on our site. |


With over 40 years in knitting and crochet design, DROPS Design offers one of the most extensive collections of free patterns on the internet - translated to 17 languages. As of today we count 325 catalogues and 12298 patterns translated into English (UK/cm).
We work hard to bring you the best knitting and crochet have to offer, inspiration and advice as well as great quality yarns at incredible prices! Would you like to use our patterns for other than personal use? You can read what you are allowed to do in the Copyright text at the bottom of all our patterns. Happy crafting!
Post a comment to pattern DROPS 112-4
We would love to hear what you have to say about this pattern!
If you want to leave a question, please make sure you select the correct category in the form below, to speed up the answering process. Required fields are marked *.