
Popular categories
Looking for a yarn?


Comments / Questions (127)
![]() Cindy wrote:
Cindy wrote:
The light bulb just went off! So easy. I’m embarrassed I struggled for a whole day over this.
12.08.2018 - 22:23
![]() Cindy wrote:
Cindy wrote:
Thank you for additional help. Am I to increase at both sides of the body piece? The directions do not say to do that.
12.08.2018 - 22:09DROPS Design answered:
Dear Cindy, see Increasing tip-1: you have to increase 1 st on each side of st with marker every other row. Happy knitting!
12.08.2018 - 22:27
![]() Cindy wrote:
Cindy wrote:
I’m having difficulty understanding section, Body Piece. Is the stitch marker placed at the second stitch from the last cast on stitch?
12.08.2018 - 05:01DROPS Design answered:
Dear Cindy, you have to work one row from right side and at the end of this row you have to cast on the number of sts indicated. Then you have to work a return row from wrong side. Finally, again on the right side, you put a marker in the second stitch, so the marker is at the opposite side of the new cast on sts. Happy knitting!
12.08.2018 - 17:17
![]() Dorte Bonnerup wrote:
Dorte Bonnerup wrote:
Jeg skal montere bukserne, men synes ikke vejledningen er helt skarp. Skal hvert ben sys sammen øverst langs kantmaskerne på de to "delte" centimeter, så hvert ben bliver de 2 cm længere, eller skal de aflukkede 5 masker på det ene bens forside sys sammen med de 5 aflukkede masker på det andet bens forside og det samme på bagsiden - hvorefter for og bag sys sammen i åbningen mellem benene?
31.03.2018 - 13:34DROPS Design answered:
Hei Dorte De 2 cm på toppen av hvert ben skal sys sammen innenfor kantmasken. Den totale lengden på benet er medregnet de 2 cm. Videre skal de avfelte maskene sys sammen slik: forstykke på det ene benet skal sys sammen med forstykke på det andre benet. Det samme gjelder bakstykket. Du får da en søm som går mellom bena fra baksiden til forsiden. God fornøyelse
05.04.2018 - 13:37
![]() Jennie Lee wrote:
Jennie Lee wrote:
I have loved your patterns for years and have been able to download relevant patterns to go back and use time and time again. Please help as I can no longer download and keep. Many thanks Jennie
07.03.2018 - 19:04DROPS Design answered:
Dear Mrs Lee, we successfully could print this pattern, you may have to check your browser/printer settings. Happy knitting!
08.03.2018 - 09:02
![]() Vignal Chantal wrote:
Vignal Chantal wrote:
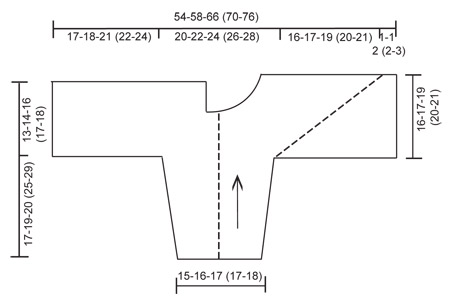
Bonjour, le devant droit se présente comme une pointe plus longue que le dos, et les 47m tricotées ne sont plus dans l' alignement de la bordure du devant. Que faire avec cette partie?Que signifie plier en double à l' épaule pour mesurer le devant par rapport au dos?
18.11.2017 - 04:42DROPS Design answered:
Bonjour Mme Vignal, le devant doit ressembler au schéma, la ligne pointillé en diagonale à partir de la manche correspond à la maille avec le marqueur (les augmentations se font de part et d'autre de cette maille). Pour vérifier la hauteur, pliez l'ouvrage le long de la ligne pointillé de la manche (= milieu manche et épaule) et vérifiez que le devant soit aussi long que le dos. Bon tricot!
20.11.2017 - 08:33
![]() Bine wrote:
Bine wrote:
Ein ganz tolles Jäckchen ist das!!! Mir ist allerdings auch nicht klar, was gemeint ist, wenn es beim Ärmel heißt: auf beiden Seiten aufnehmen. Soll ich eine Masche nach der ersten und vor der letzten M zunehmen? Oder wo genau, bitte? Denn bei Tipps zum Aufnehmen steht: auf beiden Seiten des Markierungsfadens. Aber hier befindet sich ja kein e Markierung.? Danke für eine Antwort
11.08.2017 - 22:20DROPS Design answered:
Liebe Bine, ja genau bei den Ärmeln wird es so aufgenommen - TIPP ZUM AUFNEHMEN gilt für später, wenn Sie auf beiden Seiten der Markierungsfaden aufnehmen. Viel Spaß beim stricken!
28.08.2017 - 10:13
![]() Kirsten Labove wrote:
Kirsten Labove wrote:
Was passiert mit den 10 (o.ä.) Maschen, die auf dem Hilfsfaden verbleiben? Hatte die Maschen liegen lassen und weiter am Vorderteil gestrickt. Musste alles wieder aufmachen, bis dahin, wo die 10 Maschen liegen. Bitte um verständliche Beschreibung. Kirsten Labove
10.05.2017 - 12:52DROPS Design answered:
Liebe Frau Labove, diese Maschen werden für die Halskante gestrickt. Viel Spaß beim stricken!
10.05.2017 - 16:47
![]() Lucie Hébert wrote:
Lucie Hébert wrote:
Bonjour, j'adore votre site et vos patrons qui sont habituellement très clair. Pour une première fois, je n'arrive pas à comprendre les explications de votre patron pour ce qui est de la partie avant. J'ai une pointe et je ne vois aucune explication pour combler le vide. Il y a sûrement quelque chose que je ne fais pas comme il faut. Merci de m'aider. Lucie
14.02.2017 - 15:11DROPS Design answered:
Bonjour Mme Hébert, quand la manche est terminée, montez les m du dos en fin de rang sur l'endroit, puis au rang suivant sur l'endroit augmentez 1 m de chaque côté de la m avec le marqueur (= cette m = ligne en pointillés sur le devant dans le schéma). Bon tricot!
15.02.2017 - 08:52
![]() Claudia Krieger wrote:
Claudia Krieger wrote:
Hallo, können Sie mir bitte helfen. Wenn die Maschen vom Hilfsfaden weiter gestrickt werden, verbleiben 9 auf dem Hilfsfaden, Ist das die Schulter und wann werden sie abgekettet. Vielen Dank und Grüße Claudia
17.08.2016 - 17:37DROPS Design answered:
Liebe Claudia, die 9 Maschen sind für den Halsausschnitt.
18.08.2016 - 08:39
|
||||
Killian#killianset |
||||
|
|
||||
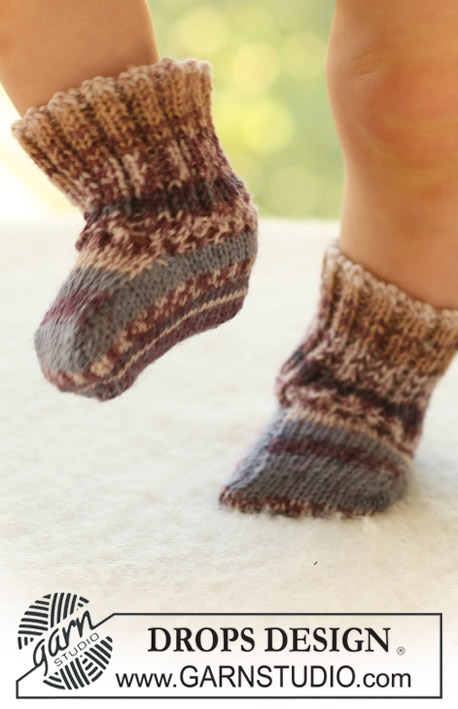
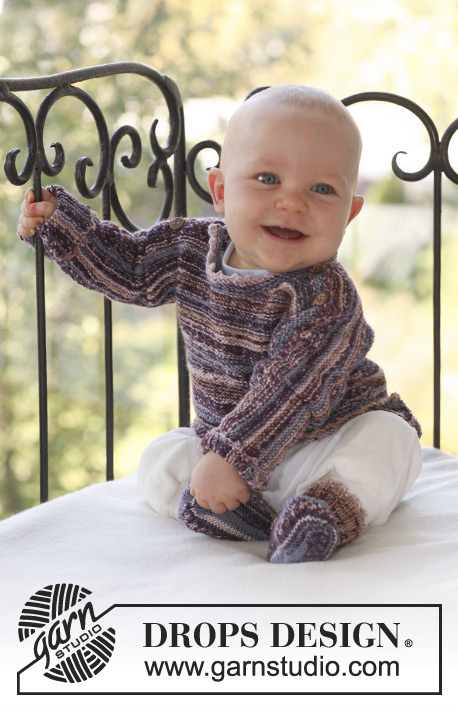
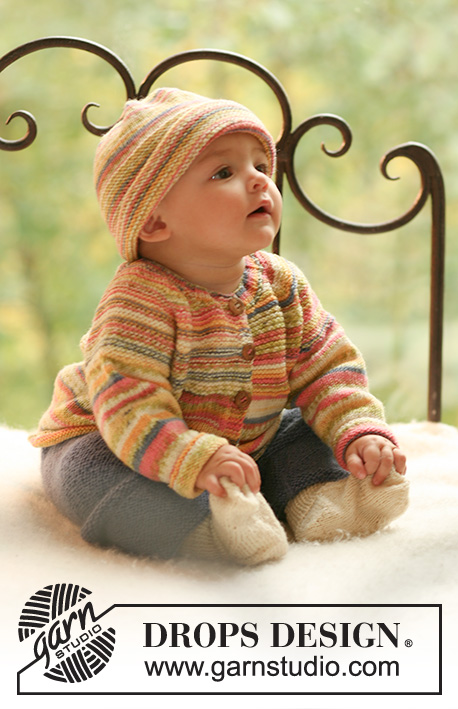
Set of knitted domino jacket in garter st in DROPS Fabel and pants in rib st in DROPS Alpaca for baby and children
DROPS Baby 18-25 |
||||
|
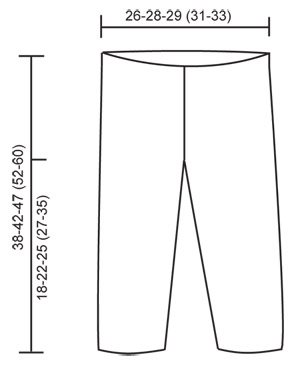
JACKET: INCREASING TIP: Inc 1 st on each side of st with marker by making 1 YO. On return row work YO into back of st in order to avoid a hole. ---------------------------------------------------------- JACKET: Worked from side to side from sleeve towards the middle of jacket, in 2 pieces sewn tog mid back afterwards. RIGHT HALF: Worked back and forth on circular needle in garter st. Cast on 36-38-40 (40-42) sts on circular needle size 3 mm with Fabel and work garter st. REMEMBER THE KNITTING TENSION! When piece measures 6-6-5 (5-6) cm inc 1 st each side and repeat the inc on every 8th row a total of 6-7-9 (11-13) times = 48-52-58 (62-68) sts. Continue until piece measures 17-19-20 (25-29) cm – adjust so that next row is from RS. BODY PIECE: K 1 row from RS, at the end of row cast on 41-43-50 (53-58) sts (= towards back piece) = 89-95-108 (115-126) sts. NOW MEASURE PIECE FROM HERE! Work return row. Insert a marker from RS in the second st on row (= right side of piece) and continue in garter st, AT THE SAME TIME inc 1 st on each side of st with marker on every other row a total of 38-40-46 (48-50) times – SEE INCREASING TIP. AT THE SAME TIME when piece measures 8½-9-10½ (11-12) cm continue on the last 60-65-74 (79-86) sts only on the left side of piece as seen from the RS (= back piece). Slip remaining sts on a stitch holder. BACK PIECE: Continue until piece measures 13-14-16 (17-18) cm (from where sts were cast on for back piece), and cast off. FRONT PIECE: Slip sts from stitch holder back on needle, but leave 9-10-10 (10-12) sts towards back piece on stitch holder for neckline. Continue to inc on every other row, AT THE SAME TIME cast off 1 st towards neckline on every 4th row a total of 6-7-7 (7-7) times. AT THE SAME TIME when piece measures 14-15-17 (18-19) cm (from where inc for front pieces beg) cast off for 3-4-4 (5-5) buttonholes as follows (from neckline, i.e. from WS): work 2 sts, cast off 2 sts, * work 12-9-11 (9-10) sts, cast off 2 sts *, repeat from *-* a total of 2-3-3 (4-4) times, and then work remaining sts on row. On return row cast on 2 new sts over the cast off sts. After dec and inc are complete there are 90-93-109 (115-121) sts on row. Now cast off 51-52-62 (66-70) sts from WS from neckline and down along front band = 39-41-47 (49-51) sts left on row. Continue in garter st back and forth on these sts for approx 1-1-2 (2-3) cm (fold piece double by shoulder to measure front piece to back piece) and cast off. LEFT HALF: Like right half, but without buttonholes – this half is assembled with WS out. ASSEMBLY: Place the 2 halves towards each other and sew tog mid back – edge to edge in order to avoid a chunky seam. Fold jacket double and sew under arm and side seams in outer loops of sts. Sew on buttons. NECKLINE: Pick up 55 to 75 sts (incl sts on stitch holders) round neckline on circular needle size 3 mm with Fabel. Work 3 rows garter st back and forth on needle and cast off. ---------------------------------------------------------- PANTS: INCREASING TIP: Inc 1 st on each side of the 2 K sts mid back (marker sits between these 2 sts). Inc by working 2 sts in 1 st and incorporate inc sts in rib as you go along. DECREASING TIP: Dec 1 st on each side of marker mid front. Dec as follows before marker: K2 tog. Dec as follows after marker: slip 1 st as if to K, K1, psso. LEG: Worked in the round on double pointed needles. Cast on 56-60-64 (68-72) sts on double pointed needles size 3 mm with Alpaca. Insert a marker at beg of round = inside of leg. Continue as follows: K1, * P2 / K2 *, repeat from *-* and finish with P2 and K1. When piece measures 4-6-4 (4-5) cm inc 1 st on each side of marker by K 2 sts in 1 st on every 5-6-8 (9-12) round a total of 8 times = 72-76-80 (84-88) sts. When leg measures 16-20-23 (25-33) cm divide the piece by marker and continue back and forth on needle (to make it easier to slip both legs on the same circular needle afterwards), AT THE SAME TIME cast on 1 new st each side for seam = 74-78-82 (86-90) sts. When piece measures 18-22-25 (27-35) cm cast off 5 sts each side (= 1 edge st, K1, P2 and K1) = 64-68-72 (76-80) sts. Put piece aside and knit the other leg in the same way. PANTS: Slip both legs on the same circular needle size 3 mm = 128-136-144 (152-160) sts. Insert 1 marker mid front and 1 marker mid back (both markers should sit between 2 K sts). Continue in rib, K2 / P2, AT THE SAME TIME inc mid back and dec mid front as follows: INC MID BACK: Inc 2 sts – SEE INCREASING TIP. Repeat the inc on every 4th round a total of 4 times. DEC MID FRONT: Dec 2 sts – SEE DECREASING TIP. Repeat the dec on every 4th round a total of 8 times. After all inc and dec are complete there are 120-128-136 (144-152) sts on round. Continue in rib until piece measures 38-42-47 (52-60) cm, cast off. ASSEMBLY: Sew inside of legs at the top inside 1 edge st. Sew opening between legs, front of leg towards back of leg. |
||||
Diagram explanations |
||||
|
||||
 |
||||
 |
||||
Have you finished this pattern?Tag your pictures with #dropspattern #killianset or submit them to the #dropsfan gallery. Do you need help with this pattern?You'll find 14 tutorial videos, a Comments/Questions area and more by visiting the pattern on garnstudio.com. © 1982-2026 DROPS Design A/S. We reserve all rights. This document, including all its sub-sections, has copyrights. Read more about what you can do with our patterns at the bottom of each pattern on our site. |
||||


With over 40 years in knitting and crochet design, DROPS Design offers one of the most extensive collections of free patterns on the internet - translated to 17 languages. As of today we count 325 catalogues and 12298 patterns translated into English (UK/cm).
We work hard to bring you the best knitting and crochet have to offer, inspiration and advice as well as great quality yarns at incredible prices! Would you like to use our patterns for other than personal use? You can read what you are allowed to do in the Copyright text at the bottom of all our patterns. Happy crafting!
Post a comment to pattern DROPS Baby 18-25
We would love to hear what you have to say about this pattern!
If you want to leave a question, please make sure you select the correct category in the form below, to speed up the answering process. Required fields are marked *.