
Popular categories
Looking for a yarn?


Comments / Questions (127)
![]() Ettie wrote:
Ettie wrote:
Hallo hoe brei ik de linkermuisknop en voorpand?
17.03.2023 - 19:06DROPS Design answered:
Dag Ettie,
Deze kun je precies hetzelfde breien als de rechter helft maar dan zonder knoopsgaten. Je hoeft hem ook niet in spiegelbeeld te breien, want de rechter helft wordt met de verdeerde kant naar buiten aan de linker helft genaaid.
19.03.2023 - 16:45
![]() Ettie wrote:
Ettie wrote:
Ik snap niet aan welke kant ik de meerderingen moet doen nadat ik de mouw heb gebreid? Aan de kant van de nieuw opgezette steken of aan de andere kant?
11.03.2023 - 11:50DROPS Design answered:
Dag Ettie,
Je breit aan de goede kant en je zet steken op aan het einde van de naald, dus de opgezette steken zijn voor het achterpand. Het meerderen doe je op het voorpand, dus aan de andere kant van de naald, aan iedere kant van de markeerdraad.
12.03.2023 - 11:49
![]() Annie Lafont wrote:
Annie Lafont wrote:
Pourriez vous me dire si les explications de ce modèle existent en francais pour femme merci
17.12.2022 - 10:53
![]() Annie Lafont wrote:
Annie Lafont wrote:
Magnifique, je voudrais savoir si les explications de ce modele existent en francais merci l
17.12.2022 - 10:51DROPS Design answered:
Bonjour Mme Lafont, votre vœu est exaucé: cliquez sur le menu déroulant sous la photo pour obtenir les explications en français. Bon tricot!
19.12.2022 - 08:48
![]() Anneke Pettinga wrote:
Anneke Pettinga wrote:
Hallo. Heb een vraag over dropshot baby 18 _25.Rechterhelft moet ik meerderen na de merkdraad. Moet dat 40 x2( aan bijde kant 1) of totaal 40 dus 20 x 1? Alvast bedankt
12.02.2022 - 21:50DROPS Design answered:
Dag Anneke,
Je meerdert aan beide kanten van de markeerdraad dus 40 keer in totaal en dit doe je om de naald, dus de ene naald wel en de andere naald niet. Er zijn dan 80 steken bij gekomen; aan elke kant van de markeerdraad 40 steken.
13.02.2022 - 10:12
![]() Antonella wrote:
Antonella wrote:
Quando si aumentano le 2 maglie ai lati della seconda maglia, cosa si intende per lavorare a coste? Grazie
03.01.2022 - 14:24DROPS Design answered:
Buonasera Antonella, deve incorporare gli aumenti nella lavorazione a coste. Buon lavoro!
03.01.2022 - 20:00
![]() Antonia wrote:
Antonia wrote:
Hola..cuando dice aumento cada 2 hileras. Se hace el aumento y despues se tejen 2 hileras mas y en la 3era hilera se realiza el nuevo aumento o no . Gracias por los patrones son hermosos.
26.08.2021 - 08:03DROPS Design answered:
Hola Antonia, esto significa que haces una hilera y aumentas en otra (secunda) hilera, etc. Buen trabajo!
27.08.2021 - 08:57
![]() Gabi wrote:
Gabi wrote:
Gibt es diese Jacke auch in Angaben für Erwachsene?
30.05.2021 - 11:46DROPS Design answered:
Liebe Gabi, es sind Alternative: Mitre z.B. mit V-Ausschnitt und als längere Jacken: Oseberg und City Explorer. Viel Spaß beim stricken!
31.05.2021 - 07:54
![]() Nicole wrote:
Nicole wrote:
Bonjour madame, j'essaie de tricoter ce modèle, mais je suis un peu perdue. Après avoir monté les 41 mailles (côté dos) et marquer la seconde maille, à 8.5 cm les 60 mailles à tricoter sont elles comptées après les mailles augmentées autour de la maille marquée ou doit on les tricoter à partir du début du rang ?
08.02.2021 - 12:20DROPS Design answered:
Bonjour Nicole, vous allez mettre en attente les mailles du début du rang sur l'endroit (elles seront ensuite reprises pour terminer le devant du gilet) et conserver les 60 dernières mailles (toujours vu sur l'endroit) pour tricoter le dos. Bon tricot!
09.02.2021 - 09:22
![]() Marion Schuhmann-Ränsch wrote:
Marion Schuhmann-Ränsch wrote:
VORDERTEIL: Die M. auf dem Hilfsfaden wieder auf die Nadel legen, jedoch 9-10-10 (10-12) M. gegen das Rückenteil für den Halsausschnitt auf dem Hilfsfaden liegen lassen. Mit den Aufnahmen bei jeder 2. R. weiterfahren – GLEICHZEITIG gegen den Hals (gegen die M. auf dem Hilfsfaden) 1 M. abk. und bei jeder 4. R. total 6-7-7 (7-7) Mal wiederholen. Am Hals eine Masche abketten, wie soll ich das machen? Zusammenstricken?
06.01.2021 - 10:06DROPS Design answered:
Liebe Frau Schuhmann-Ränsch, diese Masche wird am Anfang der Reihe vom Hals (Richtung untere Kante) abgekettet. Viel Spaß beim stricken!
06.01.2021 - 13:11
|
||||
Killian#killianset |
||||
|
|
||||
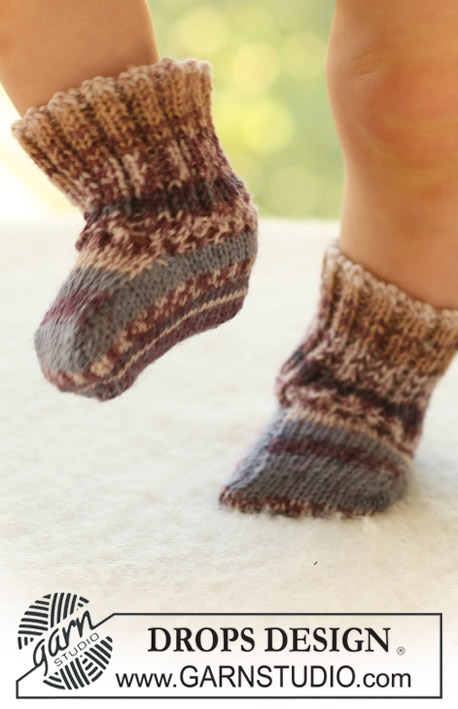
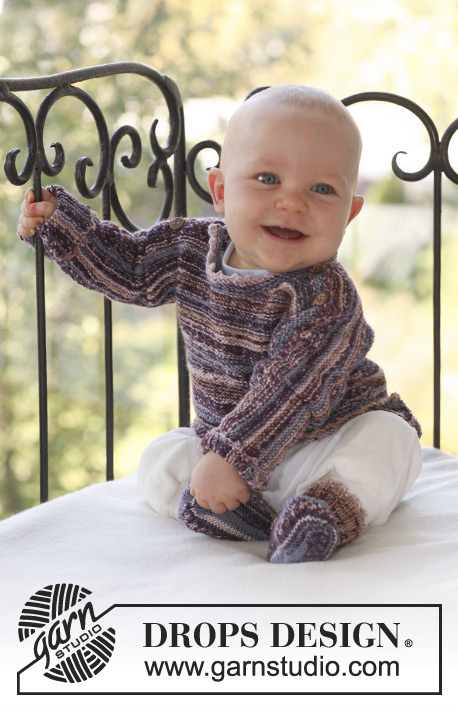
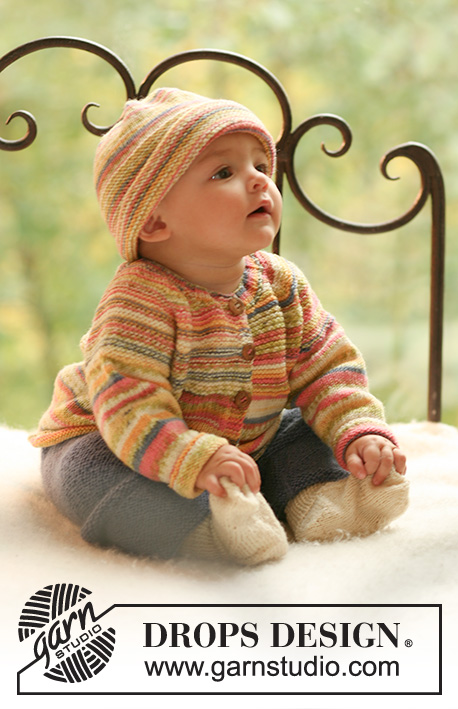
Set of knitted domino jacket in garter st in DROPS Fabel and pants in rib st in DROPS Alpaca for baby and children
DROPS Baby 18-25 |
||||
|
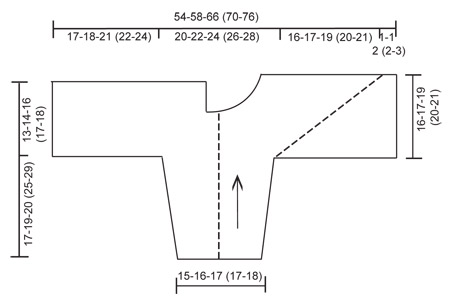
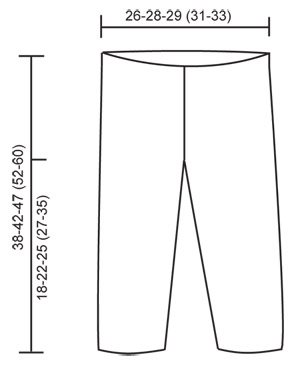
JACKET: INCREASING TIP: Inc 1 st on each side of st with marker by making 1 YO. On return row work YO into back of st in order to avoid a hole. ---------------------------------------------------------- JACKET: Worked from side to side from sleeve towards the middle of jacket, in 2 pieces sewn tog mid back afterwards. RIGHT HALF: Worked back and forth on circular needle in garter st. Cast on 36-38-40 (40-42) sts on circular needle size 3 mm with Fabel and work garter st. REMEMBER THE KNITTING TENSION! When piece measures 6-6-5 (5-6) cm inc 1 st each side and repeat the inc on every 8th row a total of 6-7-9 (11-13) times = 48-52-58 (62-68) sts. Continue until piece measures 17-19-20 (25-29) cm – adjust so that next row is from RS. BODY PIECE: K 1 row from RS, at the end of row cast on 41-43-50 (53-58) sts (= towards back piece) = 89-95-108 (115-126) sts. NOW MEASURE PIECE FROM HERE! Work return row. Insert a marker from RS in the second st on row (= right side of piece) and continue in garter st, AT THE SAME TIME inc 1 st on each side of st with marker on every other row a total of 38-40-46 (48-50) times – SEE INCREASING TIP. AT THE SAME TIME when piece measures 8½-9-10½ (11-12) cm continue on the last 60-65-74 (79-86) sts only on the left side of piece as seen from the RS (= back piece). Slip remaining sts on a stitch holder. BACK PIECE: Continue until piece measures 13-14-16 (17-18) cm (from where sts were cast on for back piece), and cast off. FRONT PIECE: Slip sts from stitch holder back on needle, but leave 9-10-10 (10-12) sts towards back piece on stitch holder for neckline. Continue to inc on every other row, AT THE SAME TIME cast off 1 st towards neckline on every 4th row a total of 6-7-7 (7-7) times. AT THE SAME TIME when piece measures 14-15-17 (18-19) cm (from where inc for front pieces beg) cast off for 3-4-4 (5-5) buttonholes as follows (from neckline, i.e. from WS): work 2 sts, cast off 2 sts, * work 12-9-11 (9-10) sts, cast off 2 sts *, repeat from *-* a total of 2-3-3 (4-4) times, and then work remaining sts on row. On return row cast on 2 new sts over the cast off sts. After dec and inc are complete there are 90-93-109 (115-121) sts on row. Now cast off 51-52-62 (66-70) sts from WS from neckline and down along front band = 39-41-47 (49-51) sts left on row. Continue in garter st back and forth on these sts for approx 1-1-2 (2-3) cm (fold piece double by shoulder to measure front piece to back piece) and cast off. LEFT HALF: Like right half, but without buttonholes – this half is assembled with WS out. ASSEMBLY: Place the 2 halves towards each other and sew tog mid back – edge to edge in order to avoid a chunky seam. Fold jacket double and sew under arm and side seams in outer loops of sts. Sew on buttons. NECKLINE: Pick up 55 to 75 sts (incl sts on stitch holders) round neckline on circular needle size 3 mm with Fabel. Work 3 rows garter st back and forth on needle and cast off. ---------------------------------------------------------- PANTS: INCREASING TIP: Inc 1 st on each side of the 2 K sts mid back (marker sits between these 2 sts). Inc by working 2 sts in 1 st and incorporate inc sts in rib as you go along. DECREASING TIP: Dec 1 st on each side of marker mid front. Dec as follows before marker: K2 tog. Dec as follows after marker: slip 1 st as if to K, K1, psso. LEG: Worked in the round on double pointed needles. Cast on 56-60-64 (68-72) sts on double pointed needles size 3 mm with Alpaca. Insert a marker at beg of round = inside of leg. Continue as follows: K1, * P2 / K2 *, repeat from *-* and finish with P2 and K1. When piece measures 4-6-4 (4-5) cm inc 1 st on each side of marker by K 2 sts in 1 st on every 5-6-8 (9-12) round a total of 8 times = 72-76-80 (84-88) sts. When leg measures 16-20-23 (25-33) cm divide the piece by marker and continue back and forth on needle (to make it easier to slip both legs on the same circular needle afterwards), AT THE SAME TIME cast on 1 new st each side for seam = 74-78-82 (86-90) sts. When piece measures 18-22-25 (27-35) cm cast off 5 sts each side (= 1 edge st, K1, P2 and K1) = 64-68-72 (76-80) sts. Put piece aside and knit the other leg in the same way. PANTS: Slip both legs on the same circular needle size 3 mm = 128-136-144 (152-160) sts. Insert 1 marker mid front and 1 marker mid back (both markers should sit between 2 K sts). Continue in rib, K2 / P2, AT THE SAME TIME inc mid back and dec mid front as follows: INC MID BACK: Inc 2 sts – SEE INCREASING TIP. Repeat the inc on every 4th round a total of 4 times. DEC MID FRONT: Dec 2 sts – SEE DECREASING TIP. Repeat the dec on every 4th round a total of 8 times. After all inc and dec are complete there are 120-128-136 (144-152) sts on round. Continue in rib until piece measures 38-42-47 (52-60) cm, cast off. ASSEMBLY: Sew inside of legs at the top inside 1 edge st. Sew opening between legs, front of leg towards back of leg. |
||||
Diagram explanations |
||||
|
||||
 |
||||
 |
||||
Have you finished this pattern?Tag your pictures with #dropspattern #killianset or submit them to the #dropsfan gallery. Do you need help with this pattern?You'll find 14 tutorial videos, a Comments/Questions area and more by visiting the pattern on garnstudio.com. © 1982-2026 DROPS Design A/S. We reserve all rights. This document, including all its sub-sections, has copyrights. Read more about what you can do with our patterns at the bottom of each pattern on our site. |
||||


With over 40 years in knitting and crochet design, DROPS Design offers one of the most extensive collections of free patterns on the internet - translated to 17 languages. As of today we count 325 catalogues and 12298 patterns translated into English (UK/cm).
We work hard to bring you the best knitting and crochet have to offer, inspiration and advice as well as great quality yarns at incredible prices! Would you like to use our patterns for other than personal use? You can read what you are allowed to do in the Copyright text at the bottom of all our patterns. Happy crafting!
Post a comment to pattern DROPS Baby 18-25
We would love to hear what you have to say about this pattern!
If you want to leave a question, please make sure you select the correct category in the form below, to speed up the answering process. Required fields are marked *.