
Popular categories
Looking for a yarn?


Comments / Questions (127)
![]() IGUILLOT wrote:
IGUILLOT wrote:
Bonjour Je voudrais tricoter le modèle Kilian avec des rayures. Les explications que j’ai imprimées ne mentionnent pas de deuxième couleur. Tous les combien de rangs doit-on changer de couleur? Merci de votre retour Isabelle
27.10.2024 - 13:05DROPS Design answered:
Bonjour Isabelle, les rayures sont formées ici naturellement par la laine DROPS Fabel - cf nuancier. Si vous souhaitez tricoter avec 2 couleurs différentes, vous devrez choisir la fréquence de vos changements en fonction de la largeur des rayures souhaitées. Bon tricot!
28.10.2024 - 09:33
![]() Sue wrote:
Sue wrote:
I can not find a tutorial anywhere for this lovely pattern as i am stuck after casting on 50 sts on the body piece ,,,,,,,,So do i assume i cast on 1 st each side on the opposite side to where i cast on the 50 sts ? I am waiting with baited breath on the other side of the wold to you and thankyou in advance
14.08.2024 - 14:47DROPS Design answered:
Hi Sue, The marker is inserted in the 2nd stitch on the right front piece (the opposite side from the cast-on stitches for the back piece) and you increase on each side of this marker-stitch every 2nd row as described in the text. Happy knitting!
15.08.2024 - 06:42
![]() JAULIN Nadia wrote:
JAULIN Nadia wrote:
Bonjour, encore moi avec mon modèle en 12/18 mois, je pense avoir un souci avec les augmentations. Une fois montée mes 50 mailles est ce que je dois faire une 1ère aug. avant la maille marquée au 1er rang et la 2ème aug. après la maille marquée au 3ème. Car actuellement j'ai 46 aug sur 44 rang. Merci de votre réponse par avance. Cdt
06.06.2024 - 13:24DROPS Design answered:
Bonjour Mme Jaulin, vous montez les 50 m en fin de rang sur l'endroit (=dos), tournez et tricotez le rang sur l'envers, puis placez un marqueur dans la 2ème maille, vu sur l'endroit (à droite, pour le devant). Vous augmentez ensuite de chaque côté de cette maille, autrement dit, le nombre de maille avant/après cette maille va augmenter d'1 m tous les 2 rangs; quand vous avez augmenté 46 fois, vous avez 47 mailles avant la maille avec le marqueur (et 46 m en plus après la m avec le marqueur) - 46 fois tous les 2 rangs = 92 rangs ou 46 côtes mousse . Bon tricot!
06.06.2024 - 16:38
![]() JAULIN Nadia wrote:
JAULIN Nadia wrote:
Merci infiniment de vos retours
05.06.2024 - 13:31
![]() JAULIN Nadia wrote:
JAULIN Nadia wrote:
Bonsoir, Je fais la taille 12/18 mois et je voudrais savoir si ce sont bien les mailles 46 mailles montées + aug que je dois mettre en attente et continuer sur les 74 mailles du début du tricot. Merci de votre réponse. Cdt
04.06.2024 - 17:31DROPS Design answered:
Bonjour Mme Jaulin, en taille 12/18 mois, le dos correspond aux 74 mailles à gauche, vu sur l'endroit, autrement dit les 50 mailles que vous aviez monté en fin de rang sur l'endroit après la manche + les 24 dernières mailles de la manche (emmanchure/épaule). Les augmentations faites 46 fois de chaque côté de la maille avec un marqueur (soit 92 mailles augmentées au total) correspondent au devant, la maille avec un marqueur correspond à la ligne diagonale dans le diagramme. Bon tricot!
05.06.2024 - 07:51
![]() JAULIN Nadia wrote:
JAULIN Nadia wrote:
Bonjour, je fais ce modèle en taille 12-18 mois et j'ai un doute sur ou placer le marqueur à partir du montage des 50 mailles : est ce que je dois le mettre à la 2ème maille en partant des 50 mailles ou à la fin au niveau des 58 premières mailles travaillées Merci par avance de votre réponse. Cdt
30.05.2024 - 19:18DROPS Design answered:
Bonjour Mme Jaulin, les 50 mailles sont montées en fin de rang sur l'endroit pour le dos, le marqueur doit être placé dans la 2ème maille du rang sur l'endroit pour le devant; vous allez laisser le marqueur dans cette maille puis augmenter de chaque côté de cette maille (vous aurez donc de plus en plus de mailles avant/après cette maille); cette maille avec le marqueur correspond à la ligne diagonale sur le schéma. Bon tricot!
31.05.2024 - 07:33
![]() Taryn wrote:
Taryn wrote:
Hi! I am a little confused about where to place the marker for increase. Is this done at the end of the 95 stitches- ie between the 41st and 42nd cast on stitch, or 2 stitches from the sleeve side? Sorry! Please help x
27.05.2024 - 23:54DROPS Design answered:
Dear Taryn, insert the marker in the 2nd stitch of the row as follows: 1 stitch, 1 stitch with marker, 93 stitches (seen from RS), then let the marker follow in this stitch, after each increase, there will be 1 stitch more on each side of the stitch with the marker, see dotted line in the chart, this is the stitch with the marker. Happy knitting!
28.05.2024 - 08:00
![]() Paulette wrote:
Paulette wrote:
I am working the sweater. I got to the 108 stitches. And now I am stumped! The 50 cast on stitches are the back of the sweater? Why am I inc. 1 stitch ea side of marker? Where is that on the schematics?
02.09.2023 - 03:02DROPS Design answered:
Dear Paulette, yes, the 50 stitches cast on are for the back of the sweater. Now you work the back piece and at the same time you work the increases for the shape of the front. That's the 1 stitch at each side of the marker. This would be the part where you have a discontinuous diagonal line on the front piece. Happy knitting!
03.09.2023 - 23:57
![]() Gloria wrote:
Gloria wrote:
Hola. Creo que no explican el aumento de uno de los lados. Solo dice montar 43 puntos (talla 2) para la espalda pero pareciera que solo ese lado de la espalda lleva los puntos nuevos montados, y no la parte del frente, creo que es una omisión porque no encontré los nuevos puntos a montar en el lado del frente. Sin embargo me guié por el dibujo y así lo estoy sacando. Gracias, muy hermoso diseño.
13.07.2023 - 02:02
![]() Monika wrote:
Monika wrote:
Hallo, was heißt beim Jäckchen "TOTAL .... wiederholen"? Danke.
07.07.2023 - 21:53DROPS Design answered:
Liebe Monika, die Zunahmen sollen Sie so oft wiederholen, wie für die Grösse geschrieben wird. Viel Spaß beim stricken!
27.07.2023 - 09:26
|
||||
Killian#killianset |
||||
|
|
||||
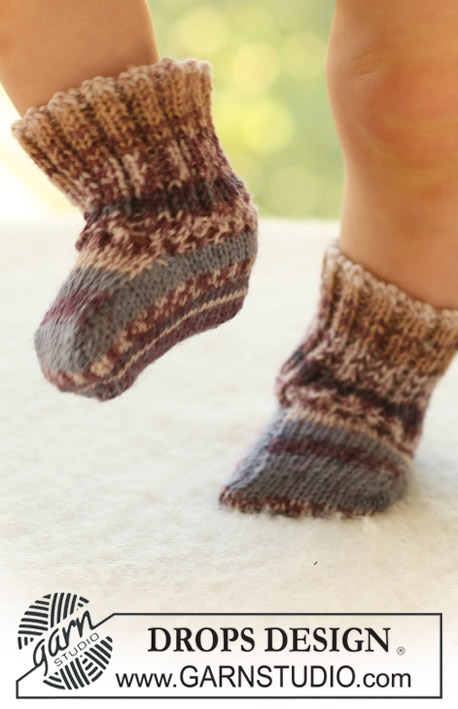
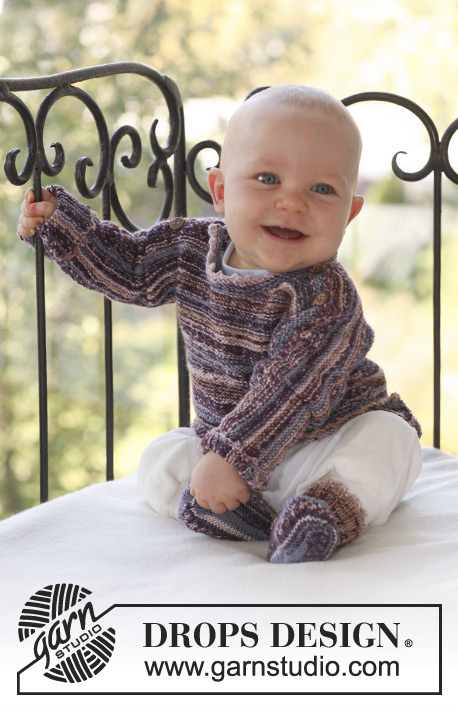
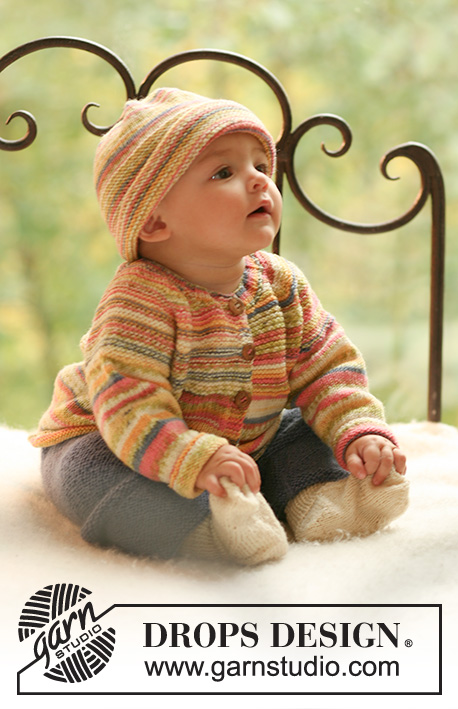
Set of knitted domino jacket in garter st in DROPS Fabel and pants in rib st in DROPS Alpaca for baby and children
DROPS Baby 18-25 |
||||
|
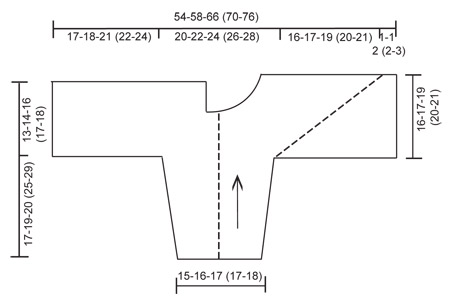
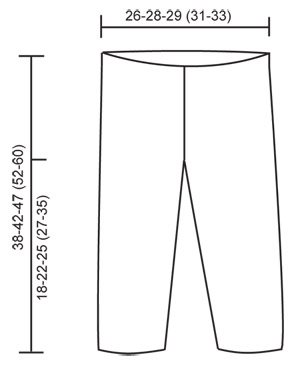
JACKET: INCREASING TIP: Inc 1 st on each side of st with marker by making 1 YO. On return row work YO into back of st in order to avoid a hole. ---------------------------------------------------------- JACKET: Worked from side to side from sleeve towards the middle of jacket, in 2 pieces sewn tog mid back afterwards. RIGHT HALF: Worked back and forth on circular needle in garter st. Cast on 36-38-40 (40-42) sts on circular needle size 3 mm with Fabel and work garter st. REMEMBER THE KNITTING TENSION! When piece measures 6-6-5 (5-6) cm inc 1 st each side and repeat the inc on every 8th row a total of 6-7-9 (11-13) times = 48-52-58 (62-68) sts. Continue until piece measures 17-19-20 (25-29) cm – adjust so that next row is from RS. BODY PIECE: K 1 row from RS, at the end of row cast on 41-43-50 (53-58) sts (= towards back piece) = 89-95-108 (115-126) sts. NOW MEASURE PIECE FROM HERE! Work return row. Insert a marker from RS in the second st on row (= right side of piece) and continue in garter st, AT THE SAME TIME inc 1 st on each side of st with marker on every other row a total of 38-40-46 (48-50) times – SEE INCREASING TIP. AT THE SAME TIME when piece measures 8½-9-10½ (11-12) cm continue on the last 60-65-74 (79-86) sts only on the left side of piece as seen from the RS (= back piece). Slip remaining sts on a stitch holder. BACK PIECE: Continue until piece measures 13-14-16 (17-18) cm (from where sts were cast on for back piece), and cast off. FRONT PIECE: Slip sts from stitch holder back on needle, but leave 9-10-10 (10-12) sts towards back piece on stitch holder for neckline. Continue to inc on every other row, AT THE SAME TIME cast off 1 st towards neckline on every 4th row a total of 6-7-7 (7-7) times. AT THE SAME TIME when piece measures 14-15-17 (18-19) cm (from where inc for front pieces beg) cast off for 3-4-4 (5-5) buttonholes as follows (from neckline, i.e. from WS): work 2 sts, cast off 2 sts, * work 12-9-11 (9-10) sts, cast off 2 sts *, repeat from *-* a total of 2-3-3 (4-4) times, and then work remaining sts on row. On return row cast on 2 new sts over the cast off sts. After dec and inc are complete there are 90-93-109 (115-121) sts on row. Now cast off 51-52-62 (66-70) sts from WS from neckline and down along front band = 39-41-47 (49-51) sts left on row. Continue in garter st back and forth on these sts for approx 1-1-2 (2-3) cm (fold piece double by shoulder to measure front piece to back piece) and cast off. LEFT HALF: Like right half, but without buttonholes – this half is assembled with WS out. ASSEMBLY: Place the 2 halves towards each other and sew tog mid back – edge to edge in order to avoid a chunky seam. Fold jacket double and sew under arm and side seams in outer loops of sts. Sew on buttons. NECKLINE: Pick up 55 to 75 sts (incl sts on stitch holders) round neckline on circular needle size 3 mm with Fabel. Work 3 rows garter st back and forth on needle and cast off. ---------------------------------------------------------- PANTS: INCREASING TIP: Inc 1 st on each side of the 2 K sts mid back (marker sits between these 2 sts). Inc by working 2 sts in 1 st and incorporate inc sts in rib as you go along. DECREASING TIP: Dec 1 st on each side of marker mid front. Dec as follows before marker: K2 tog. Dec as follows after marker: slip 1 st as if to K, K1, psso. LEG: Worked in the round on double pointed needles. Cast on 56-60-64 (68-72) sts on double pointed needles size 3 mm with Alpaca. Insert a marker at beg of round = inside of leg. Continue as follows: K1, * P2 / K2 *, repeat from *-* and finish with P2 and K1. When piece measures 4-6-4 (4-5) cm inc 1 st on each side of marker by K 2 sts in 1 st on every 5-6-8 (9-12) round a total of 8 times = 72-76-80 (84-88) sts. When leg measures 16-20-23 (25-33) cm divide the piece by marker and continue back and forth on needle (to make it easier to slip both legs on the same circular needle afterwards), AT THE SAME TIME cast on 1 new st each side for seam = 74-78-82 (86-90) sts. When piece measures 18-22-25 (27-35) cm cast off 5 sts each side (= 1 edge st, K1, P2 and K1) = 64-68-72 (76-80) sts. Put piece aside and knit the other leg in the same way. PANTS: Slip both legs on the same circular needle size 3 mm = 128-136-144 (152-160) sts. Insert 1 marker mid front and 1 marker mid back (both markers should sit between 2 K sts). Continue in rib, K2 / P2, AT THE SAME TIME inc mid back and dec mid front as follows: INC MID BACK: Inc 2 sts – SEE INCREASING TIP. Repeat the inc on every 4th round a total of 4 times. DEC MID FRONT: Dec 2 sts – SEE DECREASING TIP. Repeat the dec on every 4th round a total of 8 times. After all inc and dec are complete there are 120-128-136 (144-152) sts on round. Continue in rib until piece measures 38-42-47 (52-60) cm, cast off. ASSEMBLY: Sew inside of legs at the top inside 1 edge st. Sew opening between legs, front of leg towards back of leg. |
||||
Diagram explanations |
||||
|
||||
 |
||||
 |
||||
Have you finished this pattern?Tag your pictures with #dropspattern #killianset or submit them to the #dropsfan gallery. Do you need help with this pattern?You'll find 14 tutorial videos, a Comments/Questions area and more by visiting the pattern on garnstudio.com. © 1982-2026 DROPS Design A/S. We reserve all rights. This document, including all its sub-sections, has copyrights. Read more about what you can do with our patterns at the bottom of each pattern on our site. |
||||


With over 40 years in knitting and crochet design, DROPS Design offers one of the most extensive collections of free patterns on the internet - translated to 17 languages. As of today we count 325 catalogues and 12298 patterns translated into English (UK/cm).
We work hard to bring you the best knitting and crochet have to offer, inspiration and advice as well as great quality yarns at incredible prices! Would you like to use our patterns for other than personal use? You can read what you are allowed to do in the Copyright text at the bottom of all our patterns. Happy crafting!
Post a comment to pattern DROPS Baby 18-25
We would love to hear what you have to say about this pattern!
If you want to leave a question, please make sure you select the correct category in the form below, to speed up the answering process. Required fields are marked *.