
Popular categories
Looking for a yarn?


Comments / Questions (51)
![]() Vicky wrote:
Vicky wrote:
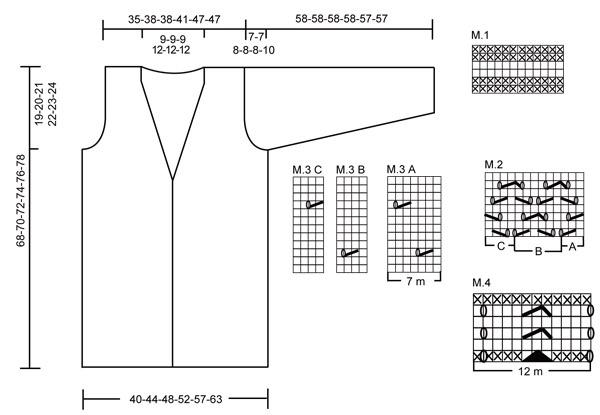
Bonjour, dans le diagramme M2, rangs 3 et 7, je ne comprends pas puisqu’il semble y avoir 4 jetés mais seulement 2 fois des mailles ensemble. Est-ce qu’il y a quelque chose que je ne vois pas bien?
25.09.2020 - 16:03DROPS Design answered:
Bonjour Vicky, sur ces rangs, on a 4 jetés (diagrammes A,B et C confondus) et 4 diminutions au total - le nombre de mailles a bien rester le même. Au 7ème rang, le 1er jeté du rang est la nouvelle maille de A; tricotez la dernière m de A avec les 2 premières mailles de B (= c'est désormais la 1ère m de B)- en fin de rang, le jeté est la dernière m de B et tricotez la dernière m de B avec les 2 premières m du B suivant/de C. N'hésitez pas à mettre des marqueurs entre chaque diagramme si besoin, pour vous aider à bien visualiser le nombre de mailles dans chaque diagramme (il ne change pas). Bon tricot!
25.09.2020 - 16:29
![]() Lena Fransson wrote:
Lena Fransson wrote:
Hej. Jag undrar vad måtten är för resp. storlek i mönstren, (Byst, midja, stuss) Hittar ingen guide för det. Hälsn. Lena F
28.07.2020 - 12:47DROPS Design answered:
Hej Lena, Denna koftan är helt rak. Du hittar måtten på plagget i måttskissen nederst i mönstret. Lycka till :)
28.07.2020 - 15:34
![]() Нина Кардаш wrote:
Нина Кардаш wrote:
Hello, is it possible to knit this model with Drops Flora yarn and what are the recommendations thanks
06.05.2020 - 13:39DROPS Design answered:
Dear Нина Кардаш, sure you can see difference between Alpaca and Flora here - use our yarn converter to get the new amount of yarn - and just remember as always to check and keep tension. Happy knitting!
06.05.2020 - 14:50
![]() Moni wrote:
Moni wrote:
Decreasing for front. At same time after 2 rows of M.2 dec to shape. 1 st on every 8th row total 3 times and 1 st on every 6th row total 8 times. Is first dec on row 8 then 6, 8, 6 etc. and where does 2 rows of M2 dec start it has me confused.
04.02.2020 - 04:40DROPS Design answered:
Dear Moni, you start to decrease for neck while working the 3rd row in M.2. Then work 7 rows in pattern without decreasing. Repeat these 8 rows one more time. Decrease one more time on next RS row (= you decreased a total of 3 times), then work 5 rows, decrease on next row (= every 6th row) and work these 6 rows a total of 5-7-7 times (see size). Happy knitting!
04.02.2020 - 11:17
![]() Laila wrote:
Laila wrote:
Är det meningen att antalet maskor minskar hela tiden då man stickar M2 eftersom man stickar maskor tillsammans men inte ökar på antalet någonstans
19.07.2019 - 16:20DROPS Design answered:
Hej. Ursäkta sent svar. Antalet maskor i M.2 är detsamma hela tiden, du gör omslag (cirklarna i diagrammet) så att maskantalet inte förändras när du gör minskningar. Lycka till!
22.08.2019 - 08:58
![]() Martina wrote:
Martina wrote:
Wie werden die Knopflöcher gearbeitet ?
01.06.2019 - 23:23DROPS Design answered:
Liebe Martina, es werden hier keine Knopflöcher gearbeitet, die Knöpfe werden in den Löchern /Umschläge von A.4 (re. Vorderteil) zugeknöpft. Viel Spaß beim stricken!
03.06.2019 - 09:28
![]() Christine wrote:
Christine wrote:
I am unable to get the pattern to work for the armhole decreases on the back side of the XL size. The pattern states I should have 118 stitches after binding off 4 stitches on the purl side. If I then decrease two stitches four times and one stitch two times that doesn’t come out to the 102 stitches that I should have when I finish decreasing. (2 stitches x 4 times x 2 sides = 16. 1 stitch x 2 times x 2 sides = 4 stitches. 16 +4=20.) To get to 102, decreases should equal 16. Help please.
11.02.2019 - 06:05DROPS Design answered:
Dear Christine, after you have workd M.1 one time in height, there are 102 sts, work now M.3 with 2 sts stocking stitch in each side. When all decreases for armholes are done, 98 sts remain. Happy knitting!
11.02.2019 - 11:41
![]() Gea wrote:
Gea wrote:
In het patroon van het voorpand staat: Brei de 3 voorbiesst in ribbelst tot de vereiste afmetingen – lees de instructie hierboven. Ik kan dit echter nergens terugvinden. Waar kan ik deze afmetingen vinden?
23.04.2018 - 08:49DROPS Design answered:
Dag Gea, Er wordt mee bedoelt dat je de 3 voorbiessteken over de hele hoogte breit, dus tot het voorpand klaar is.
29.04.2018 - 18:14Patricia Riley wrote:
Can you send me a large photo of pattern Drops 106-10 by drops design. Thankyou
08.03.2018 - 15:54DROPS Design answered:
Dear Mrs Riley, you can print (also with a virtual printer) the photo of this pattern clicking on "Photo" below materials, just above "Pattern instructions". Happy knitting!
09.03.2018 - 08:38
![]() Faye Robinson wrote:
Faye Robinson wrote:
A have started this pattern with the left front with 65 stitches. The pattern is not working. 1st row cast on 2nd row Knit with an edge st on the side & 3 garter (knit) st toward mid front on right side 3rd row purl on wrong side 4th row on right side:1 edge *K1 P3* finish with K1 then 3 band Knit st of garter st. 5th row on wrong side: 3 band knit st *P3 K1* to line up with stitches below 1 edge (doesn't work). Ca someone help me?
19.08.2016 - 14:45DROPS Design answered:
Dear Mrs Robinson, on 1st row with rib (= from RS) work: 1 edge st, *K1, P3* repeat from *-* and finish with K1 and 3 edge sts. On next row from WS work: K3 (edge sts), then P1, repeat *K3, P1*, ie K over K and P over P and finish with 1 edge st. Happy knitting!
19.08.2016 - 14:57
|
||||||||||||||||||||||
DROPS 106-10 |
||||||||||||||||||||||
|
|
||||||||||||||||||||||
DROPS jacket in “Alpaca” with stripes in textured patterns. Size S – XXXL
DROPS 106-10 |
||||||||||||||||||||||
|
Pattern: See Diagram M.1 to M.4. The diagram shows the pattern from the right side. Moss st, (back piece): first row: *K1, P1*, repeat from *-* and finish with K1. Second row: P over K and K over P. Repeat second row. Moss st, (front piece and sleeve): first row: *P1, K1*, repeat from *-*. Second row: K over P and P over K. Repeat second row. Decreasing tip: Dec inside 3 front band sts towards mid front. Make all dec from RS! Even if you cannot fit in a full pattern repeat after a dec, continue in pattern to the 3 front band sts, but be careful not to make more YO than dec on row. Dec as follows before 3 front band sts: K2 tog Dec as follows after 3 front band sts: K2 tog into back of st. Garter st, back and forth on needle): K all rows. Back piece: Worked back and forth on needle. Cast on 121-133-145-157-173-193 sts (includes 1 edge st each side) on needle size 3 mm. K 1 row from RS and P 1 row from WS. Continue in Rib as follows from RS: 1 edge st, *P3, K1*, repeat from *-* and finish with P3 and 1 edge st. Remember the knitting tension! When piece measures 6 cm K 1 row from RS, at the same time dec 22-26-28-30-34-40 sts evenly = 99-107-117-127-139-153 sts. P 1 row from WS and now continue in M.1. After 1 vertical repeat of M.1, K 1 row from RS and P 1 row from WS. Continue in moss st – see above – with 1 edge st each side. When piece measures 12 cm K 1 row from RS, and P 1 row from WS. Continue in M.1. After 1 vertical repeat of M.1, K 1 row from RS, at the same time adjust number of sts to 99-105-117-123-135-153 sts. P 1 row from WS and continue as follows: 1 edge st, M.2A (= 3 sts), M.2B (= 6 sts) repeated on the next 90-96-108-114-126-144 sts, M.2C (= 4 sts) and 1 edge st. Continue like this until piece measures 22 cm (adjust to a full vertical repeat). K 1 row from RS, and P 1 row from WS. Continue in M.1. After 1 vertical repeat of M.1, K 1 row from RS, at the same time adjust number of sts to 97-104-118-125-132-153 sts. P 1 row from WS and continue as follows: 1 edge st, M.3A (= 7 sts) repeated on the next 91-98-112-119-126-147 sts, M.3B (= 4 sts) and 1 edge st. When piece measures 33 cm cm K 1 row from RS, and P 1 row from WS. Continue in M.1. After 1 vertical repeat of M.1, K 1 row from RS, at the same time adjust number of sts to 97-105-117-125-133-153 sts. P 1 row from WS and continue in moss st with 1 edge st each side. When piece measures 42-43-41-42-41-42 cm K 1 row from RS, and P 1 row from WS. Continue in M.1. After 1 vertical repeat of M.1, K 1 row from RS, at the same time adjust number of sts to 99-105-117-123-135-153 sts. P 1 row from WS and continue as follows: 1 edge st, M.2A (= 3 sts), M.2B (= 6 sts) repeated on the next 90-96-108-114-126-144 sts, M.2C (= 4 sts) and 1 edge st. Work 2-2-3-3-4-4 vertical repeats of M.2. Piece now measures approx 49-50-51-52-53-54 cm. K 1 row from RS, at the same time cast off 4 sts at beg of row for armhole, work row and at the same time Size S: dec 1 st mid row Size M + L + XL + XXL + XXXL: inc 6-2-3-1-1 sts evenly = 94-107-115-122-132-150 sts. P 1 row from WS, at the same time cast off 4 sts for armhole at beg of row = 90-103-111-118-128-146 sts. Continue in M.1, at the same time dec to shape the armhole each side on every other row: 2 sts 1-2-4-4-3-8 times and 1 st 1-2-2-2-2-1 times. After 1 vertical repeat of M.1, K 1 row from RS and P 1 row from WS. There are now 84-91-95-102-114-130 sts on row. Now continue in M.3A (= 7 sts) repeated across the row with 0-0-2-2-1-9 stocking sts each side (for size L + XL + XXL + XXXL continue to dec for armhole, i.e number of stocking sts each side dec). When all dec are complete there are 84-91-91-98-112-112 sts on row. When piece measures 65-67-69-71-73-75 cm work garter st on the middle 28-27-27-34-34-34 sts, work remaining sts as before. When piece measures 66-68-70-72-74-76 cm cast off the middle 22-21-21-28-28-28 sts for neck = 31-35-35-35-42-42 sts left on each shoulder. Continue in pattern with 3 garter sts towards neckline until piece measures 68-70-72-74-76-78 cm. Cast off loosely. Left front piece: Cast on 57-65-73-77-85-93 sts (includes 1 edge st at side and 3 front band sts towards mid front) on needle size 3 mm. Work the 3 front band sts in garter st – see above - until finished measurements. K 1 row from RS and P 1 row from WS. Continue in Rib as follows from RS: 1 edge st, *K1, P3*, repeat from *-* and finish with K1 and 3 front band sts. When piece measures 6 cm K 1 row from RS, at the same time dec 11-15-17-17-19-21 sts evenly = 46-50-56-60-66-72 sts. P 1 row from WS and now continue in M.1. After 1 vertical repeat of M.1, K 1 row from RS and P 1 row from WS. Continue in moss st – see above – with 1 edge st at side and 3 front band sts towards mid front. When piece measures 12 cm K 1 row from RS, and P 1 row from WS. Continue in M.1. After 1 vertical repeat of M.1, K 1 row from RS, at the same time adjust number of sts to 47-53-59-59-65-71 sts. P 1 row from WS and continue as follows: 1 edge st, M.2A (= 3 sts), M.2B (= 6 sts) repeated on the next 36-42-48-48-54-60 sts, M.2C (= 4 sts) and 3 front band sts. Continue like this until piece measures approx 22 cm (adjust to a full vertical repeat). K 1 row from RS, and P 1 row from WS. Continue in M.1. After 1 vertical repeat of M.1, K 1 row from RS, at the same time adjust number of sts to 50-50-57-57-64-71 sts. P 1 row from WS and continue as follows: 1 edge st, M.3C (= 4 sts), M.3A (= 7 sts) repeated on the next 42-42-49-49-56-63 sts and 3 front band sts. When piece measures 33 cm cm K 1 row from RS, and P 1 row from WS. Continue in M.1. After 1 vertical repeat of M.1, K 1 row from RS, at the same time adjust number of sts to 44-46-52-54-60-68 sts. P 1 row from WS and continue in moss st with 1 edge st at side and 3 front band sts towards mid front. When piece measures 42-43-41-42-41-42 cm K 1 row from RS, and P 1 row from WS. Continue in M.1. After 1 vertical repeat of M.1, K 1 row from RS, at the same time adjust number of sts to 47-53-59-59-65-71 sts. P 1 row from WS and continue as follows: 1 edge st, M.2A (= 3 sts), M.2B (= 6 sts) repeated on the next 36-42-48-48-54-60 sts, M.2C (= 4 sts) and 3 front band sts. At the same time after 2 rows of M.2 dec to shape the neckline – see Decreasing tip – as follows: 1 st on every 8th row a total of 0-3-3-3-3-4 times and 1 st on every 6th row a total of 9-5-7-7-8-4 times. After 2-2-3-3-4-4 vertical repeats of M.2, K 1 row from RS, at the same time cast off 4 sts at side for armhole. NB! Continue dec for neckline. P 1 row from WS. Continue in M.1, at the same time dec to shape the armhole as described for back piece. After 1 vertical repeat of M.1, K 1 row from RS and P 1 row from WS. Now continue in M.3A (= 7 sts) repeated across the row with 0-0-2-2-1-9 stocking sts at side and 3 front band sts towards mid front. When all dec are complete there are 31-35-35-35-42-42 sts on shoulder. Continue until piece measures 68-70-72-74-76-78 cm. Cast off loosely. Right front piece: Cast on and work like left front piece, but mirrored. Sleeve: Worked back and forth onn needle. Cast on 70-70-74-74-78-82 sts (includes 1 edge st each side) on needle size 3 mm. K 1 row from RS and P 1 row from WS. Continue in Rib as follows from RS: 1 edge st, *K1, P3*, repeat from *-* and finish with 1 edge st. When piece measures 5 cm K 1 row from RS, at the same time dec 14 sts evenly = 56-56-60-60-64-68 sts. P 1 row from WS and now continue in M.1. After 1 vertical repeat of M.1, K 1 row from RS, at the same time inc 2 sts evenly = 58-58-62-62-66-70 sts. P 1 row from WS and continue in moss st – see above – with 1 edge st each side. When piece measures 10 cm K 1 row from RS, at the same time inc 2-2-4-4-4-6 sts evenly = 60-60-66-66-70-76 sts. P 1 row from WS. Continue in M.1. After 1 vertical repeat of M.1, K 1 row from RS, at the same time inc 3-3-3-3-5-5 sts evenly = 63-63-69-69-75-81 sts. P 1 row from WS and continue as follows: 1 edge st, M.2A (= 3 sts), M.2B (= 6 sts) repeated on the next 54-54-60-60-66-72 sts, M.2C (= 4 sts) and 1 edge st. Continue like this until piece measures approx 21 cm (adjust to a full vertical repeat). K 1 row from RS, at the same time inc 2-2-2-5-2-2 sts evenly = 65-65-71-74-77-83 sts. P 1 row from WS. Continue in M.1. After 1 vertical repeat of M.1, K 1 row from RS, at the same time inc 0-0-1-5-2-3 sts evenly = 65-65-72-79-79-86 sts. P 1 row from WS and continue as follows: 1 edge st, M.3A (= 7 sts) repeated across the row and 1 edge st. When piece measures approx 30 cm cm K 1 row from RS, at the same time inc 1-3-4-3-5-4 sts evenly = 66-68-76-82-84-90 sts. P 1 row from WS. Continue in M.1. After 1 vertical repeat of M.1, K 1 row from RS, at the same time inc 2-4-2-2-2-4 sts evenly = 68-72-78-84-86-94 sts. P 1 row from WS and continue in moss st with 1 edge st each side. When piece measures approx 40-40-39-39-38-36 cm K 1 row from RS, at the same time inc 4-4-4-5-6-4 sts evenly = 72-76-82-89-92-98 sts. P 1 row from WS. Continue in M.1. After 1 vertical repeat of M.1, K 1 row from RS, at the same time inc 3-5-5-4-7-7 sts evenly = 75-81-87-93-99-105 sts. P 1 row from WS and continue as follows: 1 edge st, M.2A, M.2B repeated on the next 66-72-78-84-90-96 sts, M.2C and 1 edge st. When piece measures approx 47-47-46-46-45-43 cm K 1 row from RS, at the same time inc 2-2-3-3-4-4 sts evenly = 77-83-90-96-103-109 sts. P 1 row from WS and now continue in M.1. After 1 vertical repeat of M.1, K 1 row from RS, at the same time inc 2-3-3-4-4-5 sts evenly = 79-86-93-100-107-114 sts. P 1 row from WS and continue as follows: 1 edge st, M.3A repeated across the row and 1 edge st. At the same time when piece measures 51-51-50-50-49-47 cm (less for the larger sizes because of longer sleeve cap and wider shoulder) cast off 4 sts each side and dec to shape the sleeve cap each side on every other row: 3 sts 2-3-3-4-4-4 times, 1 st 5-3-5-4-3-6 times and then 3 sts each side until piece measures 57-57-57-57-56-56 cm. Now cast off 4 sts each side and cast off remaining sts on next row. Piece measures approx 58-58-58-58-57-57 cm. Assembly: Sew shoulder seams. Front bands: Pick up 180 to 210 sts on needle size 3 mm on left front piece from mid back towards bottom edge (pick up in the outermost front band st on body piece). K 1 row from WS, at the same time adjust number of sts to 219-231-231-243-243-255 (includes 1 edge st mid back and 2 edge sts at bottom edge). Continue as follows from RS: 1 edge st, M.4 on the next 216-228-228-240-240-252 sts, K1 and 1 garter st. Work 6 vertical repeats of M.4, now work first row in M.4, at the same time cast off loosely. Repeat along right front band, but pick up sts from bottom edge towards mid back. Assembly: Sew front bands tog mid back inside 1 edge st. Set in sleeves. Sew sleeve and side seams inside 1 edge st. Sew buttons on left front piece, just before the 3 front band sts on body piece. Place the top button approx 2 cm from dec for neckline and the bottom one approx 24 cm from casting on row. Place the remaining buttons evenly in between. Use the holes (YO) in M.4 on right front piece as buttonholes. |
||||||||||||||||||||||
Diagram explanations |
||||||||||||||||||||||
|
||||||||||||||||||||||
 |
||||||||||||||||||||||
Have you finished this pattern?Tag your pictures with #dropspattern or submit them to the #dropsfan gallery. Do you need help with this pattern?You'll find 21 tutorial videos, a Comments/Questions area and more by visiting the pattern on garnstudio.com. © 1982-2026 DROPS Design A/S. We reserve all rights. This document, including all its sub-sections, has copyrights. Read more about what you can do with our patterns at the bottom of each pattern on our site. |
||||||||||||||||||||||


With over 40 years in knitting and crochet design, DROPS Design offers one of the most extensive collections of free patterns on the internet - translated to 17 languages. As of today we count 324 catalogues and 12290 patterns translated into English (UK/cm).
We work hard to bring you the best knitting and crochet have to offer, inspiration and advice as well as great quality yarns at incredible prices! Would you like to use our patterns for other than personal use? You can read what you are allowed to do in the Copyright text at the bottom of all our patterns. Happy crafting!
Post a comment to pattern DROPS 106-10
We would love to hear what you have to say about this pattern!
If you want to leave a question, please make sure you select the correct category in the form below, to speed up the answering process. Required fields are marked *.