
Popular categories
Looking for a yarn?


Comments / Questions (34)
![]() Sabine Ferdinand wrote:
Sabine Ferdinand wrote:
Hallo wenn ich 247 Maschen anschlage 6 Maschen Blende 58 Maschen linke Seite 113 Maschen rücken 58 Maschen rechte Seite 6 Maschen Blende Mache bleiben aber 6 Maschen von den 247 übrig Bin etwas verwirrt Kann mir jemand weiterhelfen Lg sabine
10.03.2023 - 20:47DROPS Design answered:
Liebe Frau Ferdinan, es sind dazu 2 Rapporte M.1 (in beide Seite) gestrickt: 6 Blenden-M, 58 M glatt, 3 M M.1, 113 M glatt, 3 M M.1, 58 M glatt, 6 Blenden-M = 6+58+3+113+3+58+6=247 Maschen. Viel Spaß beim stricken!
13.03.2023 - 09:08
![]() Gabriela Innerbichler wrote:
Gabriela Innerbichler wrote:
Guten Tag Nach den 9 cm muss ich beidseitig von M1 1 Masche abketten oder abnehmen? Herzlichen Dank
02.08.2022 - 12:16DROPS Design answered:
Liebe Frau Innerbichler, nach 9 cm sollen Sie 1 Masche beidseitig von jedem M.1 auf beide Seite abnehmen (2 Maschen links zusammen bei einer Hinreihe stricken). Viel Spaß beim stricken!
02.08.2022 - 13:09
![]() Analhi wrote:
Analhi wrote:
Como puedo saber que significan los símbolos del diagrama?
05.08.2021 - 17:43DROPS Design answered:
Hola Analhi, mira 'Diagrama' al final de los Instrucciones del patrón. Buen trabajo!
06.08.2021 - 09:46
![]() Grace wrote:
Grace wrote:
I’m confused about the sizing numbers . The numbers on pg 1 do not seem to match with the schematic. Am I missing something.
01.01.2021 - 01:46DROPS Design answered:
Dear Grace, the measurements in the header (page 1) are given in cm and are give around - while the measurements in chart are taken flat and in cm. Read more about charts here. Happy knitting!
04.01.2021 - 14:02
![]() Elvia Mccormack wrote:
Elvia Mccormack wrote:
Thank you for your beautiful free patterns. i’m just about to start on the back. Where exactly do i bind off the 7 stitches - before the garter stitches. When shaping the armhole, do use one stitch from the 4 garter stitches? Thank you for your help.
02.09.2018 - 02:38DROPS Design answered:
Hi Elvia, You bind off 7 stitches in the middle of M.1 in each side (so 3 stitches either side of, plus the stitch with the marking thread). When decreasing for the armhole, you decrease 1 stitch inside the 4 garter stitches and from the right side (purl 2 together). Happy knitting!
03.09.2018 - 07:59
![]() Catia wrote:
Catia wrote:
Penso di aver capito, ho sbagliato intrecciando le 7 maglie da entrambe le parti di M1. Grazie 1000 per disponibilità e velocità nel rispondere.
16.03.2016 - 12:41
![]() Catia wrote:
Catia wrote:
Ho dimenticato di dire che sono 41 e non 46 come scritto sul modello. Grazie
15.03.2016 - 21:12DROPS Design answered:
Buonasera Catia, abbiamo risposto nel commento precedente, ci riscriva se non abbiamo chiarito il suo dubbio. Buon lavoro!
15.03.2016 - 21:29
![]() Catia wrote:
Catia wrote:
Buonasera, avrei bisogno di un altro chiarimento. ho fatto lo scalfo e ora devo fare il dietro e i davanti dx e sx in modo separato. Ho contato le maglie del davanti sx dove mi son trovata con il filo ma per la taglia L che sto facendo c'è scritto che dovrebbero essere 46, ho ricontato tutte le maglie e mi ritrovo con 181 come erano prima di suddividere il lavoro con tutti i motivi M1. Spero di essere stata chiara. Grazie mille per la risposta.
15.03.2016 - 21:11DROPS Design answered:
Buonasera Catia, prima di impostare il lavoro con i motivi M.1 per la taglia L deve avere sui ferri 181 m. Poi deve lavorare con i motivi M.1 come indicato e la lavorazione a legaccio laterale. Alla fine intrecciare 7 m a ogni lato per lo scalfo (14 m intrecciate in tutto), per cui si ritrova con 167 m totali: 75 per il dietro e 46 per ogni davanti. Ci riscriva se non abbiamo chiarito il suo dubbio. Buon lavoro!
15.03.2016 - 21:29
![]() Catia wrote:
Catia wrote:
Thank you so much.
02.02.2016 - 10:35
![]() Catia wrote:
Catia wrote:
Ciao sto facendo questo modello, sono arrivata a fare gli scalfi, per poi proseguire separatamente davanti e dietro. Non riesco a capire nelle istruzioni questo passaggio: Quando il lavoro misura nel mio caso 53cm lavorare 6f a legaccio e qui ci sono, poi dice su 15 m ogni lato (=m con il segnapunti + 7m a ogni lato della m con il segnapunti)lavorare le m rimaste come prima. Non riesco a capire il passaggio tra le parentesi. Grazie Catia
01.02.2016 - 15:48DROPS Design answered:
Buonasera Catia, quando il lavoro misura 53 cm deve lavorare 6 f in questo modo: a m legaccio su 15 m a ogni lato (7 m prima del segnapunti, m con il segnapunti, 7 m dopo il segnapunti) e sulle altre m come prima. Alla fine di questi 6 f deve intrecciare 7 m a ogni lato per lo scalfo e lavorare in modo separato il davanti e il dietro. Ci riscriva se qualcosa non è chiaro. Buon lavoro!
01.02.2016 - 22:10
|
|||||||||||||
DROPS 105-12 |
|||||||||||||
|
|
|||||||||||||
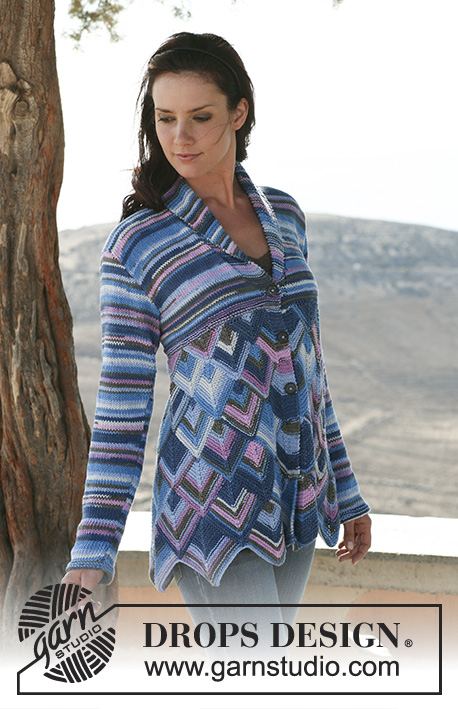
DROPS sleeveless top in “Alpaca” and “Cotton Viscose” with cables. Size S – XXXL
DROPS 105-12 |
|||||||||||||
|
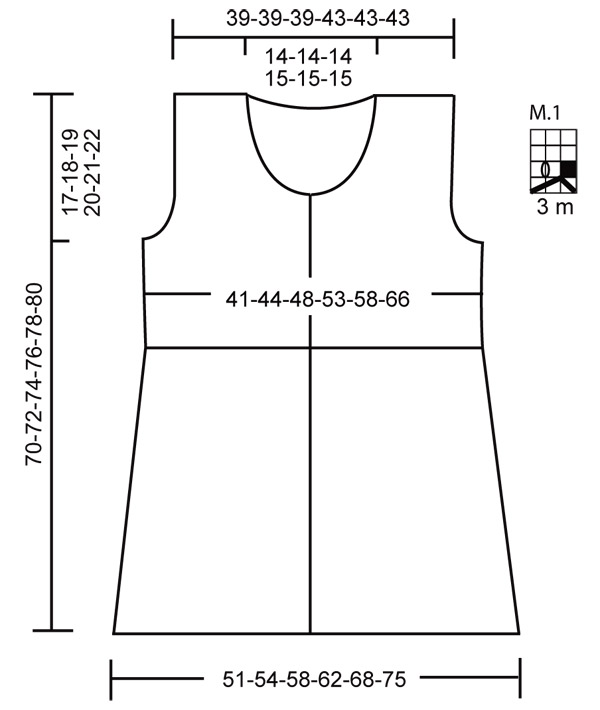
Garter st, back and forth on needle: Knit all rows. Pattern: See diagram M.1. The diagram shows the pattern from the RS. Decreasing tip (applies to armhole): Dec 1 st inside 4 garter sts from RS by P2 tog. Buttonholes: Make buttonholes on right front band. 1 buttonhole = cast off third and fourth st from mid front and cast on 2 new sts on return row. Make buttonholes when piece measures: Size S: 38, 44 and 50 cm. Size M: 39, 45 and 51 cm. Size L: 40, 46 and 52 cm. Size XL: 41, 47 and 53 cm. Size XXL: 42, 48 and 54 cm Size XXXL: 43, 49 and 55 cm. The fourth buttonhole is made on neckline. Back and front piece: Knitted back and forth on circular needle from mid front. Cast on 189-199-213-229-247-271 sts (includes 6 front band sts each side) on circular needle size 5 mm with 1 thread of each quality. Work 4 cm garter st – see above. Continue as follows from RS with 6 front band sts in garter st: 5 rows stocking st, K 1 row from WS, 5 rows stocking st, K 1 row from WS. Now work next row as follows from RS: 6 garter sts (front band), 44-46-50-54-58-64 sts in reverse stocking st, M.1, 83-89-95-103-113-125 sts in reverse stocking st, M.1, 44-46-50-54-58-64 sts in reverse stocking st, 6 garter sts (front band). Insert 1 MT in the middle of M.1 each side (to mark the sides). Remember the knitting tension! Continue in pattern like this. When piece measures 9 cm dec 1 st on both sides of M.1 each side on every 3.5 cm a total of 8 times for all sizes = 157-167-181-197-215-239 sts. When piece measures 34-35-36-37-38-38 cm work 8 rows garter st on all sts, at the same time dec 0-2-0-0-2-2 sts on back piece on last row = 157-165-181-197-213-237 sts. Now work next row as follows from RS: 6 garter sts (front band), P1, M.1, *P 6-6-6-7-7-7, M.1*, repeat from *-* a total of 3 times, P 5-7-11-12-16-22, M.1, P 5-7-11-12-16-22, M.1, *P 6-6-6-7-7-7, M.1*, repeat from *-* a total of 6 times, P 5-7-11-12-16-22, M.1, P 5-7-11-12-16-22, M.1, *P 6-6-6-7-7-7, M.1*, repeat from *-* a total of 3 times, P1 and finish row with 6 garter sts (front band). Continue in pattern like this. When piece measures 51-52-53-54-55-56 cm work 6 rows garter st on 11-13-15-17-19-21 sts each side (= st with MT + 5-6-7-8-9-10 sts on each side of MT st) – work remaining sts as before. On next row cast off 3-5-7-9-11-13 sts each side for armhole and now complete back and front pieces separately. Back piece: = 67-69-75-81-87-97 sts. Work 4 sts each side in garter st. At the same time dec to shape the armhole each side on every other row – see Decreasing tip: 1 st 0-1-4-4-7-12 times = 67-67-67-73-73-73 sts. Continue in pattern a before. When piece measures 68-70-72-74-76-78 cm cast off the middle 21-21-21-23-23-23 sts for neck and dec 1 st on neckline on next row = 22-22-22-24-24-24 sts left on each shoulder. Cast off when piece measures 70-72-74-76-78-80 cm. Right front piece: = 42-43-46-49-52-57 sts. Dec for armhole as described for back piece. At the same time when piece measures 56-57-58-59-60-61 cm put the outermost 10-10-10-11-11-11 sts toward mid front on a thread for neck. Dec to shape the neckline on every other row: 3 sts 1 time, 2 sts 2 times and 1 st 3 times. When all dec are complete there are 22-22-22-24-24-24 sts left on shoulder. Cast off when piece measures 70-72-74-76-78-80 cm. Left front piece: Like right front piece, but mirrored. Assembly: Sew shoulder seams. Pick up approx 80 to 100 sts (includes sts on threads) on needle size 5 mm with 1 thread of each quality round neckline. Work 8 rows garter st, at the same time after 2 rows make 1 buttonhole in line with the others on right front band. Cast off loosely after 8 rows. Sew on buttons. |
|||||||||||||
Diagram explanations |
|||||||||||||
|
|||||||||||||
 |
|||||||||||||
Have you finished this pattern?Tag your pictures with #dropspattern or submit them to the #dropsfan gallery. Do you need help with this pattern?You'll find 20 tutorial videos, a Comments/Questions area and more by visiting the pattern on garnstudio.com. © 1982-2026 DROPS Design A/S. We reserve all rights. This document, including all its sub-sections, has copyrights. Read more about what you can do with our patterns at the bottom of each pattern on our site. |
|||||||||||||


With over 40 years in knitting and crochet design, DROPS Design offers one of the most extensive collections of free patterns on the internet - translated to 17 languages. As of today we count 324 catalogues and 12290 patterns translated into English (UK/cm).
We work hard to bring you the best knitting and crochet have to offer, inspiration and advice as well as great quality yarns at incredible prices! Would you like to use our patterns for other than personal use? You can read what you are allowed to do in the Copyright text at the bottom of all our patterns. Happy crafting!
Post a comment to pattern DROPS 105-12
We would love to hear what you have to say about this pattern!
If you want to leave a question, please make sure you select the correct category in the form below, to speed up the answering process. Required fields are marked *.