Comments / Questions (51)
![]() Kirsti wrote:
Kirsti wrote:
Hei Denne vil jeg gjerne strikke. Elegant med innsvinget profil.
07.01.2008 - 00:44
![]() Nina wrote:
Nina wrote:
Annorlunda. Stilig. Snygg!
06.01.2008 - 22:50
![]() Bets wrote:
Bets wrote:
Looking forward to the pattern.
06.01.2008 - 19:54
![]() Gudrun wrote:
Gudrun wrote:
Mycket vacker och stilfull. tyvärr inte för mig,för kort 155 cm lång.
04.01.2008 - 21:58
![]() Susanne Jensen wrote:
Susanne Jensen wrote:
Uhyggelig flot, glæder mig til at strikke denne
01.01.2008 - 16:03
![]() Lena wrote:
Lena wrote:
Lige min smag den er sød
01.01.2008 - 15:02
![]() Elisabeth wrote:
Elisabeth wrote:
Helt enig med Anita. denne må komme i katalogen. helt min smak. tvi...tvi
01.01.2008 - 01:23
![]() Tatjana wrote:
Tatjana wrote:
Beautiful & very special!
31.12.2007 - 22:40
![]() Anita wrote:
Anita wrote:
Denne må komme i katalogen, vil passe flott til min lin kjole.
31.12.2007 - 22:10
![]() Jessica wrote:
Jessica wrote:
Oh fin, ta gärna med mönster på lång ärm.
27.12.2007 - 20:23
Gerda#gerda |
|
|
|
|
DROPS long jacket in “Bomull-Lin” and “Cotton Viscose”. Size S – XXXL
DROPS 107-6 |
|
|
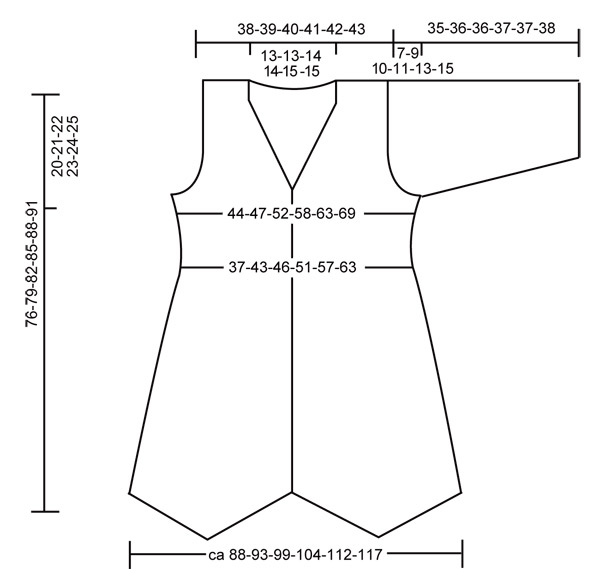
Measuring tip: Because of the weight of the yarn, all measurements should be made whilst the garment is hanging, otherwise it will be too long when worn. Stripes: Front and back piece: When piece measures 12, 25, 28 and 32 cm work 2 rows in 2 strands Cotton Viscose. Sleeves: When piece measures 13 and 17 cm work 2 rows in 2 strands Cotton Viscose. Decreasing tip-1: Make all dec from RS! Dec as follows before marker: K2 tog. Dec as follows after marker: slip 1 st as if to knit, K1, psso Decreasing tip-2 (applies to neckline): Make all dec from RS! Dec as follows after 8 sts: slip 1 st as if to knit, K1, psso Dec as follows before 8 sts: K2 tog. Garter st, back and forth on needle: K all rows. Buttonholes: Make buttonholes on right front band. 1 buttonhole = cast off 4th st from mid front and cast on 1 new st on return row. Make buttonholes when piece measures: Size S: 33, 39, 46 and 54 cm. Size M: 33, 40, 48 and 57 cm. Size L: 33, 41, 50 and 60 cm. Size XL: 33, 42, 52 and 62 cm. Size XXL: 34, 42, 50, 57 and 65 cm. Size XXXL: 34, 44, 52, 60 and 68 cm. Back piece: Loosely cast on 134-142-150-158-170-178 sts (includes 1 edge st each side) on needle size 7 mm with 1 thread Bomull-Lin. Work 2 rows garter st – see above. Insert 3 markers (M) in piece as follows: M-1 after 34-36-38-40-43-45 sts, M-2 after 67-71-75-79-85-89 sts and M-3 after 100-106-112-118-127-133 sts. Continue in stocking st, at the same time dec 1 st on each side of M-1 and M-3 on every other row a total of 39-39-41-41-43-43 times – see Decreasing tip-1. At the same time inc 1 st on each side of piece and each side of M-2 on every 4th row a total of 19-19-20-20-21-21 times = 54-62-66-74-82-90 sts. Remember the knitting tension! Remember stripes – see above. Continue until piece measures 40-41-42-43-44-45 cm – measured where shortest, see Measuring tip! Dec and inc are now complete. Change to needle size 5.5 mm. Work 12 rows garter st, at the same time inc 12-10-14-16-17-19 sts evenly on first row = 66-72-80-90-99-109 sts. Continue in stocking st, at the same time inc 1 st each side on every 2.5-2.5-2.5-3-3-3 cm a total of 5 times = 76-82-90-100-109-119 sts. When piece measures 56-58-60-62-64-66 cm cast off 3 sts each side for armhole and dec to shape the armhole on every other: 2 sts 1-1-2-3-5-7 times and 1 st 1-3-4-6-6-6 times = 64-66-68-70-71-73 sts. When piece measures 72-75-78-81-84-87 cm work garter st on the middle 38-38-40-40-41-41 sts – work remaining sts as before. When piece measures 74-77-80-83-86-89 cm cast off the middle 20-20-22-22-23-23 sts for neck and dec 1 st on neckline on next row = 21-22-22-23-23-24 sts left on each shoulder. Continue with 8 garter sts towards neckline and cast off loosely when piece measures 76-79-82-85-88-91 cm. Left front piece: Loosely cast on 75-79-83-87-93-97 sts (includes 1 edge st at side and 7 front band sts towards mid front) on needle size 7 mm with 1 thread Bomull-Lin. Insert 1 marker after 41-43-45-47-50-52 sts from mid front. Work 2 rows garter st and continue in stocking st with 7 front band sts in garter st until finished measurements. At the same time dec 1 st on each side of marker on every other row a total of 39-39-41-41-43-43 times –see Decreasing tip-1. At the same time inc 1 st each side of piece (towards mid front inc inside 7 front band sts) on every 4th row a total of 19-19-20-20-21-21 times = 35-39-41-45-49-53 sts. Remember stripes! Continue until piece measures 40-41-42-43-44-45 cm – measured where shortest. Dec and inc are now complete. Change to needle size 5.5 mm and work 12 rows garter st, at the same time inc 5-5-6-7-8-9 sts evenly on first row = 40-44-47-52-57-62 sts. Continue in stocking st with 8 sts towards mid front in garter st. At the same time inc at side as described for back piece = 45-49-52-57-62-67 sts. When piece measures 56-58-60-62-64-66 cm dec for armhole at side as described for back piece. At the same time when piece measures 56-59-62-64-67-70 cm work 2 rows garter st on the 8 front band sts only. Continue on all sts and now dec to shape the neckline on every other row – see Decreasing tip-2: 1 st a total of 18-19-19-19-20-20 times. After all dec are complete there are 21-22-22-23-23-24 sts left on shoulder. Cast off loosely when piece measures 76-79-82-85-88-91 cm. Right front piece: Cast on and work like left front piece, but mirrored. Remember buttonholes! Sleeve: Cast on 36-38-40-42-44-46 sts on needle size 7 mm with 1 thread Bomull-Lin. Work 10 rows garter st and continue in stocking st, at the same time inc 16 sts evenly on first row = 52-54-56-58-60-62 sts. When piece measures 10 cm inc 1 st each side on every 3.5-2.5-2-1.5-1-1 cm a total of 5-6-7-9-10-11 times = 62-66-70-76-80-84 sts. At the same time work stripes – see above. When piece measures 28-27-26-26-24-23 cm (less on the larger sizes because of longer sleeve cap and wider shoulder) dec to shape the sleeve cap each side on every other row: 2 sts 3 times, 1 st 0-2-3-4-5-7 times, then 2 sts each side until piece measures 34-35-35-36-36-37 cm. Now cast off 3 sts each side 1 time and cast off remaining sts on next row. Sleeve measures approx 35-36-36-37-37-38 cm. Assembly: Sew shoulder seams. Set in sleeves. Sew sleeve and side seams inside 1 edge st. Sew on buttons. |
|
 |
|
Have you finished this pattern?Tag your pictures with #dropspattern #gerda or submit them to the #dropsfan gallery. Do you need help with this pattern?You'll find 19 tutorial videos, a Comments/Questions area and more by visiting the pattern on garnstudio.com. © 1982-2026 DROPS Design A/S. We reserve all rights. This document, including all its sub-sections, has copyrights. Read more about what you can do with our patterns at the bottom of each pattern on our site. |


Post a comment to pattern DROPS 107-6
We would love to hear what you have to say about this pattern!
If you want to leave a question, please make sure you select the correct category in the form below, to speed up the answering process. Required fields are marked *.