Clicking the ORDER button will redirect you to Wool Warehouse Direct Ltd website
-------------------------------------------------------
Alternative Yarn – See how to change yarns here
Yarn Groups A to F – Use the same pattern and change the yarn here
Yarn usage using an alternative yarn – Use our yarn converter here
-------------------------------------------------------
Clicking the ORDER button will redirect you to Wool Warehouse Direct Ltd website
= brown / medium brown K | |
= brown / medium brown P | |
= off white/off white | |
= rust / orange | |
= plumb / dark purple | |
= mustard / light olive | |
= dark green / forrest | |
= YO | |
= K2 tog into back of sts | |
= K 2 tog | |
= slip 1 sts as if to knit, K2 tog, psso |
Each of our patterns has specific tutorial videos to help you.
These step-by-step tutorials might also help you:
Why is the knitting/crochet tension so important?
Knitting tension is what determines the final measurements of your work, and is usually measured per 10 x 10 cm. It is provided like so: number of stitches in width x number of rows in height - eg: 19 stitches x 26 rows = 10 x 10 cm.
The knitting tension is very individual; some people knit/crochet loosely while others work tightly. You adjust the knitting tension with the needle size, which is why the suggested needle size is only meant as a guide! You need to adjust this (up or down) to ensure that YOUR knitting tension matches the knitting tension provided in the pattern. If you work with a different knitting tension than provided you will have a different yarn consumption, and your work will have different measurements than what the pattern suggests.
The knitting tension also determines which yarns can replace each other. As long as you achieve the same knitting tension you can replace one yarn with another.
See DROPS lesson: How to measure your tension/gauge
See DROPS video: How to make a gauge tension swatch
How do I know how many balls of yarn I need?
The required amount of yarn is provided in grams, eg: 450 g. To calculate how many balls you’ll need you first need to know how many grams are in 1 ball (25g, 50g or 100g). This information is available if you click on the individual yarn quality on our pages. Divide the amount required with the amount of each ball. For example, if each ball is 50g (the most common amount), the calculation will be as follows: 450 / 50 = 9 balls.
Can I use a different yarn than what the pattern suggests?
The important thing when changing from one yarn to another is that the knitting/crochet tension remains the same. This is so that the measurements of the finished piece will be the same as on the sketch provided. It is easier to achieve the same knitting tension using yarns from the same yarn group. It is also possible to work with multiple strands of a thinner yarn to achieve the knitting tension of a thicker one. Please try our yarn converter. We recommend you to always work a test swatch.
Please NOTE: when changing yarn the garment might have a different look and feel to the garment in the photo, due to individual properties and qualities of each yarn.
See DROPS lesson: Can I use a different yarn than the one mentioned in the pattern?
What are the yarn groups?
All our yarns are categorised into yarn groups (from A to F) according to thickness and knitting tension – group A contains the thinnest yarns and group F the thickest. This makes it easier for you to find alternative yarns to our patterns, should you wish to switch yarn. All yarns within the same group have a similar knitting tension and can easily replace each other. However, different yarn qualities have different structures and properties which will give the finished work a unique look and feel.
How do I use the yarn calculator?
At the top of all our patterns you’ll find a link to our yarn calculator, which is a helpful tool should you wish to use a different yarn than suggested. By filling in the yarn quality you wish to replace, the amount (in your size) and number of strands, the calculator will present good alternative yarns with the same knitting tension. Additionally it will tell you how much you’ll require in the new qualities and whether you’ll need to work with multiple strands. Most skeins are 50g (some are 25g or 100g).
If the pattern is worked with multiple colours, every colour will have to be calculated separately. Similarly, if the pattern is worked with several strands of different yarns (for example 1 strand Alpaca and 1 strand Kid-Silk) you will have to find alternatives for each, individually.
Why do you show discontinued yarns in the patterns?
Since different yarns have different qualities and textures we have chosen to keep the original yarn in our patterns. However, you can easily find options among our available qualities by using our yarn calculator, or simply pick a yarn from the same yarn group.
It is possible that some retailers still have discontinued yarns in stock, or that someone has a few skeins at home that they would like to find patterns for.
The yarn calculator will provide both alternative yarn as well as required amount in the new quality.
What size should I knit?
If you think it's hard to decide what size to make, it can be a good idea to measure a garment you own already and like the size of. Then you can pick the size by comparing those measures with the ones available in the pattern's size chart.
You'll find the size chart at the bottom of the pattern.
See DROPS lesson: How to read size chart
Why do I get the wrong knitting tension with the suggested needle size?
The needle size provided in the pattern serves only as a guide, the important thing is to follow the knitting tension. And since knitting tension is very individual, you will have to adjust the needle size to ensure that YOUR tension is the same as in the pattern – maybe you’ll have to adjust 1, or even 2 needle sizes, up or down to achieve the correct tension. For this, we recommend that you work test swatches.
Should you work with a different knitting tension than the one provided, the measurements of the finished garment might deviate from the measurement sketch.
See DROPS lesson: How to measure your tension/gauge
See DROPS video: How to make a tension/gauge swatch
Why is the pattern worked top-down?
Working a garment top-down provides more flexibility and room for personal adjustment. For example it is easier to try the garment on while working, as well as making adjustments to length of yoke and shoulder caps.
The instructions are carefully explaining every step, in the correct order. Diagrams are adjusted to the knitting direction and are worked as usual.
How do I work according to a knitting diagram?
The diagram depicts all rows/rounds, and every stitch seen from the right side. It is read from bottom to top, from right to left. 1 square = 1 stitch.
When working back and forth, every other row is worked from the right side and every other row is worked from the wrong side. When working from the wrong side, the diagram will have to be worked reversed: from left to right, knit stitches are purled, purl stitches are knit etc.
When working in the round every round is worked from the right side and the diagram are worked from right to left on all rounds.
See DROPS lesson: How to read knitting diagrams
How do I work according to a crochet diagram?
The diagram depicts all rows/rounds, and every stitch seen from the right side. It is worked from bottom to top, from right to left.
When working back and forth every other row is worked from the right side: from right to left and every other row is worked from the wrong side: from left to right.
When working in the round, every row in the diagram are worked from the right side, from right to left.
When working a circular diagram you start in the middle and work your way outwards, counter clockwise, row by row.
The rows usually start with a given number of chain stitches (equivalent to the height of the following stitch), this will either be depicted in the diagram or explained in the pattern.
See DROPS lesson: How to read crochet diagrams
How do I work several diagrams simultaneously on the same row/round?
Instructions for working several diagrams after each other on the same row/round, will often be written like so: “work A.1, A.2, A.3 a total of 0-0-2-3-4 times". This means you work A.1 once, then A.2 is worked once, and A.3 is repeated (in width) the number of times provided for your size – in this case like so: S = 0 times, M = 0 times, L=2 times, XL= 3 times and XXL = 4 times.
The diagrams are worked as usual: begin with the first row in A.1, then work the first row in A.2 etc.
See DROPS lesson: How to read knitting diagrams
See DROPS lesson: How to read crochet diagrams
Why are the sleeves shorter in larger sizes?
The total width of the garment (from wrist-to-wrist) will be larger in the larger sizes, despite the actual sleeves being shorter. The larger sizes have longer sleeve caps and wider shoulders, so there will be a good fit in all sizes.
Where on the garment is the length measured?
The measurement sketch/schematic drawing provides information regarding the full length of the garment. If it’s a jumper or a jacket the length is measured from the highest point on the shoulder closest to the neckline, and straight down to the bottom of the garment. It is NOT measured from the tip of shoulder. Similarly, the length of yoke is measured from the highest point on the shoulder and down to where yoke is split into body and sleeves.
On a jacket measures are never taken along bands, unless specifically stated. Always measure inside band stitches when measuring the length.
See DROPS lesson: How to read a schematic drawing
What is a repeat?
Diagrams are often repeated on the round or in height. 1 repeat is the diagram the way it appears in the pattern. If it says to work 5 repeats of A.1 in the round, then you work A.1 a total of 5 times after/next to each other in the round. If it says to work 2 repeats of A.1 vertically/in height you work the entire diagram once, then begin again at the start and work the entire diagram one more time.
Why does the piece start with more chain stitches than it’s worked with?
Chain stitches are slightly narrower than other stitches and to avoid working the cast-on edge too tight, we simply chain more stitches to begin with. The stitch count will be adjusted on the following row to fit the pattern and measurement sketch.
Why increase before the rib edge when the piece is worked top-down?
The rib edge is more elastic and will contract slightly compared to, for example, stocking stitch. By increasing before the rib edge, you avoid a visible difference in width between the rib edge and the rest of the body.
Why increase in the cast-off edge?
It’s very easy to cast off too tightly, and by making yarn overs while casting off (and simultaneously casting these off) you avoid a too tight cast off edge.
See DROPS video: How to bind off with yarn overs (yo)
How do I increase/decrease on every 3rd and 4th row/round alternately?
To achieve an even increase (or decrease) you can increase on, for example: every 3rd and 4th row alternately, like so: work 2 rows and increase on the 3rd row, work 3 rows and increase on the 4th. Repeat this until the increase is complete.
See DROPS lesson: Increase or decrease 1 st on every 3rd and 4th row alternately
How can I work a jacket in the round instead of back and forth?
Should you prefer to work in the round instead of back and forth, you may of course adjust the pattern. You’ll need to add steeks mid-front (usually 5 stitches), and follow the instructions. When you would normally turn and work from the wrong side, simply work across the steek and continue in the round. At the end you’ll cut the piece open, pick up stitches to work bands, and cover the cut edges.
See DROPS video: How to knit steeks and cut open
Can I work a jumper back and forth instead of in the round?
Should you prefer to work back and forth instead of in the round, you may of course adjust the pattern so you work the pieces separately and then assemble them at the end. Divide the stitches for the body in 2, add 1 edge stitch in each side (for sewing) and work the front and back pieces separately.
See DROPS lesson: Can I adapt a pattern for circular needles into straight needles?
Why is the pattern slightly different than what I see in the photo?
Pattern repeats can vary slightly in the different sizes, in order to get the correct proportions. If you’re not working the exact same size as the garment in the photo, yours might deviate slightly. This has been carefully developed and adjusted so that the complete impression of the garment is the same in all sizes.
Make sure to follow instructions and diagrams for your size!
How do I make a women’s size garment into a men’s size one?
If you have found a pattern you like which is available in women’s size it’s not very difficult to convert it to men’s size. The biggest difference will be the length of sleeves and body. Start working on the women size that you think would fit across the chest. The additional length will be worked right before you cast off for the armhole/sleeve cap. If the pattern is worked top-down you can add the length right after the armhole or before the first decrease on sleeve.
Regarding additional yarn amount, this will depend on how much length you add, but it is better with a skein too many than too few.
How do I prevent a hairy garment from shedding?
All yarns will have excess fibres (from production) that might come off as lint or shedding. Brushed yarns (ie hairier yarns) have more of these loose, excess fibres, causing more shedding.
Shedding also depends on what is worn under or over the garment, and whether this pulls at the yarn fibres. It’s therefore not possible to guarantee that there will be no shedding
Below are some tips on how to get the best result when working with hairier yarns:
1. When the garment is finished (before you wash it) shake it vigorously so the looser hairs come off. NOTE: do NOT use a lint roller, brush or any method that pulls at the yarn.
2. Place the garment in a plastic bag and put it in your freezer - the temperature will cause the fibres to become less attached to each other, and excess fibres will come off easier.
3. Leave in the freezer for a few hours before taking it out and shaking it again.
4. Wash the garment according to the instructions on the yarn label.
Why does my garment pill?
Pilling is a natural process that happens to even the most exclusive of fibers. It's a natural sign of wear and tear that is hard to avoid, and that is most visible in high friction areas of your garment like a sweater's arms and cuffs.
You can make your garment look as new by removing the pilling, using a fabric comb or a pill/lint remover.
DROPS 43-10 |
||||||||||||||||||||||||||||||||||
|
||||||||||||||||||||||||||||||||||
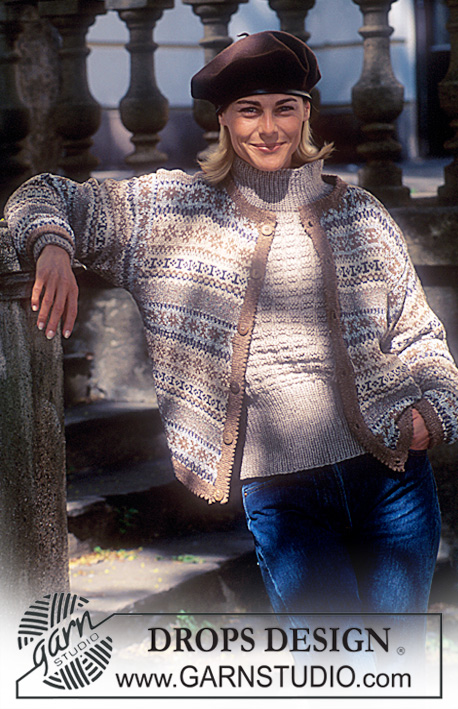
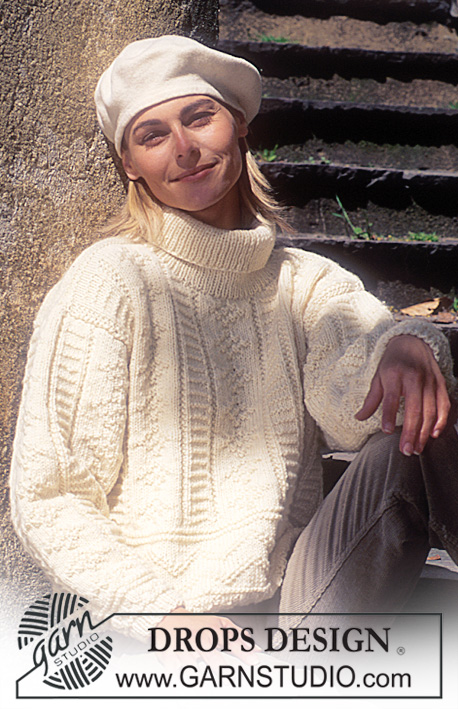
Sweater in Alaska og Nepal with border
DROPS 43-10 |
||||||||||||||||||||||||||||||||||
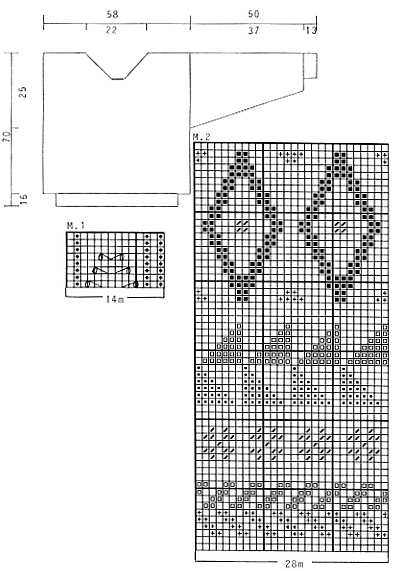
Knitting tension: 17 sts x 22 rows on needle size 5 mm in pattern = 10 x 10 cm Remember needle sizes are guidelines only! Pattern: See diagram (1 diagram = 1 pattern repeat) Diagrams are seen from RS. Body: Knit sweater on circular needles and cut up for armhole afterwards. Cast on 182 sts on circular needle size 4 mm with brown/medium brown and knit 1 round stocking sts and then M.1 5 times in height (= approx 16 cm). Change to circular needles size 5 mm, continuing knit M.2 and inc 14 sts evenly on 1st round = 196 sts. Remember knitting tension. When piece measures 45 cm inc 5 sts on each side for armhole (these sts are for cutting afterwards and are not knitted into pattern – ensure to place pattern repeat mid front). When piece measures 55 cm slip middle 8 sts for front neck onto a thread or stitch holder and complete knitting back and forth on needle. Continuing cast off to shape neckline on every other row: 1 sts 15 times. At the same time when piece measures 68 cm cast off middle 34 sts back for neck. Then cast off 2 sts on each side on next row to shape neckline. Cast off when piece measures 70 cm (adjust after pattern). Sleeve: Cast on 42 sts on double pointed needles size 4 mm with brown/medium brown and knit 1 round stocking sts and then M.1 4 times in height – at the same time inc mid under arm on every 5th row: 1 sts 6 times. Change to double pointed needles size 5 mm, knit M.2 continuously (ensure to place one pattern repeat mid top sleeve) and inc 8 sts evenly on 1st round = 56 sts. At the same time after M.1 inc mid under arm: 2 sts 15 times on every 5th row = 86 sts. When piece measures 50 cm knit 2 cm stocking sts with WS out for edge over cutting edge on body. Cast off. Assembly: Sew in a marking thread down the middle of inc sts on each side. Sew two seams on sewing machine around marking threads, 1st seam = 1/2 sts from thread, 2nd seam = 1/2 sts from 1st seam. Cut up for armhole. Sew shoulder seams. Pick up 98 sts around neckline on double pointed needles size 4 mm with brown/medium brown and knit M.1 2 times in height and cast off. Sew sleeves onto body from RS as follows: Sew alternating 1 sts in last garter st round of sleeve before folding edge and 1 sts on body after machine seam. Turn WS out on jacket and sew edge from sleeves over cutting edge on body by hand. |
||||||||||||||||||||||||||||||||||
Diagram explanations |
||||||||||||||||||||||||||||||||||
|
||||||||||||||||||||||||||||||||||
Have you made this or any other of our designs? Tag your pictures in social media with #dropsdesign so we can see them! Do you need help with this pattern?You'll find tutorial videos, a Comments/Questions area and more by visiting the pattern on garnstudio.com. © 1982-2024 DROPS Design A/S. We reserve all rights. This document, including all its sub-sections, has copyrights. Read more about what you can do with our patterns at the bottom of each pattern on our site. |
With over 40 years in knitting and crochet design, DROPS Design offers one of the most extensive collections of free patterns on the internet - translated to 17 languages. As of today we count 304 catalogues and 11422 patterns - 11422 of which are translated into English (UK/cm).
We work hard to bring you the best knitting and crochet have to offer, inspiration and advice as well as great quality yarns at incredible prices! Would you like to use our patterns for other than personal use? You can read what you are allowed to do in the Copyright text at the bottom of all our patterns. Happy crafting!
Comments / Questions (6)
Michelle wrote:
Thanks for the reply about the neckline. But if you look at the photo of the finished garment on the model, the neckline starts only a few cms before the shoulder seam. The way the instructions read, the neckline starts much further down - only 10cm after the start of the armholes. The way the instructions read and the way the garment looks on the model are completely different.
13.01.2022 - 13:47DROPS Design answered:
Dear Michelle, correct, you start neck 15 cm before shoulder, ie 10 cm after armhole (= armhole is a total of 25 cm). Feel free to make it shorter. Happy knitting!
13.01.2022 - 16:15Michelle wrote:
Two problems: 1. I have left 8 stitches on a holder after 55cm but this leaves the front of the sweater looking more like a V neck than what is shown on the model photo. My tension is correct yet 55cm brings me to nowhere near where the pattern is showing as being at the neckline in the photo. Is there a typo?? 2. Pattern says only one ball of each shade other than brown & cream but I have run out of the olive half way up the 2nd sleeve and now it's out of stock!
11.01.2022 - 14:37DROPS Design answered:
Dear Michelle, the neck on front piece started when piece measures 55 cm - see also measurement chart for the V-neck. You then continue back and forth decreasing for neck on each side, and cast off stitches for neck on back piece when piece measures 68 cm. The height of the neck is now shown on the chart, only its shape. You then will work M.1 around (picking sts around + 8 sts on thread). Sorry for the missing yarn, this info will be forwarded to our design team. Happy knitting!
12.01.2022 - 06:32Michelle wrote:
What a good job I decided to watch some of the explanatory videos BEFORE buying all my yarn etc. There is nothing in the pattern itself that mentions that you need A SEWING MACHINE!!!! Is it possible to complete this sweater by splitting the front and the back at the beginning of the armholes and working from two lots of yarn? I really don't want to have to go out an buy a sewing machine - that makes it a very expensive sweater indeed.
18.11.2021 - 12:09DROPS Design answered:
Dear Michelle, sure you can adjust the pattern to divide piece for armholes instead of casting on steek stitches - just cast on 1 extra st on each side for seam allowance and adapt pattern if necessary - or find with this video other way to work and cut steek stitches without sewing machine, but with a crochet hook. Happy knitting!
18.11.2021 - 17:18Rita wrote:
Grazie per la risposta, ma intrecciando solo sul diritto (ferri alterni), significa che lo scollo a V viene modellato sempre e solo da una parte delle 8 maglie messe in attesa sul ferro ausiliario. Cosa non capisco? Grazie Rita
07.05.2018 - 23:17DROPS Design answered:
Buongiorno Rita, si, quando mette le maglie centrali in sospeso lavora le parti laterali in modo separato, come indicato, prima una spalla poi l'altra. Buon lavoro!
08.05.2018 - 09:23Rita wrote:
“Quando il lavoro misura 55 cm trasferire le 8 m centrali per il collo davanti su un fermamaglie e finire il lavoro avanti e indietro sui f. Continuare a intrecciare per modellare la scollatura a f alterni: 1 m 15 volte. “ significa che intreccio una maglia sul diritto vicino alle 8 maglie in attesa, poi giro il lavoro e intreccio una maglia sul rovescio vicino alle maglie in attesa. Faccio un avanti e un indietro senza intrecciare (ferri alterni) e poi ripeto per altre 14 volte? Grazie Rita
06.05.2018 - 23:26DROPS Design answered:
Buongiorno Rita. Deve chiudere la maglia un ferro sì e un ferro no, quindi se intreccia la prima volta sul diritto del lavoro, lavora il ferro successivo (sul rovescio) senza intrecciare, poi intreccia nuovamente sul diritto. Buon lavoro!
07.05.2018 - 08:49Sophie Serot wrote:
Ce modèle est superbe j'ai promis de le réaliser pour ma fille le problème c'est qu'elle fait une taille xs/S comment adapter ce pull à sa taille (en réduisant d'un motif soit 14 mailles la réduction sera -t' elle suffisante et comment du coup adapter les manches? merci de votre aide je n'ai pas l'habitude des jacquards mais plutôt des torsades ou des points ajourés.
30.11.2016 - 16:29DROPS Design answered:
Bonjour Mme Serot, vous pouvez vous aider du schéma des mesures et d'un modèle analogue qui lui irait pour ajuster comme vous le souhaitez. Pour toute assistance personnalisée, contactez votre magasin, il pourra vous aider et vous renseigner. Bon tricot!
01.12.2016 - 08:53