
Popular categories
Looking for a yarn?


Comments / Questions (7)
![]() Jane wrote:
Jane wrote:
I love this jacket. Because it would take a very long time, I suggest calling it the 2-Year Jacket.
04.01.2025 - 02:52
![]() HELENE ESCANDE wrote:
HELENE ESCANDE wrote:
Que faire lors des changement de motifs, des couleurs qui doivent être retrouvées bien plus haut dans le motifs ? Doit on couper les fils des pelotes en attente ? Merci pour vos réponses
13.02.2021 - 08:24DROPS Design answered:
Bonjour Mme Escande, vous pouvez faire suivre les fils non utilisés en hauteur et les croiser en début de tour tous les 3 cm environ ou bien les couper si vous préférez. Bon tricot!
15.02.2021 - 07:24
![]() ESCANDE HELENE wrote:
ESCANDE HELENE wrote:
Bonjour, Je me suis lancée à tricoter ce beau modèle !! après avoir tricoté la bordure (en circulaire)...j'ai compris que cette bordure est tricotée en aller et retour !!! et ce n'est pas précisé . On tricote en circulaire après la bordure avec les ajouts des 5 mailles steeks. Ai-je bien compris avant de redémarrer ma bordure avec mes 240 mailles !!! Merci de votre réponse rapide Hélène
09.02.2021 - 10:43DROPS Design answered:
Bonjour Mme Escande, effectivement, les modèles plus anciens sont expliqués différemment; dans ce cas, vous tricotez bien la bordure en rangs = en allers et retours et tricotez en rond uniquement après avoir monté les mailles steek de la bordure devant. Bon tricot!
09.02.2021 - 16:14
![]() ESCANDE HELENE wrote:
ESCANDE HELENE wrote:
Bonjour, Peut on éviter ces mailles steek qui me dérangent vraiment ?? d'après ce que je comprend ce jacquart est fait sur chaque rang jersey ?? il n'y a donc pas un rang retour (envers)..... ce modèle est magnifique mais ....j'hésite à cause de ces mailles à découper ensuite.... merci pour votre aide Hélène
31.01.2021 - 11:44DROPS Design answered:
Bonjour Mme Escande, cette leçon explique comment adapter un modèle sur aiguilles droites. Vous trouverez également une vidéo montrant les mailles steek des manches ici et une autre sur les bordures des devants là. Bon tricot!
01.02.2021 - 09:34
![]() Nicole wrote:
Nicole wrote:
Beste, ik heb 240 steken opgezet voor het vest maar vraag me af waar ik moet beginnen met breien zodat de motieven mooi spiegelen bij de knopenbies. Kunt u mij hierbij helpen?
19.06.2020 - 07:46DROPS Design answered:
Dag Nicole,
Het patroon heeft 24 steken, dus je breit 10 herhalingen van het patroon. In principe begin je gewoon met de eerste steek rechts onder.
23.06.2020 - 13:59
![]() Lieve Hesius wrote:
Lieve Hesius wrote:
Beste, Graag wil Ik bovenstaande vest breien in de maat xl . Hoe kan Ik best de juiste berekening maken? Of is de beschrijving dit patroon ook beschikbaar in de maat xl? Dank je voor een spoedig antwoord.
12.09.2018 - 10:30DROPS Design answered:
Dag Lieve, Helaas is dit (wat oudere patroon) alleen in maat S en maat L. Je zou van een nieuwer patroon een tekening er bij kunnen pakken voor de afmetingen in XL of een vest uit je kledingkast die goed ziet en daarvan de maten opmeten.
12.09.2018 - 13:24
![]() Quentin Sandra wrote:
Quentin Sandra wrote:
Hallo Ich vermisse die Beschreibung des Halsbündchens :(
02.09.2016 - 06:17DROPS Design answered:
Liebe Frau Quentin, der Text wird korrigiert so schnell wie möglich, für die Halskante müssen Sie so stricken: Mit Rundnadel Nr 2,5 mit braun ca 120 M. aus dem Halsausschnitt auffassen, die Kante mit 2,5 cm glatt (anstattt 3 cm) stricken.
02.09.2016 - 08:40
|
|||||||||||||||||||
DROPS 43-2 |
|||||||||||||||||||
|
|
|||||||||||||||||||
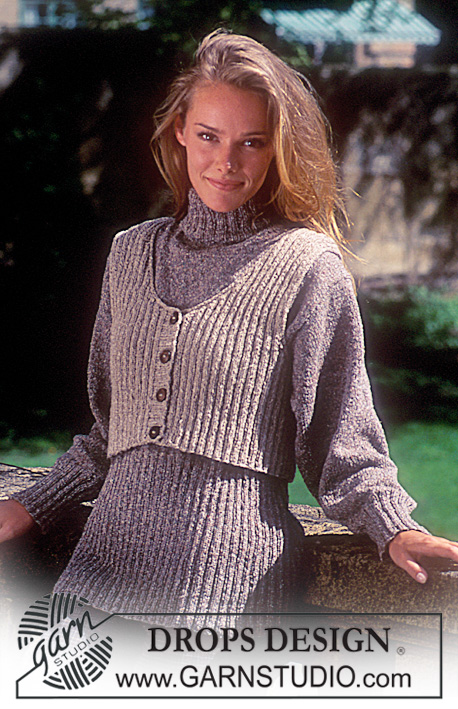
DROPS jacket in Silke-tweed with tweed border Sweater in Alaska or Silke-tweed with texture
DROPS 43-2 |
|||||||||||||||||||
|
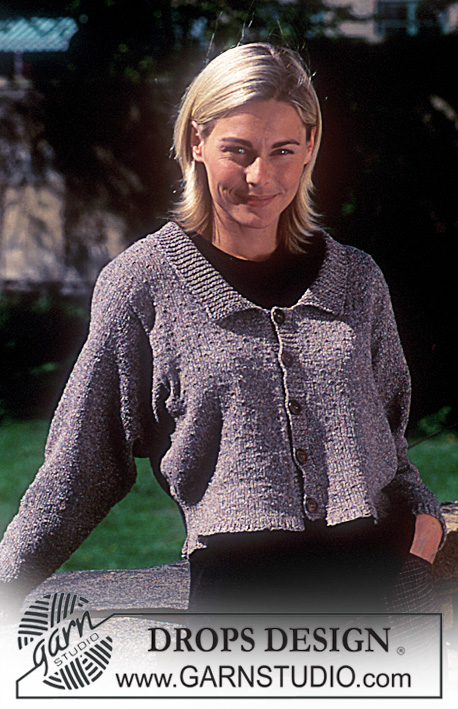
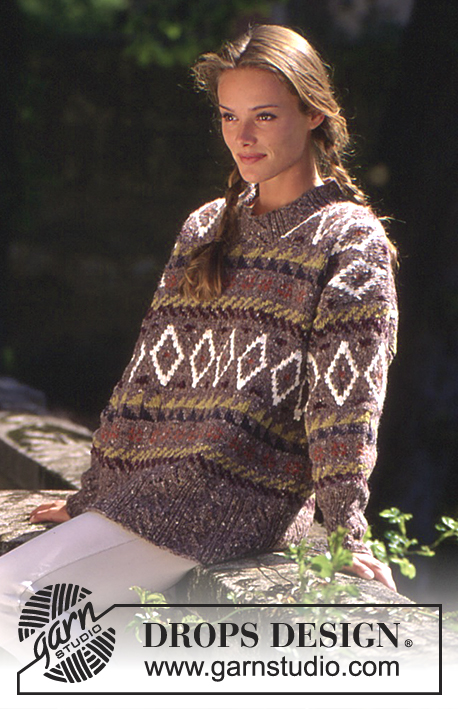
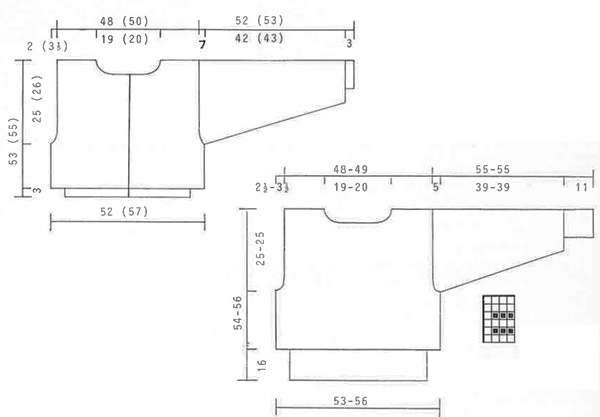
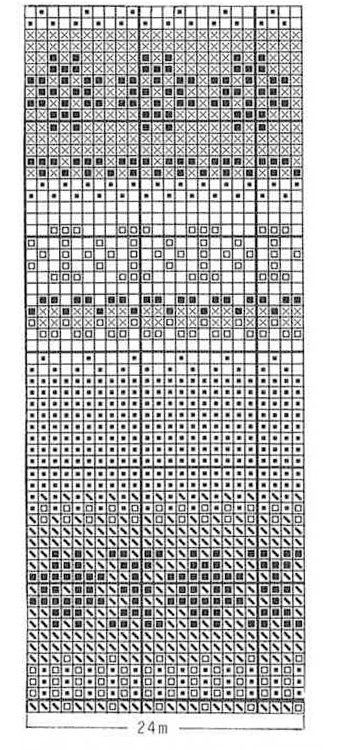
JACKET CONTINUED: Knitting tension: 23 sts x 30 rows on needle size 3.5 mm and pattern = 10 x 10 cm Remember needle sizes are guidelines only! Pattern: See diagram (1 diagram = 1 pattern repeat) Diagrams are seen from RS. Knit entire pattern in stocking sts. Edge: Knit 3 cm stocking sts, next row as follows: * K2 tog, YO (= folding edge – measure piece from here) *, 3 cm stocking sts. Body: Knit jacket in the round on circular needles after ridges and cut up for armholes and mid front when knitting is completed. Knit edge back and forth on needle. Cast on 240 (264) sts on circular needle size 2.5 mm with brown and knit Edge. Change to needle size 3.5 mm, inc 5 sts mid front (these sts are for cutting afterwards and should not be incorporated into the pattern – knit in the round on circular needles) continuing, knit Pattern. Remember knitting tension. When piece measures 28 (29) cm knit next row as follows: 58 (64) sts front piece, cast off 4 sts for armhole, 116 (128) sts back piece, cast off 4 sts for armhole, 58 (64) sts front piece. On next row, cast on 5 sts over the 4 cast off sts on each side (these sts are for cutting up afterwards). Continuing cast off for armhole on each side of the 5 sts on side of ever other row: 1 sts 3 (6) times (Each front piece = 55 (58) sts + 5 sts mid front), (Back piece = 110 (116) sts). When piece measures 48 (50-55) cm cast off middle 8 (10) (+ the 5 sts) for neck front. and continue cast off to shape neckline on every other row: 3 sts 1 time, 2 sts 5 times, 1 sts 5 times. When piece measures 51 (53) cm cast off middle 40 (42) sts back neck. Then cast off 2 sts on each side on next row to shape neckline back. Cast off when piece measures 53 (55) cm (adjust after pattern). Sleeve: Cast on 52 (60) sts on double pointed needles 3,5 (2,5) mm with brown and knit Edge. Change to double pointed needles size 3.5 mm, inc 8 (2) sts evenly on 1st round = 60 (62) sts and continue knitting pattern (ensure to place one pattern repeat mid sleeve). At the same time after Edge inc mid under arm: 2 sts 28 (29) times on every 4th round = 116 (120) sts. When piece measures 45 (46) cm slip 6 onto thread or stitch holder mid under arm and complete knitting back and forth on needle. Continuing slip sts onto thread or stitch holder to shape sleeve cap on every other row: 4 sts 9 times. Piece measures approx 52 (53) cm. Slip all sts onto same circular needle again. Now knit 2 cm stocking sts with WS out for edge over cutting edge on body. Cast off loosely. Assembly: Sew in a marking thread down middle of inc sts on each side and mid front. Sew two seams on sewing machine around marking threads, 1st seam = 1/2 sts from thread, 2nd seam = 1/2 sts from 1st seam. Cut up for armhole and mid front. Sew shoulder seams. Sew sleeves onto body from RS as follows: Sew alternating a sts in last garter st round of sleeve before edge and a sts on body after machine seam. Turn WS out on jacket and sew edge from sleeves over cutting edge on body by hand. Pick up approx 130 sts along left front band on circular needle size 2.5 mm with brown and knit Edge. Repeat along right front piece but after 1 cm knit 6 buttonholes evenly distributed on row - 1 button hole = cast off 3 sts and cast on 3 new sts over cast off sts on next row. Fold edge double towards WS over cutting edge of body and sew. Pick up approx 120 sts around neckline on circular needle size 2.5 mm with brown and knit 2.5 cm edge in stead of 3 cm. Fold edges double and sew. Sew in buttons. ________________________________________ SWEATER: Size: Small/medium - Medium/large Materials: DROPS Alaska from Garnstudio 700-800 g colour no 49, beige or use DROPS Silke-tweed: 350-400 g colour no 8, beige DROPS Circular needle and double pointed needles size 3.5 (2.5) and 5 (3.5) mm. Knitting tension: 17 sts x 22 rows (23 sts x 30 rows) on needle size 5 (3.5) mm in pattern = 10 x 10 cm Remember needle sizes are guidelines only! Pattern: See diagram (1 diagram = 1 pattern repeat) Diagrams are seen from RS. Rib: * K1, P1 *, Repeat from *-*. Body: Figures in () = SilkeTweed. Cast on 180-192 (244-256) sts on circular needle size 3.5 (2.5) mm with beige and knit 16 cm Rib. Change to circular needles size 5 (3.5) mm. Continue in Pattern. Remember knitting tension. When piece measures 29-31 (29-31) cm knit next row as follows: Cast off 2 sts for armhole, 86-92 (118-124) sts front piece, cast off 4 sts for armhole, 86-92 (118-124) sts back piece, cast off 2 sts for armhole. Complete each piece separately. Front piece: = 86-92 (118-124) sts. Continuing cast off for armhole on every other row: 2 sts 1 (1-2) times, 1 sts 0-2 (2-2) times = 82-84 (110-112) sts. When piece measures 49-51 (49-51) cm cast off middle 20-22 (32-34) sts for neck Continuing cast off to shape neckline on every other row: 2 sts 2 times, 1 sts 2 times. Cast off when piece measures 54-56 (54-56) cm Back piece: = 86-92 (118-124) sts. Continuing cast off for armhole like front piece = 82-84 (110-112) sts. When piece measures 52-54 (52-54) cm cast off middle 28-30 (40-42) sts to shape neckline. Then cast off 2 sts on each side on next row to shape neckline. Cast off when piece measures 54-56 (54-56) cm Sleeve: Cast on 48-48 (64-64) sts on circular needle size 3.5 (2.5) mm with beige and knit 11 cm Rib. Change to double pointed needles size 5 mm. Continue in pattern. At the same time after Rib inc mid under arm: 2 sts 19-19 (26-26) times on every 4th round = 86-86 (116-116) sts. When piece measures 50-50 (50-50) cm cast off 4 sts mid under arm and complete knitting back and forth on needle. Continuing cast off to shape sleeve cap on every other row: 5 sts 4 times (6 sts 6 times), cast off. Piece measures approx 55-55 (55-55) cm. Assembly: Sew shoulder seams. Pick up approx 98-102 (120-130) sts around neckline on double pointed needles size 3.5 (2.5) mm with beige and purl 1 round and then knit 8 cm rib, cast off. Sew in sleeves. |
|||||||||||||||||||
Diagram explanations |
|||||||||||||||||||
|
|||||||||||||||||||
|
|||||||||||||||||||
|
|||||||||||||||||||
Have you finished this pattern?Tag your pictures with #dropspattern or submit them to the #dropsfan gallery. Do you need help with this pattern?You'll find 25 tutorial videos, a Comments/Questions area and more by visiting the pattern on garnstudio.com. © 1982-2025 DROPS Design A/S. We reserve all rights. This document, including all its sub-sections, has copyrights. Read more about what you can do with our patterns at the bottom of each pattern on our site. |
|||||||||||||||||||


With over 40 years in knitting and crochet design, DROPS Design offers one of the most extensive collections of free patterns on the internet - translated to 17 languages. As of today we count 314 catalogues and 11822 patterns translated into English (UK/cm).
We work hard to bring you the best knitting and crochet have to offer, inspiration and advice as well as great quality yarns at incredible prices! Would you like to use our patterns for other than personal use? You can read what you are allowed to do in the Copyright text at the bottom of all our patterns. Happy crafting!
Post a comment to pattern DROPS 43-2
We would love to hear what you have to say about this pattern!
If you want to leave a question, please make sure you select the correct category in the form below, to speed up the answering process. Required fields are marked *.