
Popular categories
Looking for a yarn?


Comments / Questions (58)
![]() Mme Nasri Aïcha wrote:
Mme Nasri Aïcha wrote:
Bonsoir, je tricote la taille L c est à dire j'ai monté 128 mailles. Après avoir tricoter le col , je viens de placer les marqueurs comme vous l avez mentionné mais la division n' est pas correcte ,alors j' ai divisé comme suit: 15 mailles pour la première manche, (2 mailles raglan) 46 mailles pour le dos,(2 mailles raglan), 15 mailles pour la deuxième manche et enfin 46 mailles pour le devant. Est -ce que c'est correct
27.04.2026 - 18:58DROPS Design answered:
Bonjour Mme Nasri, pas exactement car il vous manque des mailles du raglan (de chaque côté du devant), les marqueur sont placés ainsi: 16, 48,16,48 et vous tricotez ensuite 1 m jersey (demi-raglan), 14 m manche, 2 m jersey (raglan), 46 m devant, 2 m jersey (raglan), 14 m manche, 2 m jersey (raglan), 46 m dos et 1.m jersey (demi-raglan). Bon tricot!
28.04.2026 - 08:37
![]() Mimi wrote:
Mimi wrote:
Hvad mener i med; Samtidig med at der tages 1 maske ind på hvert ærme, 1 maske på forstykket og 1 maske på bagstykket (= 4 masker taget ind) Skal det tages ind på ærme siden foran og bagstykket bagfra eller to masker på hvert ærme?
08.03.2026 - 15:50DROPS Design answered:
Hej Mimi, du tager 1 masker ind på hvert ærme, 1 maske ind på forstykket og 1 maske ind på bagstykket. Nu stemmer antal masker så du kan starte udtagningen til raglan ifølge opskriften :)
08.04.2026 - 11:23
![]() Podunavac Claudette wrote:
Podunavac Claudette wrote:
Bonjour, pourquoi faut-il, à la fin du pull, après avoir tricoté jusqu'à 52 cm à partir du marqueur du col, augmenter en taille L de 76 mailles en même temps que la bordure en côtes 2/2 ? je désire apporter une légère modification à cet endroit. Que les côtes soient serrées pour donner un aspect différent au modèle avec un léger retombé par dessus. Merci pour votre réponse
16.02.2026 - 11:44DROPS Design answered:
Bonjour Mme Podunavac, on augmente juste avant les côtes pour que les côtes ne resserrent pas le bas du pull, parce qu'il faut davantage de mailles pour les côtes avec les aiguilles 2,5 que pour le jersey avec les aiguilles 3,5. Si vous voulez que les côtes resserrent le bas du pull, il vous faudra faire les ajustements nécessaires en fonction de la largeur que vous souhaitez. Bon tricot!
17.02.2026 - 15:04
![]() Podunavac Claudette wrote:
Podunavac Claudette wrote:
Bonjour, le partage pour l'empiècement me pose problème. En taille L si je pose 1 marqueur apres 16 mailles puis 1 marqueur après 48 mailles puis un marqueur après 16 mailles il me reste 48 mailles. Est-ce bien équilibré ?
02.02.2026 - 10:50DROPS Design answered:
Bonjour Mme Podunavac, tout à fait, les tours commencent à la transition entre la manche droite et le devant, vous avez 16 m pour chaque manche et 48 m pour le dos et le devant. Notez que vous avez 2 mailles pour chaque raglan, vous aurez donc ceci: 1 m raglan, 14 m manche, 2 m raglan (avec 1 marqueur au milieu), 46 m devant, , 2 m raglan (avec 1 marqueur au milieu), 14 m manche, , 2 m raglan (avec 1 marqueur au milieu), 46 m dos, 1 m raglan = 1+14+2+46+2+14+2+46+1= 128 mailles. Bon tricot!
02.02.2026 - 17:04
![]() Birgitta wrote:
Birgitta wrote:
Hej! Har fört över ärmmaskorna på en tråd och ska fortsätta sticka fram- o bakstycke ihop. Efter att jag lagt upp de 9 extra maskorna för ärmhålen, och ska fortsätta sticka mosstickning, stämmer inte mönstret. Vid båda ärmhålen får jag två räta alternativt aviga maskor efter varandra... Ska man fortsätta med de två räta raglanmaskorna som en "vertikal linje" i varje sida, för att undvika detta? Eller finns det något tips?
26.01.2026 - 20:23DROPS Design answered:
Hei Birgitta. Ville ha prøvd å tilpasse det slik at mønstret stemmer, ellers så vil du få et ujevnt mønster i sidene. mvh DROPS Design
02.02.2026 - 14:44
![]() Susanne Meyer wrote:
Susanne Meyer wrote:
Ich denke dass darin ein Fehler ist bei den Armen die stillgelegt werden käme ich auf 68 und nicht auf 69 da ist bestimmt ein druckfehler drin
30.12.2025 - 18:03
![]() Shiva wrote:
Shiva wrote:
Hej Jeg vil høre om jeg uden forbehold kan strikke “September song” (M 450 g) i Drops Baby merino? Mvh Shiva Wollenberg
22.12.2025 - 10:35DROPS Design answered:
Hej Shiva, ja det kan du, brug vores omregner, så kan du se hvor meget du skal bruge i din størrelse :)
22.12.2025 - 12:01
![]() Laura wrote:
Laura wrote:
Bonjour, j’aimerais faire ce modèle avec plusieurs couleurs. Lors du changement de couleur je dois faire 1 rang endroit est-ce que vous croyez que cela sera apparant?
21.12.2025 - 20:42DROPS Design answered:
Bonjour Laura, peut être que cette vidéo pourra vous aider à tricoter des rayures sans décalage visible. Bon tricot!
23.12.2025 - 17:57
![]() Natalie wrote:
Natalie wrote:
Hello, I'm making this sweater and my raglan lines are turning out skewed. I wish I could add a picture here... Like all 4 of them are leaning counterclockwise. I don't understand what I am doing wrong. I'm certain there are no twisted stitches, and I'm increasing on each side of the raglan lines as described. I've started over the second time already and still ended up with skewed raglan lines. So I'm hesitant to go on working... Could you please help? Thank you!
09.11.2025 - 13:35DROPS Design answered:
Hi Natalie, please send the picture to poland@dropsproject.com, I will try to find out what is going on on your sweater:)
19.11.2025 - 08:03
![]() Bènee wrote:
Bènee wrote:
Beginning of round is at right shoulder at the back. Insert 1 marker in piece after the first 38-40-40-42-44-46 stitches on round (= approx. mid front), measures piece from this marker." How do I get to the beginning after working 9cm of neck? Do I cut yarn then start directly at beginning marker or continue the neck pattern to beginning marker thread before separating the parts? Thanks
14.10.2025 - 08:27DROPS Design answered:
Hi, the beginning of round is still at right shoulder at the back (you can put a marker here). The second marker (preferably in another colour) will be put after the first 38-40-40-42-44-46 stitches on round without working the stitches (= approx. mid front) - this marker will stay at the same place, it is used only for measurements. So don't cut the yarn, just continue YOKE part. Happy knitting!
14.10.2025 - 09:20
|
|||||||
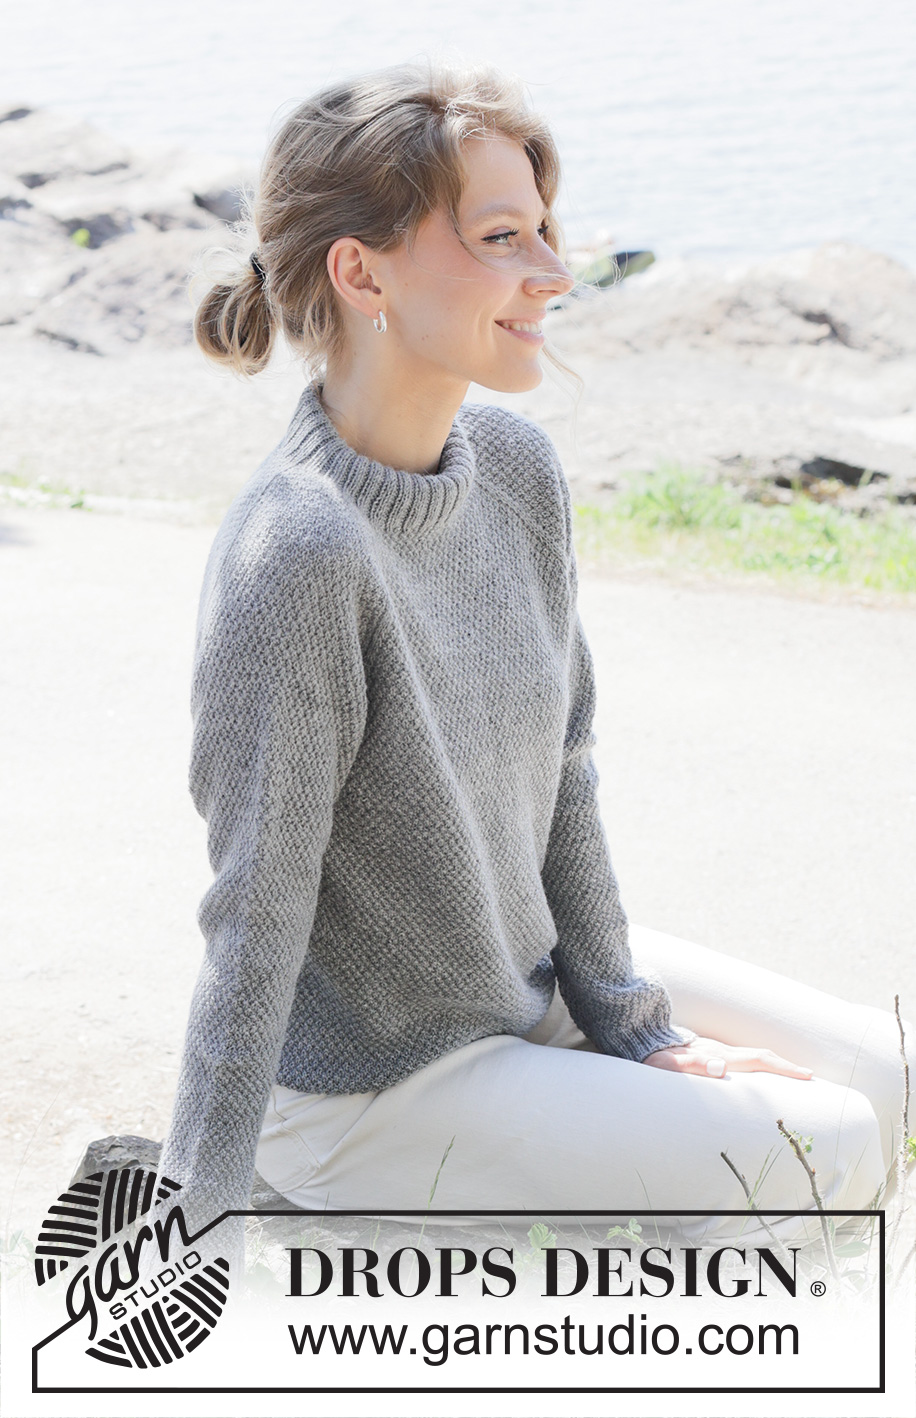
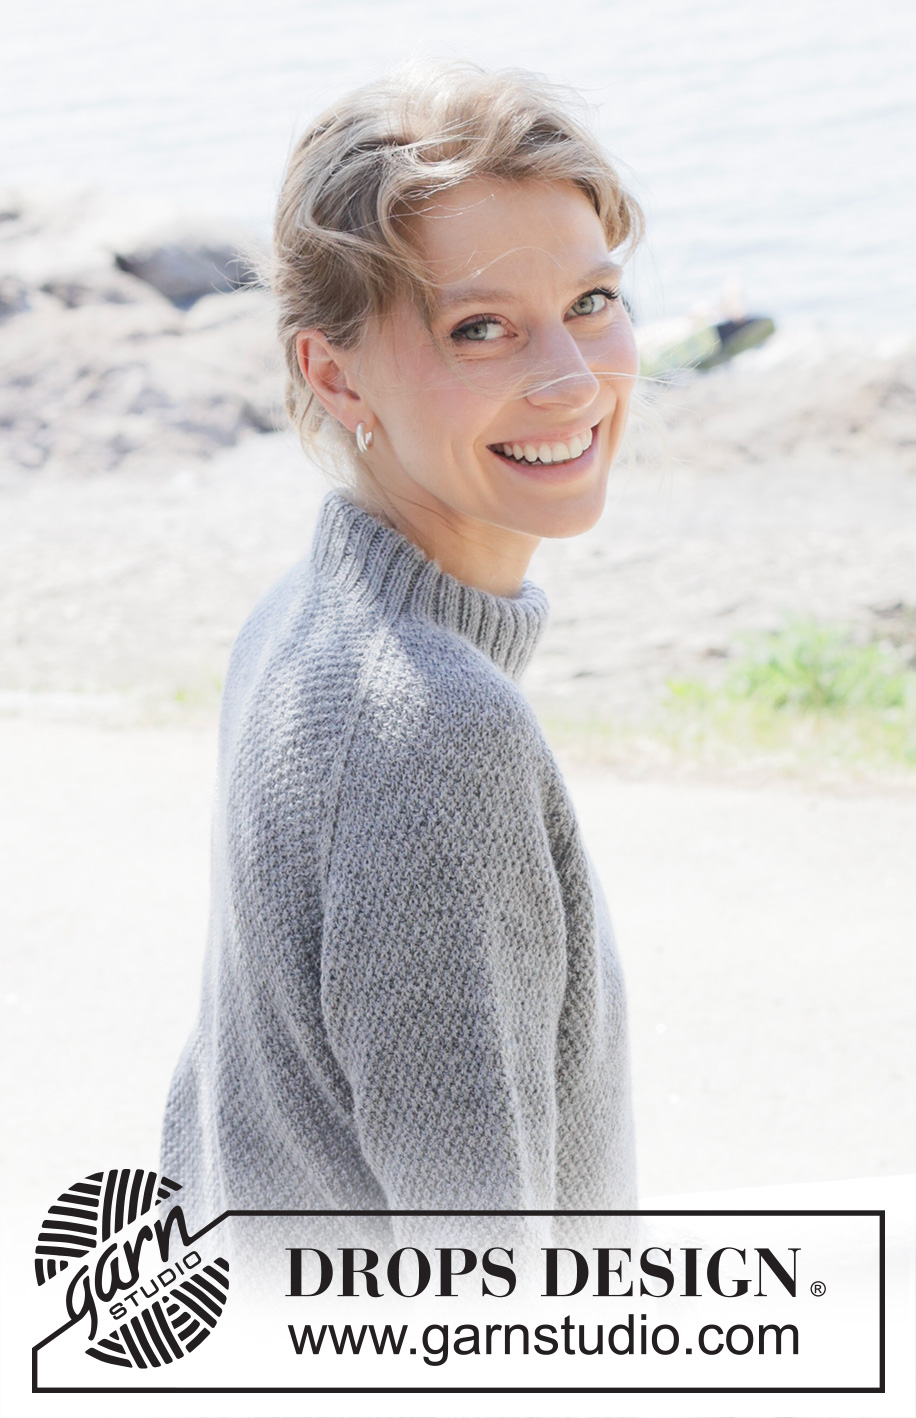
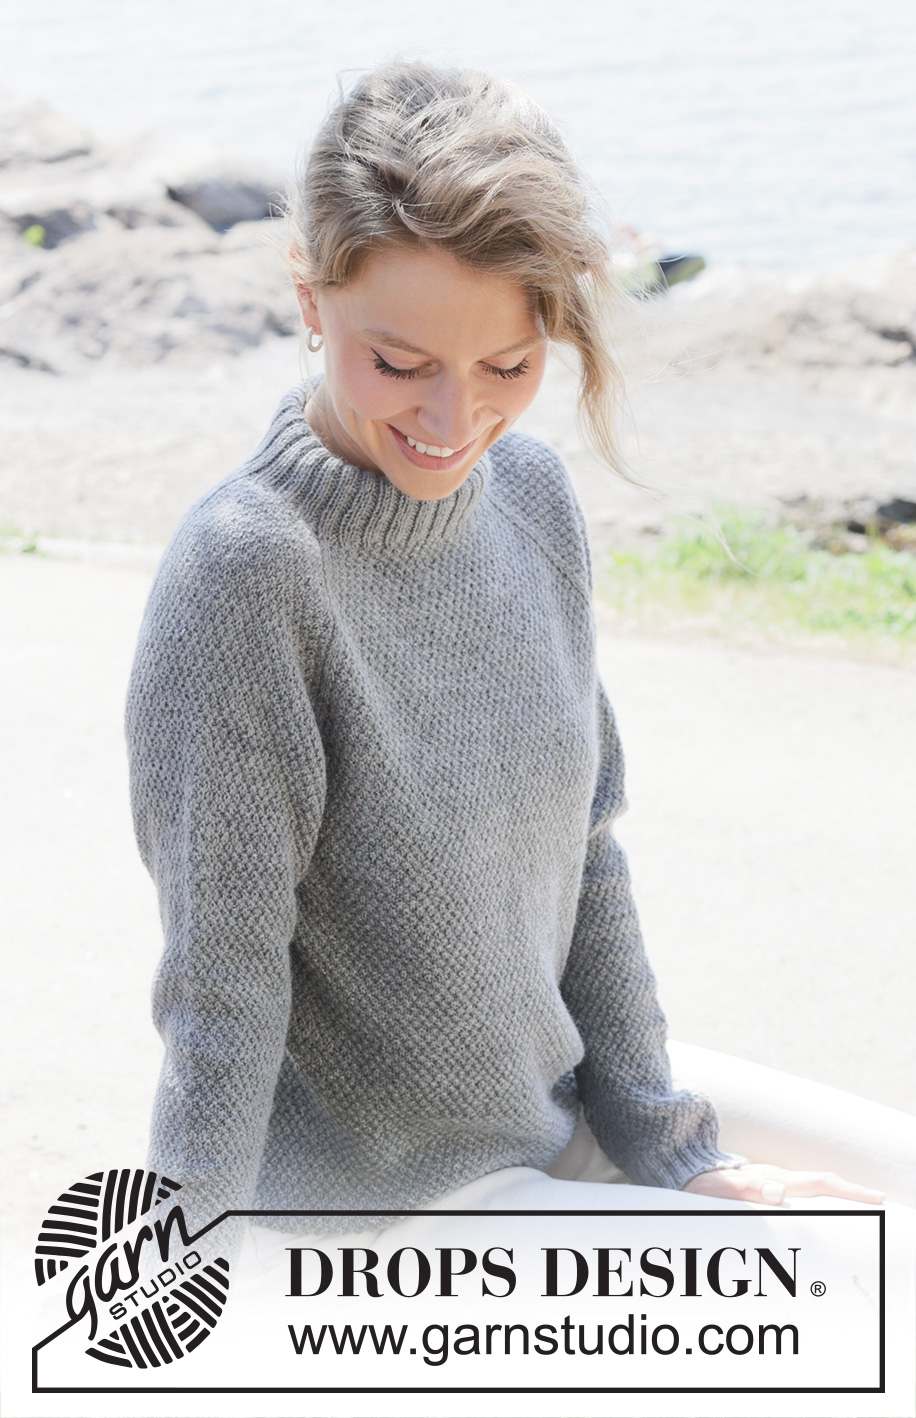
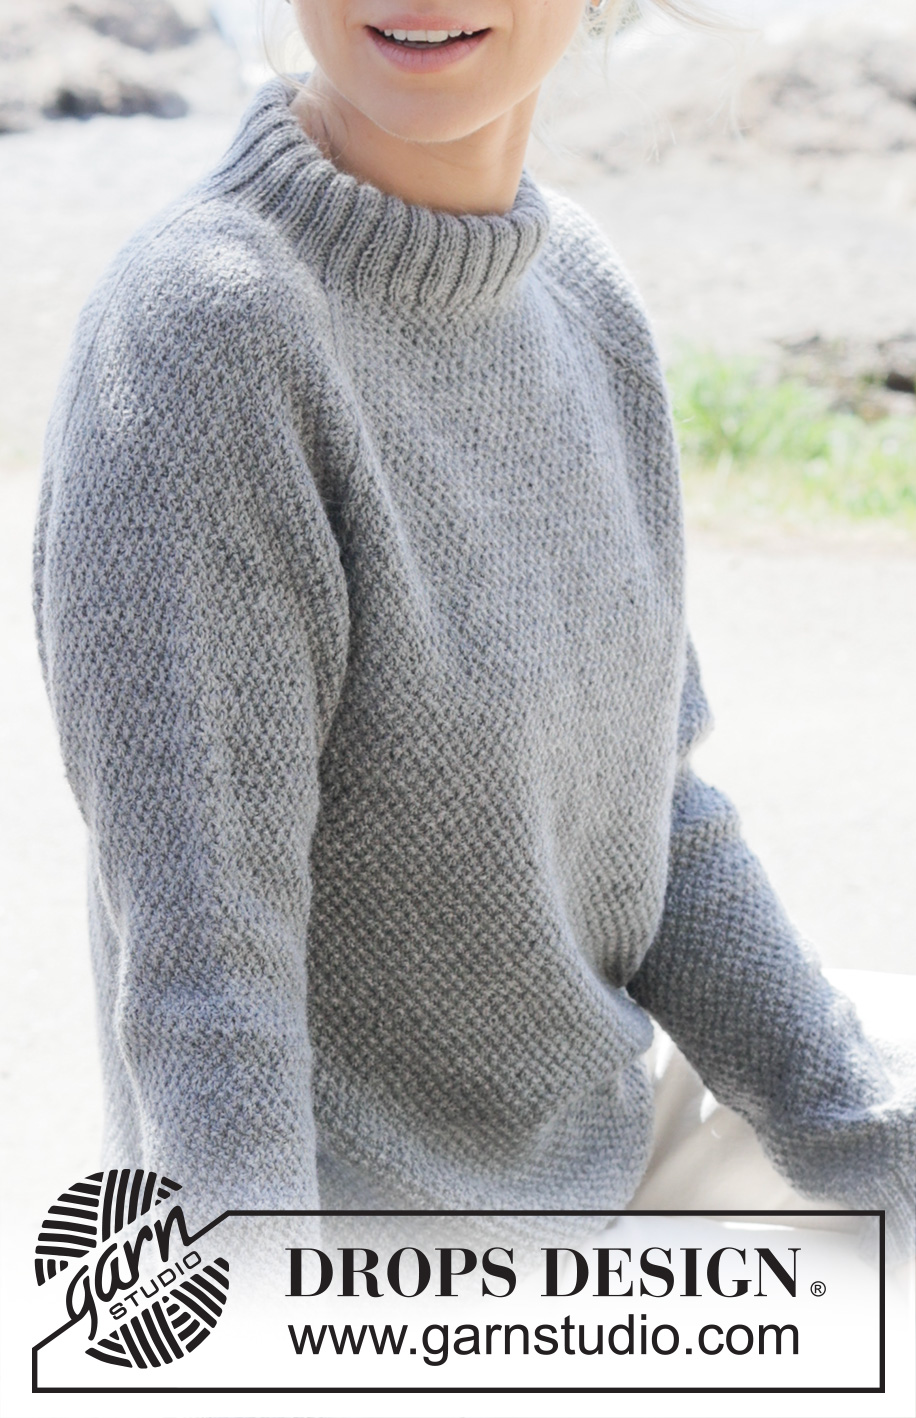
September Song#septembersongsweater |
|||||||
 |
 |
||||||
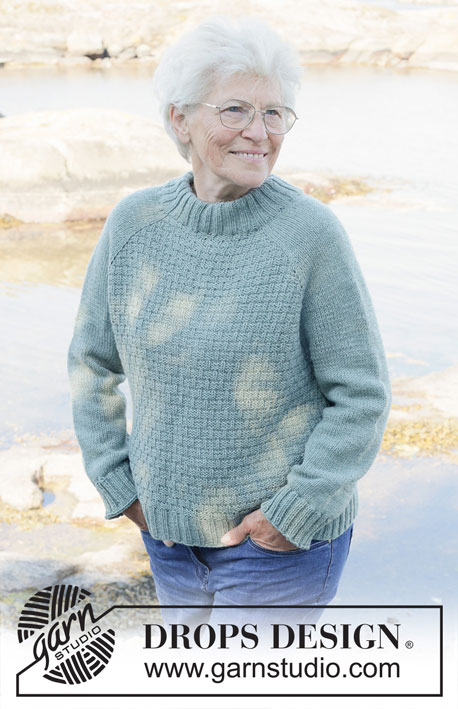
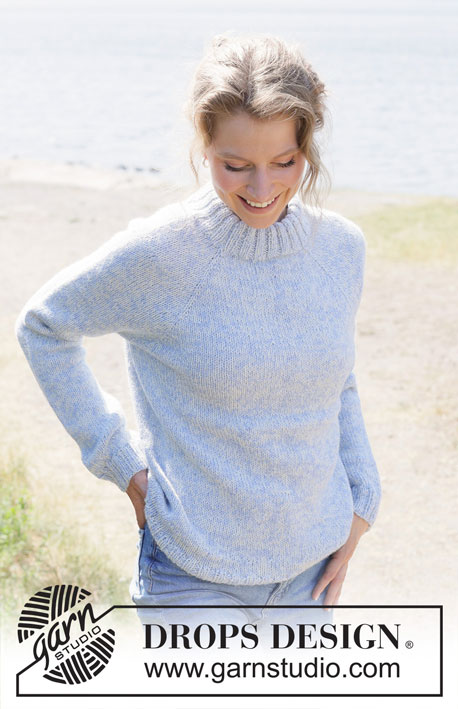
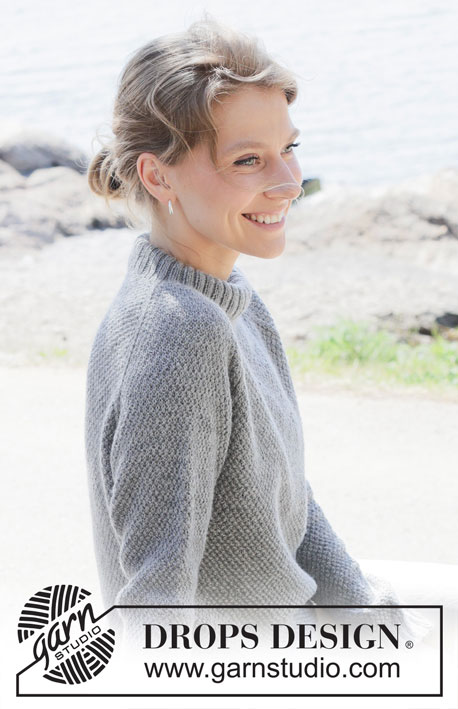
Knitted jumper in DROPS Nord or DROPS Flora. Piece is knitted top down with raglan, moss stitch and double neck edge. Size: S - XXXL
DROPS 252-21 |
|||||||
|
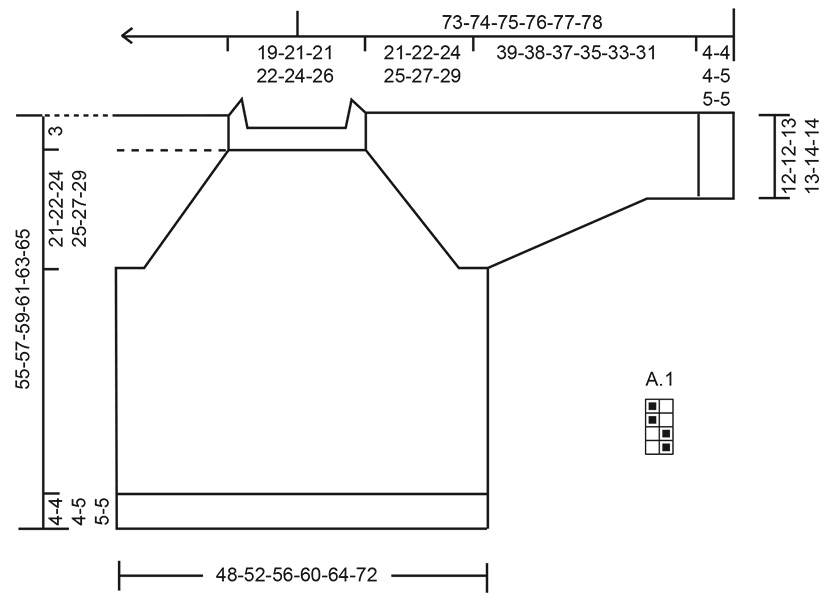
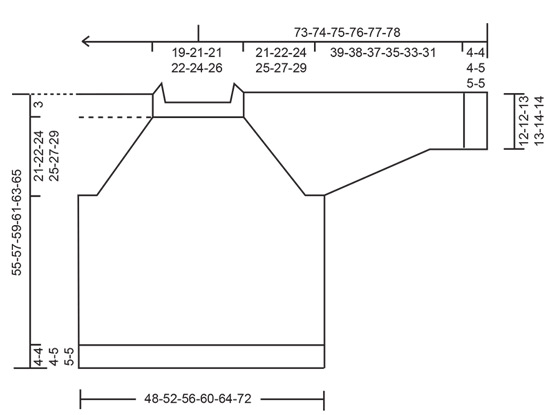
---------------------------------------------------------- EXPLANATION FOR THE PATTERN: ---------------------------------------------------------- PATTERN: See diagram A.1. RAGLAN: Increase 1 stitch by making 1 yarn over, on next round knit yarns over as explained below: BEFORE MARKER THREAD: Slip stitch off left needle and put it back on left needle but the opposite way (insert left needle in from behind when slipping it back on needle). Knit yarn overs in front loop of stitches to avoid holes. Then work the new stitches in pattern. AFTER MARKER THREAD: Knit yarn overs in back loop of stitches to avoid holes. Then work the new stitches in pattern. DECREASE TIP: Decrease 1 stitch on each side of stitch with marker as follows: Work until 2 stitches remain before stitch with marker, knit 2 together, knit 1 (= stitch with marker) slip 1 stitch knitwise, knit 1, pass slipped stitch over stitch worked (= 2 stitches decreased). Adjust the pattern after each decrease mid under sleeve. ---------------------------------------------------------- START THE PIECE HERE: ---------------------------------------------------------- JUMPER - SHORT OVERVIEW OF THE PIECE: In this pattern needles of different length have been used, begin with fitting length for number of stitches and switch as needed. Work neck edge and yoke in the round on circular needle from right shoulder back, and work top down. When yoke is done, divide piece for body and sleeves. Work body down wards in the round on circular needle while putting the sleeves aside. Then work sleeves downwards in the round on needle. Fold the neck edge double against the wrong side and fasten. NECK EDGE: Cast on 120-128-128-136-144-152 stitches on circular needle size 3.5 mm with DROPS Nord or DROPS Flora. Switch to circular needle size 2.5 mm (cast on on a larger needle to get an elastic cast-on edge). Work rib in the round as follows: Knit 1, * purl 2, knit 2 *, work from *-* until 3 stitches remain on round, finish with purl 2 and knit 1. Work until piece measures 9-9-9-11-11-11 cm. Later the neck edge is folded in towards wrong side and assembled to form a neck edge of approx. 4-4-4-5-5-5 cm. Beginning of round is at right shoulder at the back. Insert 1 marker in piece after the first 38-40-40-42-44-46 stitches on round (= approx. mid front), measures piece from this marker. YOKE: Switch to circular needle size 3.5 mm. Insert 4 marker threads in piece without working the stitches, insert marker threads between 2 knitted stitches, and these stitches are called raglan stitches and worked in stocking stitch. Insert 1st marker thread at beginning of round, count 16 stitches (= sleeve), insert 2nd marker thread before next stitch, count 44-48-48-52-56-60 stitches (= front piece), insert 3rd marker thread before next stitch, count 16 stitches (= sleeve), insert 4th marker thread before next stitch, 44-48-48-52-56-60 stitches remain after last marker thread (= back piece). Work 1 round in double moss stitch / A.1 (work raglan stitches on each side of marker thread in stocking stitch) AT THE SAME TIME decrease 1 stitch on each sleeve, 1 stitch on front piece and 1 stitch on back piece (= 4 stitches decreased) = 116-124-124-132-140-148 stitches. Continue with A.1 in the round and increase for RAGLAN on each side of the 4 marker threads - read explanation above. Increase for raglan every other round 27-29-32-36-37-40 times in total = 332-356-380-420-436-468 stitches (= 8 stitches increased on every increase round). Remember to follow the knitting tension! Increases for sleeve are now done, but continue to increase for raglan on front piece and back piece on every other round 4-4-5-3-4-5 more times = 348-372-400-432-452-488 stitches on needle (= 4 stitches increased on every increase round). Work without increasing until piece measures 21-22-24-25-27-29 cm from marker after neck edge. Now divide yoke for body and sleeves. DIVIDING FOR BODY AND SLEEVES: AT THE SAME as next round is worked divide yoke for body and sleeves as follows: Slip the first 69-73-79-87-89-95 stitches on a thread for sleeve, cast on 9-11-13-15-17-23 new stitches on needle (= in the side mid under sleeve), work 105-113-121-129-137-149 stitches as before (= front piece), slip the next 69-73-79-87-89-95 stitches on a thread for sleeve, cast on 9-11-13-15-17-23 new stitches on needle (= in the side mid under sleeve) and work the last 105-113-121-129-137-149 stitches in pattern as before (= back piece). Work body and sleeves separately. BODY: = 228-248-268-288-308-344 stitches. Begin round as before and adjust pattern over the new stitches cast on mid under sleeves. Work A.1 in the round over all stitches until piece measures 48-50-52-53-55-57 cm from marker mid front. Switch to circular needles size 2.5 mm, work rib (= knit 2/purl 2) while AT THE SAME TIME increasing 68-72-76-80-88-100 stitches evenly on 1st round = 296-320-344-368-396-444 stitches. When rib measures 4-4-4-5-5-5 cm cast off all stitches somewhat loosely. Jumper measures 52-54-56-58-60-62 cm from marker mid front and approx. 55-57-59-61-63-65 cm from the top of shoulder. SLEEVES: Slip 69-73-79-87-89-95 sleeve stitches from one thread on to circular needle size 3.5 mm and pick in addition up 1 stitch in each of the 9-11-13-15-17-23 stitches cast on under sleeve = 78-84-92-102-106-118 stitches. Insert 1 marker in the middle of the 9-11-13-15-17-23 new stitches under sleeve - round begins in this stitch. Continue A.1 from yoke in the round on needle - AT THE SAME TIME when sleeve measures 2 cm from division, decrease mid under sleeve – read DECREASE TIP and decrease as follows: Decrease 2 stitches every 4-3-2½-1½-1½-1 cm 9-12-14-19-19-25 times in total = 60-60-64-64-68-68 stitches - remember to adjust pattern when decreasing under sleeve. Work until sleeve measures 39-38-37-35-33-31 cm from division. Switch to double pointed needles size 2.5 mm and work rib (= knit 2/purl 2) while AT THE SAME TIME increasing 16-16-20-20-20-20 stitches evenly on 1st round = 76-76-84-84-88-88 stitches. When rib measures 4-4-4-5-5-5 cm cast off all stitches somewhat loosely. Sleeve measures approx. 43-42-41-40-38-36 cm from division. ASSEMBLY: Fold rib at the top of neck down on inside of garment. Fasten rib to get a double neck edge. To avoid a tight neck edge that sticks out it is important to keep the seam elastic. |
|||||||
Diagram explanations |
|||||||
|
|||||||
 |
|||||||
 |
|||||||
Have you finished this pattern?Tag your pictures with #dropspattern #septembersongsweater or submit them to the #dropsfan gallery. Do you need help with this pattern?You'll find 26 tutorial videos, a Comments/Questions area and more by visiting the pattern on garnstudio.com. © 1982-2026 DROPS Design A/S. We reserve all rights. This document, including all its sub-sections, has copyrights. Read more about what you can do with our patterns at the bottom of each pattern on our site. |
|||||||


With over 40 years in knitting and crochet design, DROPS Design offers one of the most extensive collections of free patterns on the internet - translated to 17 languages. As of today we count 325 catalogues and 12298 patterns translated into English (UK/cm).
We work hard to bring you the best knitting and crochet have to offer, inspiration and advice as well as great quality yarns at incredible prices! Would you like to use our patterns for other than personal use? You can read what you are allowed to do in the Copyright text at the bottom of all our patterns. Happy crafting!
Post a comment to pattern DROPS 252-21
We would love to hear what you have to say about this pattern!
If you want to leave a question, please make sure you select the correct category in the form below, to speed up the answering process. Required fields are marked *.