
Popular categories
Looking for a yarn?


Comments / Questions (10)
![]() Virpi wrote:
Virpi wrote:
A comment to Finnish text in "short explanation of the work". It is mentioned that at back work is knitted from bottom to top but I checked from Swedish description and it should be from top to bottom. Neulo sitten takakappale "alhaalta ylös" should be "ylhäältä alas". You have very seldom mistakes in Finnish descriptions, they are very easy to follow. :)
21.01.2026 - 08:44DROPS Design answered:
This is now fixed :)
22.01.2026 - 18:11
![]() Davina wrote:
Davina wrote:
Hi there, For the front piece, when I pick up stitches on the left shoulder, do I start picking up stitches by the neck side or the shoulder side please? Thank you! 😀
20.01.2025 - 09:22DROPS Design answered:
Dear Davina, pick up stitches for left shoulder front piece from after neck along shoulder towards armhole - see also this lesson. Happy knitting!
20.01.2025 - 15:30
![]() Costanza wrote:
Costanza wrote:
Ho una domanda sulla lunghezza delle maniche. Ho utilizzato la lunghezza specificata nello schema (20 cm per una taglia M) per le maniche, ma il risultato è considerevolmente più corto delle immagini proposte. Potreste per favore verificare? Grazie mille
22.08.2024 - 23:24DROPS Design answered:
Buonasera Costanza, ha assemblato il capo? La manica è lunga circa 24 cm ma l'attaccatura della manica è spostata verso il braccio, non a livello della spalla. Buon lavoro!
26.08.2024 - 21:18
![]() Audrey wrote:
Audrey wrote:
Hi,I was just wondering if this garment is felted ?thanks so much
13.04.2024 - 03:50DROPS Design answered:
Dear Audrey, no, this piece is not felted. It uses DROPS Sky yarn, that is a very special, light, fluffy, so called "blown" alpaca yarn. I hope this helps. Happy Knitting!
13.04.2024 - 20:27
![]() Daniela Cocco wrote:
Daniela Cocco wrote:
Buongiorno, vorrei sapere come mai non ci sia neppure un modello che spieghi la costruzione della manica con il metodo contiguous… mi trovo benissimo con i vostri modelli che ho utilizzato numerosissimi come pure i vostri filati … utilizzo solo quelli e li trovo straordinari! Però sono delusa dal fatto che non ci sia neppure un modello che spieghi il metodo contiguous, che io trovo veramente funzionale, grazie mille per l’attenzione. Cordiali saluti Daniela Cocco
05.03.2024 - 22:59DROPS Design answered:
Buonasera Daniela, inoltreremo la sua proposta al settore design. Buon lavoro!
11.03.2024 - 23:52
![]() Christa wrote:
Christa wrote:
Mir ist nicht klar, wie die Maschen für das Vorderteil aufgenommen werden müssen: je eine Masche aus dem oberen Rand des Rücken ist schon klar, aber warum heißt es „1 Masche aus jeder Reihe des oberen Rands…“? Und wo ist die obere Mitte des Armausschnitts? Hier soll ja der Markierer gesetzt werden. Vielen Dank für Ratschläge und Hilfe!
04.03.2024 - 22:37DROPS Design answered:
Liebe Christa, in diesem Video zeigen wir, wie man die Maschen für beide Schulter vom Vorderteil auffasst. Mehr Video finden Sie auch unter "Videos" über die Materialliste. Viel Spaß beim Stricken!
05.03.2024 - 09:20
![]() Lakshmi wrote:
Lakshmi wrote:
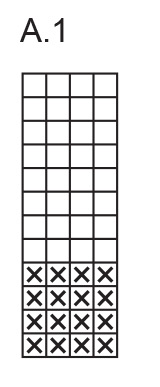
Are the colors reversed in the schematic?
08.02.2024 - 00:18DROPS Design answered:
Dear Mrs Lakshmi, thanks for noticing, diagram symbols have now been updated. Happy knitting!
08.02.2024 - 09:15
![]() Lauryna wrote:
Lauryna wrote:
Peaches and cream
22.01.2024 - 11:19
![]() Rodica wrote:
Rodica wrote:
Summer breeze
21.01.2024 - 21:47
![]() Irene wrote:
Irene wrote:
Alba
19.01.2024 - 14:08
|
||||||||||
Beach Lines#beachlinessweater |
||||||||||
 |
 |
|||||||||
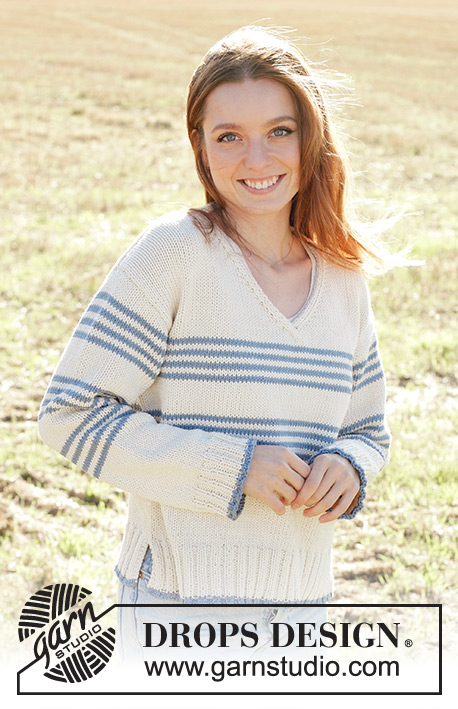
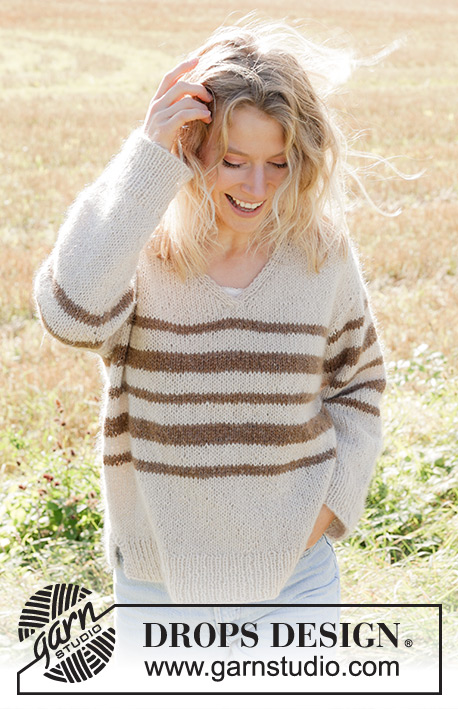
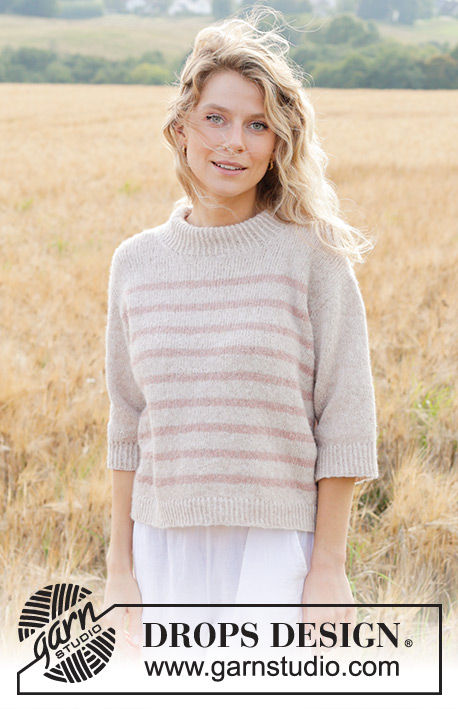
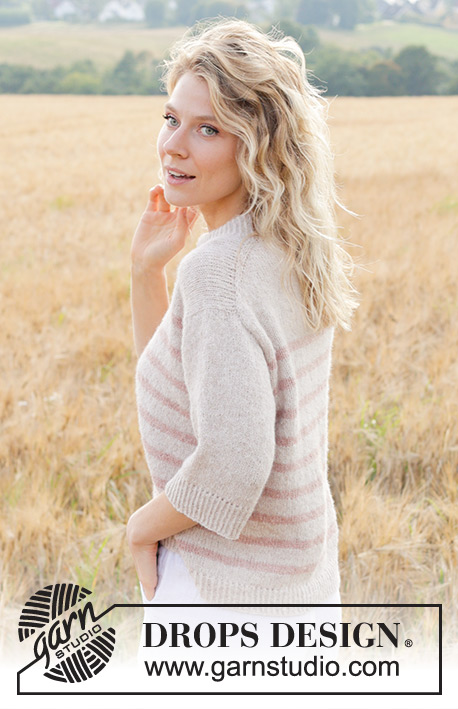
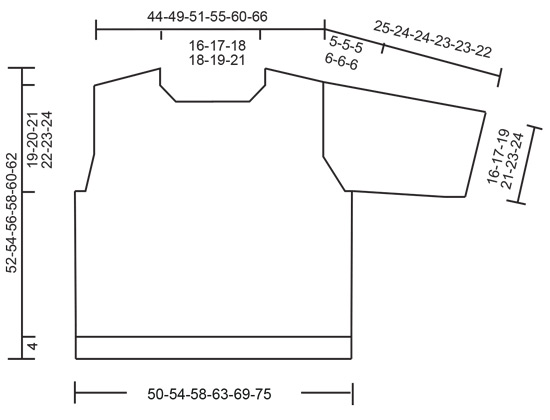
Knitted jumper in DROPS Sky. The piece is worked top down with diagonal/European shoulders, stripes and double neck. Sizes S - XXXL.
DROPS 248-16 |
||||||||||
|
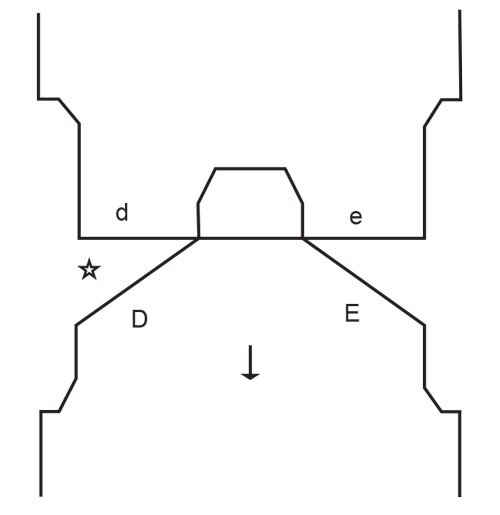
------------------------------------------------------- EXPLANATIONS FOR THE PATTERN: ------------------------------------------------------- STRIPES: See diagram A.1. STRIPES TIP (when working in the round): To give a neat transition at the end/beginning of the round when working stripes: Change to the new colour and work 1 round. Work the first stitch on the 2nd round as follows: Take the first stitch from the previous round onto the needle, knit this stitch together with the first stitch. INCREASE TIP-1: INCREASE 1 STITCH TOWARDS THE LEFT - from RIGHT SIDE: Use left needle to pick up yarn between 2 stitches from row below, pick up yarn from the front and knit in the stitch loop that is on the back of the needle. INCREASE 1 STITCH TOWARDS THE RIGHT - from RIGHT SIDE: Use left needle to pick up yarn between 2 stitches from row below, pick up yarn from the back and knit in the stitch loop that is on the front side of the needle. INCREASE TIP-2: INCREASE 1 STITCH TOWARDS THE RIGHT - from WRONG SIDE: Use left needle to pick up yarn between 2 stitches from row below, pick up yarn from the back and purl in the stitch loop that is on the front side of the needle. INCREASE 1 STITCH TOWARDS THE LEFT - from WRONG SIDE: Use left needle to pick up yarn between 2 stitches from row below, pick up yarn from the front and purl in the stitch loop that is on the back side of the needle. DECREASE TIP (mid-under sleeve): Decrease 1 stitch on each side of the marker-thread as follows: Work until there are 3 stitches left before the marker-thread, knit 2 together, knit 2 (marker thread sits between these 2 stitches) slip 1 stitch knit-wise, knit 1, pass the slipped stitch over the knitted stitch. ------------------------------------------------------- START THE PIECE HERE: ------------------------------------------------------- JUMPER – SHORT OVERVIEW OF THE PIECE: The pattern uses both long and short circular needles; start with the length which fits the number of stitches and change when necessary. The piece is started working back and forth on the needle, casting on stitches for the back of the neck, working the back piece top down and increasing on each side for the shoulders which are slightly diagonal. Work as far as the armholes. The back piece then waits while the front piece is worked in 2 sections, knitting up stitches along one shoulder, working and increasing for the neckline, then doing the same along the other shoulder. The front piece is joined when the neckline is finished and worked as far as the armholes. The front and back pieces are joined and the body continued in the round. Stitches are knitted up around each armhole. The sleeve cap is worked back and forth with short rows, then the sleeve is continued in the round. Stitches are knitted up around the neckline and the neck worked to finish, folded double to the wrong side and sewn down. BACK PIECE: Cast on 36-38-40-40-42-46 stitches with circular needle size 4 mm and colour white fog DROPS Sky. Purl 1 row from the wrong side. Read INCREASE TIP-1 and work as follows from the right side: Knit 3, increase towards the left, knit until there are 3 stitches left, increase towards the right, knit 3. Read INCREASE TIP-2 and work as follows from the wrong side: Purl 3, increase towards the right, purl until there are 3 stitches left, increase towards the left, purl 3. . REMEMBER THE KNITTING TENSION! Continue increasing like this every row a total of 28-32-34-38-42-46 times. After the last increase there are 92-102-108-116-126-138 stitches. Insert 1 marker outermost on one side. The piece is now measured from here! Work stocking stitch back and forth until the piece measures 4-5-6-7-7-8 cm, from the marker along the armhole. Work A.1 over all stitches. Work stocking stitch and A.1 back and forth until the piece measures 11-12-12-13-12-13 cm, from the marker along the armhole. Work as follows from the right side: Knit 3, increase towards the left, knit until there are 3 stitches left, increase towards the right, knit 3 - remember INCREASE TIP-1. Increase like this on each row from the right side a total of 3-3-4-4-5-5 times = 98-108-116-124-136-148 stitches. Continue working until the piece measures 13-14-15-16-16-17 cm, from the marker along the armhole. You should now have worked 2 repeats of A.1 in height. Cut the strand, place the stitches on a stitch holder and work the front piece. FRONT PIECE: Start with the left shoulder (when the garment is worn). Knit up 28-32-34-38-42-46 stitches inside the outermost stitch along the left back shoulder (knit up 1 stitch in each row from the top edge, see D in sketch). All measurements are taken from here. Work stocking stitch. When the piece measures 9 cm, increase for the neckline as follows. Working from the right side: Knit 3, increase towards the left, knit to end of row – remember INCREASE TIP-1. Increase like this on each row from the right side a total of 4 times = 32-36-38-42-46-50 stitches. Purl back from the wrong side, cut the strand and work the right shoulder. Knit up 28-32-34-38-42-46 stitches inside the outermost stitch along the right back shoulder (knit up 1 stitch in each row from the top edge, see E in sketch). All measurements are taken from here. Work stocking stitch. When the piece measures 9 cm, increase for the neckline: Working from the right side: Knit until there are 3 stitches left, increase 1 towards the right, knit 3. Increase like this on each row from the right side a total of 4 times = = 32-36-38-42-46-50 stitches. Purl back from the wrong side. Now join the 2 front pieces: Working from the right side, knit the 32-36-38-42-46-50 stitches from the front right shoulder, cast on 28-30-32-32-34-38 stitches for the neckline, knit the 32-36-38-42-46-50 stitches from the left front shoulder = 92-102-108-116-126-138 stitches. Work stocking stitch back and forth over all stitches until the piece measures 16-17-18-19- 21-22 cm. Work A.1 over all stitches. Work stocking stitch and A.1 back and forth until the piece measures 23-24-24-25-26-27 cm. Work as follows from the right side: Knit 3, increase towards the left, work until there are 3 stitches left, increase towards the right, knit 3 – remember INCREASE TIP-1. Increase like this each row from the right side a total of 3-3-4-4-5-5 times = 98-108-116-124-136-148 stitches. Work until the piece measures 25-26-27-28-30-31 cm. You should have now worked 2 repeats of A.1 in height. Make sure you finish on the same row as the back piece, so the stripes match in the round. Now join the front and back pieces for the body. BODY: Continue the stripes over the 98-108-116-124-136-148 front-piece stitches, cast on 6-6-6-8-8-10 stitches (in side under sleeve), continue as before over the 98-108-116-124-136-148 back-piece stitches, cast on 6-6-6-8-8-10 stitches (in side under sleeve) = 208-228-244-264-288-316 stitches. Continue A.1 in the round until the piece measures approx. 48-50-52-54-56-58 cm, from the top of the front shoulder, finishing after a couple of rounds with colour white fog. Knit 1 round and increase 12-12-12-12-16-16 stitches evenly spaced = 220-240-256-276-304-332 stitches. Change to circular needle size 3 mm. Work rib (knit 1 twisted, purl 1) for 4 cm using colour white fog. Cast off. The jumper measures approx. 52-54-56-58-60-62 cm, from the top of the front shoulder. SLEEVES: Lay the piece flat and insert 1 marker at the top of the armhole (NOTE! This is not where stitches were knitted up but approx. 6-8 cm down the front piece = mid-top of shoulder). Using circular needle size 4 mm, start in the middle of the cast-on stitches under the sleeve and knit up 86-90-94-100-104-110 stitches around the armhole with colour white fog – make sure you have equal numbers of stitches on each side of the marker. Work stocking stitch back and forth with short rows for the sleeve cap (to give the sleeve a better fit). Start mid-under the sleeve. Row 1 (right side): work to 10-11-11-12-13-13 stitches past the marker, turn. Row 2 (wrong side): work 10-11-11-12-13-13 stitches past the marker, turn. Row 3 (right side): work to 4-5-5-4-4-5 stitches past the previous turn, turn. Row 4 (wrong side): work to 4-5-5-4-4-5 stitches past the previous turn, turn. Repeat rows 3 and 4 until you work 34-41-41-40-41-48 stitches past the marker (7-7-7-8-8-8 turns on each side). Work from the right side to the beginning of the row (mid-under sleeve). Insert 1 marker-thread here, which is used when decreasing under the sleeve. Allow the thread to follow your work onwards. Continue with stocking stitch in the round. When the sleeve measures 7-7-7-8-8-8 cm, from the knitted-up stitches (all lengths measured mid-top of sleeve), decrease 2 stitches under the sleeve – read DECREASE TIP. Decrease like this every 2nd round 2 times, then every 1½-1½-1½-1½-2½-2 cm, 7-7-5-4-2-3 times (a total of 9-9-7-6-4-5 times) = 68-72-80-88-96-100 stitches. Work until the sleeve measures 21-20-20-19-19-18 cm. Knit 1 round and increase 4-4-4-4-8-8 stitches evenly spaced = 72-76-84-92-104-108 stitches. Change to double pointed needles size 3 mm. Work rib (knit 1 twisted, purl 1) for 4 cm with colour white fog. Cast off. The sleeve measures approx. 25-24-24-23-23-22 cm. NECK: Start on one shoulder-line. Knit up from the right side, inside 1 edge stitch, 120 to 140 stitches around the neckline using short circular needle size 3 mm and colour white fog. Stitch count must be divisible by 2. Work rib in the round (knit 1 twisted, purl 1) for 8 cm. Cast off. Fold the neck double to the inside and sew down. To avoid the neck being tight and rolling outwards, it is important that the seam is elastic. |
||||||||||
Diagram explanations |
||||||||||
|
||||||||||
 |
||||||||||
 |
||||||||||
 |
||||||||||
Have you finished this pattern?Tag your pictures with #dropspattern #beachlinessweater or submit them to the #dropsfan gallery. Do you need help with this pattern?You'll find 34 tutorial videos, a Comments/Questions area and more by visiting the pattern on garnstudio.com. © 1982-2026 DROPS Design A/S. We reserve all rights. This document, including all its sub-sections, has copyrights. Read more about what you can do with our patterns at the bottom of each pattern on our site. |
||||||||||


With over 40 years in knitting and crochet design, DROPS Design offers one of the most extensive collections of free patterns on the internet - translated to 17 languages. As of today we count 325 catalogues and 12298 patterns translated into English (UK/cm).
We work hard to bring you the best knitting and crochet have to offer, inspiration and advice as well as great quality yarns at incredible prices! Would you like to use our patterns for other than personal use? You can read what you are allowed to do in the Copyright text at the bottom of all our patterns. Happy crafting!
Post a comment to pattern DROPS 248-16
We would love to hear what you have to say about this pattern!
If you want to leave a question, please make sure you select the correct category in the form below, to speed up the answering process. Required fields are marked *.