
Popular categories
Looking for a yarn?


Comments / Questions (21)
![]() Carina wrote:
Carina wrote:
Hola. No entiendo bien este patrón: los aumentos se hacen al mismo tiempo que A2, A3 y A4? Entonces va a ser complicado que encajen los puntos, no? Gracias
14.04.2024 - 23:11DROPS Design answered:
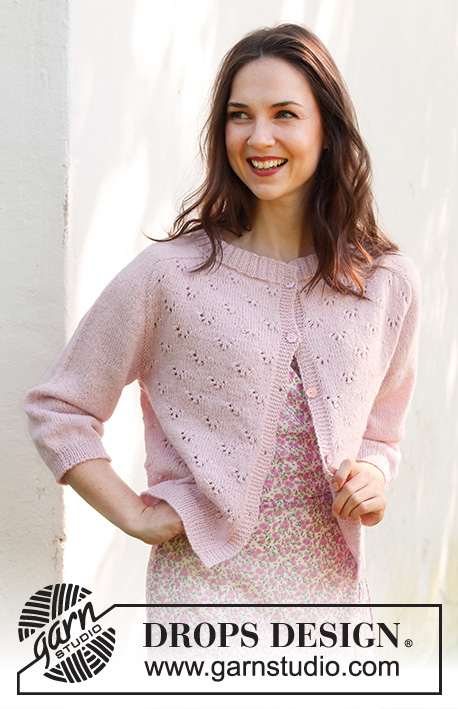
Hola Carina, A.1, A.2. A.3 y A.4 son el mismo patrón de puntos, pero ligeramente variados o extendidos. Por lo tanto, el dibujo de calados se obtiene con cualquiera de los diagramas y son casi intercambiables, ya que mayoritariamente varían en el largo/ancho de los diagramas. Cuando vayas aumentando puntos, los puntos se trabajarán según el diagrama A.1. Por lo tanto, a medida que tengas más puntos podrás añadir más repeticiones del patrón de calados.
15.04.2024 - 00:01
![]() Sophie wrote:
Sophie wrote:
C’est la première fois que je fais un cardigan et je dois avouer que je ne comprends absolument pas vitré patron/diagramme. Je crois que je vais simplement trouver un patron plus facile.
19.02.2024 - 21:34
![]() Sophie wrote:
Sophie wrote:
Qu’est-ce que vois voulez dire par « s’assurer que A1 soit bien aligné vis à vis À2 A3 et A4? Je ne comprends pas trop le motif. À quel moment doit-on débuter le diagramme
19.02.2024 - 03:07DROPS Design answered:
Bonjour Sophie, le diagramme A.1 montre un rapport du point fantaisie, lorsque vous avez terminé les diagrammes A.2-A.4 vous devez continuer les motifs exactement comme avant, ils doivent être espacés de 7 mailles au 1er rang et 7 rangs entre chaque. comme avant. Bon tricot!
19.02.2024 - 09:41
![]() Valerie R Evansl wrote:
Valerie R Evansl wrote:
I am having a great time making suggestions for the patterns. I submitted this name. How do you notify us if you do, indeed use our name? I was so thrilled to see the name I dropped in but, I don't believe I was notified. Can you please reply?? Thank you, Valerie Evans {Park Avenue}
27.10.2023 - 23:10
![]() Valerie R Evansl wrote:
Valerie R Evansl wrote:
This is the name I suggested! How do they notify people if your suggestion is picked?
27.10.2023 - 23:06
![]() Nicole wrote:
Nicole wrote:
Bonjour, Je crois qu’il y a une erreur dans la section « techniques employées - augmentations 1 -sur l’endroit ( avant le marqueur) la maille inclinée vers la droite ….devrait -elle plutôt être de « l’arrière vers l’avant »? Et celle inclinée à gauche devrait être de « « l’avant vers l’arrière » ? La vidéo montre autre chose…
02.09.2022 - 22:39DROPS Design answered:
Bonjour Nicole, vous avez tout à fait raison, les augmentations-1 ont été corrigées, merci d'avoir relevé cette erreur. Bon tricot!
05.09.2022 - 08:44
![]() Nicole wrote:
Nicole wrote:
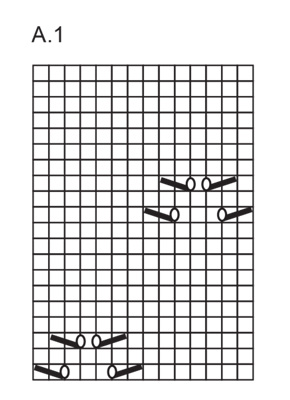
Bonjour, Malgré le fait qu’il est indiqué correction pour le diagramme A2 et A4 , ces derniers ne semblent pas avoir été corrigés puisqu’il y a encore trop de mailles sur le rang malgré ce qui est indiqué et ce pour toutes les grandeurs. Ex. A2- small = 32 mailles dans le graphique au lieu des 25 mailles indiquées. Est-ce possible de joindre les nouveaux diagrammes ? Merci.
02.09.2022 - 19:02DROPS Design answered:
Bonjour Nicole, les nouveaux diagrammes devraient maintenant s'afficher, si tel n'est pas le cas, pensez à vider votre cache et nettoyer vos cookies puis essayez à nouveau. Bon tricot!
05.09.2022 - 10:14
![]() Rosie wrote:
Rosie wrote:
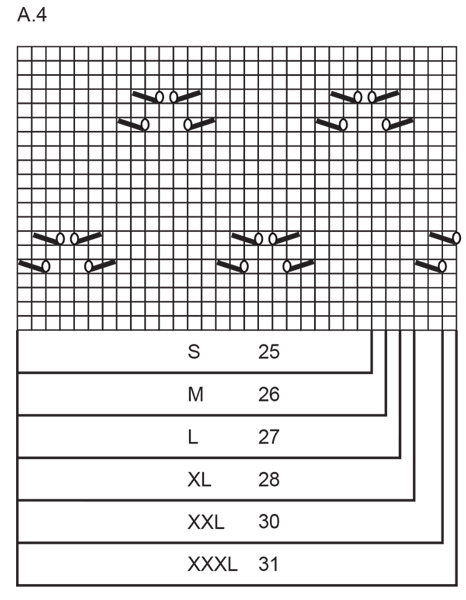
For the A.4 pattern in a size Medium the knitting diagram lists there should be 26 stitches, but counting the stitches in the diagram there are 33 outlined for the size medium. Which are the 26 stitches to be included in the pattern? The first 26 if reading from the right to left?
27.08.2022 - 07:15DROPS Design answered:
Dear Rosie, it looks like you are right, diagrams A.2 and A.4 should be edited so that you work the first 26 sts (size M) in A.2 and the last 26 sts in A.4. Thanks for noticing, diagrams will be edited asap. Happy knitting!
29.08.2022 - 08:34
![]() Nicole wrote:
Nicole wrote:
Bonjour, Au début du patron ,après le montage de mailles, on doit faire « un rang envers sur l’envers et au rang suivant sur l’endroit commencer et finir avec 6 mailles de bordure au point mousse ». Est-ce ce qu’on doit commencer la bordure en point mousse dès ce 1er rang sur l’envers? Si ce 1er rang est tricoté au complet à l’envers, ça donne du jersey au tour suivant… Merci!
27.08.2022 - 04:16DROPS Design answered:
Bonjour Nicole, quand vous avez monté vos mailles, tricotez toutes les mailles à l'envers (= 1er rang tricoté = envers de l'ouvrage), puis tricotez en côtes avec 6 m point mousse de chaque côté, le 1er de ces rangs est l'endroit de l'ouvrage. On veut effectivement avoir un rang jersey endroit, vu sur l'endroit, avant de commencer les côtes. Bon tricot!
29.08.2022 - 08:26
![]() Josephine wrote:
Josephine wrote:
Pink roses cardigan
18.01.2022 - 19:32
|
|||||||||||||||||||||||||
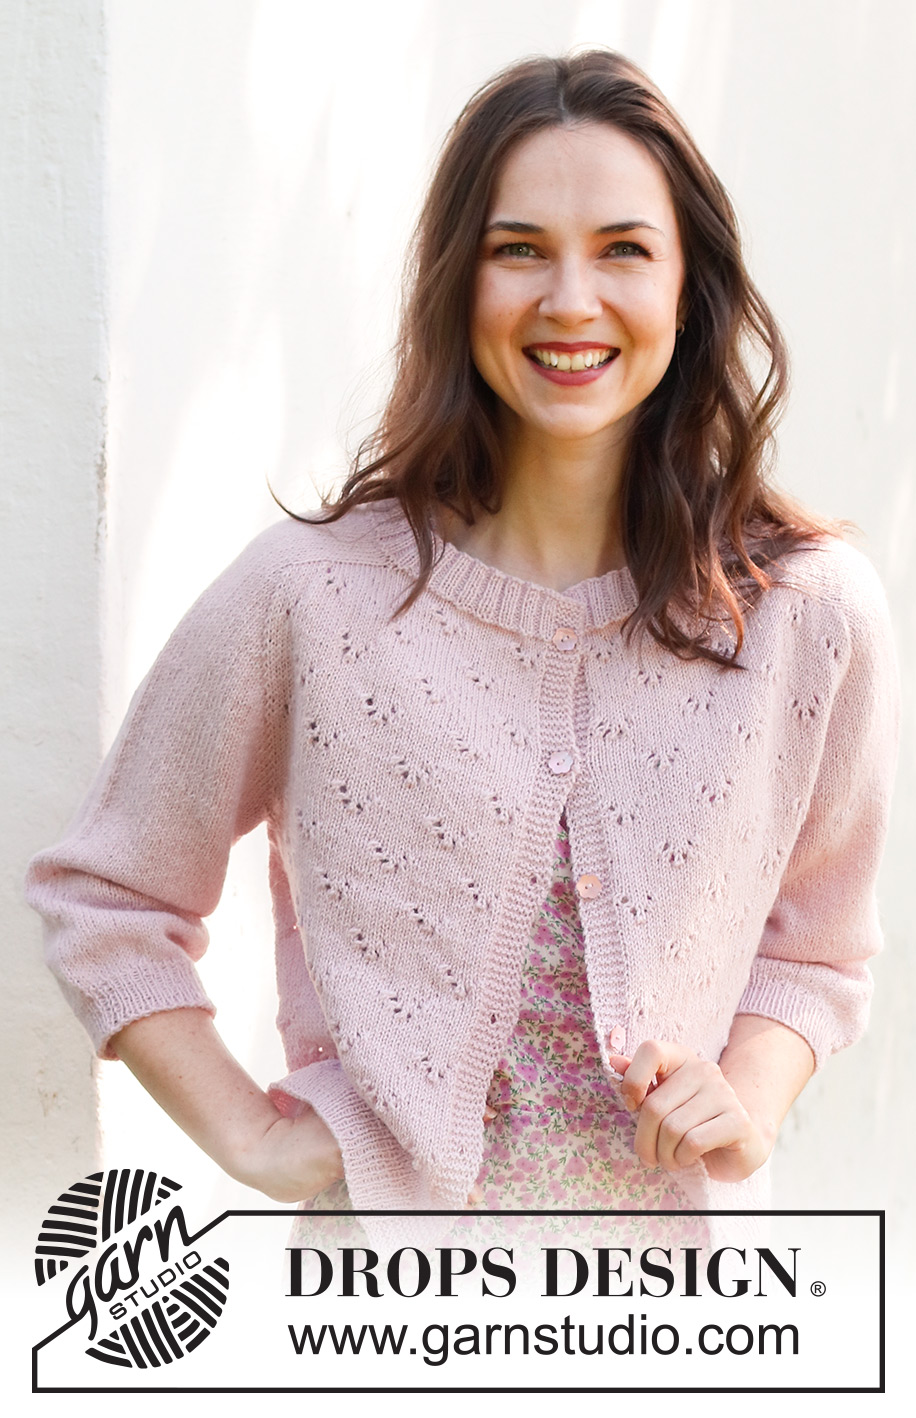
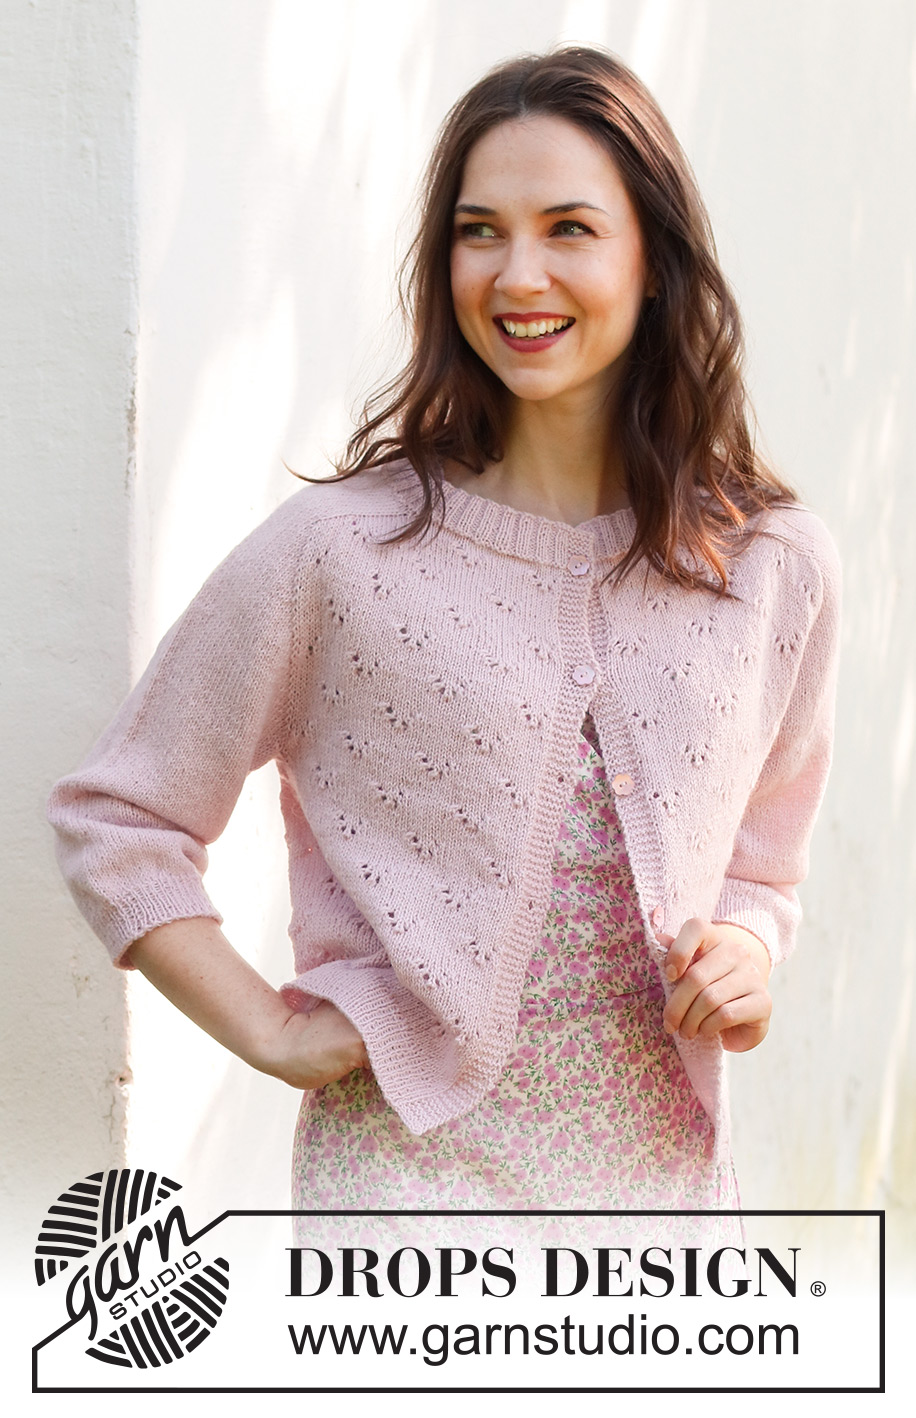
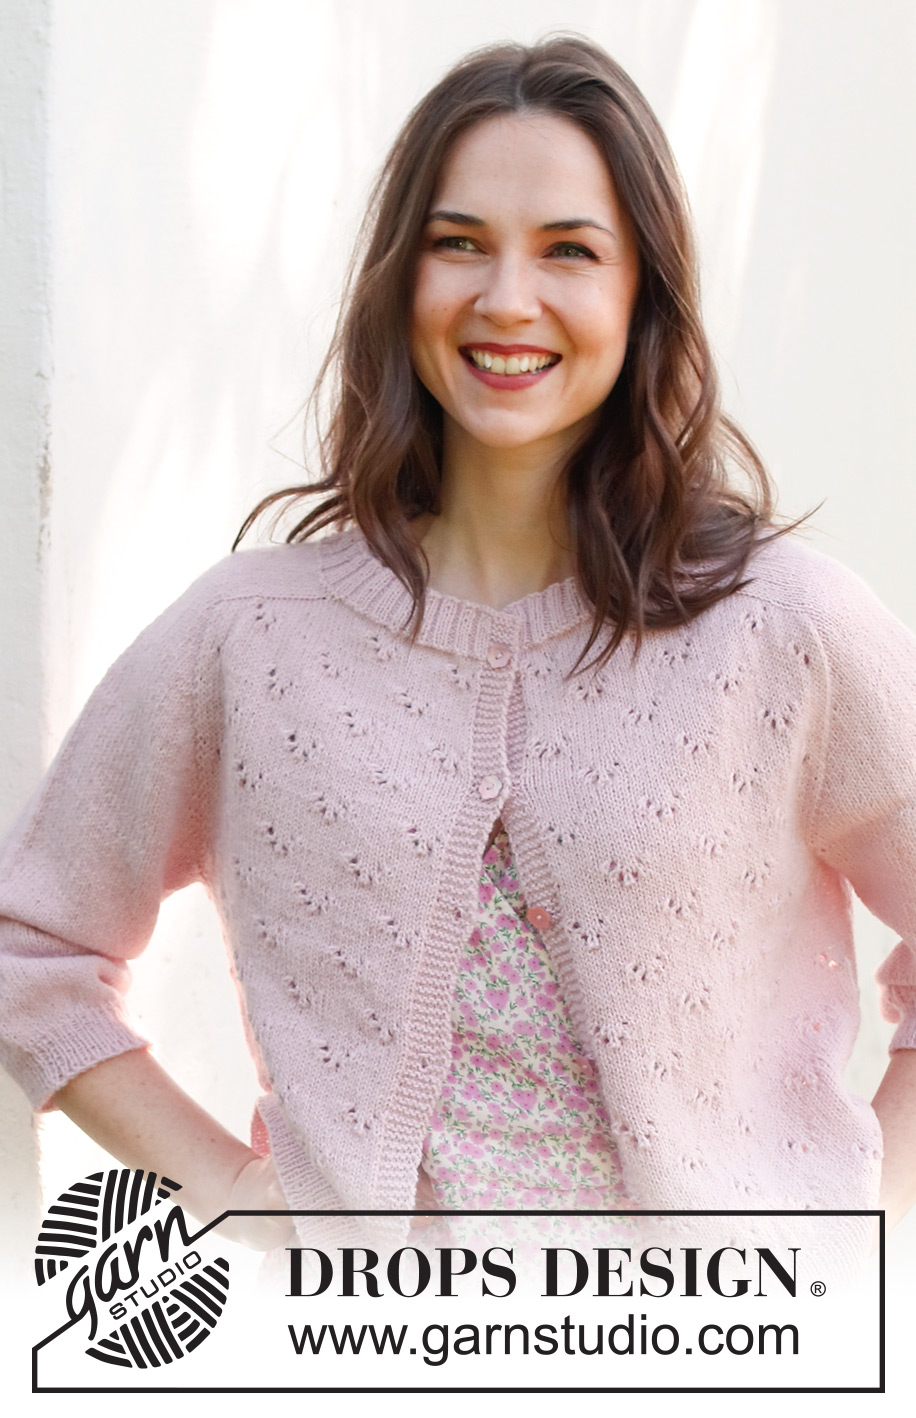
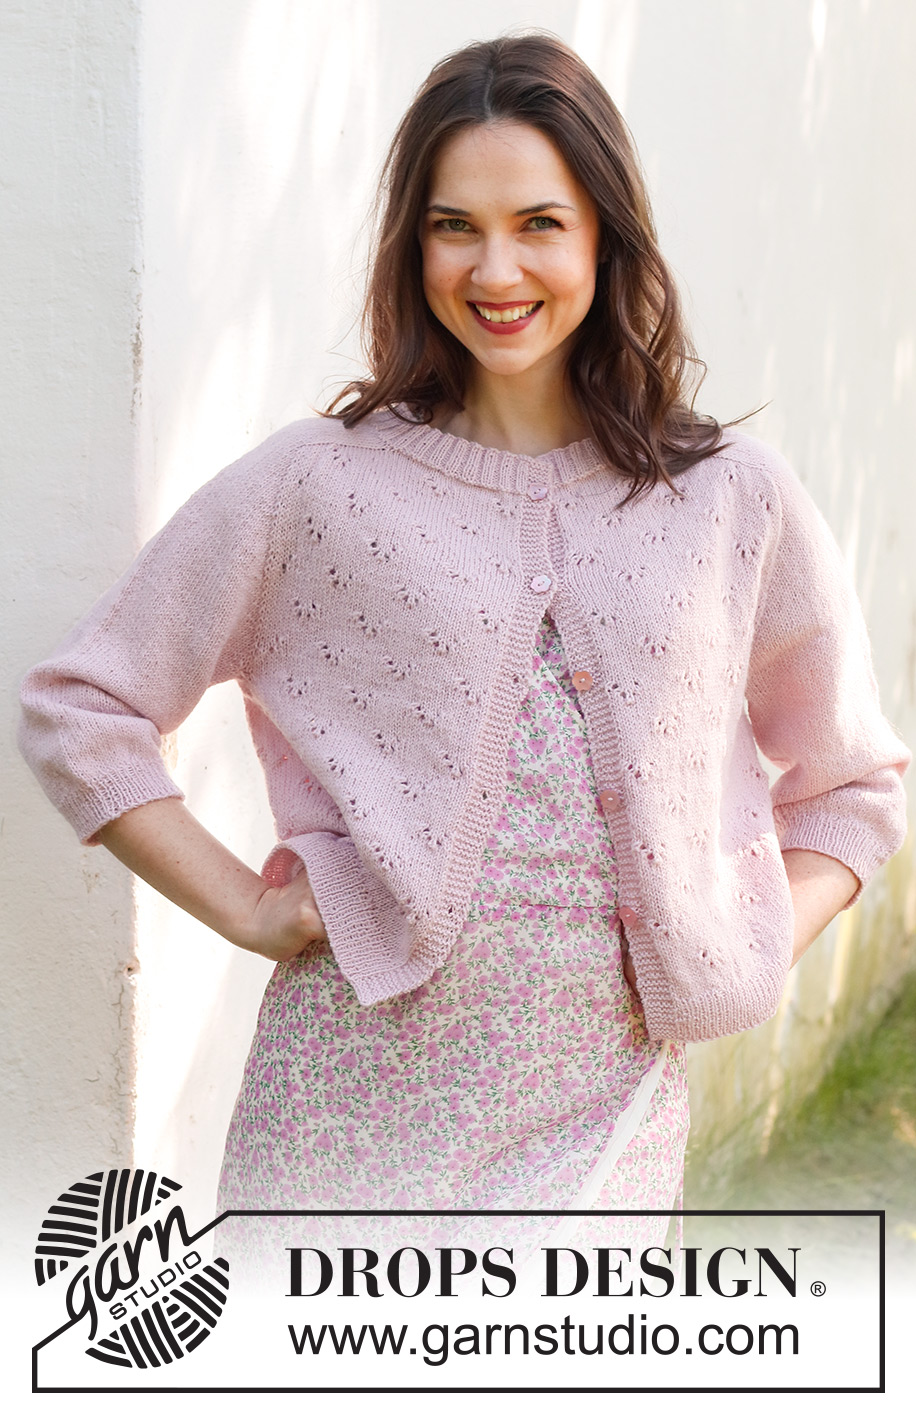
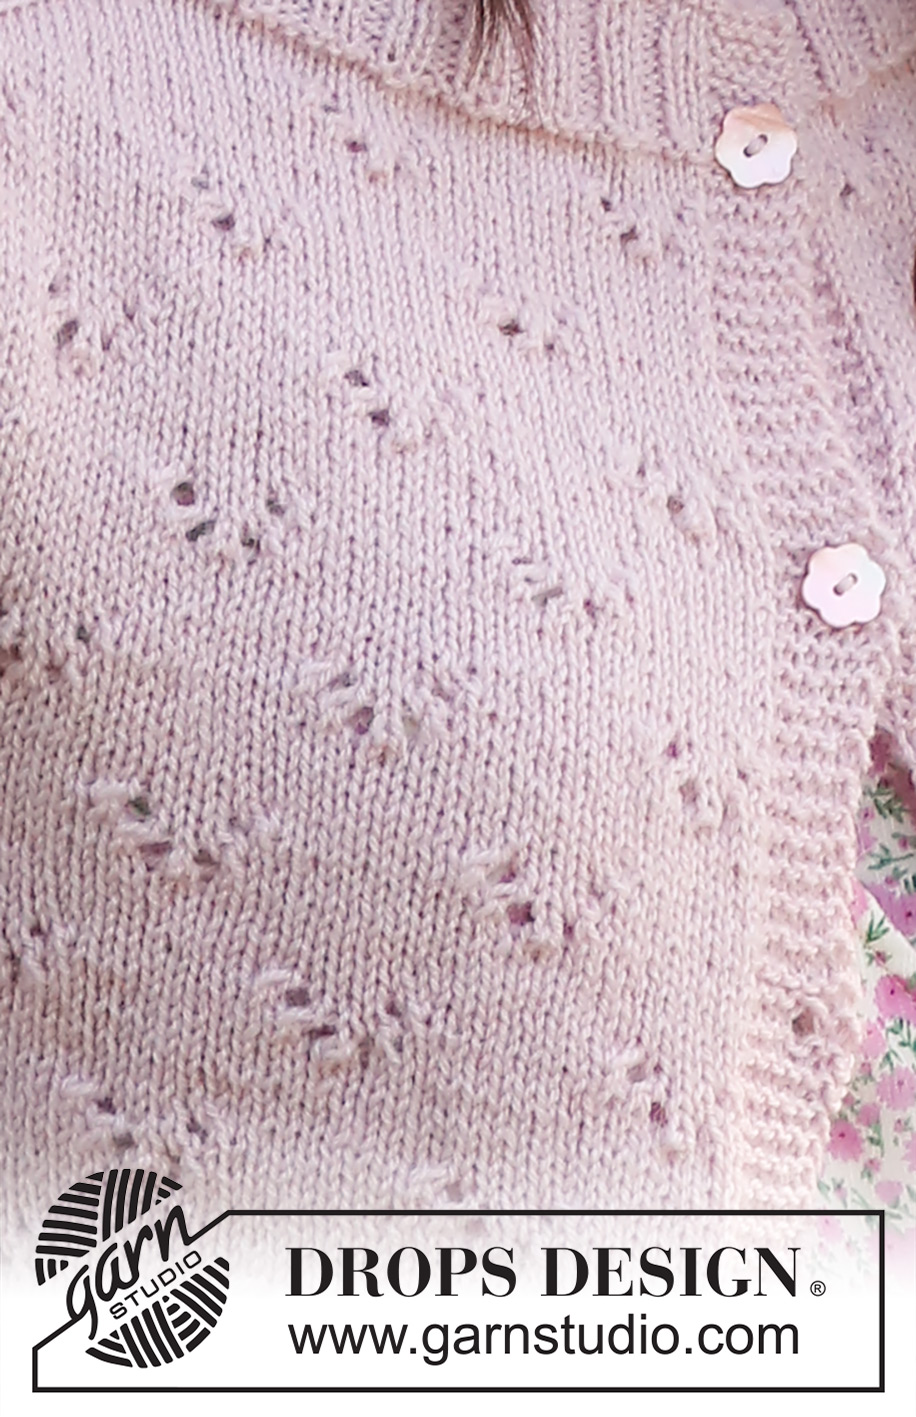
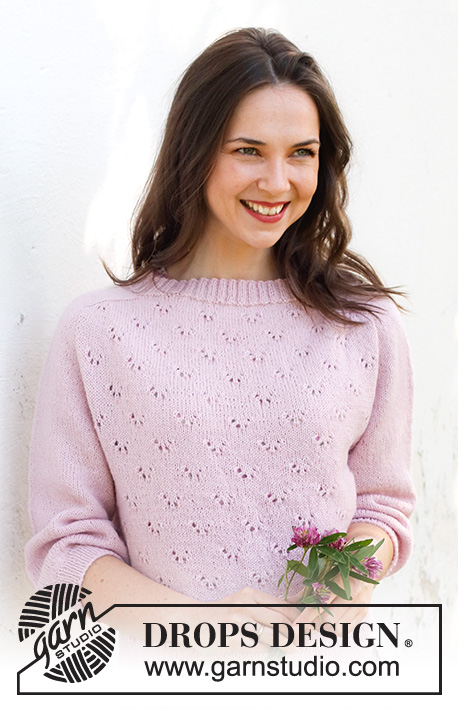
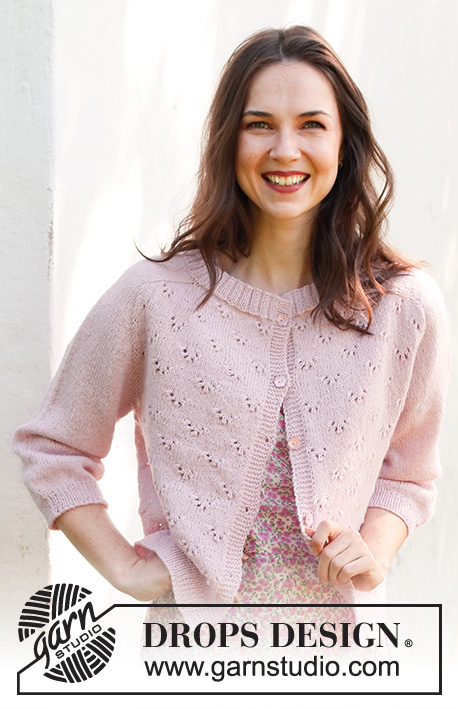
Pink Peony Cardigan#pinkpeonycardigan |
|||||||||||||||||||||||||
 |
 |
||||||||||||||||||||||||
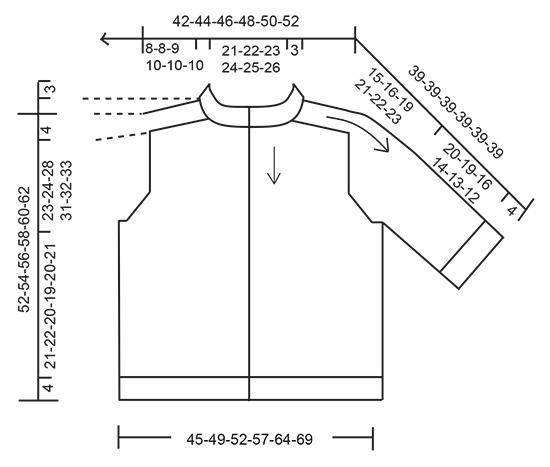
Knitted jacket in DROPS Flora. Piece is knitted top down with saddle shoulders, lace pattern and ¾ -length sleeves. Size: S - XXXL
DROPS 232-26 |
|||||||||||||||||||||||||
|
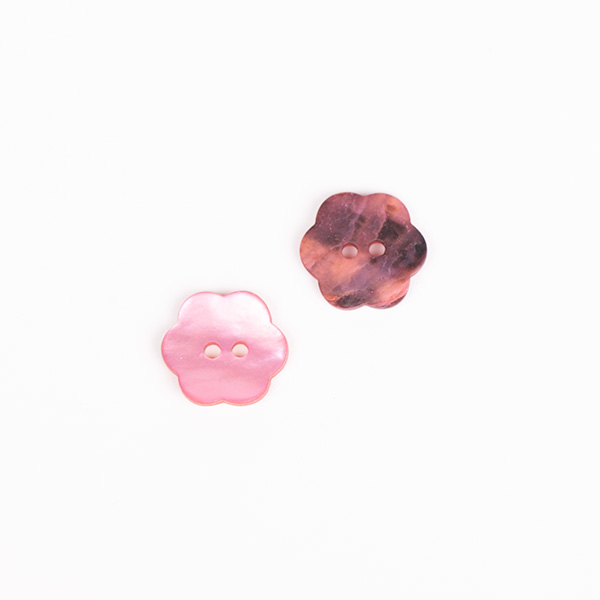
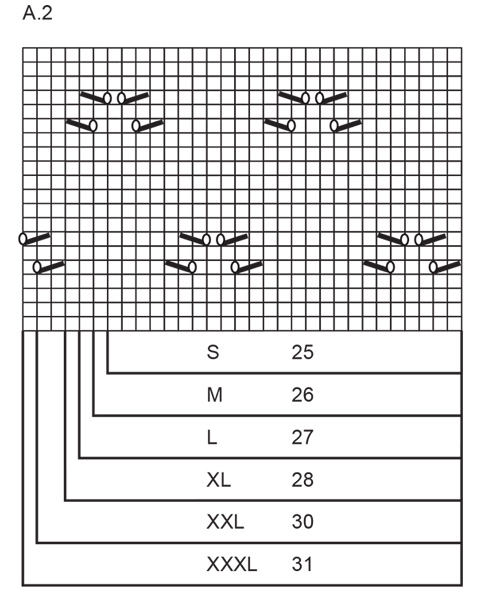
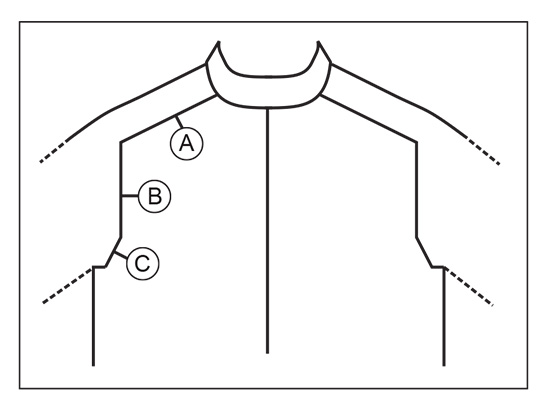
---------------------------------------------------------- EXPLANATION FOR THE PATTERN: ---------------------------------------------------------- GARTER STITCH (back and forth): Knit all rows. 1 ridge vertically = knit 2 rows. BUTTONHOLES: Decrease for buttonholes on right band (when garment is worn). 1 buttonhole = work from right side as before until 3 stitches remain on needle, make 1 yarn over, knit 2 together and finish by knitting 1. On next row (wrong side) knit the yarn over to make a hole. Decrease first buttonhole right after rib in the neck, then decrease the next 4-4-4-5-5-5 buttonholes as explained above approx. 9-9-9-10-10-10 cm apart. PATTERN: See diagrams A.1 to A.4. Find your size in the diagrams. Diagrams show all rows in pattern seen from the right side. INCREASE TIP-1 (applies to increase for saddle shoulder, sleeves and yoke from RIGHT SIDE): BEFORE MARKER: The new stitch is twisted towards the right. Use left needle to pick up yarn between 2 stitches from row below, pick up yarn from the back and knit stitch in front loop of stitch. AFTER MARKER: The new stitch is twisted towards the left. Use left needle to pick up yarn between 2 stitches from row below, pick up yarn from the front and knit stitch in back loop of stitch. INCREASE TIP-2 (applies to increase for saddle shoulder from WRONG SIDE) BEFORE MARKER: The new stitch is twisted towards the right. Use left needle to pick up yarn between 2 stitches from row below, pick up yarn from the front and purl stitch in back loop of stitch. AFTER MARKER: The new stitch is twisted towards the left. Use left needle to pick up yarn between 2 stitches from row below, pick up yarn from the back and purl stitch in front loop of stitch. ---------------------------------------------------------- START THE PIECE HERE: ---------------------------------------------------------- JACKET - SHORT OVERVIEW OF THE PIECE: Work neck edge and yoke back and forth on circular needle from mid front, work top down. Increase stitches for saddle shoulder, then increase stitches for sleeve, and increase stitches for yoke. Now divide yoke for body and sleeves. Worked back and forth on circular needle from mid front. Work sleeves in the round on double pointed needles/a short circular needle. NECK EDGE: Cast on 170-178-182-186-194-198 stitches on circular needle size 2.5 mm with DROPS Flora. Purl 1 row (= wrong side). Work next row as follows from right side: 6 band stitches in GARTER STITCH - read explanation above - * knit 2, purl 2 *, repeat from *-* until 8 stitches remain on needle, knit 2, and finish with 6 band stitches in garter stitch. Continue rib like this for 3 cm. When rib has been worked, knit 1 row from wrong side while decreasing 13-17-17-17-17-17 stitches evenly (do not decrease over stitches in band) = 157-161-165-169-177-181 stitches. Decrease for BUTTONHOLES on right band - read explanation above. Switch to circular needle size 3 mm. Then work yoke as explained below. YOKE: Insert a marker after band at the beginning of row mid front – NOW MEASURE PIECE FROM HERE! In addition insert 4 new marker in the piece as explained below - this is done without working the stitches, and each of these 4 markers are inserted between 2 stitches. Use markers when increasing for saddle shoulder. They should be a different colour than the marker by neck. 1st marker: Begin mid front, count 31-32-33-34-36-37 stitches (= front piece), insert 1st marker in next stitch. 2nd marker: Count 22 stitches from 1st marker (= shoulder stitches), insert 2nd marker before next stitch. 3rd marker: Count 51-53-55-57-61-63 stitches from 2nd marker (= back piece), insert 3rd marker before next stitch. 4th marker: Count 22 stitches from 3rd marker (= shoulder stitches), insert 4th marker before next stitch. 31-32-33-34-36-37 stitches remain on front piece after 4th marker. Move these 4 markers upwards when working, increase at each of these markers later. SADDLE SHOULDER INCREASE: Read all of the following section before continuing! Continue piece with 6 band stitches in garter stitch, A.2 over the next 25-26-27-28-30-31 stitches, stocking stitch over the next 22 stitches, A.3 over the next 51-53-55-57-61-63 stitches, stocking stitch over the next 22 stitches, A.4 over the next 25-26-27-28-30-31 stitches, and 6 band stitches in garter stitch. A.1 shows a repetition of pattern, when increasing stitches for saddle shoulder the new stitches should be worked in this pattern. AT THE SAME TIME on first row from right side increase 4 stitches for saddle shoulder as follows: Increase 1 stitch BEFORE 1st and 3rd marker and increase 1 stitch AFTER 2nd and 4th marker – read INCREASE TIP -1. Remember to increase only on front piece and back piece and number of shoulder stitches stays the same. On next row from wrong side increase for saddle shoulder as follows: Increase 1 stitch BEFORE 4th and 2nd marker and increase 1 stitch AFTER 3rd and 1st marker – read INCREASE TIP-2. I.e. increase unevenly from right side and from wrong side so that the stitches lay nicely. Continue in the pattern like this, and increase on every row (i.e. from both right side and from wrong side) 24-28-30-32-32-32 times in total = 253-273-285-297-305-309 stitches. REMEMBER THE KNITTING TENSION! Work the increased stitches in pattern A.1. Make sure that A.1 fits over stitches from A.2, A.3 and A.4. After last increase piece measures approx. 8-8-9-10-10-10 cm from marker by the neck. Then increase for sleeves as explained below. SLEEVE INCREASE: Work in stocking stitch over stitches on sleeves, pattern the same way as before on body and 6 band stitches in garter stitch in each side towards mid front. AT THE SAME TIME on next row from right side increase 4 stitches for sleeves as follows: Increase 1 stitch AFTER 1st and 3rd marker and increase 1 stitch BEFORE 2nd and 4th marker. Remember; increase now only on sleeves but number of stitches on front piece and back piece stays the same. Work the increased stitches in stocking stitch. Increase like this on every other row (i.e. every row from right side) 26-28-32-34-30-28 times in total = 357-385-413-433-425-421 stitches. Piece now measures approx. 23-24-28-30-28-27 cm from marker in neck. YOKE INCREASE: This section only applies to sizes XL, XXL and XXXL, in sizes S, M and L the increases are done. Move the 4 markers from sleeve increase so that each of the 4 markers is in the outermost stitch in each side on front pieces and back piece. There are 90-82-78 stitches between stitches with marker on each sleeve. On next row increase 8 stitches for yoke by increasing both before and after each of the 4 stitches with marker - remember INCREASE TIP. Increase stitches on front pieces, back piece and both sleeves, and work the increased stitches in A.1 on back piece/front pieces and in stocking stitch on sleeves. Increase like this every other row 2-7-11 times in total = 449-481-509 stitches. ALL SIZES: = 357-385-413-449-481-509 stitches. When all increases are done, the piece measures approx. 23-24-28-31-32-33 cm from marker in neck. If the garment is shorter than this, continue as before without increases until correct measurements. Now divide piece for body and sleeves on next row as follows: Work first 55-60-63-68-75-80 stitches (front piece), slip the next 74-78-86-94-96-100 stitches on a thread for sleeve, cast on 8-8-10-12-14-16 new stitches under sleeve, work the next 99-109-115-125-139-149 stitches (back piece), slip the next 74-78-86-94-96-100 stitches on a thread for sleeve, cast on 8-8-10-12-14-16 new stitches, work the last 55-60-63-68-75-80 stitches (front piece). Finish body and sleeves separately. NOW MEASURE PIECE FROM HERE! BODY: = 225-245-261-285-317-341 stitches. Work A.1 back and forth with 6 band stitches in garter stitch in each side towards mid front, work the stitches that do not fit A.1 in the side in stocking stitch. Work until piece measures 21-22-20-19-20-21 cm from division. Knit 1 row from right side while increasing 46-50-52-58-64-68 stitches evenly = 271-295-313-343-381-409 stitches. Switch to circular needle size 2.5 mm. Work next row as follows from wrong side: 6 band stitches in garter stitch, * purl 1, knit 1 *, repeat from *-* until 7 stitches remain on needle, purl 1, and finish with 6 band stitches in garter stitch. Continue rib like this for 4 cm. Loosely cast off. Jacket measures approx. 52-54-56-58-60-62 cm from shoulder and down. SLEEVES: Slip the 74-78-86-94-96-100 stitches from stitch holder in one side of piece on double pointed needles or a short circular needle size 3 mm and pick in addition up 1 stitch in each of the 8-8-10-12-14-16 new stitches cast on under sleeve = 82-86-96-106-110-116 stitches. Insert 1 marker thread mid under sleeve, i.e. in the middle of the 8-8-10-12-14-16 stitches that were cast on under sleeves. Begin round at the marker thread and work stocking stitch in the round. Work in stocking stitch until sleeve measures 20-19-16-14-13-12 cm from division. 4 cm remain until finished measurements. Knit 1 round , and decrease at the same time 4-4-10-16-16-16 stitches evenly = 78-82-86-90-94-100 stitches. Switch to double pointed needles size 2.5 mm. Work rib in the round = knit 1/purl 1 for 4 cm. Loosely cast off. Sleeve measures approx. 24-23-20-18-17-16 cm from division. Work the other sleeve the same way. ASSEMBLY: Sew the buttons on to the left band. |
|||||||||||||||||||||||||
Diagram explanations |
|||||||||||||||||||||||||
|
|||||||||||||||||||||||||
 |
|||||||||||||||||||||||||
 |
|||||||||||||||||||||||||
 |
|||||||||||||||||||||||||
 |
|||||||||||||||||||||||||
 |
|||||||||||||||||||||||||
 |
|||||||||||||||||||||||||
Have you finished this pattern?Tag your pictures with #dropspattern #pinkpeonycardigan or submit them to the #dropsfan gallery. Do you need help with this pattern?You'll find 25 tutorial videos, a Comments/Questions area and more by visiting the pattern on garnstudio.com. © 1982-2026 DROPS Design A/S. We reserve all rights. This document, including all its sub-sections, has copyrights. Read more about what you can do with our patterns at the bottom of each pattern on our site. |
|||||||||||||||||||||||||


With over 40 years in knitting and crochet design, DROPS Design offers one of the most extensive collections of free patterns on the internet - translated to 17 languages. As of today we count 324 catalogues and 12239 patterns translated into English (UK/cm).
We work hard to bring you the best knitting and crochet have to offer, inspiration and advice as well as great quality yarns at incredible prices! Would you like to use our patterns for other than personal use? You can read what you are allowed to do in the Copyright text at the bottom of all our patterns. Happy crafting!
Post a comment to pattern DROPS 232-26
We would love to hear what you have to say about this pattern!
If you want to leave a question, please make sure you select the correct category in the form below, to speed up the answering process. Required fields are marked *.