
Popular categories
Looking for a yarn?


Comments / Questions (41)
![]() Régine wrote:
Régine wrote:
Quel point fantaisie pas d explications Merci
12.03.2026 - 14:18DROPS Design answered:
Bonjour Régine, ce modèle se tricote en jersey, avec les bordures en côtes, pas de point fantaisie particulier ici. Bon tricot!
12.03.2026 - 16:10
![]() Linda wrote:
Linda wrote:
I am making Fern Feast and have got to the section Increases for Yoke and am told to move the markers to the outermost stitch, Please can you explain again or refer me to video, thanks
01.09.2025 - 22:29DROPS Design answered:
Hello, By moving the arlers to the outermost stitches of front and back, you will have 1 marker at the beginning and at the end of the front and of the back in order to delimit the sleeve sts.On the next round increase 8 stitches by increasing both before and after each marker-stitch – remember INCREASE TIP-2. Hope this will help. Happy Knitting!
21.10.2025 - 11:43
![]() Anette wrote:
Anette wrote:
Jeg forstår ikke denne tekst, under bærestykke.(På næste omgang tages der 8 masker ud til bærestykke ved at tage ud både før og efter hver af de 4 masker med mærke ) Skal der være to huller under hver mærke ? Findes der et billede af det?
16.06.2025 - 00:44DROPS Design answered:
Hej Anette, der bliver ikke hul, når du tager ud ifølge UDTAGNINGSTIPS 2. Se også videoerne med sadelskulder og udtagning bærestykke , du finder dem når du klikker på Videoer øverst i opskriften :)
17.06.2025 - 08:17
![]() Inger wrote:
Inger wrote:
Hei, spørsmål gjelder økning til sadelskulder: 1. omgang skal det økes FØR 1 og 3 merke, og ETTER 2 og 4 merke. Det er greit. Men i 2. omgang skal økningen skje før eller etter de maskene som det er økt i første omgang?? Dvs før 1. merke, blir det da: Merke, ny maske , så den masken som var ny i forrige omgang og så sadel.. ? Eller blir det: Merke, den masken som var ny i forrige omgang, så ny maske og deretter sadel.. Diagram for skulder og erme økning ønskes!!
08.06.2025 - 08:50DROPS Design answered:
Hej Inger, du øker altid ret før og efter selve sadelskulder merket. Så 2.omgang strikker du først den nye maske, øker, 1merke, sadelskulder, 1 merke, øker, den nye maske :)
12.06.2025 - 08:42
![]() Cassandra Ludwig wrote:
Cassandra Ludwig wrote:
Hi! I'm starting the increases for the sleeve and I'm a little confused how many rounds I should have going. The pattern says to do the increases "every 2nd round a total of 17-18-18-17-17-17 times." For the medium size, it's 18 times. Would this be 18 rounds with 9 of them being increases, or 36 rounds with 18 rounds for increases? Then just knitting to the length of 22cm? Thanks in advance
30.04.2025 - 05:21DROPS Design answered:
Hi Cassandra, This will be 36 rounds, increasing every 2nd round, then, if necessary, continue working until the piece measures 22 cm. Regards, Drops Team.
30.04.2025 - 07:12
![]() Minu wrote:
Minu wrote:
Hallo, ich verstehe nicht wie die Markierer der Ärmel zunahmen versetzt werden sollen, da zwischen den markieren sowieso 54 Ärmelmaschen sind! Können Sie mir bitte helfen. Lg
19.04.2025 - 16:20DROPS Design answered:
Liebe Minu, die Markierer waren bis jetzt zwischen 2 Maschen, jetzt sollen die Markierer in jeweils die 1. und die letzte Maschen vom Vorder- und Rückenteil, so sind es immer noch 54 Maschen für dei Ärmel zwischen die Markierer. Viel Spaß beim Stricken!
22.04.2025 - 14:46
![]() Sharon Hunt wrote:
Sharon Hunt wrote:
Hello, the stitch count in size xxl seems to be correct. The instructions stated that one should have 136 after increasing. I could not get it to add up. I then counted the instructions for the division before saddle shoulders and the final count should be 138 not 136. Am just going to increase on the last set of increase.
15.04.2025 - 13:45DROPS Design answered:
Dear Sharon, that's correct, there seems to be a typo in the pattern; for size XXL it should be 22 stitches left after the last marker, instead of 24, to match the 136 stitches. Happy knitting!
19.04.2025 - 19:36
![]() Sharon Hunt wrote:
Sharon Hunt wrote:
I have a quick question. Is the saddle shoulder a bit longer in this pattern at your rpi gauge. I am knitting to length, but the shoulder in the first sweater I made seems a bit longer. My row gauge is 32rpi. You see, am using stash yarn that gives me spi but not rpi. I also regretted not knitting longer after the division for the sleeve.
07.04.2025 - 07:47DROPS Design answered:
Dear Mrs Hunt, if you don't have the same gauge in height as in the pattern you will have to adjust some parts of the pattern, for the saddel shoulder, you can then for example increase sometimes on every other round instead of on every round the number of times necessary to "compensate" the height of the gauge here. Or maybe just continue working to the requested height without further increase, this might also work. Happy knitting!
07.04.2025 - 14:23
![]() Sharon Hunt wrote:
Sharon Hunt wrote:
Hi. Sorry to bother you guys, but am confused. The pattern states that the length after the increases after the saddle shoulder is 10 (am using) inches here. Is the 10 inches sleeve length? The after the sleeve increases it says piece measures 9 inches. A bit confused.
27.03.2025 - 07:30DROPS Design answered:
Dear Mrs Hunt, the saddle shoulder should measure approx 10 cm = approx. 3,94 inches when the increases are done for saddle shoulder - the "cm" was missing as well as the matching measurements in inches that should be added soon. Thanks for noticing. Happy knitting!
27.03.2025 - 13:10
![]() Sharon Hunt wrote:
Sharon Hunt wrote:
Hi! Have completed the increase for the yoke and the measurement for the largest that am making says this: After the last increase the piece measures 8-8-9-9-10-10 from the marker on the neck. Then increase for the sleeves as described below. 10 what? Inches or cm? I am using stash yarn 🧶 and need to knit a bit longer for length. Thanks for responding.
20.03.2025 - 21:06DROPS Design answered:
Hi Sharon, If you are using the US English translation, you will have the measurements in both cms and inches. If you are using the UK English translation, the measurements are in cms. Happy crafting!
21.03.2025 - 07:49
|
|||||||||||||
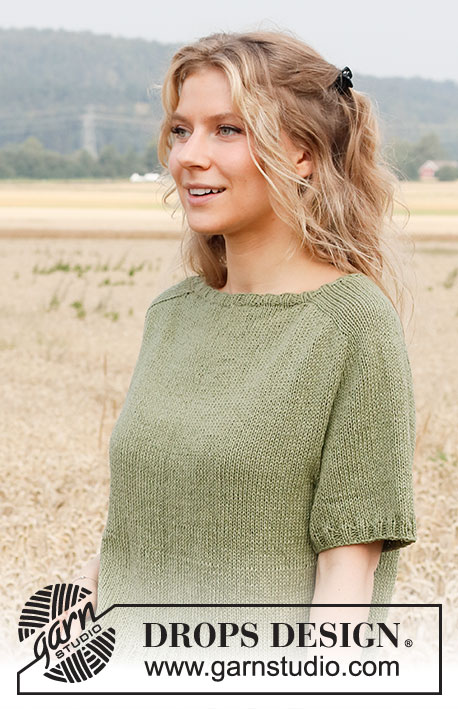
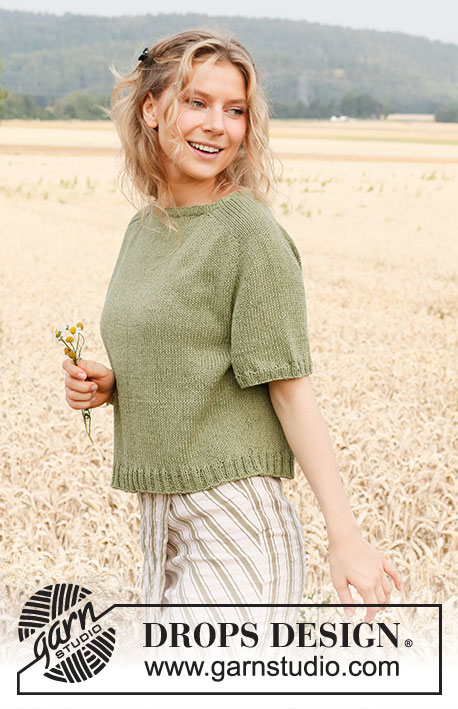
Fern Feast#fernfeasttop |
|||||||||||||
 |
 |
||||||||||||
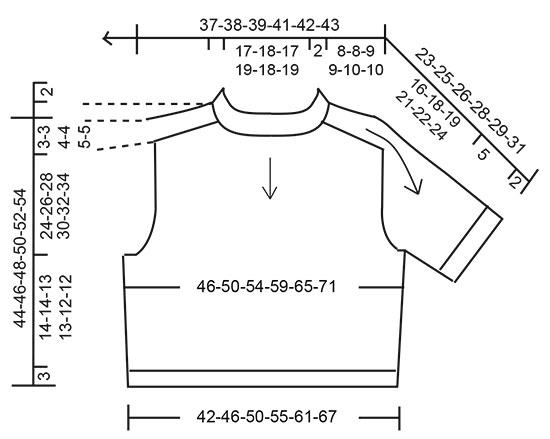
Knitted jumper in DROPS Belle or DROPS Sky. The piece is worked top down with saddle shoulders and short sleeves. Sizes S - XXXL.
DROPS 220-26 |
|||||||||||||
|
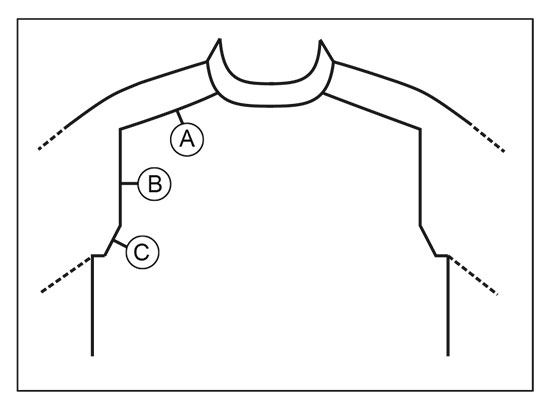
------------------------------------------------------- EXPLANATIONS FOR THE PATTERN: ------------------------------------------------------- INCREASE TIP-1 (evenly spaced): To work out how to increase evenly, count the total number of stitches on the needle (e.g. 92 stitches) and divide by the number of increases to be made (e.g. 12) = 7.7. In this example, increase by making 1 yarn over after alternately each 7th and 8th stitch (approx.). On the next round work the yarn overs twisted to avoid holes. INCREASE TIP-2: BEFORE MARKER: The new stitch twists towards the right. Use the left needle to pick up the strand between 2 stitches from the previous round, picking it up from the back and then knitting in the front loop. AFTER MARKER: The new stitch twists towards the left. Use the left needle to pick up the strand between 2 stitches from the previous round, picking it up from the front and knitting in the back loop. DECREASE TIP (for sides of body and under sleeves): Decrease 1 stitch on each side of the marker as follows: Work until there are 3 stitches left before the marker, knit 2 together, knit 2, slip 1 stitch as if to knit, knit 1 and pass the slipped stitch over the knitted stitch. CASTING-OFF TIP: To avoid the cast-off edge being tight you can cast off with a larger size needle. If the edge is still tight, make 1 yarn over after approx. each 4th stitch at the same time as casting off; the yarn overs are cast off as normal stitches. ------------------------------------------------------- START THE PIECE HERE: ------------------------------------------------------- JUMPER – SHORT OVERVIEW OF THE PIECE: The piece is worked in the round, top down. Stitches are increased on the yoke for the saddle shoulders and then stitches are increased for the sleeves. The yoke is divided for body and sleeves and the body continued in the round with circular needle. The sleeves are worked in the round with double pointed needles, top down. NECK: Cast on 92-96-100-108-112-116 stitches with circular needle size 3.5 mm and Belle or Sky. Knit 1 round, then work rib (knit 2, purl 2) in the round for 2 cm. Knit 1 round where you increase 12-12-20-20-24-28 stitches evenly spaced – read INCREASE TIP-1 = 104-108-120-128-136-144 stitches. YOKE: Change to circular needle size 4.5 mm and insert a marker at the beginning of the round (mid-back) – THE PIECE IS MEASURED FROM HERE! In addition, insert 4 new markers in the piece as described below – without working the stitches and inserting the markers between 2 stitches; the markers are used when increasing for the shoulders and should have a different colour from the marker on the neck. Marker-1: Start mid-back and count 18-19-20-22-22-24 stitches (= ½ back piece), insert the marker before the next stitch. Marker-2: Count 16-16-20-20-24-24 stitches from marker-1 (= shoulder), insert the marker before the next stitch. Marker-3: Count 36-38-40-44-44-48 stitches from marker-2 (= front piece), insert the marker before the next stitch. Marker-4: Count 16-16-20-20-24-24 stitches from marker-3 (= shoulder), insert the marker before the next stitch. There are 18-19-20-22-24-24 stitches left on the back piece after marker-4. Allow these 4 markers to follow your work onwards. INCREASES FOR SADDLE-SHOULDER: Work stocking stitch in the round. AT THE SAME TIME, on the first round, increase 4 stitches for the shoulders as follows: Increase BEFORE markers 1 and 3 and AFTER markers 2 and 4 – read INCREASE TIP-2. Here you only increase on the front and back pieces, so the number of shoulder stitches remains the same. Continue working in the round and increase like this every round a total of 21-21-24-24-26-26 times = 188-192-216-224-240-248 stitches. REMEMBER THE KNITTING TENSION! After the last increase the piece measures 8-8-9-9-10-10 cm from the marker on the neck. Then increase for the sleeves as described below. INCREASES FOR SLEEVE: Work stocking stitch in the round. AT THE SAME TIME, on the next round, increase 4 stitches for the sleeves as follows: Increase AFTER markers 1 and 3 and increase BEFORE markers 2 and 4 – remember INCREASE TIP-2. Here you only increase on the shoulders, so the number of stitches on the front and back pieces remains the same (the increased stitches are worked in stocking stitch). Increase like this every 2nd round a total of 17-18-18-17-17-17 times = 256-264-288-292-308-316 stitches. The piece now measures 21-22-23-22-23-23 cm from the marker on the neck. Continue with stocking stitch if necessary, without further increases, until the piece measures 21-22-23-22-23-23 cm. Then increase for the yoke as described below. INCREASES FOR YOKE: Move the 4 markers so each marker sits in the outermost stitch on each side of the front piece and the back piece. There are now 50-52-56-54-58-58 stitches between the marker-stitches on each sleeve. On the next round increase 8 stitches by increasing both before and after each marker-stitch – remember INCREASE TIP-2. Here you increase on both the front and back pieces and on the sleeves. Increase like this every 2nd round a total of 4-5-6-10-11-14 times = 288-304-336-372-396-428 stitches. When the increases are finished, the piece measures 24-26-28-30-31-34 cm from the marker on the neck. Continue with stocking stitch if necessary, without further increases, to the correct length. Now divide the yoke for body and sleeves as follows: Work the first 42-45-49-54-59-65 stitches as before (= ½ back piece), place the next 60-62-70-78-80-84 stitches on a thread for the sleeve, cast on 8-10-10-10-12-12 new stitches on the needle (= in side under sleeve), work 84-90-98-108-118-130 stitches as before (= front piece), place the next 60-62-70-78-80-84 stitches on a thread for the sleeve, cast on 8-10-10-10-12-12 new stitches on the needle (= in side under sleeve), work as before over the last 42-45-49-54-59-65 stitches (= ½ back piece). Body and sleeves are finished separately. THE PIECE IS NOW MEASURED FROM HERE. BODY: = 184-200-216-236-260-284 stitches. Insert 1 marker in the middle of the 8-10-10-10-12-12 stitches under each sleeve; these markers are used when decreasing in the sides. Work stocking stitch in the round. When the piece measures 3 cm from the division, decrease 1 stitch on each side of both markers – read DECREASE TIP (= 4 stitches decreased). Decrease like this every 3-3-2½-2½-2½-2½ cm a total of 4 times = 168-184-200-220-244-268 stitches. When the piece measures 14-14-13-13-12-12 cm from the division, knit 1 round where you increase 32-36-40-44-48-56 stitches evenly spaced = 200-220-240-264-292-324 stitches. Change to circular needle size 3.5 mm and work rib (knit 2, purl 2) in the round for 3 cm. Cast off with knit over knit and purl over purl – read CASTING-OFF TIP! The jumper measures approx. 44-46-48-50-52-54 cm from the shoulder down. SLEEVE: Place the 60-62-70-78-80-84 stitches from the thread on the one side of the piece on double pointed needles/short circular needle size 4.5 mm and knit up 1 stitch in each of the 8-10-10-10-12-12 stitches cast on under the sleeve = 68-72-80-88-92-96 stitches. Work stocking stitch in the round. When the piece measures 5 cm from the division, change to circular needle size 3.5 mm. Work rib (knit 2, purl 2) in the round for 2 cm. Cast off with knit over knit and purl over purl – remember CASTING-OFF TIP. The sleeve measures 7 cm from the division in all sizes. Work the other sleeve in the same way. |
|||||||||||||
Diagram explanations |
|||||||||||||
|
|||||||||||||
 |
|||||||||||||
 |
|||||||||||||
Have you finished this pattern?Tag your pictures with #dropspattern #fernfeasttop or submit them to the #dropsfan gallery. Do you need help with this pattern?You'll find 29 tutorial videos, a Comments/Questions area and more by visiting the pattern on garnstudio.com. © 1982-2026 DROPS Design A/S. We reserve all rights. This document, including all its sub-sections, has copyrights. Read more about what you can do with our patterns at the bottom of each pattern on our site. |
|||||||||||||


With over 40 years in knitting and crochet design, DROPS Design offers one of the most extensive collections of free patterns on the internet - translated to 17 languages. As of today we count 325 catalogues and 12298 patterns translated into English (UK/cm).
We work hard to bring you the best knitting and crochet have to offer, inspiration and advice as well as great quality yarns at incredible prices! Would you like to use our patterns for other than personal use? You can read what you are allowed to do in the Copyright text at the bottom of all our patterns. Happy crafting!
Post a comment to pattern DROPS 220-26
We would love to hear what you have to say about this pattern!
If you want to leave a question, please make sure you select the correct category in the form below, to speed up the answering process. Required fields are marked *.