
Popular categories
Looking for a yarn?


Comments / Questions (23)
![]() Svea wrote:
Svea wrote:
Hilfe, ich habe das Rumpfteil und die Ärmel fertig. Jetzt geht es ans zusammenfügen. Ich stricke Größe 2. Das Rumpfteil hat 37 Maschen und dann die Lücke mit den 8 abgeketteten Maschen. Bei der Passe steht nun: 1 Randmasche und 32 Maschen stricken (=33) und dann den Markierer und dann die Ärmelmaschen... Was mache ich mit den restlichen 4 Maschen?? 😳 Bitte dringend um Aufklärung...
28.03.2026 - 11:08DROPS Design answered:
Liebe Svea, die 4 letzten Maschen vom Vorderteil gehören jetzt zum Ärmel, so legen Sie den Markierer hier in die 34. Masche (= nach den 33 Maschen), dann sind es 3 M vom Vorderteil + 52 M vom Ärmel + 3 M vom Rückenteil =Ärmel), den nächsten Markierer in die nächste Masche einsetzen, usw. Viel Spaß beim Stricken!
07.04.2026 - 09:14
![]() Baumann wrote:
Baumann wrote:
Bjr, j’ai un problème avec vos diminutions pour raglan: elles ne sont pas symétriques et ça fausse tout le travail ! Avez vous un touto plus détaillé ?
25.08.2025 - 15:53DROPS Design answered:
Bonjour Mme Baumann, dans ce modèle, on tricote les diminutions du raglan comme dans cette vidéo, ainsi, la maille du raglan est la maille centrale et on va automatiquement diminuer 1 m avant + 1 m après la maille du raglan. Bon tricot!
26.08.2025 - 15:36
![]() Jutta Blechschmidt wrote:
Jutta Blechschmidt wrote:
Wie stricke ich die Raglanabnahmen?
29.03.2025 - 18:46DROPS Design answered:
Liebe Frau Blechschmidt, nehmen Sie für den Raglan wie unter RAGLANABNAHMEN beschrieben, in diesem Video zeigen wir, wie man diese Abnahmen arbeitet; sicher kann das Ihnen helfen. Viel Spaß beim Stricken!
31.03.2025 - 08:38
![]() Fiona wrote:
Fiona wrote:
How many stitches do you cast on for the rib and what size needle, please
05.11.2024 - 13:29DROPS Design answered:
Dear Fiona, you will find all informations about sizes and yarn amount in each size, needle size and tension under the header - see tab "Pattern" - you will work here with 2 strands: 1 strand DROPS Sky + 1 strand DROPS Kid-Silk; You will then find the amount of stitches to cast of for each piece under each piece - see under START THE PIECE HERE: then each part will have its own paragraph. Happy knitting!
05.11.2024 - 16:30
![]() Alina Rodriguez wrote:
Alina Rodriguez wrote:
No entiendo el ranglan y donde pone marcadores
04.12.2023 - 23:41
![]() Piera wrote:
Piera wrote:
Buongiorno, nella spiegazione dello sprone risulta che ci sono 58 maglie per le maniche (quindi 58x2= 116), 64 maglie per il dietro e 32 maglie per i due davanti (quindi 64). Sommando tutte le maglie 116+64+64 +2magli di vivagno mi risultano 246maglie non 250. Dove sono le altre 4 maglie? Grazie Piera
23.10.2023 - 17:59DROPS Design answered:
Buonasera Piera, ha inserito i segnapunti dello sprone NELLE maglie con indicato? e non TRA le maglie? Le 4 maglie che mancano sono quelle con i segnapunti. Buon lavoro!
23.10.2023 - 22:24
![]() Anh wrote:
Anh wrote:
Bonjour, pouvez-vous m’éclairer sur les diminutions raglan pour ce modèle : faudrait-t-il diminuer à 2mailles avant le marqueur et pas de diminution après le marqueur, parce qu’il est écrit : Tricoter jusqu’à ce qu’il reste 1 maille avec le marqueur... Merci d’avance et merci aussi pour les jolis modèles proposés.
21.03.2022 - 22:10DROPS Design answered:
Bonjour Mme Anh, vous diminuez 2 mailles à chaque marqueur soit 8 mailles au total, commencez quand il reste 1 maille avant le fil marqueur, glissez 2 mailles à l'endroit (la maille avant le marqueur + celle avec le marqueur), tricotez 1 maille endroit (= celle après le marqueur), et passez les 2 mailles glissées par-dessus la maille tricotée = vous avez diminué 2 mailles: 1 maille avant + 1 maille après le marqueur. Bon tricot!
22.03.2022 - 10:14
![]() Marijke wrote:
Marijke wrote:
Vraag 2 Raglan wordt gebreid door 2 steken over te halen. Is dat in iedere naald (dus ook averecht). Dit staat bij 'raglan'. Of alleen als er recht gebreid wordt? In iedere naald is het resultaat namelijk heel anders dan de foto.
18.01.2022 - 22:26DROPS Design answered:
Dag Marijke,
De raglanminderingen worden om de naald gemaakt (iedere andere naald), dus de ene naald wel en de andere naald niet.
21.01.2022 - 09:05
![]() Marijke wrote:
Marijke wrote:
Vraag 1: Vanaf de beschrijving 'pas' moeten er in maat L totaal 266 steken op de naald zijn. Dat klopt. Maar in de eerste rij, waar de markeerdraaden ingevoegd moeten worden kom ik op een totaal van 262 steken (inclusief kantsteken). Hoe moet de verdeling precies?
18.01.2022 - 22:25DROPS Design answered:
Dag Marijke,
Je voegt de markeerdraden in de steken, niet tussen de steken. Waarschijnlijk zorgt dit voor het verschil van 4 steken.
21.01.2022 - 09:02
![]() Goretti wrote:
Goretti wrote:
Buenas, en la talla M, al montar todos los puntos en la misma aguja, frente, mangas y espalda pone que hay 250 puntos. Pero con las piezas relizadas anteriormente son 246; donde pongo los marcadores?
13.01.2022 - 18:30DROPS Design answered:
Hola Goretti, en las partes anteriores has obtenido 52 puntos en cada manga (= 104 puntos), 37 para cada delantero (= 74 puntos) y 72 puntos en la espalda. En total son 250 puntos. Los marcapuntos se ponen en la transición entre la manga y el cuerpo.
16.01.2022 - 23:20
|
|
North Woods#northwoodscardigan |
|
 |
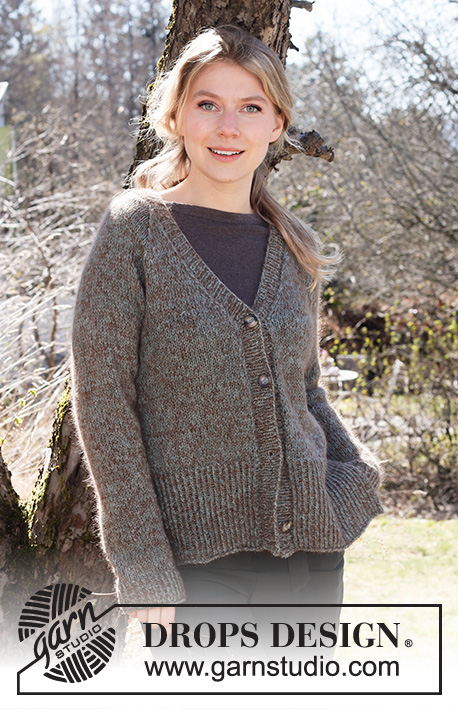 |
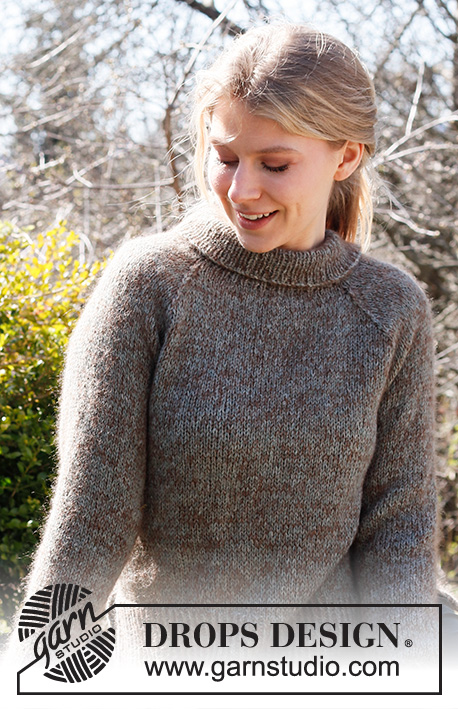
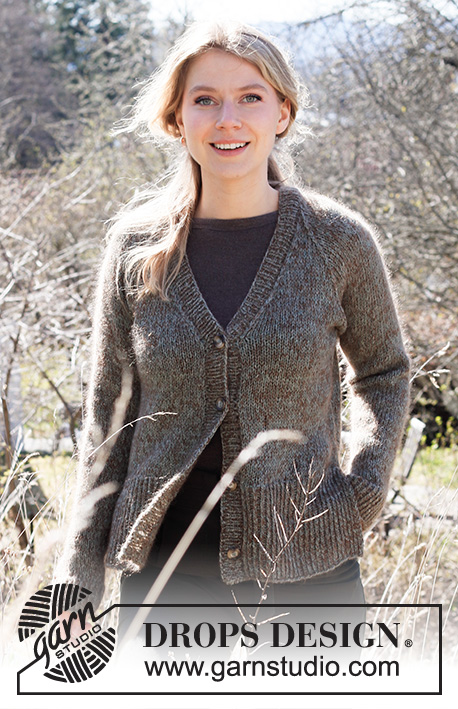
Knitted jacket with raglan in DROPS Sky and DROPS Kid-Silk. Piece is knitted with V- neck and vent. Size: S - XXXL
DROPS 216-21 |
|
|
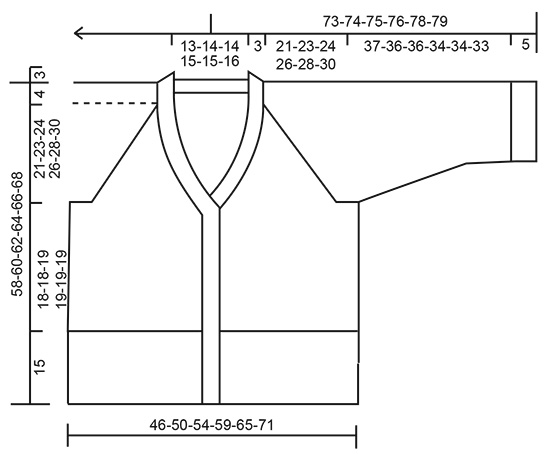
------------------------------------------------------- EXPLANATION FOR THE PATTERN: ------------------------------------------------------- GARTER STITCH (back and forth): Knit all rows. 1 ridge vertically = knit 2 rows. DECREASE TIP (evenly): To calculate how to decrease evenly, use the total number of stitches on row (e.g. 91 stitches), minus edge stitches (2 stitches) and divide the remaining stitches by number of decreases to be done (e.g. 16) = 5.6. In this example decrease by knitting alternately approx. every 4th and 5th stitch and every 5th and 6th stitch together. INCREASE TIP (applies to sleeves): Work until 2 stitches remain before marker thread, 1 yarn over, knit 4 (marker thread is in the middle of these stitches), 1 yarn over. On next round knit yarn overs twisted to avoid holes. Then work the new stitches in stocking stitch. RAGLAN: Decrease 2 stitches in every transition between body and sleeves as follows: Work until 1 stitch remains before stitch with marker, slip 2 stitches knitwise, knit 1, pass the 2 slipped stitches over stitch worked (= 2 stitches decreased). BUTTONHOLES: Decrease for buttonholes on right band (when garment is worn). 1 buttonhole: Make 1 yarn over, knit the next 2 stitches together. On next row knit yarn over to make holes. Decrease first buttonhole approx. 4-5-5-5-5-5 cm from bottom of body, then decrease the next 3 buttonholes approx. 9½-9½-10-10-10-10 cm apart. Adjust so that top buttonhole is placed approx. 1 cm below decrease until V-neck begins. ------------------------------------------------------- START THE PIECE HERE: ------------------------------------------------------- JACKET - SHORT OVERVIEW OF THE PIECE: Work front and back piece back and forth separately until rib at the bottom is done. Then slip all parts on to same circular needle and work back and forth from mid front up to armhole. Work sleeves in the round on double pointed needles/a short circular needle. Then slip sleeves on to same circular needle as body and work yoke back and forth from mid front. Finally pick up stitches for band and work back and forth. BACK PIECE: Cast on 91-101-109-117-129-141 stitches (including 1 edge stitch in garter stitch in each side) on circular needle size 4 mm with 1 strand Sky and 1 strand Kid-Silk (= 2 strands). Purl 1 row from wrong side. Then work rib as follows: ROW 1 (= right side): 1 edge stitch in GARTER STITCH - read explanation above, * knit 1 twisted, purl 1 *, work from *-* until 2 stitches remain on needle, knit 1 twisted and finish with 1 edge stitch in garter stitch. ROW 2 (= wrong side): 1 edge stitch in garter stitch, * purl 1 twisted, knit 1 *, work from *-* until 2 stitches remain on row, purl 1 twisted and finish with 1 edge stitch in garter stitch. Repeat 1st and 2nd row until rib measures 15 cm. Cut the yarn and slip stitches on a stitch holder. Put piece aside and work the front pieces. LEFT FRONT PIECE: Cast on 47-51-55-59-65-71 stitches (including 1 edge stitch in garter stitch in each side) on circular needle size 4 mm with 1 strand Sky and 1 strand Kid-Silk (= 2 strands). Purl 1 row from wrong side. Then work rib as follows: ROW 1 (= right side): Work 1 edge stitch in garter stitch, * knit 1 twisted, purl 1 *, work from *-* until 2 stitches remain on needle, knit 1 twisted and finish with 1 edge stitch in garter stitch. ROW 2 (= wrong side): Work 1 edge stitch in garter stitch, * purl 1 twisted, knit 1 *, work from *-* until 2 stitches remain on row, purl 1 twisted and finish with 1 edge stitch in garter stitch. Repeat 1st and 2nd row until rib measures 15 cm. Cut the yarn and slip stitches on a stitch holder. Put piece aside and work the right front piece. RIGHT FRONT PIECE: Work the same way as on left front piece until piece measures 15 cm – adjust to finish after a row from wrong side. Do not cut the yarn. BODY: Now work parts together. Work over right front piece from right side as follows: 1 edge stitch in garter stitch, knit the next 45-49-53-57-63-69 stitches and decrease at the same time 8-9-10-10-11-12 stitches evenly over these stitches, knit last stitch on right front piece together with first stitch on back piece (= 1 stitch decreased), knit the next 89-99-107-115-127-139 stitches on back piece and decrease at the same time 17-21-23-23-25-27 stitches evenly, knit last stitch on back piece together with first stitch on left front piece (= 1 stitch decreased), knit the next 45-49-53-57-63-69 stitches and decrease at the same time 8-9-10-10-11-12 stitches evenly over these stitches, work last stitch in garter stitch = 150-162-174-190-210-230 stitches. Switch to circular needle size 5.5 mm. Continue back and forth in stocking stitch with 1 edge stitch in garter stitch in each side towards mid front. REMEMBER THE KNITTING TENSION! When piece measures 33-33-34-34-34-34 cm from cast on edge, cast off stitches for armholes in each side as follows: Work the first 34-37-39-43-47-51 stitches as before (= right front piece), cast off the next 8-8-10-10-12-14 stitches (= armhole), work the next 66-72-76-84-92-100 stitches (= back piece), cast off the next 8-8-10-10-12-14 stitches (= armhole), work the last 34-37-39-43-47-51 stitches (= left front piece). Put piece aside and work the sleeves. SLEEVES: Cast on 46-48-50-52-52-56 stitches on double pointed needles size 4 mm with 1 strand Sky and 1 strand Kid-Silk (= 2 strands). Now work in the round as follows: Knit 1 round. Then work rib (= knit 1 twisted/purl 1) in the round for 5 cm. Knit 1 round while decreasing 8-8-8-8-8-10 stitches evenly = 38-40-42-44-44-46 stitches. Switch to double pointed needles size 5.5 mm. Insert a marker thread at beginning of round (= mid under sleeve). Move the marker thread when working; it is used for increase under sleeve later. Work in stocking stitch in the round. When piece measures 11-10-10-10-7-7 cm from cast-on edge, increase 1 stitch on each side of marker thread - read INCREASE TIP. Increase like this approx. every 3-3-2½-2-2-2 cm 10-10-12-13-15-15 times in total = 58-60-66-70-74-76 stitches. When sleeve measures 42-41-41-39-39-38 cm (shorter measurements in the larger sizes because of wider neck and longer yoke), cast off 8-8-10-10-12-14 stitches under sleeve (i.e. 4-4-5-5-6-7 stitches on each side of marker thread) = 50-52-56-60-62-62 stitches. Put piece aside and knit another sleeve the same way. YOKE: Slip sleeves on to same circular needle as body where armholes were cast off = 234-250-266-290-310-326 stitches. Work first row from right side as follows: 1 edge stitch in garter stitch, knit the next 30-32-34-38-41-44 stitches, insert 1 marker in next stitch, knit the next 54-58-62-66-70-72 stitches (= sleeve), insert 1 marker in next stitch, knit the next 60-64-68-76-82-88 stitches (= back piece), insert 1 marker in next stitch, knit the next 54-58-62-66-70-72 stitches (= sleeve), insert 1 marker in next stitch, knit the next 30-32-34-38-41-44 stitches, 1 edge stitch in garter stitch (= left front piece). Stitches with markers indicate transition between body and sleeves. Continue back and forth in stocking stitch with 1 edge stitch in garter stitch in each side towards mid front. Then decrease for raglan and V-neck as explained below. RAGLAN: When 4-4-2-2-2-2 rows have been worked, begin decrease for RAGLAN – read explanation above. Decrease like this every other row 19-21-23-25-27-29 times in total. V-NECK: When 2-4-4-4-4-4 rows have been worked on yoke, begin to decrease for V-neck from right side as follows: Work 1 edge stitch in garter stitch, slip 1 stitch knitwise, knit 1, pass slipped stitch over the last stitch worked (= 1 stitch decreased), work until 3 stitches remain, knit the next 2 stitches together (= 1 stitch decreased), work 1 edge stitch in garter stitch. Decrease like this one more time after 7 rows and then on every 4th row 8-9-9-10-11-12 times = 10-11-11-12-13-14 decreases in total for V-neck on each side. When all decreases for raglan and V-neck are done, 62-60-60-66-68-66 stitches remain on row. Work next row from right side as follows: 1 edge stitch in garter stitch, slip 1 stitch knitwise, knit 1, pass slipped stitch over (= 1 stitch decreased), knit the next 56-54-54-60-62-60 stitches - decrease at the same time 12-8-8-12-13-9 stitches evenly, knit the next 2 together (= 1 stitch decreased), 1 edge stitch in garter stitch = 48-50-50-52-53-55 stitches. Cast off. RIGHT BAND: Begin from right side at the bottom of right front piece with circular needle size 4 mm and 1 strand in each quality (= 2 strands). Pick up 135-145 stitches inside 1 edge stitch in garter stitch along right front piece all the way up to mid back on back piece (number of stitches must be divisible by 2 + 1 stitch). Purl 1 row from wrong side - increase with yarn overs where first decrease began by working as follows: * Purl 1, make 1 yarn over *, work from *-* 2 times (= 2 stitches increased) - on next row work yarn overs twisted to avoid holes. Now work rib as follows from right side: Work 1 edge stitch in garter stitch, * knit 1, purl 1 *, work from *-* until 2 stitches remain on needle, knit 1 and finish with 1 edge stitch in garter stitch. Continue rib back and forth like this until band measures 1-1½ cm. Decrease for BUTTONHOLES – read explanation above. Continue with rib until band measures 3-3½ cm in total. Cast off stitches with knit over knit and purl over purl. LEFT BAND: Begin from right side mid back of neck with circular needle size 4 mm and 1 strand in each quality (= 2 strands). Pick up 135-145 stitches inside 1 edge stitch in garter stitch along the edge and down left front piece (number of stitches must be divisible by 2 + 1 stitch). Purl 1 row from wrong side - increase with yarn overs where first decrease began by working as follows: * Purl 1, make 1 yarn over *, work from *-* 2 times (= 2 stitches increased) - on next row work yarn overs twisted to avoid holes. Now work rib as follows from right side: Work 1 edge stitch in garter stitch, * knit 1, purl 1 *, work from *-* until 2 stitches remain on needle, knit 1 and finish with 1 edge stitch in garter stitch. Continue rib back and forth like this until band measures approx. 3-3½ cm - adjust length according to right band. Cast off stitches with knit over knit and purl over purl. ASSEMBLY: Sew bands together mid back of neck inside 1 edge stitch in garter stitch in each side. Sew the buttons on to left band. Sew the openings under the sleeves together. |
|
 |
|
Have you finished this pattern?Tag your pictures with #dropspattern #northwoodscardigan or submit them to the #dropsfan gallery. Do you need help with this pattern?You'll find 33 tutorial videos, a Comments/Questions area and more by visiting the pattern on garnstudio.com. © 1982-2026 DROPS Design A/S. We reserve all rights. This document, including all its sub-sections, has copyrights. Read more about what you can do with our patterns at the bottom of each pattern on our site. |
|


With over 40 years in knitting and crochet design, DROPS Design offers one of the most extensive collections of free patterns on the internet - translated to 17 languages. As of today we count 324 catalogues and 12290 patterns translated into English (UK/cm). 12290
We work hard to bring you the best knitting and crochet have to offer, inspiration and advice as well as great quality yarns at incredible prices! Would you like to use our patterns for other than personal use? You can read what you are allowed to do in the Copyright text at the bottom of all our patterns. Happy crafting!
Post a comment to pattern DROPS 216-21
We would love to hear what you have to say about this pattern!
If you want to leave a question, please make sure you select the correct category in the form below, to speed up the answering process. Required fields are marked *.