
Popular categories
Looking for a yarn?


Comments / Questions (53)
![]() Riitta Apajalahti-Ginman wrote:
Riitta Apajalahti-Ginman wrote:
Mikä voisi olla vaihtoehtoinen lanka, mielellään puuvillaa? Kiitos! Riitta
26.04.2021 - 20:47DROPS Design answered:
Hei, esim. DROPS Muskat on 100% puuvillaa. Voit myös kokeilla DROPS Belle-lankaa.
05.05.2021 - 16:53
![]() Ivanete Aguillera Dias wrote:
Ivanete Aguillera Dias wrote:
Muito lindo este trabalho. Pretendo adaptá-lo para máquina de tricô.
06.03.2021 - 15:25
![]() Vibeke wrote:
Vibeke wrote:
Avsnitt 3 under «Bol»: «Bytt til rundpinne 3 og strikk 1 omgang som før over alle masker, SAMTIDIG som det økes 1 maske mellom hver A.1» Betyr dette rundt hele eller bare bakstykket? Og HVOR mellom A1ene skal masken økes? Ser at også Lone har spurt om dette uten å få ordentlig svar.
01.03.2021 - 23:07DROPS Design answered:
Hei Vibeke, Du har A.1 på hver siden av bolen og du skal øke 1 maske mellom hver A.1, så det blir 2 masker. i tillegg til maskene allerede på pinnen. Det kan økes ved siden av A.1 for at det skal være minst synlig. God fornøyelse!
03.03.2021 - 07:46
![]() Sandra wrote:
Sandra wrote:
Zur einfacheren Klärung: meine Frage bezieht sich auf folgendes Modell: "Ready to Play Romper by DROPS Design" DROPS Design: Modell me-065-by in Größe 56/62
17.02.2021 - 17:19DROPS Design answered:
Liebe Sandra, es sind genau 26 M zwischen beiden A.1 für das Rückenteil, bei der 1. verkürzten Reihe stricken Sie bis 5 M bleiben vor A.1 (= 21 M), wenden und bis 5 M vor A.1 auf den anderen Seiten bleiben (= 16 M), wenden und bis 10 M vor A.1 bleiben (= 11 M) wenden und bis 10 M vor A.1 bleiben (= 6 M), die verkürzten Reihen sind fertig. Wenden Sie jetzt und die nächste Hinreihe bis in der Mitte von 1. A.1 stricken. Viel Spaß beim stricken!
18.02.2021 - 08:52
![]() Sandra wrote:
Sandra wrote:
Wie wird die Erhöhung hinten gearbeitet? Laut Beschreibung wird der Abschnitt für die Erhöhung um 30 M (2x5 M und 2x10 M vor den A1) verringert. Die hintere Mitte besteht bei mir (kleinste Größe) allerdings nur noch aus 26 Maschen zwischen beiden A1 -> wende ich nach der linke Rückreihe, um 10 M übrig zu lassen, habe ich nur noch 6 M auf der Nadel, obwohl hier 10 M vor dem A1 vor dem nächsten Wenden stehen sollten, um dann noch zur Mitte zwischen beiden A1 zu kommen.
17.02.2021 - 17:10
![]() Susanne Lövmark Ek wrote:
Susanne Lövmark Ek wrote:
Byt till rundsticka 3 och sticka 1 varv som förut över alla maskor, (Då är jag ju på avigan av bakstycket om det bara är bakstycket jag ska sticka detta "varv" på?)SAMTIDIGT som det ökas 1 maska mellan varje A.1 = 86-90-94-106 maskor – OBS: För att undvika hål vid varje vändning hämtas öglan mellan 2 maskor upp och stickas vridet räta (Men i och med det står RÄTA så antar jag det är på räta sidan jag är?!)tillsammans med nästa maska på stickan.
16.02.2021 - 21:07
![]() Susanne Lövmark Ek wrote:
Susanne Lövmark Ek wrote:
Det står ingenstans att varvet ska börja 8 m före markören dräkten VÄNSTRA sida. Jag har börjat på motsatt sida. Det ställer ju till det för mig nu när jag ska börja med höjningen bak. Hur tycker ni jag ska göra? Kan jag bara sticka ett extra varv på bakstycket och sedan låtsas starta om varvet på vänstra sidan så jag kan läsa mönstret rätt
14.02.2021 - 14:00
![]() Lone wrote:
Lone wrote:
Der står skift til rund pind 3 og strik en omgang som før, det var jo kun over bagstk og ikke en hel omgang ligeledes står der at der tages 1 maske ud mellem hver A1 Kan i beskrive det på en anden måde så jeg kan finde ud af det. På forhånd tak.
01.02.2021 - 17:40DROPS Design answered:
Hej Lone, Hvor langt er du kommet i opskriften. Er det evt lettere at forstå hvis vi skrive strik en omgang/pind som før?
05.02.2021 - 14:59
![]() Pia Larsen wrote:
Pia Larsen wrote:
Ang. forhøjning bagpå. I skriver: skift til rundpind 3 og strik 1 omgang som før over alle masker. Hvad betyder det? Så skriver I OBS. For at undgå hul.... hentes løkken op....... henviser I her til at jeg skulle gøre det, da jeg lavede den tidligere forhøjning? Mvh Pia
07.12.2020 - 19:39DROPS Design answered:
Hej Pia, nej det skal du gøre på denne omgang du er kommet til, over hver af de huller du har fået ved tidligere vendinger. God fornøjelse!
10.12.2020 - 15:44
![]() Kim wrote:
Kim wrote:
Une fois qu'on a fini le dos et qu'on le met en attente pour faire le devant, est-ce qu'on doit couper le fil pour commencer le devant ?
19.11.2020 - 15:44DROPS Design answered:
Bonjour Kim, tout à fait, coupez le fil à la fin du dos, tricotez le devant et, à la fin du devant, vous glisserez les mailles du dos sur la même aiguille que celles du devant. Bon tricot!
19.11.2020 - 16:02
|
|||||||||||||
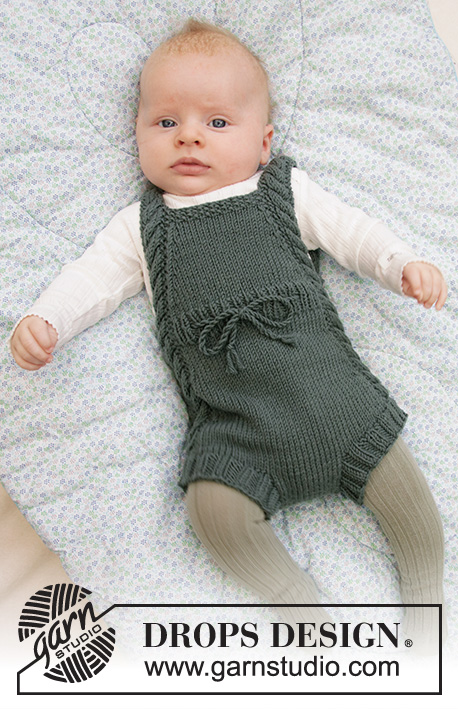
Ready to Play Romper#readytoplayromper |
|||||||||||||
 |
 |
||||||||||||
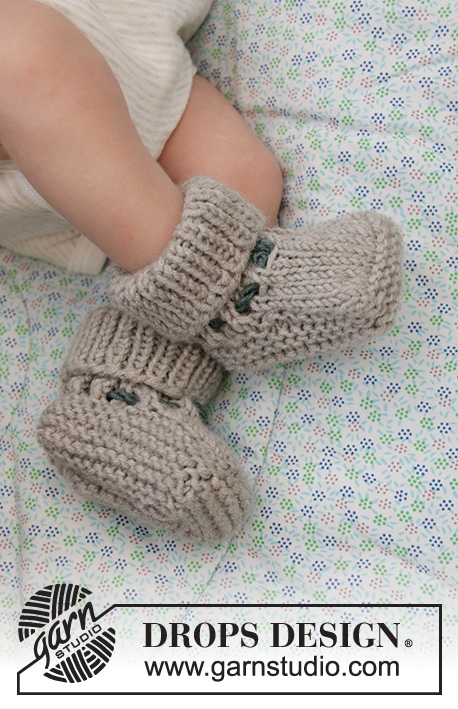
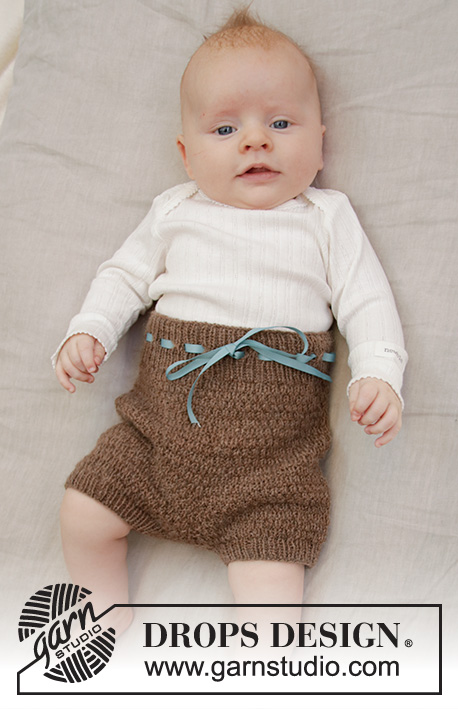
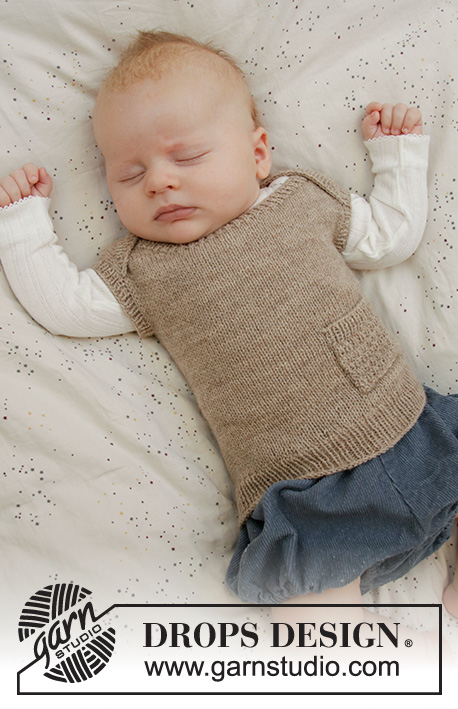
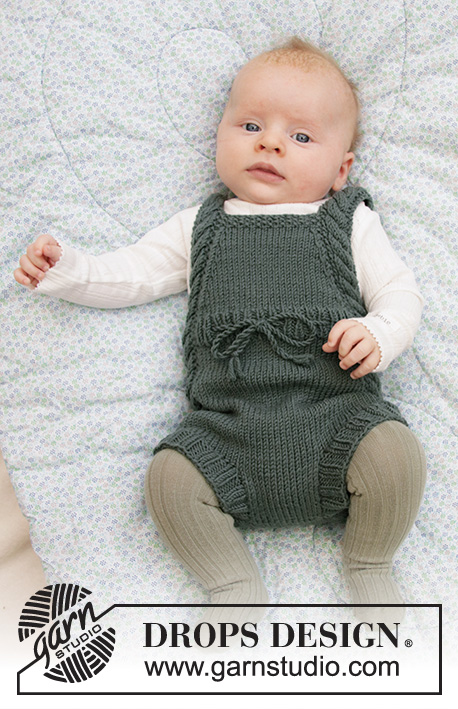
Knitted play suit for baby with cables and moss stitch in DROPS Merino Extra Fine. Size 1 - 24 months.
DROPS Baby 33-21 |
|||||||||||||
|
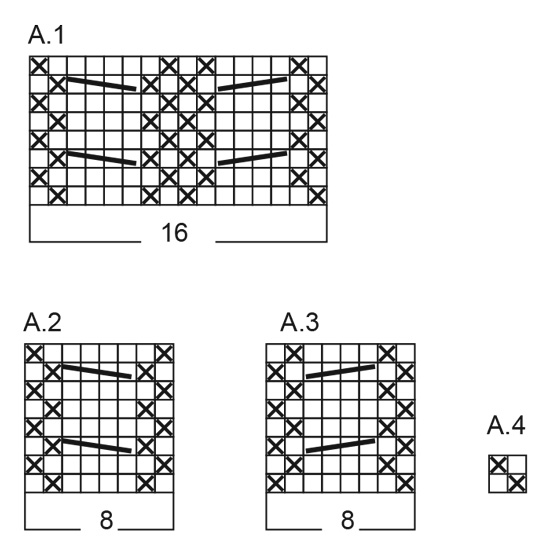
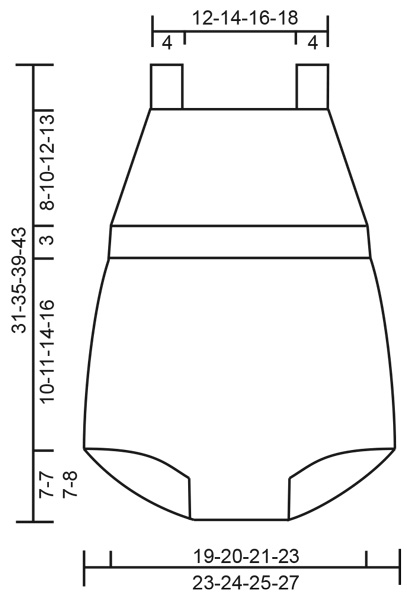
---------------------------------------------------------- EXPLANATION FOR THE PATTERN: ---------------------------------------------------------- GARTER STITCH (worked in the round): 1 ridge = 2 rounds. Knit 1 round and purl 1 round. GARTER STITCH (back and forth): 1 ridge = knit 2 rows. PATTERN: See diagrams A.1 to A.4 DECREASE TIP: Work until 2 stitches remain before A.1, decrease as follows: Knit 2 together, work stitches in A.1, slip 1 stitch knitwise, knit 1, pass slipped stitch over. ---------------------------------------------------------- START THE PIECE HERE: ---------------------------------------------------------- PLAY SUIT – SHORT OVERVIEW OF THE PIECE: Piece is worked back and forth in 2 parts, bottom up to after leg opening. Then work piece in the round before dividing at the waist, and finishing front piece back and forth on needle. BACK PIECE: Cast on 14-16-18-20 stitches on circular needle size 3.5 mm with Merino Extra Fine and work in stocking stitch back and forth. AT THE SAME TIME cast on 2 new stitches at the end of every row 9-9-9-10 times in total in each side = 50-52-54-60 stitches on needle and piece measures approx. 6-6-6-7 cm. Put piece aside and work the front piece. FRONT PIECE: Cast on 14-16-18-20 stitches on circular needle size 3.5 mm with Merino Extra Fine and work in stocking stitch back and forth for 5-5-5-6 cm. SIZE 1/3 months - 6/9 months - 12/18 months: Now cast on 6 new stitches at the end of every row 3 times in total each side. SIZE 24 months: Cast on 6 new stitches in each side at the end of every row 2 times, then 8 new stitches in each side 1 time = 50-52-54-60 stitches on needle and piece measures approx. 7-7-7-8 cm. BODY: Slip stitches from front and back piece on to same circular needle = 100-104-108-120 stitches on needle. Insert 1 marker in each side (= 50-52-54-60 stitches between markers) - NOW MEASURE PIECE FROM HERE. Continue to work - beginning of the round should be 8 stitches before first marker thread. Work A.1 (= 16 stitches), stocking stitch over the next 34-36-38-44 stitches in stocking stitch, A.1 (= 16 stitches), stocking stitch over the next 34-36-38-44 stitches in stocking stitch. Marker threads are in the middle of A.1 in each side. Continue this pattern in the round. When piece measures 2-3-5-7 cm, decrease 1 stitch on each side of both A.1 - READ DECREASE TIP (= 4 stitches decreased). Repeat decrease every 2 cm 4 times in total = 84-88-92-104 stitches on needle. When piece measures 10-11-14-16 cm from markers (piece measures approx. 17-18-21-24 cm from cast-on edge) work an elevation at the back as follows – NOTE: To avoid holes at every turn pick up loop between 2 stitches and knit twisted together with next stitch on needle: work knit over knit and A.1 over A.1 as before over the first 58-60-62-68 stitches, i.e. until after the second repetition of A.1 (= front piece), knit until 5 stitches remain before A.1 at the beginning of round, turn and purl back until 5 stitches remain before A.1 in the other side, turn piece. Knit until 10 stitches remain before A.1, turn piece and purl until 10 stitches remain before A.1 in the other side. Turn piece and knit until the middle of the first A.1. Switch to circular needle size 3 mm and work 1 round as before over all stitches, AT THE SAME TIME increase 1 stitch between every A.1 = 86-90-94-106 stitches. Work next round as follows: Continue with A.2 over the first 8 stitches (= make sure to begin on same row that should have been worked in A.1), work rib purl 1/knit 1 over the next 27-29-31-37 stitches, work A.3 over the next 8 stitches (= make sure to begin on same row that should have been worked in A.1), work rib purl 1/knit 1 over the next 43-45-47-53 stitches. When piece measures 1 ½ cm, work a row eyelet holes as follows: Work as before over the first 8 stitches, purl 1, * knit 1, purl 1, 1 yarn over, knit 2 together*, repeat from *-* over the next 24-28-28-36 stitches, work 10-8-10-8 stitches as before, purl 1, * knit 1, purl 1, 1 yarn over, knit 2 together*, repeat from *-* over the next 40-44-44-52 stitches, work 2-0-2-0 stitches as before. Then continue pattern and rib as before, until 1 round remains before rib measures 3 cm. Work next round as follows: Work over the first 43-45-47-53 stitches (= front piece), LOOSELY cast off the next 43-45-47-53 stitches with knit over knit and purl over purl (= back piece). FRONT PIECE: Insert 1 marker, NOW MEASURE PIECE FROM HERE! Switch to circular needle size 3.5 mm and work first row from right side as follows: Continue A.2 over the first 8 stitches on needle, 27-29-31-37 stitches in stocking stitch, A.3 over the last 8 stitches on needle. Continue like this back and forth. AT THE SAME TIME when piece measures 1-0-0-1 cm, decrease 1 stitch in each side - READ DECREASE TIP. Repeat decrease every 2nd-4th-6th-6th needle 7-7-6-6 times in total = 29-31-35-41 stitches remain on needle. When piece measures 7-9-11-12 cm from marker - adjust so that next row is from right side), work 6 rows with A.4 over stitches between A.2 and A.3 in each side. Work next row as follows from right side: work 8 stitches (= A.2) and slip these stitches on 1 stitch holder for shoulder strap, cast off the next 13-15-19-25 stitches and work the last 8 stitches (= A.3, shoulder strap). SHOULDER STRAP: Continue in A.3 back and forth until shoulder strap measures approx. 18 to 24 cm (or desired length). Cast off. Continue in A.2 back and forth until the other shoulder strap measures approx. 18 to 24 cm (or desired length). Cast off. ASSEMBLY: RIB EDGE: Pick up from right side approx. 50 to 58 stitches along one opening for leg on circular needle size 3 mm with Merino Extra Fine. Purl 1 row from wrong side AT THE SAME TIME increase evenly to 58-62-66-70 stitches. Then work rib = knit 2/purl 2 back and forth with 1 edge stitch in garter stitch in each side. When edge measures 2-4 cm, loosely cast off with knit over knit and purl over purl. Repeat along the other leg. Sew opening between legs inside 1 edge stitch - i.e. sew together one rib edge, then sew seam between leg openings and finally the other rib edge. Fasten a button at the bottom on each shoulder strap. Use holes in eyelet row on rib to button. TIE: Cut 2 lengths Merino Extra Fine yarn of approx. 3 metres. Twine the strands tog until they resist, fold the string double so that it twines again. Make a knot at each end. Begin mid front and thread tie up and down through eyelet row on rib in waist. |
|||||||||||||
Diagram explanations |
|||||||||||||
|
|||||||||||||
 |
|||||||||||||
 |
|||||||||||||
Have you finished this pattern?Tag your pictures with #dropspattern #readytoplayromper or submit them to the #dropsfan gallery. Do you need help with this pattern?You'll find 24 tutorial videos, a Comments/Questions area and more by visiting the pattern on garnstudio.com. © 1982-2026 DROPS Design A/S. We reserve all rights. This document, including all its sub-sections, has copyrights. Read more about what you can do with our patterns at the bottom of each pattern on our site. |
|||||||||||||


With over 40 years in knitting and crochet design, DROPS Design offers one of the most extensive collections of free patterns on the internet - translated to 17 languages. As of today we count 324 catalogues and 12290 patterns translated into English (UK/cm). 12290
We work hard to bring you the best knitting and crochet have to offer, inspiration and advice as well as great quality yarns at incredible prices! Would you like to use our patterns for other than personal use? You can read what you are allowed to do in the Copyright text at the bottom of all our patterns. Happy crafting!
Post a comment to pattern DROPS Baby 33-21
We would love to hear what you have to say about this pattern!
If you want to leave a question, please make sure you select the correct category in the form below, to speed up the answering process. Required fields are marked *.