Comments / Questions (51)
![]() Bente Michaelsen wrote:
Bente Michaelsen wrote:
Det undre mig at de søde bukser ikke har en knaplukning mellem benene, så det er lettere at skifte ble. Jeg har selv tilføjet det, idet jeg ellers synes at modelen er upraktisk!
13.11.2021 - 23:25
![]() GUNILLA ENGLUND wrote:
GUNILLA ENGLUND wrote:
För 35 år sedan stickade jag till mitt barn en dress med knappar i grenen, praktiskt vid blöjbyte. Nu har jag fått barnbarnsbarn och tänkte sticka något liknande men nej, hittar inget sådant mönster, tråkigt. blir ingen dress.
09.09.2021 - 18:01
![]() B Guitton wrote:
B Guitton wrote:
A quoi sert une rehausse et est ce vraiment nécessaire sur ce modèle ? Peut on voir ce que ça rend, photo du dos ? Merci beaucoup
19.07.2021 - 17:39DROPS Design answered:
Bonjour Mme Guitton, la réhausse donne plus de hauteur au côté dos de la partie short pour le confort. cette vidéo montre comment tricoter ce type de réhausse avec rangs raccourcis pour allonger une partie de l'ouvrage (dos d'un short/pantalon ou bien encolure dos d'un pull ou d'un gilet). Bon tricot!
20.07.2021 - 08:33
![]() Maran wrote:
Maran wrote:
Mit welchem der beiden Fäden wird an dieser Stelle weitergestrickt? Wo genau sitzt der 1. Markierer? Die Maschen von Vorder- und Rückenteil auf dieselbe Rundnadel legen = 100-104-108-120 Maschen auf der Nadel. Je 1 Markierer an beiden Seiten des Rumpfteils anbringen (= je 50-52-54-60 Maschen zwischen den Markierern).
14.07.2021 - 19:34DROPS Design answered:
Liebe Maran, Sie stricken weiter mit dem Faden von Vorderteil, die Markierungen sind beide zwischen Vorder- und Rückenteil, aber Anfang der Runde ist 8 M vor einer der Markierung damit die nächsten 16 m in A.1 gestrickt werden. Viel Spaß beim stricken!
15.07.2021 - 09:46
![]() Judith Kaski wrote:
Judith Kaski wrote:
Under the body section - what is meant by 10-8 10-8 And 2-0 2-0?
11.06.2021 - 15:28DROPS Design answered:
Dear Mrs Kaski, each number refers to the size, ie in first size, the first number will apply: 10 then 2 ; in the 2nd size the 2nd number applies: 8 and 0 (= no stitch), etc.. Hope this will help, happy knitting!
11.06.2021 - 17:22
![]() Helga wrote:
Helga wrote:
Ich verstehe das stricken der Erhöhung hinten nicht. So wie in der Anleitung beschrieben ist die Erhöhung aber am Vorderteil. Ist das richtig? Da steht " bis nach dem 2. Rapport A1 ( Vorderteil) "
28.05.2021 - 19:39DROPS Design answered:
Liebe Helga, ja genau, dh die Maschen vom Vorderteil sind jetzt gestrickt und dann stricken Sie rechts bis noch 5 Maschen vor A.1 am Rundenbegin übrig sind, und jetzt beginnen die verkürzten Reihen = Rückenteil. Viel Spaß beim stricken!
31.05.2021 - 07:20
![]() Lydia El-Shazly wrote:
Lydia El-Shazly wrote:
Is the chart available in written form? I am really struggling to follow it because it doesn't download on the PDF so isn't coming up with the rest of the pattern on Knitcompanion. Also it says about knitting on the right side, purl on the back but if it is in the round and you are always working on the right side so I don't understand how it works.
26.05.2021 - 21:26DROPS Design answered:
Dear Lydia unfortunately we do not have written instructions for the diagrams, because we believe that with them its not only the very next step you can see, but the bigger picture, as how the stitches and rows relate to each other. Diagrams always show every row as you would see them on the right side. The pattern has places (like the shoulder straps) that knitted back and forth, thats why we give thefull descriotion. If there is a stitch saying knit from RS, P from WS, but you always knit it from the right side, then you always kit it as a knit stitch. Happy Knitting!
26.05.2021 - 21:57
![]() Saija wrote:
Saija wrote:
Kun takakappale on neulottu jatkuu ohje "Jätä työ odottamaan ja neulo etukappale" miten lanka tuossa jätetään, katkaistaan takakappaleen lanka ja aloitetaan etukappaleen silmukoiden luominen samalla kerällä vai jätetään lanka kiinni takakappaleeseen ja aloitetaan etukappale uudelta kerältä? Miten jatketaan kappaleiden yhdistämisvaiheessa siis kumman kappaleen langalla?
04.05.2021 - 09:49DROPS Design answered:
Hei, voit itse valita miten teet. Itse katkaisisin langan takakappaleen valmistuttua.
05.05.2021 - 16:43
![]() Riitta Apajalahti-Ginman wrote:
Riitta Apajalahti-Ginman wrote:
Mikä voisi olla vaihtoehtoinen lanka, mielellään puuvillaa? Kiitos! Riitta
26.04.2021 - 20:47DROPS Design answered:
Hei, esim. DROPS Muskat on 100% puuvillaa. Voit myös kokeilla DROPS Belle-lankaa.
05.05.2021 - 16:53
![]() Ivanete Aguillera Dias wrote:
Ivanete Aguillera Dias wrote:
Muito lindo este trabalho. Pretendo adaptá-lo para máquina de tricô.
06.03.2021 - 15:25
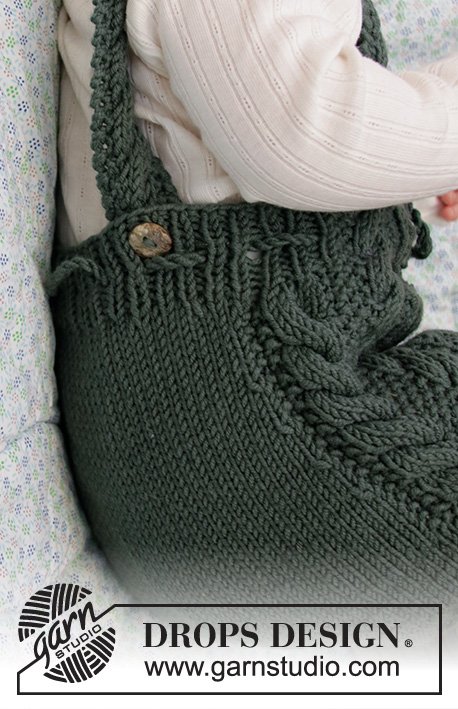
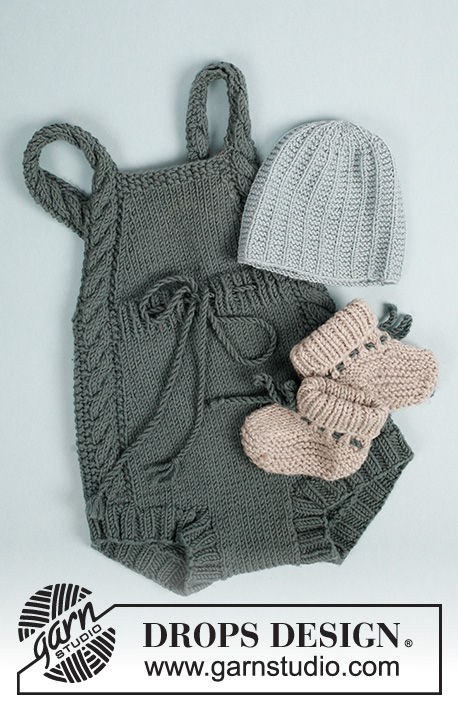
Ready to Play Romper#readytoplayromper |
|||||||||||||
 |
 |
||||||||||||
Knitted play suit for baby with cables and moss stitch in DROPS Merino Extra Fine. Size 1 - 24 months.
DROPS Baby 33-21 |
|||||||||||||
|
---------------------------------------------------------- EXPLANATION FOR THE PATTERN: ---------------------------------------------------------- GARTER STITCH (worked in the round): 1 ridge = 2 rounds. Knit 1 round and purl 1 round. GARTER STITCH (back and forth): 1 ridge = knit 2 rows. PATTERN: See diagrams A.1 to A.4 DECREASE TIP: Work until 2 stitches remain before A.1, decrease as follows: Knit 2 together, work stitches in A.1, slip 1 stitch knitwise, knit 1, pass slipped stitch over. ---------------------------------------------------------- START THE PIECE HERE: ---------------------------------------------------------- PLAY SUIT – SHORT OVERVIEW OF THE PIECE: Piece is worked back and forth in 2 parts, bottom up to after leg opening. Then work piece in the round before dividing at the waist, and finishing front piece back and forth on needle. BACK PIECE: Cast on 14-16-18-20 stitches on circular needle size 3.5 mm with Merino Extra Fine and work in stocking stitch back and forth. AT THE SAME TIME cast on 2 new stitches at the end of every row 9-9-9-10 times in total in each side = 50-52-54-60 stitches on needle and piece measures approx. 6-6-6-7 cm. Put piece aside and work the front piece. FRONT PIECE: Cast on 14-16-18-20 stitches on circular needle size 3.5 mm with Merino Extra Fine and work in stocking stitch back and forth for 5-5-5-6 cm. SIZE 1/3 months - 6/9 months - 12/18 months: Now cast on 6 new stitches at the end of every row 3 times in total each side. SIZE 24 months: Cast on 6 new stitches in each side at the end of every row 2 times, then 8 new stitches in each side 1 time = 50-52-54-60 stitches on needle and piece measures approx. 7-7-7-8 cm. BODY: Slip stitches from front and back piece on to same circular needle = 100-104-108-120 stitches on needle. Insert 1 marker in each side (= 50-52-54-60 stitches between markers) - NOW MEASURE PIECE FROM HERE. Continue to work - beginning of the round should be 8 stitches before first marker thread. Work A.1 (= 16 stitches), stocking stitch over the next 34-36-38-44 stitches in stocking stitch, A.1 (= 16 stitches), stocking stitch over the next 34-36-38-44 stitches in stocking stitch. Marker threads are in the middle of A.1 in each side. Continue this pattern in the round. When piece measures 2-3-5-7 cm, decrease 1 stitch on each side of both A.1 - READ DECREASE TIP (= 4 stitches decreased). Repeat decrease every 2 cm 4 times in total = 84-88-92-104 stitches on needle. When piece measures 10-11-14-16 cm from markers (piece measures approx. 17-18-21-24 cm from cast-on edge) work an elevation at the back as follows – NOTE: To avoid holes at every turn pick up loop between 2 stitches and knit twisted together with next stitch on needle: work knit over knit and A.1 over A.1 as before over the first 58-60-62-68 stitches, i.e. until after the second repetition of A.1 (= front piece), knit until 5 stitches remain before A.1 at the beginning of round, turn and purl back until 5 stitches remain before A.1 in the other side, turn piece. Knit until 10 stitches remain before A.1, turn piece and purl until 10 stitches remain before A.1 in the other side. Turn piece and knit until the middle of the first A.1. Switch to circular needle size 3 mm and work 1 round as before over all stitches, AT THE SAME TIME increase 1 stitch between every A.1 = 86-90-94-106 stitches. Work next round as follows: Continue with A.2 over the first 8 stitches (= make sure to begin on same row that should have been worked in A.1), work rib purl 1/knit 1 over the next 27-29-31-37 stitches, work A.3 over the next 8 stitches (= make sure to begin on same row that should have been worked in A.1), work rib purl 1/knit 1 over the next 43-45-47-53 stitches. When piece measures 1 ½ cm, work a row eyelet holes as follows: Work as before over the first 8 stitches, purl 1, * knit 1, purl 1, 1 yarn over, knit 2 together*, repeat from *-* over the next 24-28-28-36 stitches, work 10-8-10-8 stitches as before, purl 1, * knit 1, purl 1, 1 yarn over, knit 2 together*, repeat from *-* over the next 40-44-44-52 stitches, work 2-0-2-0 stitches as before. Then continue pattern and rib as before, until 1 round remains before rib measures 3 cm. Work next round as follows: Work over the first 43-45-47-53 stitches (= front piece), LOOSELY cast off the next 43-45-47-53 stitches with knit over knit and purl over purl (= back piece). FRONT PIECE: Insert 1 marker, NOW MEASURE PIECE FROM HERE! Switch to circular needle size 3.5 mm and work first row from right side as follows: Continue A.2 over the first 8 stitches on needle, 27-29-31-37 stitches in stocking stitch, A.3 over the last 8 stitches on needle. Continue like this back and forth. AT THE SAME TIME when piece measures 1-0-0-1 cm, decrease 1 stitch in each side - READ DECREASE TIP. Repeat decrease every 2nd-4th-6th-6th needle 7-7-6-6 times in total = 29-31-35-41 stitches remain on needle. When piece measures 7-9-11-12 cm from marker - adjust so that next row is from right side), work 6 rows with A.4 over stitches between A.2 and A.3 in each side. Work next row as follows from right side: work 8 stitches (= A.2) and slip these stitches on 1 stitch holder for shoulder strap, cast off the next 13-15-19-25 stitches and work the last 8 stitches (= A.3, shoulder strap). SHOULDER STRAP: Continue in A.3 back and forth until shoulder strap measures approx. 18 to 24 cm (or desired length). Cast off. Continue in A.2 back and forth until the other shoulder strap measures approx. 18 to 24 cm (or desired length). Cast off. ASSEMBLY: RIB EDGE: Pick up from right side approx. 50 to 58 stitches along one opening for leg on circular needle size 3 mm with Merino Extra Fine. Purl 1 row from wrong side AT THE SAME TIME increase evenly to 58-62-66-70 stitches. Then work rib = knit 2/purl 2 back and forth with 1 edge stitch in garter stitch in each side. When edge measures 2-4 cm, loosely cast off with knit over knit and purl over purl. Repeat along the other leg. Sew opening between legs inside 1 edge stitch - i.e. sew together one rib edge, then sew seam between leg openings and finally the other rib edge. Fasten a button at the bottom on each shoulder strap. Use holes in eyelet row on rib to button. TIE: Cut 2 lengths Merino Extra Fine yarn of approx. 3 metres. Twine the strands tog until they resist, fold the string double so that it twines again. Make a knot at each end. Begin mid front and thread tie up and down through eyelet row on rib in waist. |
|||||||||||||
Diagram explanations |
|||||||||||||
|
|||||||||||||
 |
|||||||||||||
 |
|||||||||||||
Have you finished this pattern?Tag your pictures with #dropspattern #readytoplayromper or submit them to the #dropsfan gallery. Do you need help with this pattern?You'll find 24 tutorial videos, a Comments/Questions area and more by visiting the pattern on garnstudio.com. © 1982-2026 DROPS Design A/S. We reserve all rights. This document, including all its sub-sections, has copyrights. Read more about what you can do with our patterns at the bottom of each pattern on our site. |
|||||||||||||








Post a comment to pattern DROPS Baby 33-21
We would love to hear what you have to say about this pattern!
If you want to leave a question, please make sure you select the correct category in the form below, to speed up the answering process. Required fields are marked *.