
Popular categories
Looking for a yarn?


Comments / Questions (44)
![]() Juliane wrote:
Juliane wrote:
Hallo, sind die * richtig gesetzt? Es stoßen A4 und A1 aneinander - das ergibt eine Asymmetrie und nicht genügend Linksbereiche. Mir scheint die Anleitung an dieser Stelle fehlerhaft zu sein. Danke fürs Überprüfen! Viele Grüße, Juliane
07.10.2025 - 19:42DROPS Design answered:
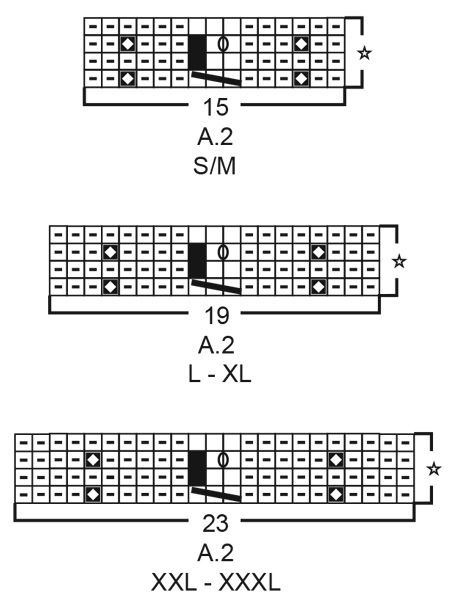
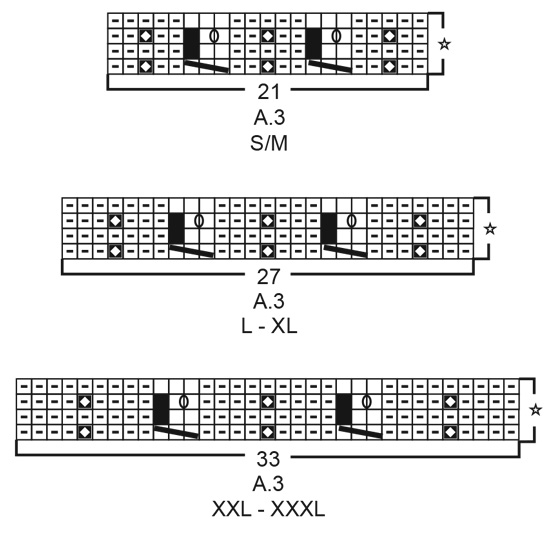
Liebe Juliane, ja, die Sternchen sind richtig gesetzt, die beiden Muster stoßen nicht direkt aneinander: * 1-1-6-6 Maschen links, A.1 (= 8 Maschen), A.2 (= 15-19-19-23 Maschen), A.1 (= 8 Maschen), A.3 (= 21-27-27-33 Maschen), A.4 (= 8 Maschen), A.2 (= 15-19-19-23 Maschen) und A.4 (= 8 Maschen) *, von *-* noch 1 x wiederholen. D.h. Sie stricken noch 1 bzw. 6 Linksmaschen nach A.4 und dann kommt erst wieder A.1. Die beiden Bereiche, in denen A.1 und A.4 nebeneinander liegen, sind genau an den Seiten des Rocks. Viel Spaß beim Stricken!
23.10.2025 - 01:04
![]() Aurelia wrote:
Aurelia wrote:
Bonjour, je souhaiterais faire des tutos entiers de votre gamme de pull de snood de jupe et de châles en me filme en train de tricoter du début à la fin sur Youtube je voulais voir avec vous si cela vous dérangeait si vous prenez sur vos modèles de votre site en vous citant dans mes vidéos. Merci de me contacter via facebook en entrant mon nom et mon prénom.
07.10.2025 - 11:56
![]() Aurelia wrote:
Aurelia wrote:
Bonsoir merci pour votre réponse je commence enfin à m'en sortir, je voulais savoir s'il était possible de m'expliquer avec les mêmes motifs pour faire un châle à manches longues si vous avez un tuto n'hésitez pas à me le faire savoir. Cordialement Aurélia.
04.10.2025 - 17:00
![]() Aurelia wrote:
Aurelia wrote:
Je n'ai pas compris ? Je dois faire autour un rang 1 de A1,6m envers,rang 1 de a2,6menvers,rang1 de A3, 6menvers, rang 1 de A4 et idem sur les autres rangs ?
24.09.2025 - 17:14DROPS Design answered:
Bonjour Aurélie, au tout 1er tour, vous tricotez le 1er tour des diagrammes dans l'ordre indiqué (avec les mailles envers), au 2ème tour, vous tricotez le 2ème tour des diagrammes et ainsi de suite, après le 4ème tour, A.2 et A.3 sont terminés (= 4 tours chacun), au 5ème tour, vous tricotez le 5ème tour de A.1 et A.4 mais vous tricotez de nouveau le 1er tour de A.2 et A.3 (vous les répétez en hauteur). Quand les diagrammes sont terminés en hauteur, vous devez les répéter, mais ils ne vont pas tous se répéter en même temps car ils se tricotent sur un nombre de rangs différents. Bon tricot!
25.09.2025 - 16:33
![]() Aurelia wrote:
Aurelia wrote:
Désolé de vous déranger j'espère que je ne vous embête pas, je voulais savoir si on devait tricoter le rang 1 de tous les diagrammes en même temps au premier tour ou pas merci pour vos réponses si rapide
24.09.2025 - 15:49DROPS Design answered:
Bonjour Aurélia, les diagrammes ne se répètent pas tous sur le même nombre de rangs en hauteur, donc si au 1er rang, vous tricotez bien le 1er rang de A.1, A.2, A.3, et A.4, lorsque le diagramme est terminé en hauteur (les 4 rangs de A.2 et A.3), vous les recommencez au 1er rang alors que vous continuez A.1 et A.4 comme le diagramme le montre. A.1 et A.4 se répètent sur 10 rangs et en même temps, A.2 et A.4 se répètent sur 4 rangs. Bon tricot!
24.09.2025 - 16:48
![]() Aurelia wrote:
Aurelia wrote:
Bonjour, je voulais savoir s’il y avais des vidéos qui explique le point avec le petit carré blanc sur fond noir ? Je n’arrive pas à le faire
23.09.2025 - 11:57DROPS Design answered:
Bonjour Aurélia, retrouvez ici, en vidéo comment on tricote ce type de torsades (même si la technique est un peu différente: on passe de 3 mailles à 2 mailles endroit et de nouveau à 3 mailles endroit). Bon tricot!
24.09.2025 - 16:47
![]() Aurelia wrote:
Aurelia wrote:
Je n'arrive pas a comprendre le diagramme a.2 a faire les points j'ai toujours que 24m sa serait simpas si possible de faire un petit tuto en montrant tout les points des diagrammes si possible en français jen demande beaucoup désolé j'espère que c'est faisable.
20.09.2025 - 23:10DROPS Design answered:
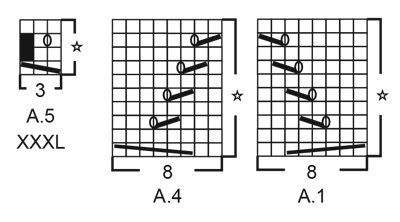
Bonjour Aurélia, en taille XXL et XXXL, vous devez avoir 23 mailles dans chaque A.2: 4 m env, 1 m en côtes anglaises, 5 m envers, une torsade ajourée sur 3 mailles (on diminue 1 m au 1er rang et on fait 1 jeté au 3ème rang; on aura ainsi 2 m après le 1er et le 2ème rang et 3 m après le 3ème et le 4ème rang), 5 m env, 1 m en côtes anglaises et 4 m envers. Retrouvez ici comment tricoter ce type de torsades (un peu différente dans la vidéo, mais l'idée est la même). Bon tricot!
24.09.2025 - 07:27
![]() Aurelia wrote:
Aurelia wrote:
Bonsoir, auriez vous des vidéos qui explique le diagramme a.2 du modèle 199-46 pour la jupe je n'arrive pas a la faire et je ne trouve pas le modèle sur youtube merci de me répondre rapidement bon tricot
20.09.2025 - 19:33DROPS Design answered:
Bonjour Aurelia, nous n'avons pas de video sur ce diagramme. Quel probleme avez-vous? J'envoyerai la demande pour preparer le video sur ce sujet. Bon tricot!
20.09.2025 - 20:23
![]() Cindy Royea wrote:
Cindy Royea wrote:
I am knitting s/m size. When I add the stitches in the pattern they add up to 168, which is correct but when I finish the 1st round, I have 15 stitches left over??? I checked and I didn’t miss any charts. What am I doing wrong?
03.02.2025 - 18:17DROPS Design answered:
Hi Cindy, In your size, the first round consists of purl 1 + A.1 (8stitches) + A.2 (15 stitches) + A.1 (8) + A.3 (21 stitches) + A.4 (8 stitches) + A.2 (15) + A.4 (8), which is then repeated one more time. 1 + 8 + 15 + 8 + 21 + 8 + 15 + 8 = 84. And 84 x 2 = 168. Hope this helps and happy knitting!
04.02.2025 - 07:01
![]() Daniela Blindu wrote:
Daniela Blindu wrote:
Ho lavorato ai ferri questa gonna in merino extra fine, l'ho comprata da un negozio in Romania andrele.ro, la prima volta ho ordinato 5 bobine, poi quando non ne ho avuto abbastanza ne ho ordinate altre 2, lo stesso codice 51, perché è l'ombra diverso? Non penso di poter indossare questa gonna.
30.11.2024 - 14:49
|
||||||||||||||||||||||||||||||||||
Cable Waterfall#cablewaterfallskirt |
||||||||||||||||||||||||||||||||||
 |
 |
|||||||||||||||||||||||||||||||||
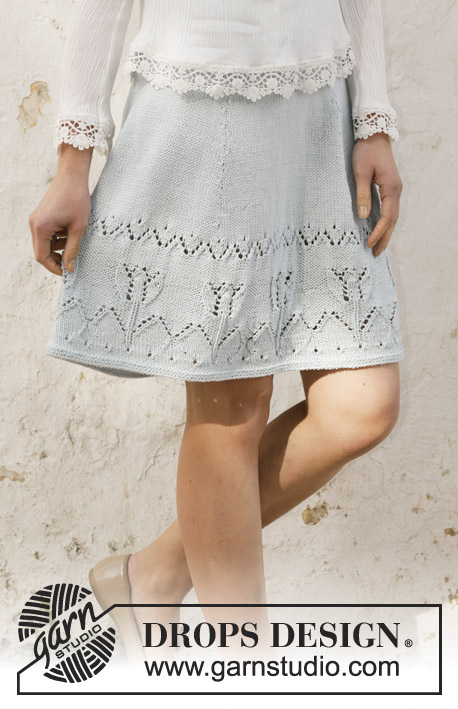
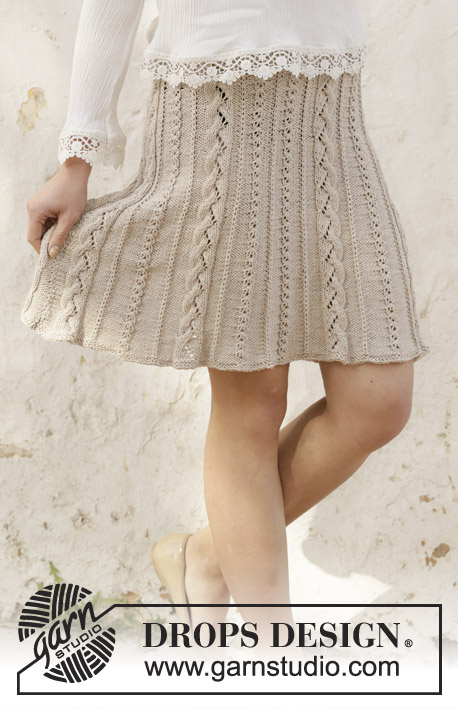
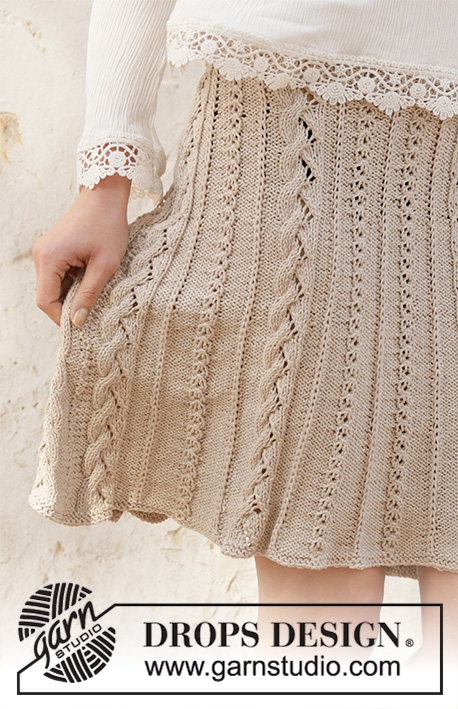
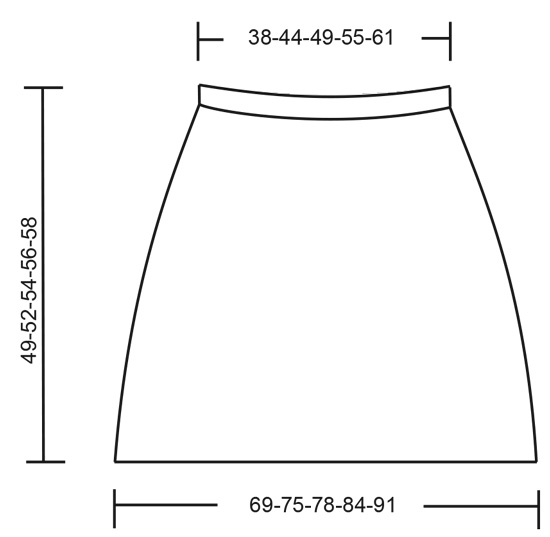
Knitted skirt in DROPS Cotton Light. The piece is worked top down with cables and lace pattern. Sizes S - XXXL.
DROPS 199-46 |
||||||||||||||||||||||||||||||||||
|
------------------------------------------------------- EXPLANATIONS FOR THE PATTERN: ------------------------------------------------------- RIDGE/GARTER STITCH (worked in the round): 1 ridge in height = 2 rounds. Knit 1 round and purl 1 round. PATTERN: See diagrams A.1 to A.5. Choose the right diagram for your size. A.5 applies only to Size XXXL. KNITTING TIP: All stitch-counts, when working cables and lace pattern on the skirt, are based on the small cables each having 3 stitches; be aware that the number of stitches in the small cables can vary between 3 and 2 and this will affect the number of stitches on the round. INCREASE TIP-1 (evenly spaced): To work out how to increase evenly, count the total number of stitches on the needle (e.g. 184 stitches) and divide by the number of increases to be made (e.g. 12) = 15.3. In this example, increase by making 1 yarn over after approx. each 15th stitch. On the next round knit the yarn overs twisted to avoid holes. INCREASE TIP-2 (for increasing in purled sections): Increase 1 stitch in a purled section by making 1 yarn over. On the next round purl the yarn over twisted to avoid a hole. Then purl the new stitches. NOTE: It is neatest if you increase alternately at the beginning and end of the purled section (not in middle). ------------------------------------------------------- START THE PIECE HERE: ------------------------------------------------------- SKIRT - SHORT OVERVIEW OF THE PIECE: The piece is worked in the round with circular needle, top down. First you work a lining in stocking stitch for the elastic. The rest of the skirt is then worked with cables and lace pattern. LINING: Cast on 160-184-206-232-256 stitches with circular needle size 3 mm and Cotton Light. Work stocking stitch for 2 cm. Purl 1 round (= folding edge). Work stocking stitch for 2 cm. Then knit 1 round where you increase 8-12-0-2-0 stitches evenly spaced – read INCREASE TIP-1 = 168-196-206-234-256 stitches. Then work the skirt as described below. SKIRT: Change to circular needle size 4 mm. The first row is worked as follows: SIZES S/M, L, XL and XXL: * Purl 1-1-6-6 stitches, work A.1 (= 8 stitches), A.2 (= 15-19-19-23 stitches), A.1 (= 8 stitches), A.3 (= 21-27-27-33 stitches), A.4 (= 8 stitches), A.2 (= 15-19-19-23 stitches) and A.4 (= 8 stitches) *, work from *-* 1 more time. SIZE XXXL: * Work A.5 (= 3 stitches), purl 7, work A.1 (= 8 stitches), A.2 (= 23 stitches), A.1 (= 8 stitches), A.3 (= 33 stitches), A.4 (= 8 stitches), A.2 (= 23 stitches), A.4 (= 8 stitches) and purl 7 *, work from *-* 1 more time. ALL SIZES: Continue the pattern described above and read KNITTING TIP! When the piece measures 8 cm from the folding edge, increase 1 stitch in every other purled section on the round – read INCREASE TIP-2 (= 15-15-15-15-16 stitches increased). Repeat this increase when the piece measures 12 cm from the folding edge, but now increase in the purled sections where you did not increase the last time = 198-226-236-264-288 stitches. Continue the pattern as before with 1 more stitch in each purled section. REMEMBER THE KNITTING TENSION! When the piece measures 16 cm from the folding edge, increase 1 stitch in every other purled section (= 15-15-15-15-16 stitches increased). When the piece measures 22-22-22-23-23 cm, increase 1 stitch in the remaining purled sections (= 15-15-15-15-16 stitches increased). Increase like this every other purled section every 6-6-6-7-7 cm until you have increased 2 more times in each purled section (a total of 4 times including the increases in the purled section described at the beginning of the skirt) = 288-316-326-354-384 stitches. Continue working until the piece measures 48-51-53-55-57 cm from the folding edge at top (or to desired length; there is 1 cm left to finished length). Change to circular needle size 3 mm. Work 2 RIDGES in the round over all stitches – read description above. Change back to circular needle size 4 mm and cast off with knit (this is done to avoid the cast-off edge being tight). The skirt measures approx. 49-52-54-56-58 cm from the folding edge down. ASSEMBLY: Fold the lining to the wrong side and sew down neatly; leave a small opening to thread the elastic through. |
||||||||||||||||||||||||||||||||||
Diagram explanations |
||||||||||||||||||||||||||||||||||
|
||||||||||||||||||||||||||||||||||
 |
||||||||||||||||||||||||||||||||||
 |
||||||||||||||||||||||||||||||||||
 |
||||||||||||||||||||||||||||||||||
 |
||||||||||||||||||||||||||||||||||
Have you finished this pattern?Tag your pictures with #dropspattern #cablewaterfallskirt or submit them to the #dropsfan gallery. Do you need help with this pattern?You'll find 20 tutorial videos, a Comments/Questions area and more by visiting the pattern on garnstudio.com. © 1982-2026 DROPS Design A/S. We reserve all rights. This document, including all its sub-sections, has copyrights. Read more about what you can do with our patterns at the bottom of each pattern on our site. |
||||||||||||||||||||||||||||||||||


With over 40 years in knitting and crochet design, DROPS Design offers one of the most extensive collections of free patterns on the internet - translated to 17 languages. As of today we count 324 catalogues and 12291 patterns translated into English (UK/cm). 12291
We work hard to bring you the best knitting and crochet have to offer, inspiration and advice as well as great quality yarns at incredible prices! Would you like to use our patterns for other than personal use? You can read what you are allowed to do in the Copyright text at the bottom of all our patterns. Happy crafting!
Post a comment to pattern DROPS 199-46
We would love to hear what you have to say about this pattern!
If you want to leave a question, please make sure you select the correct category in the form below, to speed up the answering process. Required fields are marked *.