
Popular categories
Looking for a yarn?


Comments / Questions (74)
![]() Bressolles Jeannine wrote:
Bressolles Jeannine wrote:
Bonjour, je suis en train de réaliser le bandeau .Lorsque vous dites de mettre les premières 18 mailles sur l'aiguille auxiliaire , est-ce qu'il faut mettre les 18 mailles devant ou derrière l'ouvrage , j'ai essayer ,cela ne me fait pas le croisé . Dans l'attente d'une réponse . cordialement
22.01.2019 - 18:41DROPS Design answered:
Bonjour Mme Bressolles, vous pouvez mettre votre aiguille auxiliaire devant ou derrière l'ouvrage, au choix, l'idée est simplement de réaliser une torsade sur ces 36 m, glissez simplement les 18 premières m sur l'aiguille auxiliaire, tricotez les 18 dernières mailles sur l'aiguille et tricotez maintenant les 18 m en attente, comme pour une torsade normale, mais sur toutes les mailles. Bon tricot!
23.01.2019 - 08:57
![]() Mariska Tardijn wrote:
Mariska Tardijn wrote:
Ik vind het zo jammer, dat de favoriete patronen na 60 dagen gewist worden. Is er een mogelijkheid, dat ze langer bewaard worden? Ik heb regelmatig periodes , dat ik niet aan breien/ haken toekom. Als ik dan verder wil, is mijn favorietenlijst leeg! Met vriendelijke groet, Mariska Tardijn.
14.12.2018 - 01:37DROPS Design answered:
Dag Mariska,
Bedankt voor de tip, ik zal het doorgeven aan de webbeheerder. Voor nu zou je ze in de favorieten van je browser kunnen zetten, hoewel dat iets minder overzichtelijk is.
18.12.2018 - 10:15
![]() Helena wrote:
Helena wrote:
Liebes Drops-Team, da ich mein Stirnband gern etwas breiter haben möchte, habe ich 7 Rapporte in der Breite gestrickt. Wie verkreuze ich jetzt am besten die Mitte? Gibt es hier trotz ungerader Rapport-Zahl eine Möglichkeit?
12.12.2018 - 20:09DROPS Design answered:
Liebe Helena, hier wird die Hälfte der Maschen gekreuzt, vielleicht dann am besten auch eine gerade Rapport-Zahl stricken, sonnst sollen Sie vielleicht am besten nach einem fertigen Rapport kreuzen, aber eine "Seite" wird dann etwas weniger breit sein (wegen ungerade Rapport-Zahl). Viel Spaß beim stricken!
13.12.2018 - 09:22
![]() Natalie wrote:
Natalie wrote:
Wie ist denn die Strickschrift genau zu lesen? Von rechts nach links wie immer? Wie ist dann die Rückreihe zu stricken? Ich habe beispielsweise in Reihe 3 bei A.1 in der Rückreihe alle Maschen links gestrickt und die Randmaschen rechts. War das richtig? Oder wäre die Rückreihe für die 3. Reihe in A.1 die Reihe darüber gewesen? (alle Maschen rechts)
02.12.2018 - 14:17DROPS Design answered:
Liebe Natalie, alle Reihen sind im Diagram gezeigt, die Hinreihen lesen Sie rechts nach links und die Rückreihen lesen Sie links nach rechts. Viel Spaß beim stricken!
03.12.2018 - 09:45
![]() Paola wrote:
Paola wrote:
Grazie della dritta!!! Bene a sapersi.... saluti
30.11.2018 - 22:48
![]() Paola wrote:
Paola wrote:
Mi sono un po' picchiata ma ho risolto.... lavoravo male le maglie messe in attesa..scusate l'inutile disturbo!!! Saluti
30.11.2018 - 16:35DROPS Design answered:
Buonasera Paola, siamo contente che sia riuscita a lavorare la treccia. Per le prossime volte, se dovesse aver bisogno di inviare foto può mandarle all'indirizzo italian@garnstudio.com. Buon lavoro!
30.11.2018 - 22:46
![]() Paola wrote:
Paola wrote:
Non voglio stressarti....ma seguendo le indicazioni...il ferro dopo le maglie in attesa che è al rovescio si presenta con maglie da lavorare come fossi sul diritto...ho fatto foto ma non so come inviarle così di vedrebbe cosa intendi Devo lavorare le maglie come si presentano perché se così fosse sul diritto del lavoro avrei poi due tipi di lavorazione... Scusate ancora x la mia incomprensione
30.11.2018 - 07:19
![]() Paola wrote:
Paola wrote:
Grazie....però a me non si gira bene....le prime 18 maglie le metto in attesa senza lavorarle Giusto? Inizio a lavorare le ultime 18 e poi lavoro quelle che erano in attesa Però quando giro il lavoro mi sembra che sia attorcigliato...
29.11.2018 - 19:40DROPS Design answered:
Buonasera Paola, è corretto, deve lavorare una treccia su tutte le maglie: mette le prime 18 maglie in attesa sul fermamaglie, lavorare le ultime 10 maglie e poi lavora le 18 maglie in attesa. Buon lavoro!
29.11.2018 - 19:49
![]() Paola wrote:
Paola wrote:
Quando si parla di treccia al centro si dice lasciare in attesa 18 m. Su ferro ausiliario... davanti o dietro del lavoro? Grazie!!
29.11.2018 - 07:14DROPS Design answered:
Buongiorno Paola, le maglie vanno lasciate in sospeso sul davanti del lavoro. Buon lavoro
29.11.2018 - 10:17
![]() Elke wrote:
Elke wrote:
Mir ist es nicht gelungen in der Mitte die jeweils 18 Maschen zu verzopfen. Ich kann mir auch nicht vorstellen, wie es gehen soll. Ein Video dazu fände ich sehr hilfreich. Ich habe stattdessen einen Rapport A2 getrennt über die je 18 Maschen gestrickt und dann die beiden Hälften verzopft. Ich finde, dass das Foto auch eher darauf schließen läßt, dass das Stirnband auf diese Weise gearbeitet wurde.
25.11.2018 - 20:09
|
|||||||||||||||||||
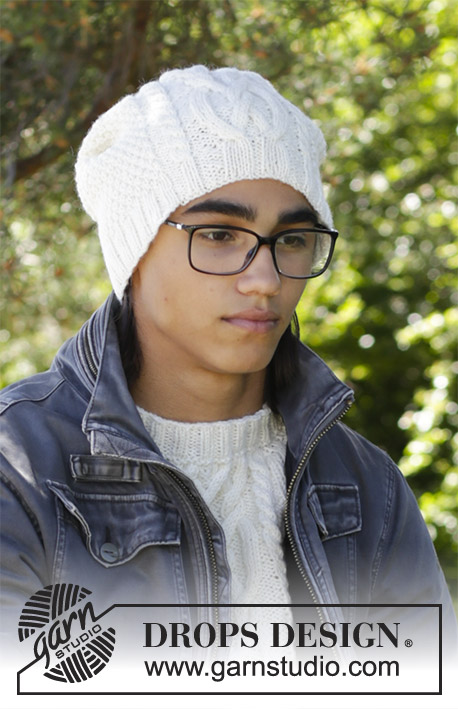
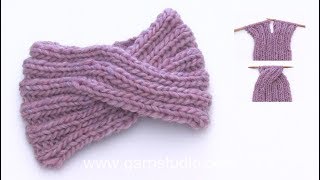
Waiting for Snow Headband#waitingforsnowheadband |
|||||||||||||||||||
|
|
|||||||||||||||||||
Knitted head band with cables in DROPS Merino Extra Fine or DROPS Karisma.
DROPS 195-2 |
|||||||||||||||||||
|
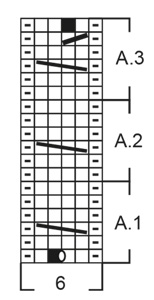
EXPLANATION FOR THE PATTERN: ---------------------------------------------------------- GARTER STITCH (back and forth): 1 ridge = knit 2 rows. PATTERN: See diagrams A.1 to A.3. Diagrams show all rows in pattern seen from the right side. ---------------------------------------------------------- START THE PIECE HERE: ---------------------------------------------------------- HEAD BAND - SHORT OVERVIEW OF THE PIECE: Worked back and forth from mid back and sewn together when finished. HEAD BAND: Cast on 30 stitches on needle size 4 mm with Merino Extra Fine or Karisma. Work 1 ridge in GARTER STITCH back and forth - read explanation above! Now work pattern as follows: Work A.1 (= 5 stitches on first row) 6 times in total on needle. After first row in A.1, 6 stitches has been increased in total = 36 stitches. When A.1 has been worked, work A.2 (= 6 stitches) over every repetition of A.1. REMEMBER THE KNITTING TENSION! When piece measures 24 cm divide the piece in the middle (= 18 stitches in each half). Work pattern A.2 as before for 4 cm over the first half. Then work the second half in the same way. Place the stitches from the first half back on the needle, but change places with the second half so that the two halves are plaited mid front. Continue with pattern A.2 back and forth until piece measures approx. 49 cm – adjust to finish after a whole repetition of A.2 vertically (approx. 3 cm remain until finished measurements). Now work A.3 over every repetition of A.2. When A.3 has been worked, there are 30 stitches on row. Work 1 ridge over all stitches. Cast off. Sew head band together mid back by sewing one and one stitch inside cast-on edge and cast-off edge. Fasten off. |
|||||||||||||||||||
Diagram explanations |
|||||||||||||||||||
|
|||||||||||||||||||
 |
|||||||||||||||||||
Have you finished this pattern?Tag your pictures with #dropspattern #waitingforsnowheadband or submit them to the #dropsfan gallery. Do you need help with this pattern?You'll find 17 tutorial videos, a Comments/Questions area and more by visiting the pattern on garnstudio.com. © 1982-2026 DROPS Design A/S. We reserve all rights. This document, including all its sub-sections, has copyrights. Read more about what you can do with our patterns at the bottom of each pattern on our site. |
|||||||||||||||||||


With over 40 years in knitting and crochet design, DROPS Design offers one of the most extensive collections of free patterns on the internet - translated to 17 languages. As of today we count 325 catalogues and 12291 patterns translated into English (UK/cm). 12291
We work hard to bring you the best knitting and crochet have to offer, inspiration and advice as well as great quality yarns at incredible prices! Would you like to use our patterns for other than personal use? You can read what you are allowed to do in the Copyright text at the bottom of all our patterns. Happy crafting!
Post a comment to pattern DROPS 195-2
We would love to hear what you have to say about this pattern!
If you want to leave a question, please make sure you select the correct category in the form below, to speed up the answering process. Required fields are marked *.