
Popular categories
Looking for a yarn?


Comments / Questions (74)
![]() Ingunn Johansen wrote:
Ingunn Johansen wrote:
Hei! Er det 2 nøster garn man må bestille for ett pannebånd?
16.07.2020 - 10:27DROPS Design answered:
Hei Ingunn, Ja, nøstene er 50 g hver, så du trenger 2 nøster til pannebåndet. God fornøyelse!
17.07.2020 - 07:19
![]() Maria wrote:
Maria wrote:
Herzlichen Dank für die Hilfe
03.04.2020 - 17:00
![]() Maria wrote:
Maria wrote:
Ich stricke zunächst A1 und A2 im Wechsel bis das Stirnband eine Länge von 49 cm hat, richtig? Aber man nimmt doch in der 1. Reihe von A1 durch den Umschlag immer zu wenn die 2. Reihe dann links gestrickt wird. Wie schafft man es dann die Maschenzahl weiterhin auf 36 zu beschränken? Vielen Dank schonmal für die Hilfe 😊
03.04.2020 - 13:15DROPS Design answered:
Liebe Maria, Sie stricken zuerst Diagram A.1 und dann stricken Sie A.2, dh A.1 wird nur einmal (am Anfang) in der Höhe gestrickt, dann wird A.2 wiederholt (und am Ende stricken Sie A.3 anstatt A.2). Viel Spaß beim stricken!
03.04.2020 - 14:24
![]() May Helen wrote:
May Helen wrote:
Hei Prøver å strikke pannebånd med fletter. Men jeg forstår ikke oppskriften. Skal jeg strikke mønsteret A1 6 ganger. Hva med A2 og A3 hvor mange ganger skal disse strikkes.
20.01.2020 - 16:03DROPS Design answered:
Hei May Helen, Du strikker A.1 6 ganger i bredden men bare 1 gang i høyden. Deretter strikker du A.2 over hver rapport av A.1 (med fletten etterhvert) og repetere i høyden til arbeidet måler 49 cm. Til slutt strikker du A.3 over hver rapport av A.2 1 gang i høyden. God fonøyelse!
22.01.2020 - 07:53
![]() Christel wrote:
Christel wrote:
Denne mye omtalte fletten på midten kan løses med å strikke noen omganger på to pinner. I steden for å bruke en flettepinne, sett de første 18 maskene på en vanlig pinne. Flett som vanlig, men sett ikke maskene over på en pinne før etter noen runder. Det ble min løsning. Håper det hjelper.
19.01.2020 - 10:04
![]() Tereza wrote:
Tereza wrote:
And third, it seems torched wrong way for a loong time and you may thing you did something wrong, but after knitting five, six or more rows, it eventually starts looking like it should. so don't be afraid, just keep knitting. and for my fellow knitters: vypadá to skrouceně, ale časem se to srovná, nebojte.
05.01.2020 - 21:11
![]() Tereza wrote:
Tereza wrote:
Since Drops doesn't seem to be very helpful by repeating the same sentence from the instructions again and again, I have some tips how I won the battle against the centre cable. I struggled a lot, had to undo many times, but finally i did it. First, remember that it is really hard to do it, you'll need some force, you'll have to fight. Second, I prefer to knit with round needles, but for this particular part I switched to double pointed needles, those for socks and sleeves and it helped a lot
05.01.2020 - 21:05
![]() Bee wrote:
Bee wrote:
Im having real trouble with the mid cable -it doesnt seem to work and looks nothing like the picture. pls can you give beeter instructions
28.12.2019 - 11:05DROPS Design answered:
Dear Bee, can you give us some more details, so we could figure out what is the problem? Also, if you are stuck with a pattern, you can always ask for help on person, in th store where you bought your DROPS yarn from. Happy Crafting!
29.12.2019 - 08:30
![]() Giuliana wrote:
Giuliana wrote:
Ok grazie ma devo lavorare per qualche giro con le 2 se Ti separate?perché se le incrocio a treccia subito poi il lavoro mi si attorciglia 😥🤔 grazie
24.12.2019 - 08:39DROPS Design answered:
Buonasera Giuliana, sicuramente è un pò complicato gestire una treccia così ampia, ma deve intrecciare subito, senza tenere le maglie separate. Buon lavoro!
24.12.2019 - 17:58
![]() Giuliana wrote:
Giuliana wrote:
Buonasera non capisco come fare la treccia (leggendo un vostro commento)dice di mettere su un ferro ausiliario 18 maglie poi lavorare 10 maglie e le 18 restanti ma come,se le maglie sono 36???Grazie
23.12.2019 - 18:00DROPS Design answered:
Buonasera Giuliana, correggeremo la risposta: deve mettere in sospeso 18 maglie su un ferro ausiliario, lavorare le 18 maglie rimaste e poi le 18 sul ferro ausiliario. Buon lavoro!
23.12.2019 - 21:56
|
|||||||||||||||||||
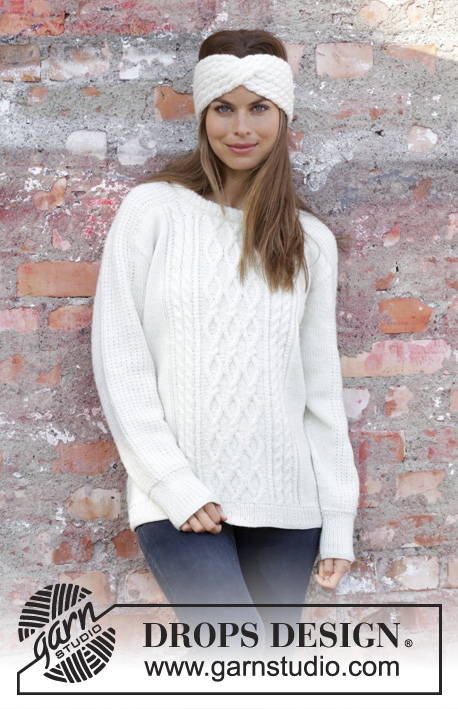
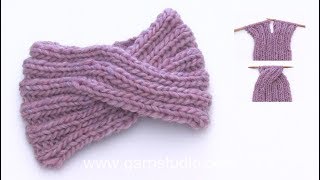
Waiting for Snow Headband#waitingforsnowheadband |
|||||||||||||||||||
|
|
|||||||||||||||||||
Knitted head band with cables in DROPS Merino Extra Fine or DROPS Karisma.
DROPS 195-2 |
|||||||||||||||||||
|
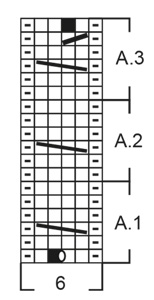
EXPLANATION FOR THE PATTERN: ---------------------------------------------------------- GARTER STITCH (back and forth): 1 ridge = knit 2 rows. PATTERN: See diagrams A.1 to A.3. Diagrams show all rows in pattern seen from the right side. ---------------------------------------------------------- START THE PIECE HERE: ---------------------------------------------------------- HEAD BAND - SHORT OVERVIEW OF THE PIECE: Worked back and forth from mid back and sewn together when finished. HEAD BAND: Cast on 30 stitches on needle size 4 mm with Merino Extra Fine or Karisma. Work 1 ridge in GARTER STITCH back and forth - read explanation above! Now work pattern as follows: Work A.1 (= 5 stitches on first row) 6 times in total on needle. After first row in A.1, 6 stitches has been increased in total = 36 stitches. When A.1 has been worked, work A.2 (= 6 stitches) over every repetition of A.1. REMEMBER THE KNITTING TENSION! When piece measures 24 cm divide the piece in the middle (= 18 stitches in each half). Work pattern A.2 as before for 4 cm over the first half. Then work the second half in the same way. Place the stitches from the first half back on the needle, but change places with the second half so that the two halves are plaited mid front. Continue with pattern A.2 back and forth until piece measures approx. 49 cm – adjust to finish after a whole repetition of A.2 vertically (approx. 3 cm remain until finished measurements). Now work A.3 over every repetition of A.2. When A.3 has been worked, there are 30 stitches on row. Work 1 ridge over all stitches. Cast off. Sew head band together mid back by sewing one and one stitch inside cast-on edge and cast-off edge. Fasten off. |
|||||||||||||||||||
Diagram explanations |
|||||||||||||||||||
|
|||||||||||||||||||
 |
|||||||||||||||||||
Have you finished this pattern?Tag your pictures with #dropspattern #waitingforsnowheadband or submit them to the #dropsfan gallery. Do you need help with this pattern?You'll find 17 tutorial videos, a Comments/Questions area and more by visiting the pattern on garnstudio.com. © 1982-2026 DROPS Design A/S. We reserve all rights. This document, including all its sub-sections, has copyrights. Read more about what you can do with our patterns at the bottom of each pattern on our site. |
|||||||||||||||||||


With over 40 years in knitting and crochet design, DROPS Design offers one of the most extensive collections of free patterns on the internet - translated to 17 languages. As of today we count 325 catalogues and 12291 patterns translated into English (UK/cm). 12291
We work hard to bring you the best knitting and crochet have to offer, inspiration and advice as well as great quality yarns at incredible prices! Would you like to use our patterns for other than personal use? You can read what you are allowed to do in the Copyright text at the bottom of all our patterns. Happy crafting!
Post a comment to pattern DROPS 195-2
We would love to hear what you have to say about this pattern!
If you want to leave a question, please make sure you select the correct category in the form below, to speed up the answering process. Required fields are marked *.