
Popular categories
Looking for a yarn?


Comments / Questions (84)
![]() Ilse Van Wezel wrote:
Ilse Van Wezel wrote:
Ik zou graag dit vestje willen breien, maar ik zie dat in deze kleur de wol niet te verkrijgen is. Hebben jullie een alternatief?
07.05.2018 - 11:02
![]() Stephanie wrote:
Stephanie wrote:
If I knit this in yarn group D, as given as an option in the pattern, how many grams will I need for size M or L, please? The yarn converter doesn't cope with substituting for 3 strands of two different yarns.
01.05.2018 - 14:06DROPS Design answered:
Dear Stephanie, If I would want to substitute, I would get about 800-100 meters yarn to knit this sweater. Do not forget, you can always ask for help (even to calculate the exact amount you might need) in teh store you are buying your DROPS yarn from. Happy Knitting!
01.05.2018 - 21:25
![]() Merete wrote:
Merete wrote:
Hei. Hvis man strikker i glattstrikk istedetfor perlestrikk, vil den da bli større?
25.04.2018 - 13:25DROPS Design answered:
Hej Merete, Ikke hvis du holder samme strikkefasthed som der står i opskriften :)
26.04.2018 - 09:16
![]() Gourcy wrote:
Gourcy wrote:
Il y a une erreur dans le calcul des pelotes. Compte tenu qu'il faut deux fils de soie il faut plus de kid Silk ; c'est à dire pour 4 pelotes de jaune il faut 6 pelotes de soie
23.04.2018 - 17:23DROPS Design answered:
Bonjour Mme Gourcy, pour les tailles où il faut 200 g d'Alpaca, on a bien 6 pelotes de Kid-Silk (=150 g Kid-Silk à 25 g la pelote). Bon tricot!
24.04.2018 - 09:23
![]() Tranvouez M wrote:
Tranvouez M wrote:
Le raccourcis pour imprimer les explications a un problème. On ne peut imprimer que la première page . Ce problème n\'est pas présent dans les explications de la version pull.
18.04.2018 - 13:22DROPS Design answered:
Bonjour Mme Tranvouez, nous avons réussi avec succès un test d'impression de ce modèle. Vérifiez les paramètres de votre imprimante pour que toutes les pages soient bien imprimées. Bon tricot!
18.04.2018 - 15:21
![]() Fatima Florez wrote:
Fatima Florez wrote:
I love your website and your instructions. I want to receive this projects more often, how can I do it?
13.04.2018 - 13:59DROPS Design answered:
Dear Mrs Florez, thank you very much. You can subscribe our newsletter and follow us on social medias such as on Facebook, Instagram, Twitter. Happy knitting!
13.04.2018 - 14:04
![]() Cecilie wrote:
Cecilie wrote:
Hei! Hvis man vil strikke denne i kun Alpaca, hvor mye garn går det med til en str. XL? På forhånd takk. :)
12.04.2018 - 14:08DROPS Design answered:
Hej Cecilie, da skal den strikkes med 3 tråde og så skal du bruge 600 gr DROPS Alpaca :)
12.04.2018 - 15:54
![]() Olya wrote:
Olya wrote:
Hi! I love your patterns, i'm lucky to speak English fluently, but would be great if they were translated officially into Rusdian. Lots of my friends would love to knit your things but they don't speak English. There are a lot of lousy translations and disappoints me a lot...
05.04.2018 - 13:17
![]() Louise Jacobsen wrote:
Louise Jacobsen wrote:
Hej. Jeg har fundet en skøn farve i alpakka som jeg gerne vil strikke trøjen i - og den findes ikke i det andet garn der skal bruges. Går det mon at strikke med to tråde alpakka?
03.04.2018 - 11:53DROPS Design answered:
Hej Louise, Ja det går fint, men for at få samme strikkefasthed som der står i opskriften, skal du bruge 3 tråde DROPS Alpaca. God fornøjelse!
04.04.2018 - 13:27
![]() Véronique wrote:
Véronique wrote:
Bonjour, je souhaite réaliser ce modele mais avec un seul fil de Baby Alpaca Silk. Pouvez vous m indiquer la quantité à acheter ? Merci
26.03.2018 - 17:48DROPS Design answered:
Bonjour Véronique, ce modèle est prévu pour être tricoté avec 3 fils du groupe A (= 1 fil Alpaca + 2 fils Kid-Silk), pour le tricoter avec 1 seul fil du groupe A, il faudra tout recalculer les explications en fonction de votre échantillon. Si vous voulez simplement remplacer Alpaca par BabyAlpaca Silk, vous trouverez comment faire ici. Bon tricot!
28.03.2018 - 14:42
|
|||||||
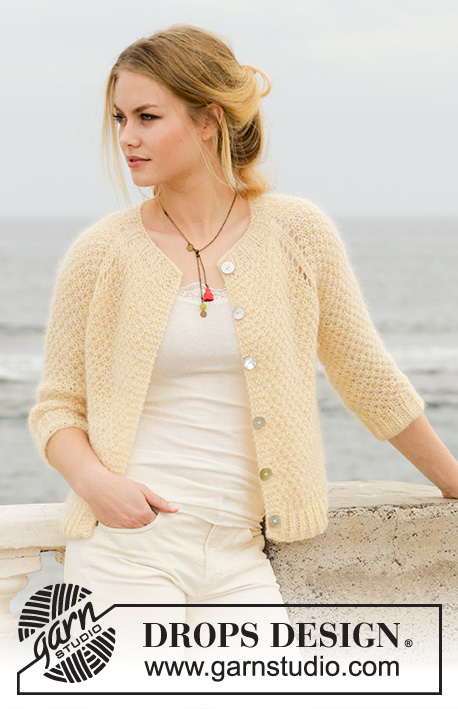
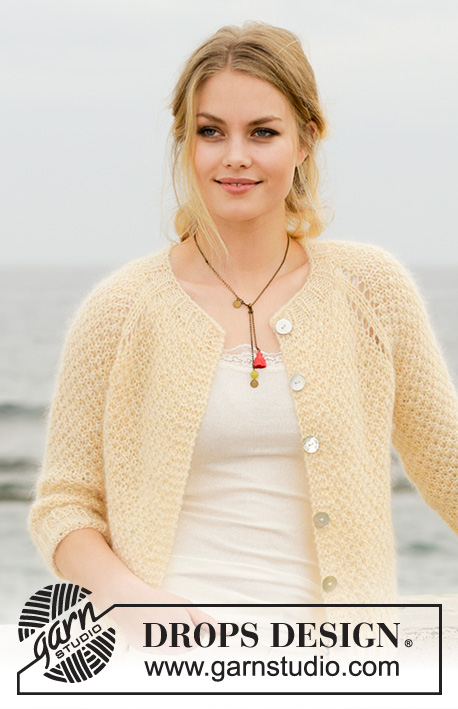
Le Conquet#leconquetcardigan |
|||||||
 |
 |
||||||
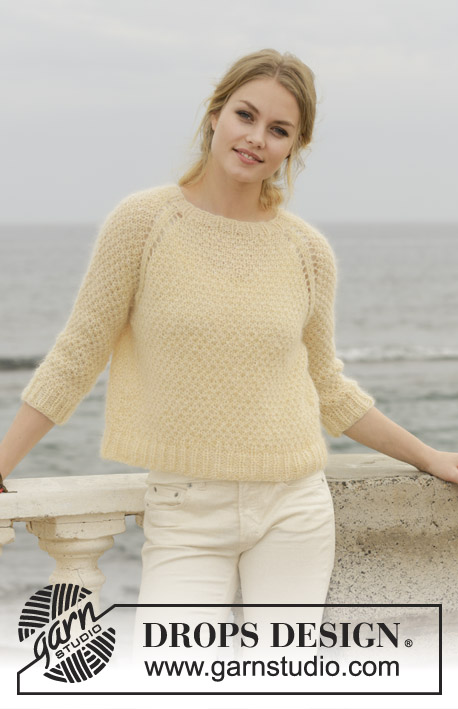
Jacket with raglan, moss stitch and ¾ sleeves, knitted top down. Size: S - XXXL Piece is knitted in 1 strand DROPS Alpaca or DROPS Flora and 2 strands DROPS Kid-Silk.
DROPS 191-8 |
|||||||
|
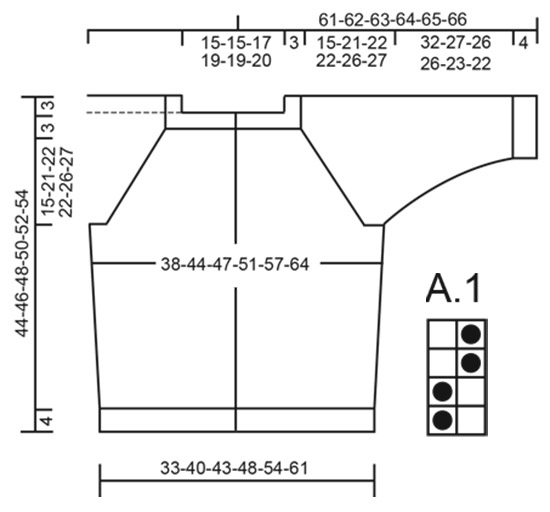
---------------------------------------------------------- INFORMATION FOR PATTERN: GARTER STITCH (back and forth): 1 ridge = knit 2 rows. INCREASE TIP: To calculate how to increase evenly, use the total number of stitches on row (e.g. 63 stitches), minus bands (e.g. 8 stitches) and divide the remaining stitches by number of increases to be done (e.g. 12) = 4.6. In this example increase after alternately approx. every 4th and 5th stitch. Increase 1 stitch by making 1 yarn over, on next row work yarn over twisted to avoid holes. PATTERN: See diagram A.1 (moss stitch). Diagrams show all rows in pattern seen from the right side. RAGLAN: All increases are done from the right side. Increase on every other row (i.e. every row from right side) as follows: Begin 1 stitch before marker thread, make 1 yarn over, work 2 stitches in stocking stitch (marker thread is in the middle of these two stitches), make 1 yarn over (= 2 stitches increased). Increase on each side of the 4 marker threads. On next row (wrong side) purl yarn overs to make holes, then work the increased stitch in pattern. The 2 stitches along each raglan line are worked in stocking stitch until yoke is done. DECREASE TIP (applies to sides on body and mid under sleeves): Work until 1 stitch remains before stitch with marker thread, slip 2 stitches as if to knit together, work next stitch as shown in A.1 and pass the 2 slipped stitches over. This way A.1 will continue nicely over decrease on next row/round. BUTTONHOLES: Decrease for buttonholes on right band (when garment is worn). Decrease from right side when 3 stitches remain on row as follows: Make 1 yarn over, knit the next 2 stitches together, knit last stitch. On next row knit yarn over to make holes. Decrease first buttonhole when neck edge measures approx. 1½-2 cm. Then decrease the next 5-5-5-6-6-6 buttonholes approx. 7½-8-8-7-7½-8 cm apart. ---------------------------------------------------------- JACKET: Work back and forth on circular needle from mid front, work top down. Sleeves are worked in the round on a short circular needle top down, switch to double pointed needles when needed. NECK EDGE: Cast on 63-63-69-75-78-81 stitches (including 4 band stitches in each side towards mid front) on circular needle size 6 mm with 1 strand Alpaca/Flora + 2 strands Kid-Silk (= 3 strands). Purl 1 row (= wrong side). Work next row as follows from right side: 4 band stitches in GARTER STITCH - see explanation above - * knit 1, purl 2 *, repeat from *-* until 5 stitches remain, knit 1 and finish with 4 band stitches in garter stitch. Continue rib like this for 3 cm – remember BUTTONHOLES on right band – see explanation above. After rib purl 1 row from wrong side while increasing 12-12-14-14-11-10 stitches evenly - read INCREASE TIP = 75-75-83-89-89-91 stitches. Now insert 4 marker threads in the piece as follows (without working the stitches): Insert first marker thread after the first 16-16-18-20-20-20 stitches (= front piece), insert 2nd marker thread after the next 9 stitches (= sleeve), insert 3rd marker thread after the next 25-25-29-31-31-33 stitches (= back piece), and insert 4th marker thread after the next 9 stitches (= sleeve). There are 16-16-18-20-20-20 stitches after last marker thread on front piece. Then work yoke as explained below. YOKE: Switch to circular needle size 7 mm and work first row from right side as follows: 4 band stitches in garter stitch, work A.1 over the next 11-11-13-15-15-15 stitches (begin and end with knit 1), make 1 yarn over, work 2 stitches in stocking stitch (marker thread is in the middle of these two stitches), make 1 yarn over, work A.1 over the next 7 stitches (begin and end with knit 1), make 1 yarn over, work 2 stitches in stocking stitch, make 1 yarn over, work A.1 over the next 23-23-27-29-29-31 stitches (begin and end with knit 1), make 1 yarn over, work 2 stitches in stocking stitch, make 1 yarn over, work A.1 over the next 7 stitches (begin and end with knit 1), make 1 yarn over, work 2 stitches in stocking stitch, make 1 yarn over, work A.1 over the next 11-11-13-15-15-15 stitches (begin and end with knit 1) and finish with 4 band stitches in garter stitch (= 8 stitches increased). Continue A.1 back and forth with 4 band stitches in garter stitch in each side towards mid front and 2 stitches in stocking stitch along each raglan line. AT THE SAME TIME continue increase in RAGLAN on each side of the 4 marker threads – see explanation above, until 11-15-16-16-19-20 increases have been done in total along each raglan line (including increase on first row after neck edge). REMEMBER THE KNITTING TENSION! After last increase there are 163-195-211-217-241-251 stitches on needle. Continue pattern with 2 stitches in stocking stitch along each raglan line until piece measures 18-24-25-25-29-30 cm from cast-on edge mid front. Work next row as follows from wrong side: Work the first 26-30-32-34-38-40 stitches as before, slip the next 33-41-45-45-49-49 stitches on 1 stitch holder for sleeve, cast on 5-5-5-7-7-11 new stitches on needle (= in the side under sleeve), work the next 45-53-57-59-67-73 stitches as before, slip the next 33-41-45-45-49-49 stitches on a stitch holder for sleeve, cast on 5-5-5-7-7-11 new stitches on needle and work the last 26-30-32-34-38-40 stitches as before. Then finish body and sleeves separately. NOW MEASURE THE PIECE FROM HERE! BODY: = 107-123-131-141-157-175 stitches. Insert 1 marker thread in the middle of the 5-5-5-7-7-11 stitches cast on under sleeve in each side and move the marker threads upwards when working. Continue A.1 back and forth with 4 band stitches in garter stitch in each side. When piece measures 4 cm from division, decrease 2 stitches in each side - read DECREASE TIP (= 4 stitches decreased). Decrease like this every 6-4-4-8-8-8 cm a total of 3-3-3-2-2-2 times in each side = 95-111-119-133-149-167 stitches. When piece measures 19-15-16-18-16-17 cm from division, knit 1 row from right side while increasing 13-12-13-17-19-19 stitches evenly = 108-123-132-150-168-186 stitches. Switch to circular needle size 6 mm. Work next row as follows from wrong side: 4 band stitches in garter stitch, * purl 1, knit 2 *, repeat from *-* until 5 stitches remain, purl 1 and 4 band stitches in garter stitch. Continue rib like this for 4 cm. Switch back to circular needle size 7 mm and cast off with knit over knit and purl over purl - make sure to avoid a tight cast-off edge. Jacket measures approx. 44-46-48-50-52-54 cm from shoulder and down. SLEEVE: Slip the 33-41-45-45-49-49 stitches from stitch holder in one side of piece on a short circular needle size 7 mm and pick in addition up 1 stitch in each of the 5-5-5-7-7-11 stitches cast on under sleeve = 38-46-50-52-56-60 stitches. Insert 1 marker thread in the middle stitch of the 5-5-5-7-7-11 stitches under sleeve. Continue A.1 in the round. When piece measures 3 cm from division, decrease 2 stitches mid under sleeve - read DECREASE TIP. Decrease like this every 13-3½-3-3-2-1½cm 3-7-8-8-10-11 times in total = 32-32-34-36-36-38 stitches. Continue until sleeve measures 32-27-26-26-23-22 cm from division (shorter measurements in the larger sizes because of wider neck and longer yoke). Knit 1 round while increasing 4-4-5-3-3-4 stitches evenly = 36-36-39-39-39-42 stitches. Switch to double pointed needles size 6 mm. Work rib in the round = knit 1/purl 2 for 4 cm. Cast off with knit over knit and purl over purl but to avid at tight cast-off edge make 1 yarn over after every 6th stitch at the same time cast off (cast off yarn overs as stitches). Sleeve measures approx. 36-31-30-30-27-26 cm from division. Work the other sleeve the same way. ASSEMBLY: Sew the buttons on to the left band. |
|||||||
Diagram explanations |
|||||||
|
|||||||
 |
|||||||
Have you finished this pattern?Tag your pictures with #dropspattern #leconquetcardigan or submit them to the #dropsfan gallery. Do you need help with this pattern?You'll find 27 tutorial videos, a Comments/Questions area and more by visiting the pattern on garnstudio.com. © 1982-2026 DROPS Design A/S. We reserve all rights. This document, including all its sub-sections, has copyrights. Read more about what you can do with our patterns at the bottom of each pattern on our site. |
|||||||


With over 40 years in knitting and crochet design, DROPS Design offers one of the most extensive collections of free patterns on the internet - translated to 17 languages. As of today we count 324 catalogues and 12291 patterns translated into English (UK/cm). 12291
We work hard to bring you the best knitting and crochet have to offer, inspiration and advice as well as great quality yarns at incredible prices! Would you like to use our patterns for other than personal use? You can read what you are allowed to do in the Copyright text at the bottom of all our patterns. Happy crafting!
Post a comment to pattern DROPS 191-8
We would love to hear what you have to say about this pattern!
If you want to leave a question, please make sure you select the correct category in the form below, to speed up the answering process. Required fields are marked *.