
Popular categories
Looking for a yarn?


Comments / Questions (43)
![]() Laurence wrote:
Laurence wrote:
Dans le diagramme, il manque le dessin pour : glisser 1 maille à l\'endroit, tricoter 2 mailles ensemble à l\'endroit et passer la maille glissée par-dessus les 2 mailles tricotées ensemble (triangle noir) et le dessin pour tricoter 2 mailles ensemble à l’endroit (trait sur 2 mailles). Est-ce correct ? Merci de votre confirmation
28.03.2019 - 22:56DROPS Design answered:
Bonjour Laurence, ces symboles sont bien représentés dans la légende du diagramme et on les retrouve bien dans le diagramme, sauf si je comprends mal votre question. Bon tricot!
01.04.2019 - 10:05
![]() Maritta Schallenberg wrote:
Maritta Schallenberg wrote:
Im Diagramm sind da alle Reihen gezeigt oder nur die Hin Reihen. ?LG Maritta Schallenberg vielen Dank
14.03.2019 - 22:40DROPS Design answered:
Liebe Frau Schallenbert, alle Reihen sind im Diagram gezeichnet - mehr über Diagramme lesen Sie hier. Viel Spaß beim stricken!
15.03.2019 - 08:50
![]() Beatrice wrote:
Beatrice wrote:
Bonjour est ce que je peux faire ce modèle avec des aiguilles droites ? Cdlt.
28.05.2018 - 08:11DROPS Design answered:
Bonjour Béatrice, ce pull se tricote en rond, de haut en bas, sur aiguille circulaire. N'hésitez pas à consulter nos différentes vidéos pour apprendre à tricoter sur les aiguilles circulaires, beaucoup les ont finalement adoptées après avoir essayé. Bon tricot!
28.05.2018 - 10:17Oksana wrote:
Hi! it says DECREASE TIP: Begin 3 stitches before stitch with marker thread and knit 2 together, work 1 stitch (= stitch with marker thread). Quesiton: not 2 stiches before stitch with marker?
26.04.2018 - 20:30DROPS Design answered:
Dear Oksana, it looks you are right, the marker thread will be in a stitch mid under arm, so that you start dec 2 sts before st with marker. Thanks for your feedback, pattern will be edited asap. Happy knitting!
27.04.2018 - 08:49
![]() Nathalie wrote:
Nathalie wrote:
Bonjour... Merci pour la video qui m'a aidé à réaliser les fausses torsades. Elles ornent désormais mon pull que je viens de terminer. Bonne journée
20.04.2018 - 13:35
![]() Monique wrote:
Monique wrote:
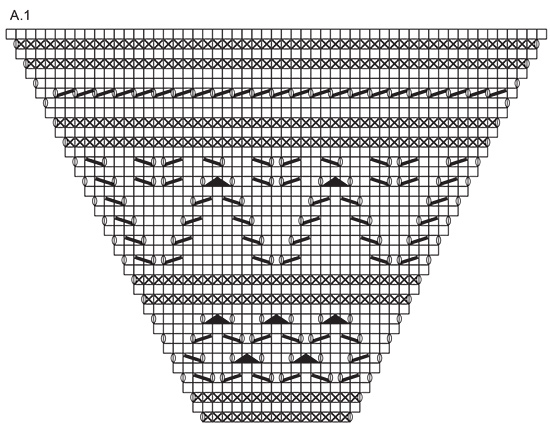
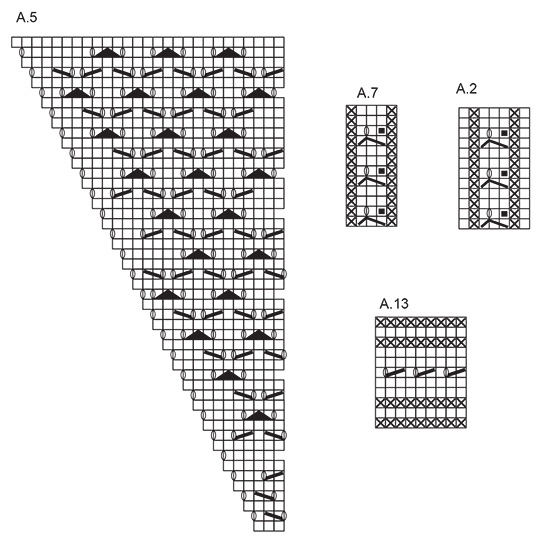
Bonjour Dans A7, que représente la case noircie d'un carré? Est ce une maille glissée? Merci
18.04.2018 - 09:53DROPS Design answered:
Bonjour Monique, la case noircie correspond à la maille glissée qui a été passée par-dessus les 2 m tricotées au rang précédent = il ne reste que 2 mailles que l'on tricote ainsi: 1 m end, 1 jeté, 1m end = on a de nouveau 3 mailles. Bon tricot!
18.04.2018 - 09:58
![]() Monique wrote:
Monique wrote:
Bonjour dans le diagramme qu\'entend on par \"pas de maille, sautez cette case merci pour votre réponse
17.04.2018 - 20:35DROPS Design answered:
Bonjour Monique, ce symbole est utilisé dans A.7 lorsque vous diminuez 1 maille au 1er rang (par ex) en passant la m glissée par-dessus les m tricotées, il ne reste donc que 2 m end au tour suivant que vous tricotez ainsi: 1 m end, 1 jeté, 1 m end. Cette vidéo montre comment tricoter cette torsade. Bon tricot!
18.04.2018 - 09:16
![]() Nathalie wrote:
Nathalie wrote:
Bonjour et merci pour ce joli modèle que je suis en train de tricoter. Il me semble qu'une erreur s'est glissée dans les diagrammes A2 et A7 : le symbole du rang 1 correspond à une double diminution sur 3 mailles, il ne peut donc pas rester au rang suivant 2 mailes en plus du jeté, il ne peut s'agir que d'une diminution simple. Bonne journée.
19.03.2018 - 11:10DROPS Design answered:
Bonjour Nathalie, ce n'est pas une double diminution = cf 3ème symbole (= on diminue 1 seule maille), il s'agit ici d'une petite torsade ajourée) - vous trouverez une vidéo correspondant à ce motif ici. Bon tricot!
19.03.2018 - 11:27
![]() Gail Tighe wrote:
Gail Tighe wrote:
I knitted small size with correct tension, why does it measure 50 cm across, not 44?
19.08.2017 - 13:27DROPS Design answered:
Hi Gail. If it is too big, you should try starting with a smaller needle and work the first round. Then, you can continue with the main needle.
20.08.2017 - 12:50
![]() Sylvie wrote:
Sylvie wrote:
Bonjour. Merci pour votre réponse mais si je compte les mailles jersey qu'il faut faire 1 m jersey au début + 3 m jersey + 1 m jersey + 1 m jersey + 3 m jersey. Il me manque donc encore des mailles.
31.07.2017 - 18:23DROPS Design answered:
Bonjour Sylvie, sans les jetés du 1er tour vous avez: 1 m jersey, A.1 (= 15 m) (= 16 m pour le demi-dos), puis A.2 (= 7 m), 3 m jersey, A.2 (= 7+3+7 = 17 m pour la manche), puis A.1, 1 m jersey (= milieu devant), A.1 (= 15+1+15 = 31 m au total pour le devant), puis A.2, 3 m jersey, A.2 (= 7+3+7 = 17 m pour la manche), et enfin A.1 (= 15 m pour le demi-dos) soit: 16+17+31+17+15 = 96 m. Bon tricot!
01.08.2017 - 08:52
|
|||||||||||||||||||||||||
Golden Summer#goldensummersweater |
|||||||||||||||||||||||||
|
|
|||||||||||||||||||||||||
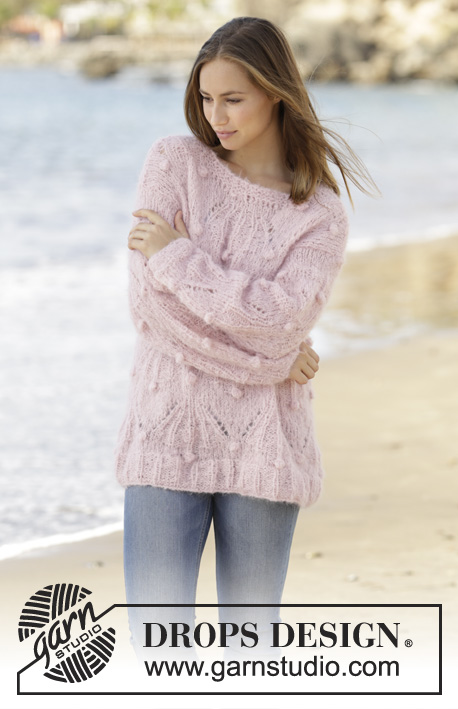
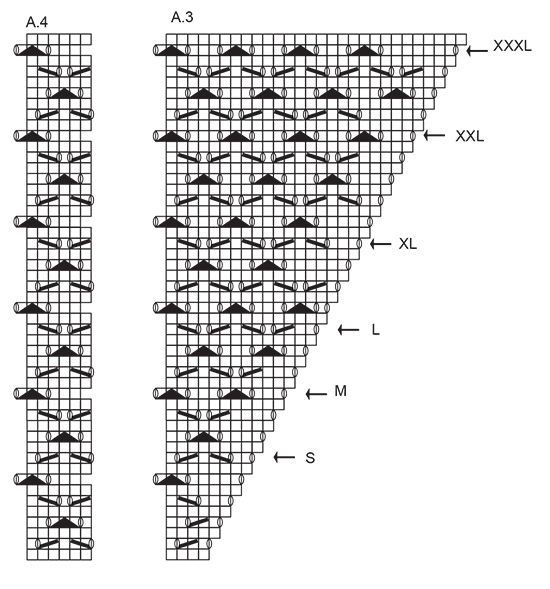
Knitted jumper with lace pattern and raglan, worked top down in DROPS Belle. Size: S - XXXL
DROPS 176-15 |
|||||||||||||||||||||||||
|
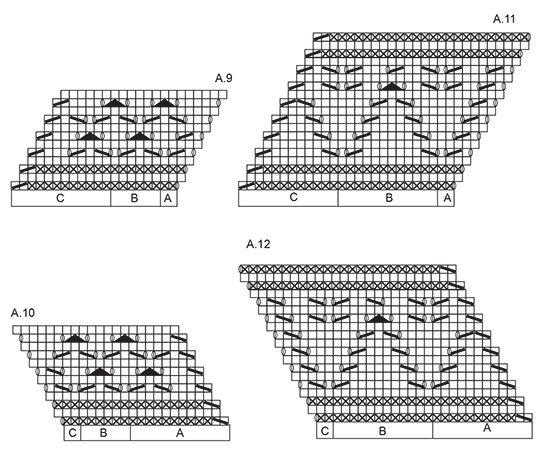
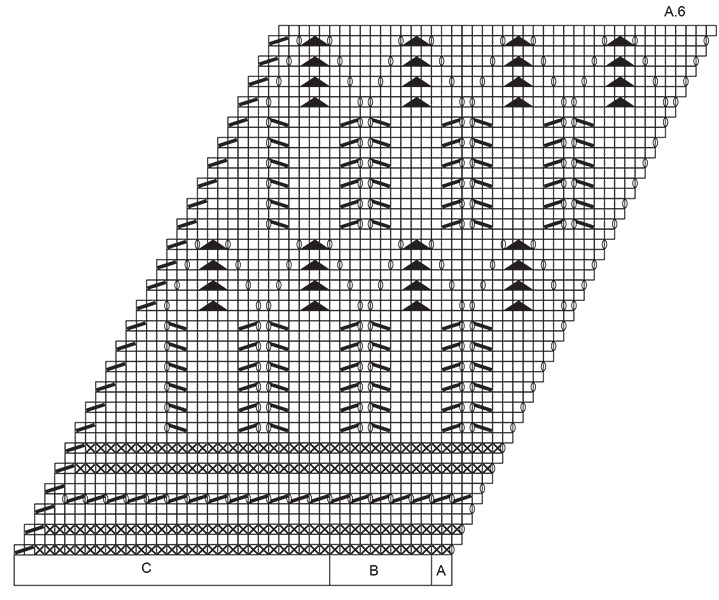
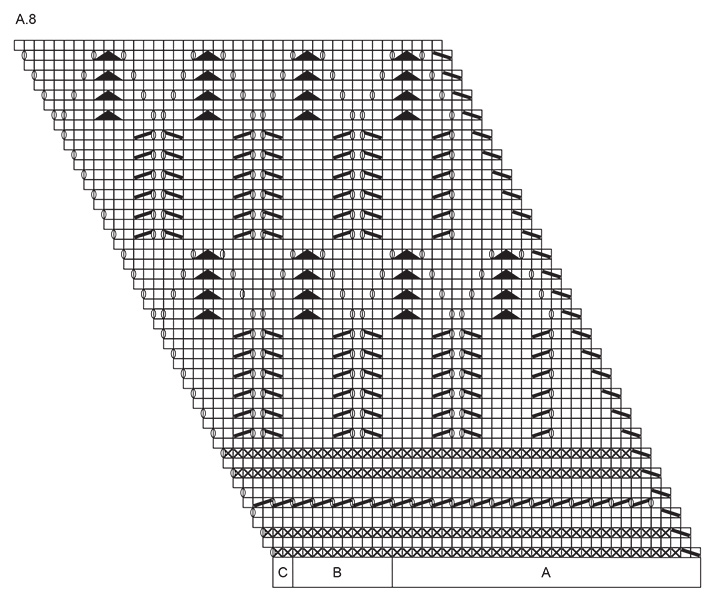
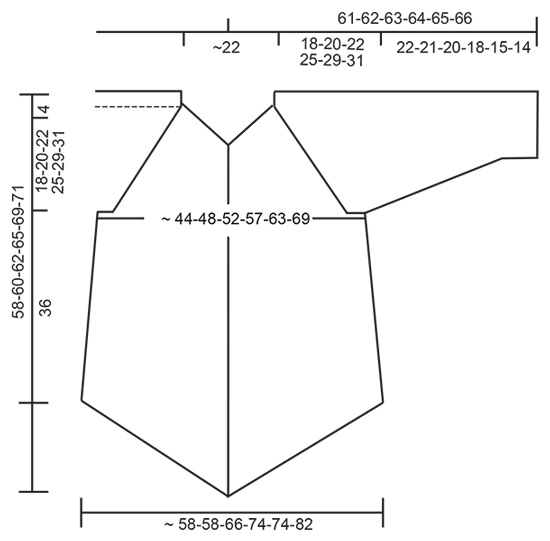
GARTER STITCH (worked in the round): 1 ridge = 2 rounds. Knit 1 round and purl 1 round. INCREASE TIP SLEEVE: Increase 2 stitches on each sleeve as follows: Work A.2, make 1 yarn over, work in stocking stitch until 7 stitches remain (= A.2), make 1 yarn over and work A.2. Knit the increase stitches twisted on next round (to avoid holes) and continue in stocking stitch. PATTERN: See diagrams A.1 to A.13. See arrow for your size in diagram A.3. DECREASE TIP: Begin 2 stitches before stitch with marker thread and knit 2 together, work 1 stitch (= stitch with marker thread), slip 1 stitch knitwise, work 1 stitch, pass slipped stitch over stitch worked. ---------------------------------------------------------- JUMPER: Worked top down in the round on circular needle from mid back. On body increases are shown in diagram A.1 and A.3. On sleeves increase inside A.2 in each side. YOKE: READ ALL OF THE FOLLOWING SECTION BEFORE CONTINUING! Cast on 96 stitches in all sizes on circular needle size 4 mm with Belle. Work 2 ridges in GARTER STITCH - see explanation above. Then work as follows from mid back: 1 stitch in stocking stitch, A.1 (= 15 stitches) (= half back piece), A.2 (= 7 stitches), 1 yarn over, 3 stitches in stocking stitch, 1 yarn over, A.2 (= 17 stitches on sleeve), A.1, 1 stitch in stocking stitch (= mid front), A.1 (= 31 stitches in total on front piece), A.2, 1 yarn over, 3 stitches in stocking stitch, 1 yarn over, A.2 (= 17 stitches on sleeve), A.1 (= half back piece). Continue with A.1 and A.2, AT THE SAME TIME increase 2 stitches on each sleeve – READ INCREASE TIP SLEEVE, increase every other round 21-26-31-31-30-30 times, then every 4th round 2-1-0-2-5-7 times. At the same time when A.1 has been worked 1 time vertically (there are now 55 stitches in every repetition of A.1) work as follows over stitches in A.1 (work the other stitches as before): Work A.3 over the first 4 stitches, A.4 over the next 48 stitches (= 8 repetitions of A.4) and A.5 over the last 3 stitches. Continue A.3, A.4 and A.5 upwards. Work to and with round with arrow, see arrow for your size = 388-428-468-508-556-596 stitches on round. Work next round as follows: Knit the first 66-72-78-86-96-104 stitches (= half back piece), slip the next 63-71-79-83-87-91 stitches on a stitch holder (= sleeve), cast on 5 new stitches under sleeve, knit the next 131-143-155-171-191-207 stitches (= front piece), slip the next 63-71-79-83-87-91 stitches on a stitch holder, cast on 5 new stitches under sleeve, knit the last 65-71-77-85-95-103 stitches (= half back piece). BODY: = 272-296-320-352-392-424 stitches on round. Then work as follows: * 1 stitch in stocking stitch, A.6 A (= 2 stitches), A.6 B over the next 32-38-44-52-62-70 stitches, AT THE SAME TIME increase 8-2-6-8-8-10 stitches evenly over these stitches, A.6 C (= 31 stitches), A.7 (= 5 stitches = in the middle of side), A.8 A (= 31 stitches), A.8 B over the next 32-38-44-52-62-70 stitches AT THE SAME TIME increase 8-2-6-8-8-10 stitches evenly over these stitches, A.8 C (= 2 stitches) *, work from *-* 1 more time = 304-304-344-384-424-464 stitches. Continue this pattern, work A.6 B and A.8 B over 40-40-50-60-70-80 stitches (= 4-4-5-6-7-8 repetitions in width). When A.6 and A.8 have been worked 1 time vertically, work as follows: * 1 stitch in stocking stitch, A.9 A (= 2 stitches), A.9B over the next 59-59-69-79-89-99 stitches, AT THE SAME TIME increase 1-7-3-5-1-3 stitches evenly over these stitches, A.9 C (= 12 stitches), A.7 (= 5 stitches = in the middle of side), A.10 A (= 12 stitches), A.10 B over the next 59-59-69-79-89-99 stitches AT THE SAME TIME increase 1-7-3-5-1-3 stitches evenly over these stitches, A.10 C (= 2 stitches) *, work from *-* 1 more time = 308-332-356-404-428-476 stitches. Continue this pattern, work A.9 B and A.10 B over 60-66-72-84-90-102 stitches (= 10-11-12-14-15-17 repetitions in width). When A.9 and A.10 have been worked 1 time vertically, work as follows: * 1 stitch in stocking stitch, A.11 A (= 2 stitches), A.11 B over the next 60-66-72-84-90-102 stitches, AT THE SAME TIME increase 12-6-12-12-6-6 stitches evenly over these stitches, A.11 C (= 12 stitches), A.7 (= 5 stitches = in the middle of side), A.12 A (= 12 stitches), A.12 B over the next 60-66-72-84-90-102 stitches AT THE SAME TIME increase 12-6-12-12-6-6 stitches evenly over these stitches, A.12 C (= 2 stitches) *, work from *-* 1 more time = 356-356-404-452-452-500 stitches. Continue this pattern, work A.11 B and A.12 B over 72-72-84-96-96-108 stitches (= 6-6-7-8-8-9 repetitions in width). When A.11 and A.12 have been worked 1 time vertically, cast off by knitting. SLEEVE: Slip the 63-71-79-83-87-91 stitches from stitch holder back on needle and pick up 1 stitch in each of the 5 stitches cast on under sleeve = 68-76-84-88-92-96 stitches. Insert 1 marker thread mid under sleeve (in the middle of the 5 new stitch cast on). Then work in the round on double pointed needles size 4 mm. NOW MEASURE PIECE FROM HERE! When piece measures 3 cm, decrease 1 stitch on each side stitch with marker thread - READ DECREASE TIP. Decrease every 6th-4th-4th-3rd-2nd-2nd round 7-9-10-10-10-10 times in total = 54-58-64-68-72-76 stitches. Work until piece measures 19-18-17-15-12-11 cm. Adjust number of stitches to 54-57-63-69-72-75, and work A.13 over all stitches. Cast off by knitting when A.13 has been worked 1 time vertically. |
|||||||||||||||||||||||||
Diagram explanations |
|||||||||||||||||||||||||
|
|||||||||||||||||||||||||
 |
|||||||||||||||||||||||||
 |
|||||||||||||||||||||||||
 |
|||||||||||||||||||||||||
 |
|||||||||||||||||||||||||
 |
|||||||||||||||||||||||||
 |
|||||||||||||||||||||||||
 |
|||||||||||||||||||||||||
Have you finished this pattern?Tag your pictures with #dropspattern #goldensummersweater or submit them to the #dropsfan gallery. Do you need help with this pattern?You'll find 27 tutorial videos, a Comments/Questions area and more by visiting the pattern on garnstudio.com. © 1982-2026 DROPS Design A/S. We reserve all rights. This document, including all its sub-sections, has copyrights. Read more about what you can do with our patterns at the bottom of each pattern on our site. |
|||||||||||||||||||||||||


With over 40 years in knitting and crochet design, DROPS Design offers one of the most extensive collections of free patterns on the internet - translated to 17 languages. As of today we count 324 catalogues and 12290 patterns translated into English (UK/cm). 12290
We work hard to bring you the best knitting and crochet have to offer, inspiration and advice as well as great quality yarns at incredible prices! Would you like to use our patterns for other than personal use? You can read what you are allowed to do in the Copyright text at the bottom of all our patterns. Happy crafting!
Post a comment to pattern DROPS 176-15
We would love to hear what you have to say about this pattern!
If you want to leave a question, please make sure you select the correct category in the form below, to speed up the answering process. Required fields are marked *.