
Popular categories
Looking for a yarn?


Comments / Questions (28)
![]() Delchet wrote:
Delchet wrote:
Bonjour, je bloque sur le poncho. j'ai fait mes 29 cm en allers retours, et je ne vois pas comment décaler le tour au milieu dos en commençant par 4 m. au point mousse pour continuer en rond. J'ai regardé la vidéo sans succès. Mon dernier rang est le 6 de A1. Pouvez-vous m'aider ? Merci
10.05.2017 - 12:34DROPS Design answered:
Bonjour Mme Delchet, vous pouvez couper le fil et commencer les tours après les 4 m point mousse du milieu dos. Bon tricot!
10.05.2017 - 13:51
![]() Benedetta wrote:
Benedetta wrote:
Sì, infatti dopo ho capito.Grazie
30.09.2016 - 08:55
![]() Benedetta wrote:
Benedetta wrote:
Buonasera,in merito agli aumenti non è specificato quante m.bisogna aumentare e quante sono le maglie alla fine in totale.Potete aiutarmi? Grazie
29.09.2016 - 21:36DROPS Design answered:
Buonasera Benedetta, nel SUGGERIMENTO PER GLI AUMENTI all'inizio delle spiegazioni può trovare tutte le indicazioni che ha chiesto. Deve continuare ad aumentare fino a quando il lavoro misura 29 cm. Buon lavoro!
29.09.2016 - 22:17
![]() Sandrine wrote:
Sandrine wrote:
Bonsoir et merci pour vos explications qui m'ont permis de comprendre très clairement. Aujourd'hui j'ai bien avancé et je dois commencer à tricoter le poncho en circulaire. Pourriez-vous me dire si je commence le premier rand en maille envers, puis inversement. En sachant, que j'ai juste avant le rang "2 m ens à l'end, 1 jeté". Merci encore pour votre aide précieuse.
24.08.2016 - 19:07DROPS Design answered:
Bonjour Sandrine, tout à fait, quand vous tricotez ce motif en rond, vous tricotez les mailles comme elles doivent se présenter sur l'endroit, c'est-à-dire aux rangs 1 et 2: à l'endroit, rang 3: comme avant (2 m ens à l'end, 1 jeté), rang 4: à l'env, rang 5: à l'end, rang 6: à l'env. Bon tricot!
25.08.2016 - 10:04
![]() Anna Lindh wrote:
Anna Lindh wrote:
Tack så hjärtligt för svar och instruktionsfilm! Nu förstår jag bättre! 😀 Mvh Anna
15.08.2016 - 20:29
![]() Anna Lindh wrote:
Anna Lindh wrote:
Hej, Jag har inte fått svar på min fråga. Mvh Anna
11.08.2016 - 19:13DROPS Design answered:
Hej. Du har nu fått svar på din fråga. Lycka till!
12.08.2016 - 07:41
![]() Sandrine wrote:
Sandrine wrote:
Bonjour et merci pour votre réponse. En effet, après relecture, j'ai compris pour les augmentations. Par contre, pour le diagramme en vidéo, j'ai beau mettre sur pause pour décortiquer la torsade, je n'y arrive pas. Je serais bien allée au magasin distributeur de votre laine à Grenoble, mais il est fermé jusqu'à mi août.
19.07.2016 - 14:18DROPS Design answered:
Bonjour Sandrine, A.1 se tricote ainsi (en allers et retours): 2 rangs jersey endroit, puis au rang 3 (sur l'endroit): *2 m ens à l'end, 1 jeté*, répétez de *-*. Rang 4 (sur l'envers): Tricotez toutes les m à l'end. Rang 5: Tricotez toutes les mailles à l'end. Rang 6: Tricotez toutes les m à l'end. Répétez ces 5 rangs en hauteur (= partie en allers et retours). Bon tricot!
19.07.2016 - 15:20
![]() Sandrine wrote:
Sandrine wrote:
Bonsoir, Il est indiqué 'EN MÊME TEMPS, augmenter tous les 2 rangs", mais ils vaut augmenter de combien de maille par rang ? De plus, j'ai beau regarder la vidéo pour le diagramme, j'ai quand même du mal à comprendre. Merci de votre réponse t de votre aide. Sandrine
15.07.2016 - 19:40DROPS Design answered:
Bonjour Sandrine, les augmentations sont expliquées au début du modèle, sous "Augmentations", soit 4 par rang/tour d'augmentations. Le diagramme se lit de droite à gauche tous les rangs sur l'endroit + tous les tours et de gauche à droite sur l'envers. N'hésitez pas à faire pause sur la vidéo pour pouvoir regarder tranquillement par rapport au diagramme. Bon tricot!
18.07.2016 - 08:29
![]() Anja wrote:
Anja wrote:
Fertig :-) Ein schnell zu strickender, wunderschöner Poncho. Sehr gut auch für Anfänger/innen. Das einfache Muster gibt Abwechslung und ist schnell gestrickt. Danke für die Anleitung!
04.04.2016 - 10:26
![]() Anette Andersen wrote:
Anette Andersen wrote:
Hvorfor er der forskel fra opskrift til tegning, der står 56-58-60-62 cm i opskriften, men 58-60-62-64 cm på tegningen? Med venlig hilsen Anette
26.03.2016 - 10:45DROPS Design answered:
Hej Anette, husk de 4 sidste omgange i retstrik så du kommer op i samme cm som på måleskitsen. God fornøjelse!
31.03.2016 - 12:22
|
|||||||||||||
Sweet Crush#sweetcrushponcho |
|||||||||||||
|
|
|||||||||||||
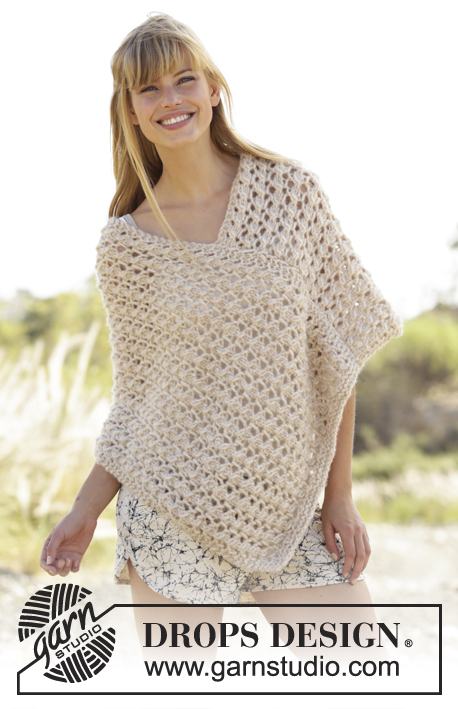
Knitted DROPS poncho with lace pattern, lacing and neck split mid front in “Air”. Worked top down. Size: S - XXXL.
DROPS 167-24 |
|||||||||||||
|
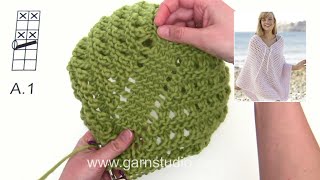
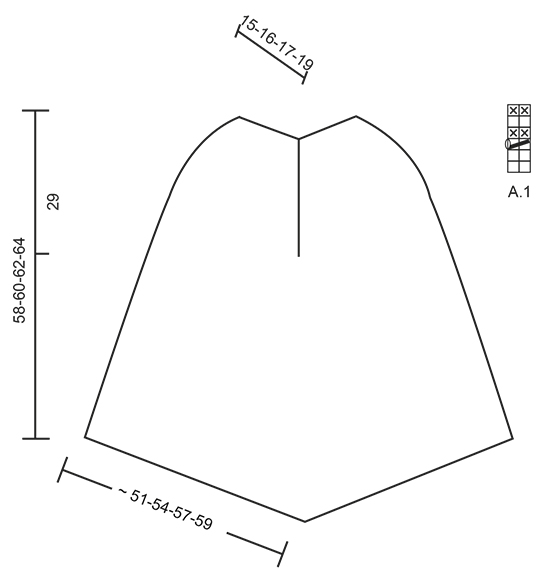
GARTER ST (back and forth): K all rows. 1 ridge = 2 rows K. GARTER ST (worked in the round): 1 ridge = 2 rounds. * K 1 round and P 1 round *, repeat from *-*. PATTERN: See diagram A.1. The diagram shows all rows in pattern seen from RS. INCREASE TIP: When piece is worked back and forth inc on every row from WS. When piece is worked in the round continue to inc every other round. Inc after 1st and 3rd marker and before 2nd and 4th marker as follows: Inc with 1 YO, DO NOT work YO twisted on next row/round, it should make a hole. Work YOs in pattern. ---------------------------------------------------------- PONCHO: First work back and forth, top down, then in the round. Cast on 78-86-94-102 sts on circular needle size 5 mm with Air. Work 1 ridge in GARTER ST - see explanation above AT THE SAME TIME on last row inc 10 sts evenly = 88-96-104-112 sts. Switch to circular needle size 6 mm. Work as follows from RS: 2 sts in garter st, insert 1st marker, repeat A.1 (= 2 sts) over the next 40-44-48-52 sts, insert 2nd marker, 4 sts in garter st, insert 3rd marker, repeat A.1 over the next 40-44-48-52 sts, insert 4th marker, finish with 2 sts in garter st. Continue the pattern like this AT THE SAME TIME inc on every other row - read INCREASE TIP. REMEMBER THE KNITTING TENSION When piece measures 29 cm, work piece in the round, displace round so that round beg mid back with 4 sts in garter st. Work A.1 and in garter st as before. Continue to inc every other round. When piece measures 56-58-60-62 cm, switch to circular needle size 5 mm. Work 2 ridges in GARTER ST - see explanation above. Loosely cast off. TIE: Cut 2 lengths of 4 metres each with off white. Twine the strands tog until they resist, fold the string double so that it twines again. Make a knot at each end. Thread the tie through the holes in pattern, cross it at the edge by the 2 sts in garter st (= neck split). |
|||||||||||||
Diagram explanations |
|||||||||||||
|
|||||||||||||
 |
|||||||||||||
Have you finished this pattern?Tag your pictures with #dropspattern #sweetcrushponcho or submit them to the #dropsfan gallery. Do you need help with this pattern?You'll find 19 tutorial videos, a Comments/Questions area and more by visiting the pattern on garnstudio.com. © 1982-2026 DROPS Design A/S. We reserve all rights. This document, including all its sub-sections, has copyrights. Read more about what you can do with our patterns at the bottom of each pattern on our site. |
|||||||||||||


With over 40 years in knitting and crochet design, DROPS Design offers one of the most extensive collections of free patterns on the internet - translated to 17 languages. As of today we count 324 catalogues and 12290 patterns translated into English (UK/cm). 12290
We work hard to bring you the best knitting and crochet have to offer, inspiration and advice as well as great quality yarns at incredible prices! Would you like to use our patterns for other than personal use? You can read what you are allowed to do in the Copyright text at the bottom of all our patterns. Happy crafting!
Post a comment to pattern DROPS 167-24
We would love to hear what you have to say about this pattern!
If you want to leave a question, please make sure you select the correct category in the form below, to speed up the answering process. Required fields are marked *.