
Popular categories
Looking for a yarn?


Comments / Questions (43)
![]() Anne-Mette Rasmussen wrote:
Anne-Mette Rasmussen wrote:
Hvor finder jeg det diagram der henvises til på denne bluse
08.05.2025 - 10:06DROPS Design answered:
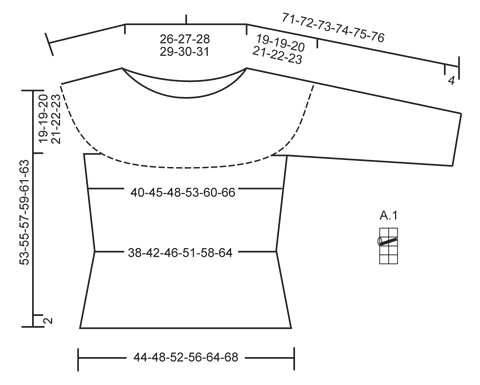
Hej Anne-Mette, det finder du til højre for måleskitsen nederst i opskriften :)
08.05.2025 - 10:25
![]() GUNTHER Véronique Marie wrote:
GUNTHER Véronique Marie wrote:
Bonjour, Comment imprimer les modèles proposés ? Cordialement. Véronique Marie
17.11.2024 - 12:15DROPS Design answered:
Bonjour Mme Gunther, vous trouverez l'icône imprimante en haut de page, à droite, à côté du coeur et de la flèche (qui sert à partager un modèle). Bon tricot!
18.11.2024 - 08:11
![]() Karin Nielsen wrote:
Karin Nielsen wrote:
Jeg er til nemme løsninger .... strikker derfor det øverste stykke i ret frem og tilbage og deler foran. Sætter en lille "stolpe" med knaphuller og knapper ( 3 stk) Derved kan jeg åbne i halsen hvis den kommer for tæt op på min hals.
09.05.2021 - 13:19
![]() Pia wrote:
Pia wrote:
Bliver den næste bluse Jeg strikker🌞
21.04.2021 - 22:14
![]() Jose wrote:
Jose wrote:
Hallo, een vraag over dit patroon. Ik kan niet goed breien met naalden zonder knop, ik neem aan dat dat in de rondte gebreid moet worden, bv. de mouw. Mag dit ook met de rondbreinaald? En moet dat dan 40cm zijn? Alvast dank. Groet, Jose
23.08.2020 - 15:13DROPS Design answered:
Dag Jose,
Jazeker, je kan de naalden zonder knop ook vervangen door een rondbreinaald.
26.08.2020 - 14:28
![]() Gunn Berg wrote:
Gunn Berg wrote:
Jeg finner ikke mønsterdiagram til denne modellen. Hvorfor finnes ikke det.
03.05.2020 - 20:19DROPS Design answered:
Hej Du hittar det längst ner, till höger om måttskissen. Mvh DROPS Design
04.05.2020 - 11:55
![]() Maria S wrote:
Maria S wrote:
Hej! Hur kommer det sig att ärmlängden för S-M-L är kortare än för XL-XXL-XXXL?? Varför är det så många fler minskningar på de större storlekarna än den minsta??
02.03.2020 - 21:58
![]() Delphine wrote:
Delphine wrote:
Bonjour, J\'ai commencé l\'empiètement et je me demande par rapport au diagramme A1 s\'il faut réaliser les deux mailles ensemble suivies d\'un jeté sur tout le rang du deuxième tour ou si c\'est juste pour les deux premières mailles? Merci d\'avance Delphine
18.01.2020 - 23:39DROPS Design answered:
Bonjour Delphine, on lit les diagrammes de bas en haut et on les répète sur les mailles indiqué, donc quand on tricote A.1 ici, on va tricoter d'abord 2 tours endroit, puis au 3ème tour tricoter (2 m ens à l'end, 1 jeté) tout le tour et tricoter toutes les mailles et les jetés à l'endroit au dernier tour de A.1. Bon tricot!
20.01.2020 - 10:34
![]() Binder wrote:
Binder wrote:
Il n'y a pas de diagrammes pour ce modèle ? Cordialement
19.05.2019 - 09:42DROPS Design answered:
Bonjour Mme Binder, vous trouverez le diagramme A.1 à droite du schéma des mesures, juste sous la manche, c'est un petit diagramme sur 2 mailles et 4 rangs. Bon tricot!
20.05.2019 - 12:20
![]() Sylvie wrote:
Sylvie wrote:
Liebes Drops Team, ich meinte die Krausrippen am Ärmelbündchen vor A1. Beste Grüße, Sylvie
04.05.2019 - 09:51
|
|||||||
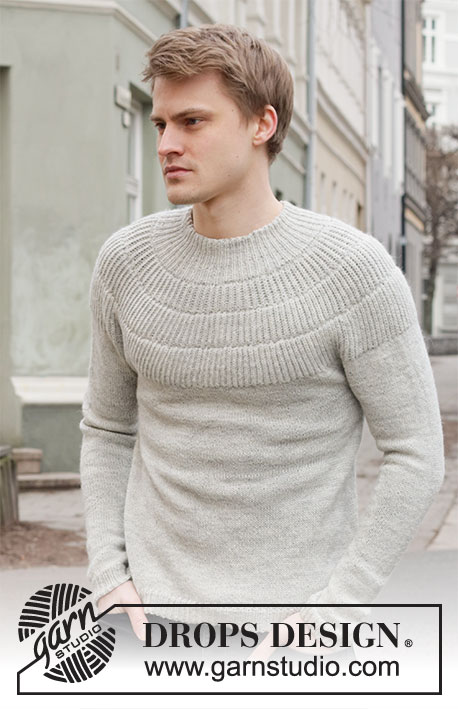
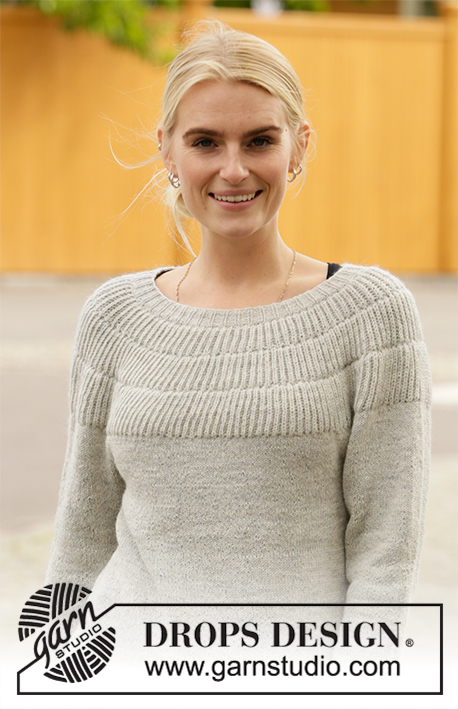
Athena Jumper#athenajumper |
|||||||
 |
 |
||||||
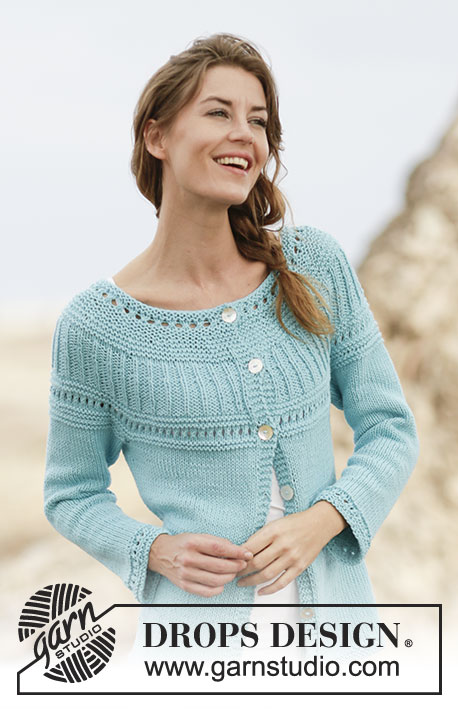
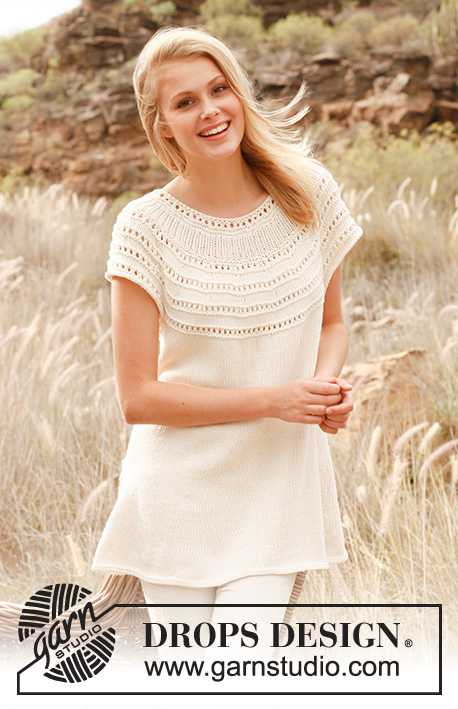
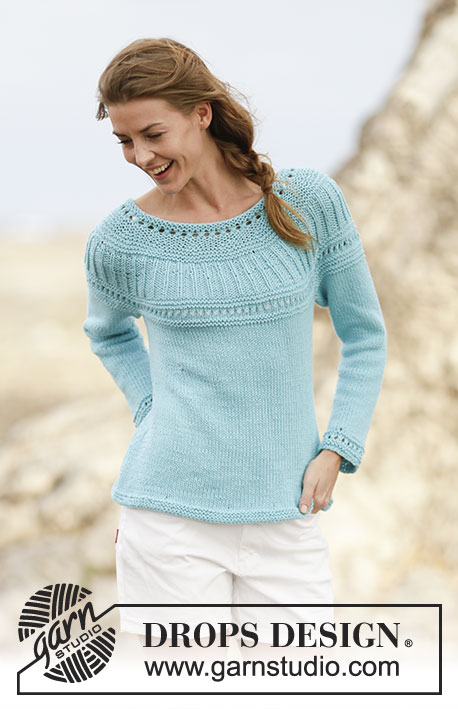
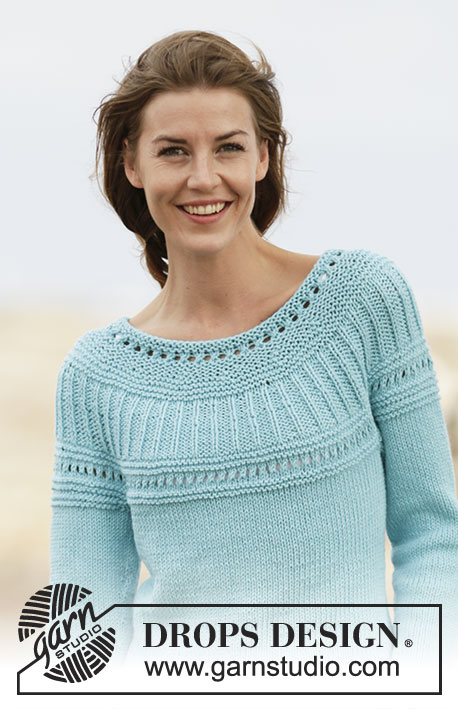
Knitted DROPS jumper in stocking st, garter st with lace pattern and round yoke, worked top down in ”Paris”. Size: S - XXXL.
DROPS 161-9 |
|||||||
|
GARTER ST (worked in the round): * K 1 round and P 1 round *, repeat from *-*. 1 ridge = 2 rounds. PATTERN: See diagram A.1. INCREASE TIP 1: Inc 1 st by making 1 YO, on next round work YO twisted (i.e. work in back loop of st instead front) to avoid holes. INCREASE TIP 2: Inc with YO on each side of 2 sts in each side (the marker sits inbetween these sts). Knit YO twisted on next round. DECREASE TIP: Dec as follows before 1 st in stocking st and marker: K 2 tog. Dec after marker and 1 st in stocking st as follows: Slip 1 st as if to K, K 1, psso. ---------------------------------------------------------- JUMPER: Worked in the round on circular needle, top down. Rounds beg = mid back. YOKE: Cast on 92-96-100-104-108-112 sts on circular needle size 4.5 mm with Paris. Work 2 ridges in GARTER ST - see explanation above. Switch to circular needle size 5 mm and work A.1, AT THE SAME TIME on first round in diagram inc 12-16-18-18-20-20 sts evenly - READ INCREASE TIP 1 = 104-112-118-122-128-132 sts. When A.1 has been worked vertically, switch back to circular needle size 4.5 mm. Work in garter st AT THE SAME TIME inc 10 sts evenly on 2nd ridge and 6-7-13-15-21-26 sts evenly on 5th ridge (NOTE: Inc on a round with K) = 120-129-141-147-159-168 sts. REMEMBER THE KNITTING TENSION When 7-7-8-8-8-10 ridges have been worked in total, piece measures approx. 7-7-8-8-8-9 cm, switch to circular needle size 5 mm. Work 2 rounds in stocking st. Now work rib as follows: * K 1, P 2 *, repeat from *-* the entire round. When rib measures 2 cm, inc by making 1 YO before K st in every section P the entire round (= 40-43-47-49-53-56 sts inc) = 160-172-188-196-212-224 sts. On next round P YOs twisted (i.e. work in back loop of st instead of front) to avoid holes. Continue with K 1/P 3. Repeat inc before every st with K when rib measures 4-4-4-5-6-6 cm = 200-215-235-245-265-280 sts. Continue with K 1/P 4 until rib measures 6-6-6-7-8-8 cm in total. Work 2 rounds in stocking st. Now switch to circular needle size 4.5 mm. Work 2 ridges while AT THE SAME TIME on first round inc 8-11-11-15-21-28 sts evenly = 208-226-246-260-286-308 sts. Switch to circular needle size 5 mm and continue with A.1. When A.1 has been worked vertically, switch to circular needle size 4.5 mm. Work 2 ridges while AT THE SAME TIME on first round inc 8-10-10-16-22-28 sts evenly = 216-236-256-276-308-336 sts. Now continue on circular needle size 5 mm as follows: Work the first 30-34-37-41-47-52 sts (= back piece), slip the next 48-50-54-56-60-64 sts on a stitch holder (= sleeve), cast on 8 new sts under sleeve, work the next 60-68-74-82-94-104 sts (= front piece), slip the next 48-50-54-56-60-64 sts on a stitch holder (= sleeve), cast on 8 new sts under sleeve, work the remaining 30-34-37-41-47-52 sts (= back piece) on round. BODY: There are now 136-152-164-180-204-224 sts for body. Insert a marker in each side of body where new sts were cast on under sleeves (= 4 new sts on each side of marker). MEASURE PIECE FROM HERE. Continue in stocking st. When piece measures 4 cm, dec on each side of each markers (= 4 sts dec) - READ DECREASE TIP! Repeat dec when piece measures 11-10-9-8-7-6 cm = 128-144-156-172-196-216 sts. When piece measures 18-17-16-15-14-13 cm, inc 1 st on each side of each marker - READ INCREASE TIP 2 (= 4 sts inc). Repeat inc every 2-2½-3-3-3½-4 cm 4 more times = 148-164-176-192-216-236 sts. When piece measures 32-33-34-35-36-37 cm, inc 10-8-11-10-14-8 sts evenly = 158-172-187-202-230-244 sts. Switch to circular needle size 4.5 mm and work 3 ridges. Loosely cast off. SLEEVE: Work sleeve in stocking st in the round on circular needle/double pointed needles. There are 48-50-54-56-60-64 sts for each sleeve. Slip sts from stitch holder back on circular needle/double pointed needles size 5 mm and cast on 8 new sts under sleeve = 56-58-62-64-68-72 sts. Work in stocking st, AT THE SAME TIME insert a marker in the middle of the new sts under sleeve. NOW MEASURE THE PIECE FROM HERE. When piece measures 4 cm, dec 1 st on each side of markes - READ DECREASE TIP! Repeat dec every 4-3½-3-2½-2½-2 cm 7-8-9-9-11-12 more times = 40-40-42-44-44-46 sts. When sleeve measures 35-35-35-34-34-34 cm, work 1 ridge over all sts and then work A.1. When A.1 has been worked vertically, switch to double pointed needles size 4.5 mm and inc 1-1-3-3-3-3 sts evenly = 41-41-45-47-47-49 sts. Work 2 ridges and cast off, sleeve measures approx. 39-39-39-38-38-38 cm. Knit another sleeve the same way. ASSEMBLY: Sew the openings under the sleeves. |
|||||||
Diagram explanations |
|||||||
|
|||||||
 |
|||||||
Have you finished this pattern?Tag your pictures with #dropspattern #athenajumper or submit them to the #dropsfan gallery. Do you need help with this pattern?You'll find 29 tutorial videos, a Comments/Questions area and more by visiting the pattern on garnstudio.com. © 1982-2026 DROPS Design A/S. We reserve all rights. This document, including all its sub-sections, has copyrights. Read more about what you can do with our patterns at the bottom of each pattern on our site. |
|||||||


With over 40 years in knitting and crochet design, DROPS Design offers one of the most extensive collections of free patterns on the internet - translated to 17 languages. As of today we count 324 catalogues and 12290 patterns translated into English (UK/cm). 12290
We work hard to bring you the best knitting and crochet have to offer, inspiration and advice as well as great quality yarns at incredible prices! Would you like to use our patterns for other than personal use? You can read what you are allowed to do in the Copyright text at the bottom of all our patterns. Happy crafting!
Post a comment to pattern DROPS 161-9
We would love to hear what you have to say about this pattern!
If you want to leave a question, please make sure you select the correct category in the form below, to speed up the answering process. Required fields are marked *.